
Likes
Comments
Share


@84ruk
Follow
The strain is really good. I harvested it when the trichomes were milky and it had a very energizing and uplifting effect. I'll definitely grow it again now with better care and the knowledge I've gained. I harvested around 20 grams dry.


Likes
13
Share


@Crazy_Doofus
Follow
She is taking her time, trichomes not ready. She has long thin formed bud/flower growth, long thin buds

Likes
21
Share


@Whitebelt
Follow
Beginning week 9
Plans this week:
Make a long time lapse while away this weekend - post more photos too
Lollipop
Tuck and tie a bit
Possibly build a second scrog level?? Thoughts anyone??
Research and purchase or build a “grow room controller” - tent: temp, rh, light(?), co2(?) — rez: ph, ec, temp, water level - maybe more stuff like tie in the cameras, also basement temp and rh, fan and lights and pump contro. Nutrient dosing and ph control would be awesome but likely too pricey— but I’m a geek and this will be fun! I’d prefer a prebuilt system but I’m not totally opposed to building an Arduino/pi style solution (reliability and time to get it right are concerns tho - plus I have an arcade cabinet project I’d like to get to soon) — **ANY THOUGHTS OR ADVICE ANYONE???
To do list:
I picked up some angle aluminum and I plan to finally make a single frame for the numerous LED lights
Mount things to the wall (temp and humidity sensors, timers, utility light, etc)
General cleanup and house keeping - wire management etc
Install new portable air conditioner in the basement - this will be a bit of a project - casement windows and other issues
Hopefully this week: install a utility sink in the basement and tie into the water lines and waste lines of the house (no more carrying water and waste upstairs!!)
Likes
19
Share


@Deepgrow
Follow
Primera semana de floracion, 7 dias, ciclo de luz 1212 y ya veo los primeros pelitos.
Empiezo a agregar pastillas easy to bloom, de Royal Queen a 2/3 de la dosis indicada por el fabricante, al bajar el PH con las pastillas agregro PH + y Ata Clean para mantener limpio el autopot, aunque se lo hecho en el riego a todas las plantas y les va bien.
Las he ido doblando las colas mas largas para equilibrarlas en altura, aunque no hizo mucha falta, quite un par de hojas muy grandes y le aplique el ultimo tratamiento de prevencion con jabon fosforico e insecticida natural de aceite de Neem, por cierto, ha venido muy bien, 0 bichos.
Quiza le aplique en un par de semanas cola de caballo para prevenir hongos.
Likes
1
Share


@JoExotic
Follow
Week 8 - The smell on these is out of this world I believe ever bit these can beat a photoperiod I went ahead and watered with nutes for the last day today going to begin flushing these last 2 weeks good luck growers Wish me luck I need it lol !
Likes
24
Share

@TrickzGrowz
Follow
Servus Moin!
Bin richtig zufrieden mit der Pink Poochie. Schöne Knollen. Alles was man will.


Likes
2
Share


@DisTentAint4Campin
Follow
I topped this one too jus tucking bigger fan leaves until i can fo some LST .she growing jus as good so my little experiment grow dots vs. Bottles is so far the same both have vigorous growth still early to decide but will definitely keep updating only issue when it came time to feed the other I forgot that this girl already got food on her plate and I poured jus a cunt hair of nutes on her before I realized I gave her growdots so I made me a little sign just as a reminder lol happy growing 🤙


Likes
41
Share


@PrairieFrostGrow
Follow
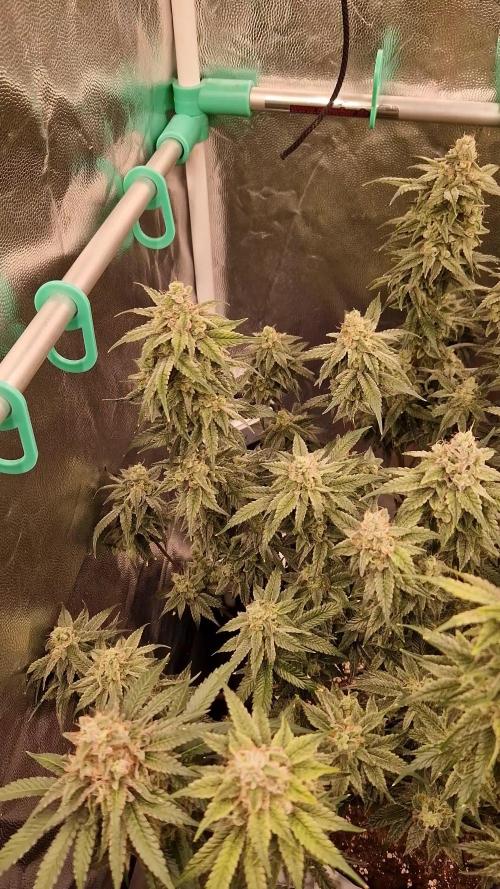
**Week 6 Flower - October 24 to 30, 2020, Days 36 to 42*********
The girls spent a full week in the bigger tent now and appear to be liking the extra room and air movement. The girls are not changing much in size now and just want them to swell at this point. Some of the hairs are going red now and need to get a flush in to bring down the ppm and then lay a nice finishing feed in the media. Overdrive being added now that we are at the finish line for feed. Expect another week of feed and then flush for two weeks. These girls may need some help though and Flawless Finish might be used.....will try and avoid though and let them finish on their own.
Trichomes are really plentiful on these girls. The lower points are also very frosty. Nugs are getting really nice colour to them and expect to see further colours come out in the days ahead😀 So we give them their last ripening feeds and then reduce to plain water by mid to end of next week. Since they are in coco I am going to feed them a little longer this run, feel I have missed some potential last run and hopeful this will run 9 weeks for a nice finish.
There were five days this week with adding moisture to the pots and a larger flush at the start of the week.
Little more detail.......
Oct 24/20, Day 36
- girls flushed in the morning with 20L of water at 4.5pH.
- in the PM they were given a feeding of nutrients as RO water was used to flush.
- 2L - Sensi Bloom, Overdrive @ 2ml/L, Liquid Wt, Vitathrive @ 1.5ml, CalMag @ 1ml
- Last feed was 850ppm and 5.7pH.......should make the girls a little happier and rinsed off the roots.
Oct 26/20, Day 38
- Heavier week 6 feed today....not many feeds left
- 4L - Terp.@3ml, Sensi Bloom, Overdrive, Rezin Microbes@2ml/L, Liquid Wt, [email protected], CalMag@1ml
- 1125ppm and 5.8pH going in. A stronger feed today with the last microbes for the girls.
- the green on these girls is a little lighter than Gorilla Girls and looking better.
- the colours are continuing to come out in the bud.
Oct 27/20, Day 39
- 3L - Sensi Bloom @ 3ml, Overdrive, Rezin, B52 @ 2ml, Liquid Wt @ 1.5ml = 1125ppm and 5.7pH
- the girls had lots of runoff yesterday and then lots again today......slowing down now?
- There is getting to be some pretty red hairs in the bud.....she may not go much past weeks???
- the bud sites are forming pointy tops now.......hmmmm she's getting close.
Oct 29/20, Day 41
- 3L - Terp @ 3ml, Sensi Bloom, Overdrive, Enzymes Komplete @ 2ml, Rezin, Lq Wt @ 1.5ml
- 1150ppm and 6.0pH for the girls.
- runoff amount was lower today, dry out day yesterday.
Oct 30/20, Day 42
- 3L - Terp @ 3ml, Sensi Bloom, Overdrive, CalMag, Rezin, Lq Wt @ 2ml
- 1350ppm and 6.0pH........one of the last feeds.
- C471 is a lighter colour than C472. C472 has some green/bluish leaf colour.
- I suspect we are going to need Flawless Finish to bring these girls home.....they are still darker than I would like.
👍
That wraps up week 6 and the girls looking really nice. They fill up half the tent nicely and have room to breath. They are a beautiful height to work with. Buds are getting more dense. She will be a nice girl.......I am missing somethings though and she is not finishing as I had worked out in my head😵


Likes
6
Share


@mattipups
Follow
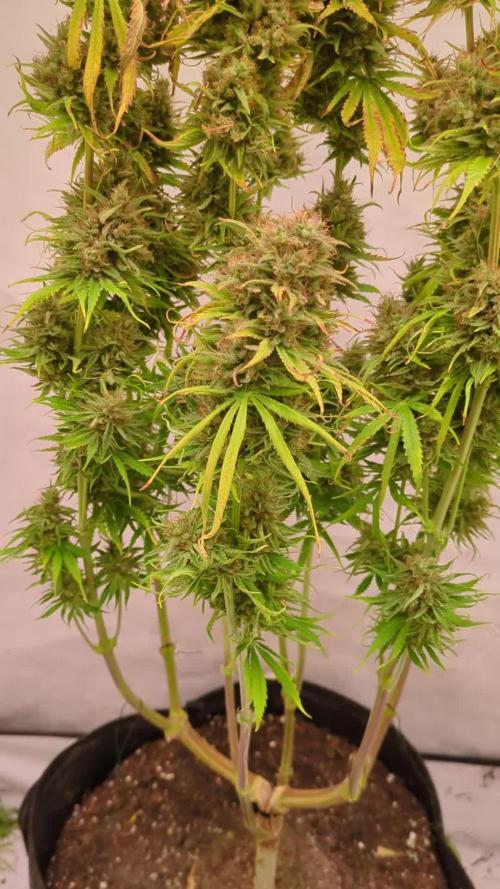
Langsam verwelken die Fächerblätter, ich glaube die Pflanze nähert sich ihrem Ende.
Likes
13
Share


@Sadhus
Follow
Foliaire tout les jours avec 420 rooting powder et Caribbean algae et un arrosage avec 420 rooting powder et bonne & muscle , par Madame grow, tout sa a ph 6,3 avec le ph down organic madame grow
J'ai un très beaux vert et une croissance vigoureuses ! 💪
Je vais bientôt faire un premier topping dans quelques jours.
Édit topping effectué sur les 2 plus grande et 2 jours après les 2 autres, suivi d'un foliaire amino canna special pour le stress topping LST HST etc ,très efficace car la croissance n pas été très ralenti elles se sont remis très rapidement

Likes
4
Share

@Nordgrow
Follow
Die ersten 3 sind gefallen.
2 sind noch übrig.
Das Nassgewicht der 3 Pflanzen war sehr unterschiedlich, aber insgesamt wirklich sehr, sehr schwer.
Die Box wurde jetzt mit einem Raumteiler in Trockenkammer und Blühkammer geteilt.
Die kleine Pflanze wurde jetzt auch gespült und wird demnächst auch gefällt.
Die große bekommt jetzt erst ihre ersten braunen Härchen.

Likes
8
Share


@TrueNorth
Follow
-Strain: AUTO GELATO - Fast Buds
-Tent: 5x5 Gorilla Grow Tent
-Lights: Budget LED Grow Lights 2 x 250 Watt
LED Full Spec/Red Spec mixed boards
-Light Cycle: 18/6
-Soil: Fox Farm
-Air Circulation: AC Infinity Cloudline T4 Inline Duct Fan
WECLOME BACK GROWMIES! Week 10 here with our AUTO GELATO by Fast Buds!
January 29, 2020 (DAY 67) - Hey there growmies we can clearly see the big bud getting to work, they are thickening out well and colour and smell is phenomenal. they are such hungry beast i love seeing the daily change!
Likes
13
Share


@GrowGuy97
Follow
Flower day 24 - Ladies are coming along great! A few are having calmag deficiencies but nothing major, other than being a bit crowded I couldn’t be happier with the grow so far! Thank you to everyone following & happy growing friends!✌️🏼🌱
Flower day 25 - Humidity is at 47% temp is at 79F - Ladies got watered today at 6.5 PH , a few got some calmag. Happy growing friends!✌️🏼
Flower day 27 - RH is 51% Temp is 81F - Ladies got fed today, I got the fox farm Dirty Dozen kit is so the got a lot more stuff this week hoping it helps! Happy growing friends!🌱✌️🏼
Flower day 29 - Noticed some PM on one of the Gorilla zkittlez😫 have her pulled out of the tent right now apply neem oil hoping she will bounce back!


Likes
Comments
Share


Likes
15
Share


@IsseyBukkake
Follow
We have hit day 35 and everything's looking great!
Only 2 girls out of 8 have started flowering in the past day or two, the remaining six have shown sex and I'm anticipating flowering to begin sometime this week.
I gave them a full feeding today.
I'm using H&G Coco A+B, which is used from seed to harvest, unlike many other nutrient brands.
I will start using H&G Bud-XL in the next few days, luckily I got a bottle before the shops close for Christmas.
I didn't expect these autos to get so big so fast, but I'm definitely not complaining.
Update day 37 - 26/12/20
I fed the girls their first dose of bud-xl today.
5/8 girls have started to flower now, hopefully, in the next few days the other 3 start up!
Update: Day 40 - 29/12/20
6/8 girls are flowering now, the two that aren't are the 2 weird pheno runts..
I've submitted a grow question regarding the 2 weird girls.
I'm hoping that they're simply late to flower and not a photoperiod..
I've been feeding the girls 1-2 litres each every day, with a plain PH'd water run every 7-14 days.
Update day 41 - 30/12/20
All the girls have started to flower now :D
I'm incredibly happy to see them so healthy at this point too
I was almost going to put the 2 runts outside but I'm leaving them inside at this point.
Thanks for stopping by!
Merry Christmas/Happy holidays to all :)

Likes
3
Share


@dwotTV
Follow
Chopped one before vacation and off to dry while I'm in Ireland and the UK, leaving the other one to keep going and chopped on return.

