


Likes
37
Share


@DaddyPrime2
Follow
5/12/2024 these plants just keep on getting fluffier and fluffier. Did a slight defoliation. The plant I did training on, seems to have better stackage than her sister. If lst doesn’t increase yield, then it at the very least will increase bud size/stacking.
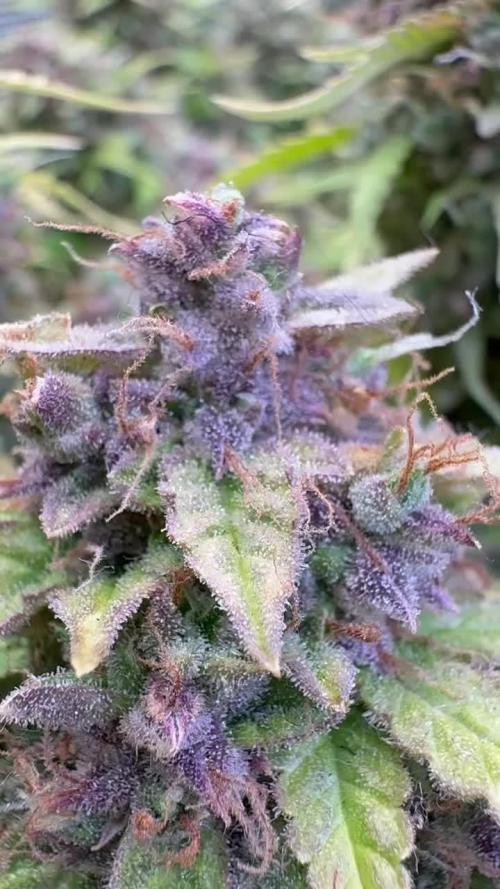
5/19 end of the week, they're starting to pack on weight now. Pistils are turning a super bright orange color that has a pink tint to it that is super beautiful. The camera does not do it justice at all. I would definitely recommend this strain to anyone. It's stupid easy to grow and the buds are just getting ridiculous. You could probably drop like 9 of these in 3 gal pots in 3x3 tent and just water and basic notes and do a sea of green style. Watch the humidity though.

Likes
14
Share


@LokalGrenz
Follow
Still just water and some fish shit
Jan. 1 Happy New Year welp to start new year off drop my very cheap PH meter in the bucket water and now the readings are off and I probably watered them today with wrong pH water Sour diesel looks cool didn’t water today soil was still moist but the amnesia haze be


Likes
12
Share


@CeezarMoolawn
Follow
Will post pics very soon Transplanted into pots today , and will add my PH and PPM information closer to the first pump!
Pics are up ! Day one of Veg Starts now! :)
Light timer worked a perfect 18/6
Had Pump timer set on 30 mins on the first * Corrected to 15min, 3x per light cycle, leaving 7am to 1pm open.
NOV 4 , Had issues with humidity , Added humidifier and turned off my Filter/Inline fan,
Temp sitting around 80degree , and 50% humidity , with Tent vents open and Door partially unzipped.

Likes
33
Share


@FlavoursUk
Follow
Day 59 - Seems since ropping up the res with nutrients the girls have taken well to it. They've started to fatten up considerably and are showing some nice colours. They are hard and sticky.. yield looks well on the first pheno.
Day 60 - plants are getting on well, the EC is dropping which lets me know the plants are utilising the nutrients, pH slightly rising which again is a good sign. Leaves are changing colour too.
I'll see what happens over the next few days, she should start to fade soon. Won't start flusing yet as she still has more to give. Stay tuned
Day 63 - Girls getting on well, strong gassy smell from one of the phenos (left) and really sweet candy like aroma from the second pheno (right) actually smells so dank! 😄 Other thsn that, feeds have been dropped.. currently sitting around 0.5 EC. pH 5.8.. girls seem to like it there but I'd like it a little higher (6.0). They put on a lot of size from one day to the other which was nice to see. Can't complain really, I'll continue for now letting the EC drop and do a res change with plain RO water and let the plants flush fir a couple days. Planning for a day 70 harvest. Stay tuned

Likes
10
Share


@Andres
Follow
I use with her top crop complete mix .... she grows outdoor ... without any relevant information ... only her vegetation is slow ... it's autumn ... and the sun is not very strong ...
Likes
6
Share


Likes
16
Share


@GreeneScene
Follow
This week made a few oopsies . I gave un-ph’d water to one of the plants “moving to fast” . Started defoliation during this week to attempt to redirect plant energy into establishing a full canopy since flowering has initiated.
Whilst defoliating I broke a branch that had to be taped to save it.
Humidity went out of whack when I stored 4 prepped 5 gal pots for transplant in the tent sooo I’ve got to buy a dehumidifier bc at one point all my plants fell out in a fit .
STILL haven’t filled these pots out, & I’m kinda sure/unsure it’s time to re-amend the soil for flowering. I’m conflicting on waiting until beginning/middle of week 7 so I can flush week 11 & 12 .
I think that covers it pretty well Week 5 in the 📚 📕 📖.

Likes
14
Share


@rainman
Follow
Finally week 2, plant is doing great. idk if it's airpot, nutrients, 20 hours of lights or genetics, but girl is growing really fast. New nutrients this week with increased amounts, but not full dose. Full dose will be given from day 10-11.
Day 8 - Plant reacted great to 20 hours of light. Stem is still little bit thin for plant size, but fan breeze will help. 1L with nutrients. PH perfect G-B-M 1.2 ml/l, Root Plus 2 ml/l, Diamond Nectar 1.25 ml/l, CALiMAGic 0.4 ml/l.
Day 9 - Good day, great progress. Very healthy color. 1L water under plant, 1L on sides of pot.
Day 10 - Plant is growing by hours. Increased amount of nutrients and water. 2L from today. PH perfect G-B-M 2 ml/l, Root Plus 2 ml/l, Diamond Nectar 1.25 ml/l, CALiMAGic 0.4 ml/l.
Day 11 - Oh man i dont know what to say about it, its growing very fast. As you can see on photos, a lot of side leaves is coming. Stem is getting strong, makes me very happy. So far so good. No water today.
Day 12 - 2L with nutrients.
Peace.


Likes
6
Share


@Fullmeltalchemist
Follow
D71/F24 - 11.29 - There's not much to say about these two. They didn't even hiccup after the defoliation, though it does appear their stretch has just about finished. They both have fat greasy prebuds right now, and the Passion Berry has particularly long pistils. A pleasure to watch em grow! <3
D76/F29 - 12.4 - Just like holy fuck these things are monsters. 🙏🙌 Praise be to Swerve 👑, I'm astonished at the pace and vigor of these two plants

Likes
20
Share


@JohnnyCash420
Follow
Alle 3 Babys haben sich von der Größe her nochmal verdoppelt in der Blütephase.
Habe gestern noch CANNA Terra Flores Düngemittel für die Blütephase gekauft. Ich hoffe dass es jetzt nicht schon zu spät ist für die Anwendung?


Likes
10
Share


@extraterrestrial1
Follow
-------------------------------------------------
Day 15
Water: N/A
Humidifier: 60% (LOW-MIST)
Fan Speed: High
Light on @ 19:00 (24.5° celsius @ 62% RH)
Light off @ 13:00 (22° celsius @ 64% RH)
-------------------------------------------------
Day 16
Water: 150ml RO water
Humidifier: 55% (LOW-MIST)
Fan Speed: High
Light on @ 19:00 (24.5° celsius @ 59% RH)
Light off @ 13:00 (21.5° celsius @ 60% RH)
-------------------------------------------------
Day 17
Water: N/A
Humidifier: 55% (LOW-MIST)
Fan Speed: High
Light on @ 19:00 (24.5° celsius @ 59% RH)
Light off @ 13:00 (22.0° celsius @ 61% RH)
-------------------------------------------------
Day 18
Water: N/A
Humidifier: 55% (LOW-MIST)
Fan Speed: High
Light on @ 19:00 (24.7° celsius @ 59% RH)
Light off @ 13:00 (20.9° celsius @ 61% RH)
-------------------------------------------------
Day 19
Water: N/A
Humidifier: 50% (LOW-MIST)
Fan Speed: High
Light on @ 19:00 (23.6° celsius @ 57% RH)
Light off @ 13:00 (22.9° celsius @ 57% RH)
-------------------------------------------------
Day 20
Water: 0.5 gallon RO water
Humidifier: 45% (LOW-MIST)
Fan Speed: High
Light on @ 19:00 (26.2° celsius @ 49% RH)
Light off @ 13:00 (22.5° celsius @ 59% RH)
-------------------------------------------------
Day 21
Water: N/A
Humidifier: 45% (LOW-MIST)
Fan Speed: High
Light on @ 19:00 (26.5° celsius @ 50% RH)
Light off @ 13:00 (22.9° celsius @ 58% RH)
-------------------------------------------------
Likes
Comments
Share

@hassehujasse
Follow
Flowering going very well, ph-6,5 ec 1,4 salt 0,04% at runoff . Everyday 3 to 4 feedings with Canna around 1,5 liter per day.
Likes
7
Share


@Big_Rade_SCLA
Follow
So far I've had two plants pop out from the 8 seeds I threw in the soil (2-30 gallon pots). A ninth seed was germinated later in the season. These are seeds I obtained from the Grease Monkey OG clone I grew last year. I don't mind getting a few seeds from the bees pollinating my plants. I can't say how good that strain is; I recommend it to everyone. I'm happy to have some cross-pollinated offspring. The soil is mostly FFOF, Happy Frog, Roots Organics, some worm castings, worms and whatever has been living in the soil. I recycle my soil and just add more stuff when necessary. I'll try and keep updates this season.
Likes
1
Share


@nowayReggie
Follow
Strain: Hillbilly Wedding
Genetics:
F-
(Raspberry Moonshine)
[Raspberry Kush x Old Time Moonshine]
x
M-
(Wedding Cake x More Cowbell)
[Girl Scout Cookies Forum Cut x (88G-13 x HP)]
that old time moonshine.... I believe is a Dj Short creation.
When I first started floating the idea to start growing the first thing that came to mind was find my favorite strain. BLUEBERRY! THAT DJ SHORT BLUE BERRY...
Dj had just rereleased the OTM line.. I did not grab those beans but I am glad Ziplock got to it!
I was graced with blueberry moonshine back in 07. 🤤
First time growing a strain with Girl Scout Cookies
and a second chance with the 88G13 & HP
Soaked for 36hrs
had a glass with a lid(seems to be working for me)
heatmat on top of drawer seeds are in set to 80
11/12 cracked open before planting{very abnormal for me}


Likes
3
Share


@GingerGarageGrow420
Follow
Week 11 Cherry Cola. Watering 0.6 L morning and night. Buds are thickening up nicely.
Looking forward to harvest!
Likes
1
Share


@midEastern
Follow
trichs are milky
this time i decided to chop as milky is peak thc and not wait to start amber
this way i see it buds stay green even after a few months in jars
Trimming initially only - and hang down in shaded ventilated place for 10-14 days
Then moving to jars wood boxes for olding process
Likes
5
Share


@AestheticGenetix
Follow
5/27 this may be the last week?
5/31 the lowest branch has a thick lollipop nug on it. This plants starting to explode