
Likes
Comments
Share


@Suemchen
Follow
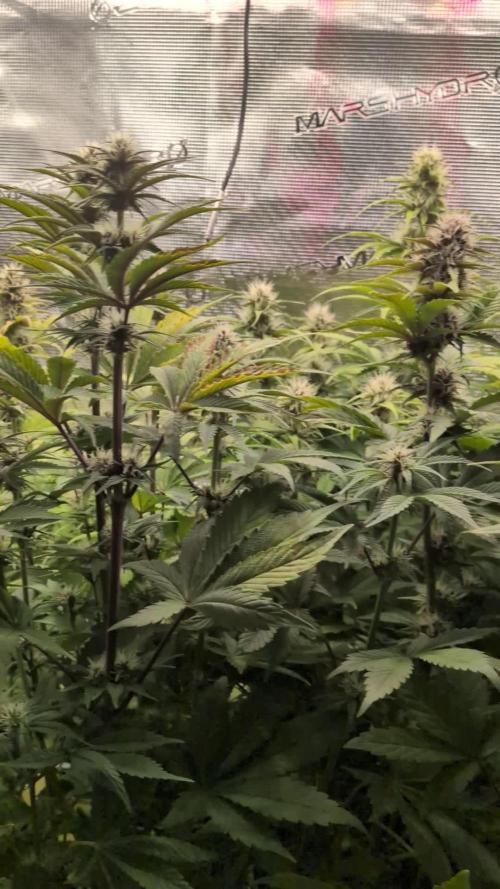
Sanlight evo at 100%
Day 71: Looks really good 👍 a couple of days now and then darkness 🤙 giving No water now...
Day 73: well, that's IT🤗 The Journey Has come to an end.... 😢 Today I turned off the lights, sprayed purolyt. She will get 48 hours of darkness and then cut and hung..

Likes
5
Share


@killerjoint
Follow
10-8-2024 TOP DRESSING AND WORM TEA.....
NOTHING MORE
10-9-2024 22ND DAYS INTO FLOWERING
SMELLS CRAZY ON THESE STRAIN
GETTING SOME SNOW ON TOP
LET'S GO
10-11-2024 DO NOT HAVE ANY PEST BUT JUST IN CASE
NATURESGOODGUYS HOOK ME UP WITH LADYBUGS
JUST GOT HANGING PATCH ABOUT /WITH SHIPPING
10-14-24 NOTHING TO DO...JUST WATER (PH6.6)AND WATCHING THE PLANTS.......
COPY CAT GENETIX STRAINS ARE CRAZY!!!!!!!!


Likes
11
Share


@Buddyhighs
Follow
Another week down a whole week of 12/12 and I won’t say she’s stretching yet, I would have thought ild see son pistols by now but no.i know she’s healthy the cutting I took only took two days to fully root
A few new things to add to the list of nutrients, this week she’s had a heavy top dress. Reaper, soil candy, and barley to kick start bloom, grow plus to make sure she has enough to stretch properly and the knf. Which I’ve add fermented fruit juice to now for bloom,
Fermented fruit juice - I’ve gone hard to ferment this properly since using shop bought fruits,
Bananas for potassium, blackberries and blueberries because that’s how I imagine a moonberry would taste 😂 I know it’s no going to influence the terps but still
LAB for microbes and jsm ( leaf mould and potato in water to collect microbes in the water)
And finally molasses. This brew took about three weeks.
The light stayed the same high flipped to 12 hours and turned up to 75%. She will stay there until the plant reaches 30cm from the light.
I thinkkkkk that wraps this week up might be a bit boring from here on out work wise butttt will be exciting watching her blow up, till next week.
Let’s get it 💪🏽

Likes
39
Share


@Velk1
Follow
expect high super high levels of frost , be sure to start your training early on this plant and defoliation of lower growth will help out a lot, with care you can have beautifull massive grapewalker kush's glad ivesaved some for the vault , thanks for sticking around for this journey now for the next =)0


Likes
101
Share


@DogDoctorOfficial
Follow
OMG the smells are becoming so intense, from lemon to the sweet caramel mix with chilies and a touch of pine trees, i think i cant put in words what im smelling and were is taking my mind, but i can tel this, what an amazing combination of fragrances that are flying around
The tricomes are shouting up as they become fatter and frostier, all cristal clear so far, i think i still have 3 mb 4 more weeks to harvest, lets see 😜
Just calculate my VPD and it’s 0.98 kPa need to increase this up to 1.2 for now s i’m moving my ligth up a bit and see if it works 🙏🤓🙏
Thank you all for following, comment, like and all 🙏 100 likes 😅🙏 🙌🙌🙌🙌🙌🙌🙌🙌 ❤️❤️❤️❤️
Loving this LED Tec 😍
Girls:
1-BlueBerry
2-Alaskan Purple
3-Poyote Gorilla
4-Hindu Kush
5-Whitw Mango
6-Super Glue
7-Badazz Cookies
8-S.A.D.
tent -8x8 / 2.4x2.4 but i'm only using 1/2 so 4x4 / 1.2x1.2
Led - Lumatek 465w Compact Pro at 100%
All i Grow is medicine for myself,
Stay safe, stay tuned and B Happy
Peace out
D


Likes
6
Share


@Barcelona_Farmers710
Follow
Esta semana apesar de tener temp Máxima de 28... se va recuperando bien de las podas, el led de TodoGrowled funciona perfectamente para sus 55w farmers!🍯

Likes
10
Share


@Weedzoks
Follow
Green Poison 2 coupée le 22 Janvier, a 91 jours et 55 jours de floraison.
A suivre 😁


Likes
11
Share


@Spectrabox360
Follow
This week gonna ad plagron bloom. 2.5ml
With plagron grow 5ml and plagron roots 1ml.

Likes
16
Share


@osmrducks
Follow
Day 29: The girls are looking great. I upped the nutes yesterday, as I have been giving them barely any at all. Will up them once again on next feeding. Looking like tomorrow. The main branch that I snapped off did not make it. Lesson learned on that one.
Day 30: Removed all other lights and added the HLG 550 V2 RSpec. Did some defoliation on the girls along with another feeding. Will do straight PH'd water next go. The girls are looking strong and healthy. 💪 Just on the small side. Still having to leave the tent wide open to subside temps and humidity.
Day 31: Nothing new to report. Looking very short and stubby and healthy!!
Day 32: Looking like they had some good stretching going on over the 3-day weekend. Will be needing fed tomorrow after work. May water a little less this time, as it is taking 2-3 days for them to dry out.
Day 33: Great stretch and bloom on the girls today! They are looking super healthy and strong! 💪 No smell yet.
Day 34: Girls are looking decent. Noticed some rusty looking splotches on the leaves. I'm thinking possibly Cal-Mag deficiency? Not sure.
Day 35: Not looking too happy today. I let them dry completely and watered with only Cal-Mag. Hoping the patchiness clears up for them!

Likes
4
Share

@therealgrowmie
Follow
The plants are demanding way more nutrients at this stage - and unfortunately, they’re almost outgrowing the grow space 😅. We’re seeing medium-level deficiencies across the board and some mild heat stress (tacoing leaves).
To fix this, we’ll start adding fertiliser with every watering for the next 4–5 rounds and see how the new growth looks. The flowers still have the potential to become A-B-S-O-L-U-T-E-L-Y massive, so we stay calm and just feed, feed, feed! 🚀🌸
Stats so far:
💧 Watering: 1.5L every other day
💦 Humidity: ~65% RH
🌡️ Temp (lights on): 22–26°C
🌡️ Temp (lights off): 20–22°C
📈 Avg. VPD (lights on): ~1.2 kPa

Likes
11
Share


@TOTEM
Follow
Hello buds! I’ve actually splitted the Dance World diary in two since I took the other one out of the grow box and started some hard training with her (see the diary).
This one has FINALLY started flowering, after two weeks passed creating something that looked like flowers, which was definitely not flowers. Like the shape of flowers with no pistils. Pistils now came out from that “shape”, and there we go! After last week flush I’ve started (again) with bloom nutes (week 1). I hope to be able to complete previous weeks with some photos I took, but for the moment, if you want to follow the veg growth of this one, please look at the other Dance World diary. Enjoy and happy growing 😃

Likes
3
Share


@MrLahey
Follow
End of week four and plants still look great to my eye. Stretch is finished and now the plant is really going to focus on flower development so the next few weeks should show a lot of growth of the flowers.
The smell is starting to really become noticeable. It’s hard for me to pinpoint but it almost smells like sprite but extra lemon limey.
I’m thinking around 5-6 more weeks until she’s ready to chop. We shall see.
Likes
23
Share


@NordicCropz
Follow
Day 60 flower on the two most developed. Should be right about done by now, but as you can see nute burn has been a pain lately. Anxious to find out how much longer they'll need to mature. Buds on the smallest one with the fattest flowers look thick, but they are waay too fluffy compared to the other equally developed plant.
I have only fed twice the last 10 days, to try to combat the nute problem. Thinking I should go down from half dose to 1/3 the rest of flowering, with a bit more normal feeding frequency, to avoid starving them in these last couple/few weeks.
Second video is of a small bud I cut off low on the smallest plant. Not mature at all, but it still blew me away. The high was wonderfully balanced. Most of all the taste, was incredible. Even after I dried it for 6 hours on my heating radiator on top of cardboard. Makes me think of how insane it will be when matured, dried and cured like it is supposed to. Just hoping it will fatten up a bit, at least the pistils are starting to come along.

Likes
15
Share

@tsf_homegrow
Follow
🇩🇪
Die letzten Tage waren wir etwas aus der Spur. Sie hing etwas durch da ich nicht optimal gegossen hatte. Ich hab einen kleinen Teil der Wurzeln weiter frei gelegt und sie weiter und Form gehalten. Entscheiden das oben am Haupttrieb noch 4 weitere Seiten Trieben entstehen dürfen. Und dann wird es langsam auch Zeit sich Gedanken zu mache sie in die Blüte zu schicken. Aber ein paar Wochen darf sie noch wachsen. Happy growing💛✌️
🇬🇧
We've been a bit off track the last few days. She was drooping a little because I hadn't been watering her properly. I've exposed a small section of the roots and kept her in shape. I've decided to allow four more side shoots to develop at the top of the main stem. And then it will slowly be time to start thinking about putting her into flowering mode. But she can continue to grow for a few more weeks. Happy growing! 💛✌️
Likes
58
Share


@nonick123
Follow
Bienvenidos a la semana #5
Inicia la floración a tope! 😀 😑 🙏 😂
Día 32 (12/06)
Las plantas se muestran sedientas.- CC, RB, OF1 = 250 ml H2O pH ajustado con Biogrow, Biobloom y Top Max- NL = 500 ml H2O pH ajustado con Biogrow, Biobloom y Top Max
¡Pasan la noche en indoor por la amenaza de lluvias!
Día 33 (13/06)
No ha hecho demasiado calor pero se muestran muy sedientas! (excepto OF1)Duplicamos el riego y vigilamos- CC, RB = 500 ml H2O pH ajustado- NL = 1 litro H2O pH ajustado
Pasan mitad de día en exterior y mitad de día en interior por lluvias torrenciales
Día 34 (14/06)
Ajustes de LST, pero se nota que las plantas ya están en floración, porque los tallos y ramas son mucho más duros (menos flexibles)
Ya ha salido el sol y parece que vamos a tener muchos días soleados por delante! 😀
Día 35 (15/06)
Riego- CC, RB = 500 ml H2O pH ajustado con Bio-Grow - NL = 1 litro H2O pH ajustado
Día 36 (16/06)
Se detecta un par de orugas verdes en CC y NL y se eliminanSe hace aplicación foliar de aceite de neem y jabón potásico a todas las plantas
Hago lolippoping en las ramas más bajas de las OF1. Ya son bastante pequeñas, así que dediquen su energía a las ramas principales...
Día 37 (17/06)
Es impresionante el vigor que muestran Crystal Candy XL y Royal Bluematic. Crecen varios centímetros al día 😀
Los colores entre morado y púrpura casi negro de la Crystal Candy son espectaculares! 😀
Northern Lights se ha quedado más pequeña, y de las Orion F1 me esperaba algo más... 😑 Veremos si los próximos días ambas strains me dan Una sorpresa y se estiran.
Inspirado en @deFharo, hago mulching con corteza de pino para evitar la evaporación por las altas temperaturas que tengo en la terraza.
Humedezco la parte superior del sustrato con spray y hago un riego con agua pH ajustado con Bio-Grow, BioBloom y Top Max en las siguientes cantidades:CC, OF1 y RB = 250 mlNL = 500 ml
Gracias por leerme y buenos humos! 😀
Likes
3
Share


@Mr_nugs_lover_David
Follow
Spectacular autoflowering kush strain, very kushy smell for real, very citric and earthy, piney too, loving this terps, I have moved her along with all ofmylast automatic plants of this outdoor season inside under my LED panel of HortiONE. They're almost ready to chop down and I think they're gonna finish perfectly under this LED. Let's see how it goes 💜💚✌️


Likes
2
Share


@NoProbation4Weed
Follow
Prepared the soil 12 days ago and prepared the pots at the day i put the seeds into glass of water.
I used 50% Dope Light and 50% Coco as light mix for the top layer
I used 50% Dope Soil and 50% Reused Soild + Additives to reactivate my old soil.