
Likes
Comments
Share


@ButterfliesLittleFarm
Follow
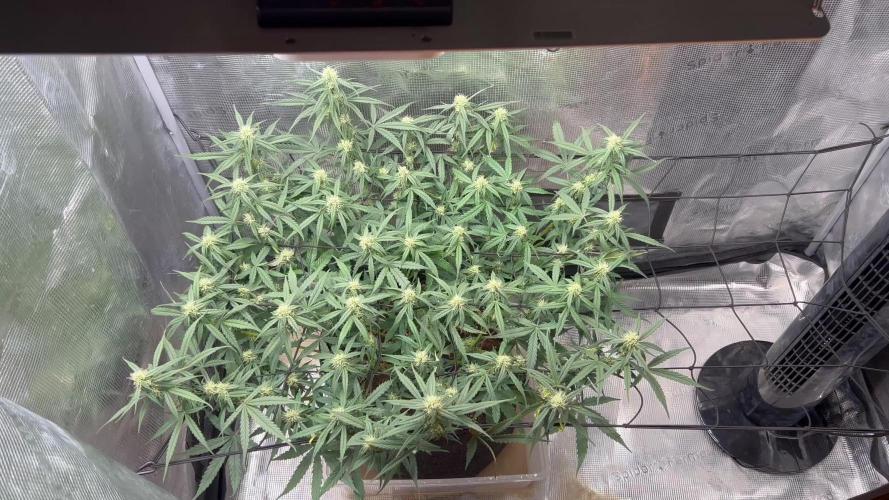
Hello Diary,
White Widow has finished the third week of flowering, and as you can see in the photos, it looks great.
I would say that she has stopped growing in height, only 4 cm this week.
Final 67 cm which is almost ideal considering the height of my grow box.
White Widow has formed its final shape and will now direct all its energy into the development of flowers, at least I hope so :).
The main cola dominates above the other branches and is completely covered with flowers on which trichomes are already visible.
All three plants have started to smell more intensely, when I open the grow box I immediately feel the smell that overwhelms me.
The leaves are a healthy green color, there are no signs that she is missing anything.
It is obvious that the new nutrients Bio Grow and Bio Bloom Fertilizer are doing their job.
Watering has become more frequent, the plants have become thirstier compared to the previous week.
I continued to add CalMg and Bio Bloom Fertilizer with each watering.
All in all, I am very pleased with how White Widow is progressing,
I try to provide her with the best possible conditions and she returns the favor in her own way.
Here is what the past week looked like.
29/08/2024 - Day 36.
Watering.
I prepared 9 liters of water, added CalMg and Bio Bloom Fertilizer and lowered the p.H. to 6.0.
With that amount of water, I watered all three plants on the "Farm".
01/09/2024 - Day 39.
Watering.
I repeated the same procedure as three days earlier.
03/09/2024 - Day 41.
Watering.
Same procedure.
04/09/2024 - Day 42.
End of the 6th week, or the third week of flowering. Photographing and measuring the height of the plants.
White Widow - Day 42. - 67 cm.
That's all from me for this week, see you soon and thank you all for your comments.

Likes
21
Share


@reirrac1
Follow
She started out as the most vigorous grower, but may have been too quick for her own good. She began having deficiencies early on which were easy to address, but they came back intermittently. Ultimately she didn’t thicken up quite as much as I would have liked, but the trichome coverage is much higher than the Sour Kush.

Likes
12
Share


@cookingwithninja
Follow
day22 video. now adding more pk booster than earlier weeks, should be done week 7-8 we will see
day23 I start adding more pk, still will 4x more pk now. Some nice pics today, videos of each, frost on fan leafs, no issues other than pros: bridal frost on fan leafs+sugar, cons 6ft tall. I think I should have pumped more pk earlier into flower/pre Its cool. Adding 2tbsp soluble pk into 5gal vs quarter tbsp in beginning 22 days ago. I am feeding soluble pk, +3 pk soil conditioners and carbs every day. There is no water day.
day 25 stacking up. been spraying old cs I made 3ish years ago to test, works on unrooted so I may potential cross. Bridal starting to smell like a mix between fresh watermelon, and lemon+lime or a citrus aroma.

Likes
14
Share


@Smokwiri
Follow
This week we the weather will be a bit cold, so I put her a bit close to the house.
Weather was a bit windy, so pictures are not the best, but hey... it's an outdoor thing isn't it?
Last week we had wonderfull weather, but this week weather will go under 15C, hope everything will go well.
No additional nutrients yet, there's enough in the soil for 1 full round, but i iwll start adding mineral nutrients soon, just to get better taste and to be sure that no shortages of minerals will be visible on leaf (or better said... let's feed enough, so the insects can have some too (outdoor).


Processing
Likes
5
Share


@Deli_Weed
Follow
Va un poco lento el engrosamiento de esos cogollos, pero la planta se ve bien en general, pudo haber estado mejor si hubiera recibido más luz creo yo, pero huele delicioso 😋 y tiene unos colores hermosos, ya quiero ver el resultado final 🌱

Likes
101
Share


@DreamIT
Follow
🌴🌞 TROPICAL FUEL BY EXOTIC SEEDS 🌞🌴
____________________________________________________________________________________
🏝️ 2.4 ...
🏝️ 3.4 ...
🏝️ 4.4 ...
🏝️ 5.4 ...
🏝️ 6.4 ...
🏝️ 7.4 fifth week almost over, from now on the photos will become more interesting, finally. It is almost boring to photograph vegetative plants, they are all the same. it is in bloom that the quality of a genetics is determined, and now the fun begins...
so far the plants have shown no deficiency and no abnormal growth. You can clearly see the difference between the fertilized plant and the non-fertilized one, but I will make the necessary observations at the end of the cycle. these will be the last plants I grow with the "classic" method. In the future only Canamatoes style 🍅🍀 (look for it here on Growdiaries, one of the best growers I know) there is little else to say at the moment about these beauties. I was hoping for some color but I'm not complaining: p thanks for stopping by 😀 🦄🤘
🏝️ 8.4
____________________________________________________________________________________
📜 A look at the details of what I'm growing 📜
🌴🌞Tropical Fuel by Exotic Seed🌞🌴
⚧ Gender
▪️ Feminised
➰ Genes
▪️ 70% Indica / 30% Sativa
🎄 Genetics
▪️ Tropicana Cookies F2 “C cut” x Tropicana Cookies F2 #5
🚜Harvest
▪️ 400 - 500 g / m²
🌷Flowering
▪️ 56 - 64 days
✨THC
▪️ 20.0 - 24.0%
✅CBD
▪️ 1.0%
🏡Room Type
▪️ Indoor
🌄Room Type
▪️ Outdoor
🕋Room Type
▪️ Greenhouse
🎂Release Year
▪️ 2020
____________________________________________________________________________________
📷🥇 Follow the best photos on Instagram 🥇📷
https://www.instagram.com/dreamit420/
🔻🔻Leave a comment with your opinions if you pass by here🔻🔻
🤟🤗💚Thanks and Enjoy growth 💚🤗🤟

Likes
45
Share


@AsNoriu
Follow
Day 92. Girls are runing to the end, foxtailing on one of Tangies is crazy, but bud is dence and i let her to go.
Now StrawberryCough have loads space, she loved nutes, leaves are a bit too dark for me, but she is flowering and its fun !
Made on her Fims , tried to understand how deep you need to cut, so she will have some strange grow 4sure.
Day 94. Early Tangie became TheRealFoxtailQueen ;)) thats it, i dont want to smoke tails, so she was choped aswell, sad , was hoping she will be my biggest girl from first 8...
Was puting ice as a test on Early bigger FastDiesel, so part of roots stayed wet, its easy to spot, that those cones in airpots really works great.
Day 95. Eve. Maybe Fatty could hang for 12 hours more, but i am leaving house for a bit and dont want them to overdry. Thats why tops are in seperate jar, not because it looks better ;) inside bigger tops, even when i trim them hard ( i could leave longer colas) still stemp is fat and keeps more mosture, that way its easier to cure them, humidity is more even trough each jar.
So now to the main point .... Weight .....
And the winner is ...... ;))) 69.65 !!!! Never hoped that much from her, my eye scales are way off ;)) i think thats the winner, only late FastDiesel or StrawberryCough can beat.
Bud dried 1-2 days too early for perfectness, but heating is on and its really dry weather in the house and dehumidifier triggers electrics ;)) i am flat out on max usage now ;)
I am in a choping spree ;) Slimmer Fat Tangie falls aswell, she smells crazy, dont know is it smart to dry like i do now, neighbours should smell it 4sure ;))
Smells is fruity from distance and citrus from close up ... Tangie in the best by smell and not so sad by quantity ;))
All girls running well, really happy and that makes me happy. The purpose of Theraphy Room - works !!!!
Day 96. Every day new champ ? ;)) Early Big FastDiesel very sticky, not rock hard, but hard buds in total of 73.61 !!! That strain i have in marks for summer, its a killer ;) if you smoke it, all neibourghood knows about it, maybe even all small town ;)))
Smaller Early FastDiesel is choped today,she easy could make two more weeks and gane weight, but her choped sister is too strong, cant have couch lock weed all day ...


Likes
32
Share


@Bossman
Follow
I have nothing to complain about I'm more than satisfied with the results this far l. Roots organic is my new bestfriend

Likes
5
Share

@GrowPro3500
Follow
She stretchin’ hard and throwin’ out sites 🔥
Got her topped, light defol + lollipopped — airflow’s clean.
Might strip a bit more soon if she bulks up.
Stackin’ up nice so far… let’s see what she doin’ next 💪🌿

Likes
20
Share


@MrPott
Follow
not much growth but definitely more leaves. might have to cut back some of the lemon balm

Likes
2
Share


@CogordoAcuatico
Follow
Cosecha finalizada, fue una de las mejores plantas que e tenido, su aroma fuerte a menta y pegamento invadió toda mi casa, ni hablar del tamaño mounstruoso


Likes
35
Share


@m0use
Follow
Combined the very last week and harvest into one entry. Plants did ok other then the yellow plant or plant #3 gong hemi and pollinating the tent.
I would try out their genetics again as they look descent, if I hit another hemri though I think that would be it for them. I reach out to them and asked if this was normal and got no reply. I will check the tent once its clean and free of stuff for light leaks aorund where plant #3 was to confirm it was not my environment.
Plant #1 Red took it the worst. it had issues from mid flower but did not finish strong and was hurting a bit. Nice smell over all.
Will be transforming all this into bubble hash with a machine I got and some bubble bags. Don't know when I'll do this but that's the plan.
God about 10oz of buds 293.5g/10.48oz It was not 100% dry yet but popped it into the freezer to keep it fresh.
Big shoutout to Medic Grow for sponsoring the lighting in my tent, They have provided me with 2x Mini Sun 2's in the 240w configuration, They use the v1 growing spectrum that is a all purpose seed to harvest spectrum so their is no hassle of switching it mid grow. If you're interested in learning more about Medic Grow products please visit the web link below.
https://medicgrow.com/
https://growdiaries.com/grower/MedicGrowLED
Likes
20
Share


@TechDCo
Follow
15/10/2024
Lights On!
All looks well. She's drinking now just over 8L:
Current feed schedule
5L/Lights On!
3L/Lights Off!
It's apparent the 65L Pot is allowing her roots to stretch and feed more!
It can be risky transplanting during early flower; 😬 looking back of my diaries, I mess this up.
Looks like the fence steal bracket diy worked for multipurpose lol
Will look for a better alternative later on!
16/10/2024
Lights On!
Both Freaky Pablos 🤪 turned out to be males!
I was going to mate them with bubblegum gpp. I think I'm best of making a full growing season for making seeds but like this. I've saved some of its ball sacs!
"Blue Geleto 41 - Barney's Farm is ready for the switch 👌 in the indica tent!
The Future is now drinking a little over 8L/24h in the 60L.
She has taken the introduction of hollands feed well!
"Time waits for one.....I just have a broken watch, so watch me wait for no one"
17/10/2024
Lights On!
The Future is edging ever so slightly to close to the light! I may have to supercrop them. Leaves huge bigger than my hands ✋️ 🙌 😌 I have M/L, the leaves are like L/XL uk metrics
"Blue Geleto 41 indica seems to be enjoying her room alone and can strectch out!
Currently under a budmaster god 6 & 4 averaging about 550watts with 30dli under canopy! No uv leds installed on these budmasters for they are mostly used for vegging. Hopefully I should be able to use the spectrum king for her last 3 weeks of flower. I have two but I need to get a series 600 meanwell driver for it. The crop master needs some new leds soldered on for its lost a lot of its optics and efficacy.
Meanwhile; I'm well footed in one of the pic lol head over heels 👠 😜 jokes 😃
18/10/2024
Lights On!
19/10/2024
Lights On!
"I put my hand upon my hip! When I dip, you dip! I dip" 🎶
Blue Geleto 41, First defoliation of the switch! (Not expecting miracles under the veg lights) for flowering with!
20/10/2024
Lights On!
Lite Defoliation and supercropped some colas; for last night she stretched 6cms.
21/10/2024
Lights On!
22/10/2024
Lights On!
Dimmed: 530watts slite canoeing!


Likes
6
Share


@Floryx
Follow
-was on vacation for a week
-plants got watered every other day by my sister
-noticed some spots on leafs as well as yellow leafs
-defoliated some yellow leafs and leafs that didnt get enough light
-put the light on 12/12 today and will start with biobizz in a few days
-Whats does the spots on the leafs mean?
Happy about every comment :)
Likes
34
Share


@JonnyKush
Follow
Day 15 🌱
everything is going well but I have accidentally decapitated N1, in reality I had topping already N3 but with N1 I broke without doing it on purpose. hope for the best.
Day 16🌱
wow today N1 I see it well it does not seem to have accused the topping. everything seems to be going well for N3 too, he seems to be growing very strong. N2 is in excellent condition.
Day 18 🌱
i am struggling a bit with "lst" but i guess because i started early. otherwise they seem to be growing well
Day 20 🌱
I let them rest for two days. some training again today, they look fit and grow great.
Day 21🌱
N1 and N3 grow great and look great. N2 grows well but has yellowed leaf tips as if I had given too much fertilizer, I think due to the pre-fertilized soil. Now I continue with water and I will check the drain ph
Thanks for viewing.
if you like my diary leave a like and a comment.
come back to see me 🎂
good cultivation and good day💚🌱


Likes
10
Share


@DeepRootsGrowTrees
Follow
MIMOSA ZKITTLEZ FF/
GANJA FARMER
WEEK #15 OVERALL
WEEK #5 FLOWER
This lady is a beast 💪 she's c completely taken over the tent she's about 4 inches from the light I mean she's just about as much plant as you can get into a small ⛺️ impressed with the genetics of this strain hearty and a strong 💪 plant she's producing nice looking buds!! Stay Growing!!
Thank you for stopping by and taking a look it's much appreciated!!
THANK YOU GANJA FARMER!!
BUDTRAINER.COM BUD CLIPS
MIMOSA ZKITTLEZ FF /
GANJA FARMER
