
Likes
Comments
Share


@MrGoonai
Follow
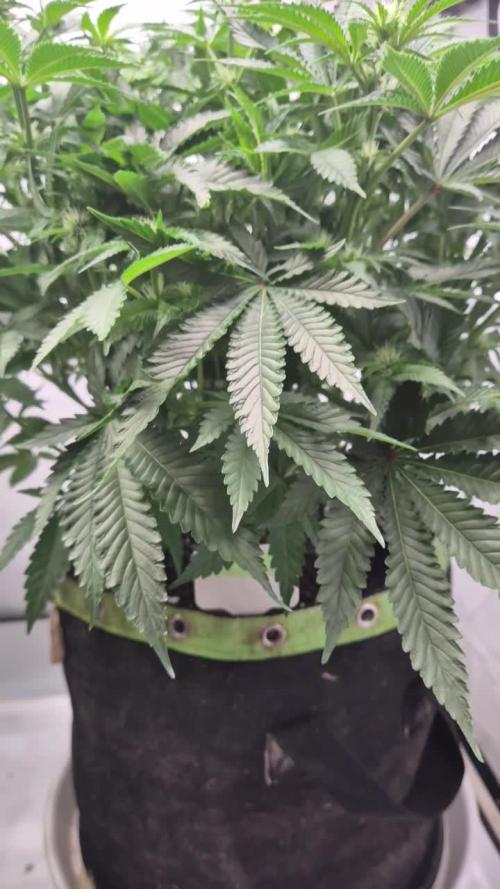
11/21/24 Short facts:
- Watered: 1 x 1.0L, 1 x 1.5L, 1 x 1.5L, 1 x 1.75L — 5.75L
- VPD @ 1.4 — raised by 0.1
- Light @ 80% ~700 to 1050 PPFD
- BioBizz Bio-Bloom increased to 3ml/L
- BioBizz Bio-Grow increased to 3ml/L
- Getting colder! At night between 18 to 19°C
---------------------------------------------------------------------------------
There isn’t much to report this week. She’s doing fine, but she might need a little more CalMag and nitrogen. So I’m giving her some extra CalMag and a small amount of bonemeal.
Since the weather is getting quite cold for the region - and we’ve already had a bit of snow - the cellar where my grow tent is set up is cooling down, with nighttime temperatures dropping to 18–19°C. Therefore, I’ve ordered some heat mats, which should arrive tomorrow. I’m aiming to stabilize the root temperature at around 22°C consistently, so the nights won’t be too cold anymore. I’ll go into more detail in next week’s update.

Likes
Comments
Share

@Borberad
Follow
Blütewoche 3 D
Die Blüte ist in vollem Gange! Die Pflanze streckt sich überhaupt nicht, als hätte sie verpasst das die Tage nur noch 12h lang sind. Jedoch entwickelt sie Blütenstände. Der DLI wurde sukzessive auf 40-45 angehoben. Der Düngeplan bleibt unverändert.
* Zustand der Pflanze: Kein Blütestretch, erste Blütenstände wachsen.
* Wichtige Ereignisse: Anhebung des DLI.
* Düngung & Messwerte:
* Gießwasser: pH ca. 6,3. Leitwert 1,4 bis 2 S.
* Drain: Wir stellen sicher, dass der pH-Wert nicht unter 5,5 und nicht über 6,8 liegt und der Leitwert die +/- 500 S Abweichung einhält.

Likes
11
Share


@Fibro_Witch
Follow
I've come to the conclusion that I'm dealing with an Iron issue with this one. Giving it more Calcium in the lime water probably wasn't the best idea, though I thought it would help stabilize the PH. Hard to tell if it's an excess or deficiency. I figured it would be an excess since we have a high amount of iron in our water. So, I think my best course of action is flushing with some sledgehammer first of all. That's what seems to be the recommended course of action. Then we can top dress with some Coast of Maine 5-2-4 for a good round amount of nutrition and hopefully that will help it out of it's funk so it can recover before it's too late😳.


Likes
3
Share


@FarithAriasFajardo
Follow
Bueno, así terminamos esta primera semana de flora. Muy feliz con ambas plantas. Muy fuertes. Cargado de nuevas enseñanzas y cada vez más ansioso de llegar a la cosecha. Aunque aún falta la mitad del proceso y la en parte la más difícil por temas de humedad ya que ha estado lloviendo mucho en mi ciudad y he tenido picos nocturnos de 85% aunque en parte es normal ya que estás dos primeras semanas con el corte de bajos y chiquitaje que no producirá nada ellas transpiran un poco más. Esperemos que esta semana se nivele un poco o en últimas tendré que conseguir el deshumidificador para las últimas semanas y pues nada más que agregar. Gracias por llegar hasta aquí nos veremos en la próxima semana antes de empezar a dar engorde para estos cogollos!


Likes
10
Share


@Cr4zyElite
Follow
Second Week / 15. - 22.05.24
🌿 Week 2 of my grow and my little green friends are thriving! 🚀 Strong leaf growth this week, just sticking to watering with plain water as it's still early days—no nutrients added yet. 🚫💧
Everything's running smoothly and the autos are showing promising vigor. Loving this journey so far, fingers crossed for more lush growth ahead! 🤞🌱

Likes
4
Share


@Creme_De_La_Creme
Follow
week 4 resumes in a lot of leaf tucking and explosion growth, large fan leaves everywhere !
no stress at all, just letting her be

Likes
33
Share


@GoldenArrow
Follow
Son 2 hafta civarına girdik someklerin en cok şişiceği dönemi gozlemleyecegiz .

Processing
Likes
3
Share


@Tryhard1988
Follow
Uploaded a video of all my strains together she in the left back corner and did a separate video of her by her self this is my favourite smelling plants she's phenomenal she really is

Likes
15
Share


@Ctsbestsmoke
Follow
This week has been a tough week as my son got into a bad accident so I wasn’t able to be home with the plants. I was away in the hospital for five days. I must say the one time I wasn’t home the system failed me by not draining after one of the feeding. In which caused my plants to get a little bit of a deficiency and bite burn as well. So I was very disappointed in that. Other then that they kept growing at light speed and the topped one is like oooooo watch me watch me and just showing off lol 😆! I don’t have many pictures from my phone only from my camera in the tent. So not the best quality but it’s something right? Well that’s it for now growmies wish everyone a great week and be safe and hold your loved ones as close as possible!!!!
Likes
11
Share


@Mo_Powers
Follow
the weather in germany is still totally changeable. temperatures from 10 degrees at night to 30 degrees during the day. and lots of rain. she is doing really well and you can see that she is made for this weather. 💪😃 i stopped LST and let it grow as it likes.
Likes
14
Share


@ApothecAries
Follow
I used half the recommended dose of Indo products for each plant through this grow. The monkey juice is half recommended making it every week rather than full dose every two. The sticky bandit was fed with it every week at half dose till later on
Likes
8
Share

@Organic473
Follow
Transferred her to 1 gallon part I’m going to veg her for a few more weeks then transfer her to 5 gallon then possibly pollinate.


Likes
39
Share


@MOSS_FIGURE
Follow
Easy for grow, If you haven't tried this strain. You should hurry and buy the seeds.
A link for buy 👉🏻( https://2fast4buds.com/ )
Likes
16
Share


@Albeginner420
Follow
The gelato Is the strongest in the garden, She handled the transplant very well. I put her for flower under the lumatek attis 300W. I defoliated a bit to let the canopy spread, awesome structure. By now i use only water with adjusted pH because i put the organic pellet from RQS in the soil of the new fabric pot.
Likes
15
Share


@B4nkz
Follow
As you can see today I heavily defoliated the plant and adjusted the ties to gave her the desired shape.
I‘m watering every 3 days
Likes
6
Share


@NewbieLearner
Follow
Amazing Colours! As you can see the colours on this plant at the end of its run are absolutely amazing. The buds didnt out as dense as I had hoped but I think thats just this pheno and we are busy hunting a denser pheno atm. what a great strain to grow though. no problems during the cycle of the plant and the colours make it so rewarding to grow! I would definitely recommend this strain to people who like fruity and colourful plants.
Barneys never disappoints really;)

Likes
31
Share


@JuicyFruit
Follow
Day 70 - 01/12/19
This is going to be a lot bigger than my last harvests :) the colas are getting bigger each day and even the side colas are bigger than my last plants main cola.
Smell is still weak/normal with that lavender/weed concoction :) hoping it gets pretty strong in the next couple of weeks!
Plant hasnt gotten any taller as its finished its stretch. all thats left now is watering and waiting :) this beauty should be ready to chop down just before christmas. might have some buds dried by christmas day ahah.
Main cola refuses to snap even after being bumped off the grow lamp etc. rhizotonic is definitely doing its job at strengthening stems.
I added a few photos to show progress from last week. really excited for this one :) hopefully the buds will be much more dense and tighter as i will give this strain all the time it needs. ive also been watering using the full 1.8L can. the plant is drinking this and drying out in the space of 24 hours. im definitely going to give it as much water and nutes as it wants lol.
Same day update:
Was taking some pictures to show off LST on my other diary and they just looked great. my quick one is towering over the other diarys plant and the colas look beautiful! i posted the pictures on this week also. take a look!
Day 75 - 06/12/19
Most fan leaves are yellowing and crispy now so im assuming its near the end. im going to check the trichomes in the morning to see whats up :)
chopped a small bit of bud from the top of the main cola and smoked it. nice little stoned high from it :)
Il probably start flushing in a few days time :) plant should definitely be ready for a week 12 harvest! i get more and more excited for the harvest of every plant i grow. im learning and improving every time.
Day 76 - 07/12/19
Quick One turned into a Fat One compared to 6 days ago. im gonna start flushing tomorrow and try to harvest around the start of week 12. a nice smell of lavender and colas are thick and sticky. a definite improvement over my last diary!
Keep on growing and check out my other diaries if you get a chance.
Processing
Likes
8
Share


@eldruida_lamota
Follow
Buenas noches familia, de nuevo actualizamos el diario, y acabamos la cuarta semana de floración, vaya brazos laterales que están tirando, se van a poner hermosas, se las ve sanas y vigorosas, nota mucho la forma sativa de sus hojas así que veremos lo que tardan en florecer.
Ph controlado a 6,5 y humedad por debajo de 45% not bad las condiciones temperaturas mínimas de 20 y maximas de 27,5 Grados.
Al atar las puntas los brazos tendieron a ir a la luz y gracias a eso la planta está tomando la forma de la esquina.
