The Grow Awards 2026 🏆
Likes
Comments
Share
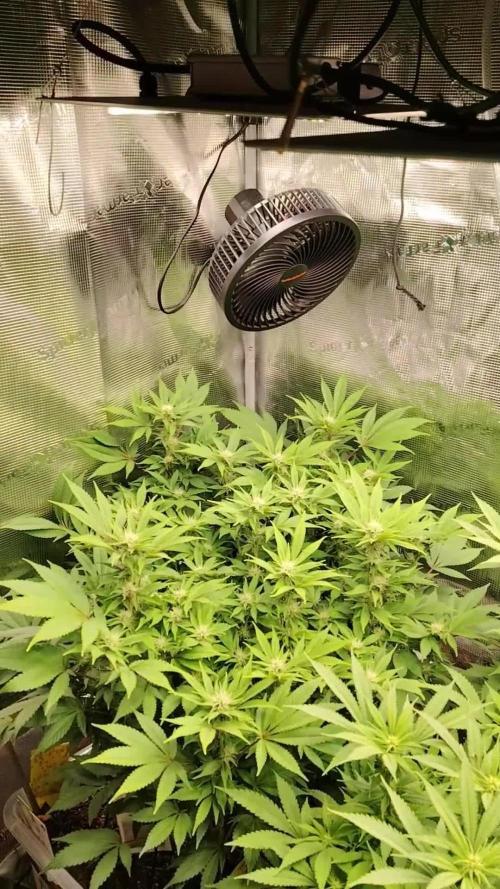
So end up losing the first set (guess that's how you know it alive n real) never the less week was great...will do some transplanting nxt week also wanna get some more gelato cuts to get the numbers up but will see how that
Likes
5
Share
@AustinRon
Follow
TH 1Q2025 - Week 4 - Bolt I 
(ON Haze X Original Haze) X Northern Lights #2 “Todd’s Haze” Objective - 8 Female Plants, Topped ONCE @ Flip, 12” when topped - Modified Sea of Green Seeds Wet: 1139PM, 28.2.2025 Germinated: 2.3.2025 Flip: 21.3.2025 Harvest: 77 Days, DATE: 6.6.2025 _________________________________________ 
Weeks Summary: - Photos indicate we’ve been overdriving our plants. Lime - Yellow Green, Stressed lowers. NOT Relaxed. - Tue - EOW We’ll run moderate light, Low-Moderate Feed (EC: 1.1) __ Fri Mar 28, 2025 TH 1Q25 8:B:1:1 All plants have lifted, with minor praying at least.  Applied Remaining Gallon of Root Steering solution. TODAY we switch to Rooted Leaf Medium @ 1.3 mS/cm. At this point the Coco should be WELL BUFFERED with CalMag - Reducing Calcium to normal level, we should be able to run w/ NORMAL Calcium levels, no boots. We’ll see We need - more nitrogen evident in the plants - to get from 351 - 750 µMol/m2/s - To ramp EC from 1.2 - 1.6 When the girls are receptive . . . __ Sat Mar 29, 2025 TH 1Q25 9:B:1:2  PRE-CUT Foliar of MOMs (15 Min before taking Cuts): [ 1, pt] - Cal Mag Fuel: [ 2.5, ml] - Lush Green: [ 0.625, ml] - Resin Bloom: [ 2.5, ml] Wrap Label below Top Node Top to Node 3, Cut plunged in water - [x] 8 Cuts, “Todd’s Haze” - [x] 2 Cuts, Lemon Jeffery Dip Tray - Rooting Powder, Aloe Gel - Top + 2 Nodes Cuts to Rooting Cubes - Cut 45° just below 2nd Node - Gently Abrade cuticle of stem below 2nd Node - Dip END in - Rooting Powder - Beauveria Bassiana - Fresh Aloe Vera Gel - Afix IN Prepped Rooting Cube - 1/4” from BOTTOM NOT THROUGH - Place in Rooting Tray, Cover “Cut Foliar Solution” When All cuts in Dome, Foliar (1 pt) w/ - PCAL 1660: [ .25, g] - KelPak: [ 1, ml] - CalMag Fuel: [ 1, ml] # Acidification of PCAL 1660 - Photosynthesis Plus: [ .75, ml] DAILY UNTIL ROOTED - - [x] Verify Rooting Cubes are adequately hydrated - [x] Light Foliar with Cut Solution Take Cuts WHEN All Phenos are WELL into 6 Nodes - When ALL Cultivars have At Least 6 Nodes: - Top to 3 - Use Crown as Cut for Labeled Pheno - [x] Prep Cut Dome - [x] Pull Seedling Mat (78°F) for use UNDER Cut Dome - [x] Rooting Prep - [x] Rooting Powder - [x] Beauveria Bassiana - [x] FRESH Aloe Vera Gel - [x] Root Riot Cubes MOISTENED / NOT WET Cut Spray Solution - [x] KelPak: [ 4, ml, gal] - [x] PCAL1660, [ 2, g, gal] - [x] Photosynthesis Plus, [ 6, ml, gal] - [x] Check All Pots for Emergent Roots Once we’ve roots at EACH pot - Switch to Normal Fertigation . . . Fertigation: 1 Gal, EC: 1.2-3 - [x] Primer A&B: [ 5, ml] - [x] CalMag Fuel: [ 2.5, ml] - [x] Silica Skin: [ 2.5, ml] - [x] Lush Green: [ 2, ml] - [x] Root Anchor: [ 2, ml] - [x] Peak Bloom: [ 2, ml] - [x] Photosynthesis Plus: [ 6, ml]  __ Sun Mar 30, 2025 TH 1Q25 10:B:1:3 Fertigation: 1 Gal, EC: 1.2-3 - [x] Primer A&B: [ 5, ml] - [x] CalMag Fuel: [ 2.5, ml] - [x] Silica Skin: [ 2.5, ml] - [x] Lush Green: [ 2, ml] - [x] Root Anchor: [ 2, ml] - [x] Peak Bloom: [ 2, ml] - [x] Photosynthesis Plus: [ 6, ml] - [x] TM-7 (µNutrients): [ 0.5, tsp] # Teabag Style Infusion  __ Mon Mar 31, 2025 TH 1Q25 11:B:1:4 Fertigation: 1 Gal, EC: 1.3 - [x] Primer A&B: [ 5, ml] - [x] CalMag Fuel: [ 2.5, ml] - [x] Silica Skin: [ 2.5, ml] - [x] Lush Green: [ 2, ml] - [x] Root Anchor: [ 2, ml] - [x] Peak Bloom: [ 2, ml] - [x] Photosynthesis Plus: [ 6, ml] - [x] Quillaja 60 Powder: [scant] IF Initial appearance at Lights on doesn’t suggest “Relaxed, supple,” we’ll run @ EC: 1.1 Until resolved . . . __ Tue Apr 1, 2025 TH 1Q25 12:B:1:5 We’re Running Lowered Light. And reducing EC to 1.1 until we’ve plants that seem REALLY HAPPY. Fertigation: 1 Gal, EC: 1.1 - [x] Primer A&B: [ 5, ml] - [x] CalMag Fuel: [ 3.0, ml] - [x] Silica Skin: [ 2, ml] - [x] Lush Green: [ 2, ml] - [x] Root Anchor: [ 2, ml] - [x] Peak Bloom: [ 2, ml] - [x] Photosynthesis Plus: [ 6, ml] - [x] TM-7: [ 0.5, g] - [x] Quillaja 60 Powder: [scant] - [ ]  __ Wed Apr 2, 2025 TH 1Q25 13:B:1:6 EC: 1.1 LightIntensity: [ 400, µMol/m2/s] We only watered 220 / plant, about half of what we’ve been delivering. Foliar: # 1 pt Spray Bottle @ Lights ON - [x] Solar Rain: [ 2.5, ml] - [x] Silica Skin: [ 2.5, ml] - [x] Photosynthesis Plus: [ 1.5, ml] - [x] Quillaja 60 Powder: [scant] __ Thu Apr 3, 2025 TH 1Q25 14:B:1:7 EC: 1.3 LightIntensity: [ 401, µMol/m2/s]. # Staying low, waiting for plants to resolve Fertigation: 1 Gal, EC: 1.3 - [x] Primer A&B: [ 5, ml] - [x] CalMag Fuel: [ 2, ml] - [x] Silica Skin: [ 2, ml] - [x] Lush Green: [ 2, ml] - [x] Root Anchor: [ 2, ml] - [x] Peak Bloom: [ 2, ml] - [x] Kelpak: [ 4, ml] - [x] Photosynthesis Plus: [ 6, ml] - [x] Quillaja 60 Powder: [scant]
Processing
Likes
2
Share
@m1ndofAC
Follow
Started off week 2 of flowering on 11/19. All of the ladies look good with the Tangerine Dream being the only set of clones to start showing bud sights and not just pre-flowering. Did a significant amount of clipping and clipped most of the fan leaves on the main colas of my ladies and side branches too. I also began playing classical music for them! True to it’s genetics my Tangerine Dreams are putting off numerous side branches with side branches coming off those branches! Since flowering my Cotton Candy has grown the most. Before flowering it was just barely half the height of my TDs and now they’re taller! As for the Chronic Thunder it’s always been the tallest but in flowering it’s focus has all been on the side branches without me even topping it.
Likes
23
Share
Como estamos familia, a día de hoy, viernes, llevamos exactamente 7 días en la fase de floración y todas ellas están marcadas por su sexo. Todo va sobre ruedas, tenemos mínimas de 20,5 y maximas de 28,5 grados. la humedad no supera nunca el 60%. Altura mínima lemon kush 25cm. Altura maxima northern light xl 42cm. •las power plant xl Han pegado un estirón serio, están empezando a ensanchar bastante. •una marea verde desde semilla, con tan solo 5 semanas de crecimiento y un solo trasplante desde que se germinó, para controlar un mal crecimiento.
Likes
111
Share
@DreamIT
Follow
🍋🥧🏎️ LEMON PIE AUTO BY FAST BUDS 🏎️🥧🍋 🍋 6.5 Just a few contest memes to start the week, yeah! 🍋 7.5 🍋 8.5 🍋 9.5 Go with the new format! what a great technology 🤣🤣🦄 🍋 10.5 🍋 11.5 🍋 12.5 ____________________________________________________________________________________ ❓ Are you new to the world of the cultivation and don't know where to safely buy your seeds? 😮 Fast Buds is literally shipped all over the world, and totally anonymously !!! check out their amazing genetics !! ✅http: //bit.ly/FastBudsgood _________________________________________________________________ 👀 Are you looking for a good lamp to start with? 👀 🌞Viparspectra has something more than the others, take a look at their site. ✅ http://bit.ly/pro-seriesproductspro-series-p1500 ⏩Use "GDVIP" for an extra discount, or "DREAMIT" for an extra 5% discount💯 👀Search for it on Amazon ✅http://bit.ly/ViparSpectraXS1000Amazon ⏩ Use the code - lt10gdvip - for an extra 10% discount 👀 Watch my ViparSpectra XS1000 unboxing on YouTube, leave a like and write to the channel 🦄 ✅http://bit.ly/UnboxingViparSpectraDreamIT __________________________________________________________________________________ 📷🥇 Follow the best photos on Instagram 🥇📷 https://www.instagram.com/dreamit420/ 🔻🔻Leave a comment with your opinions if you pass by here🔻🔻 🤟🤗💚Thanks and Enjoy growth 💚🤗🤟
Likes
40
Share
@BudXs
Follow
Explosive growth this week. They are ready for the flip and will be going into 12/12 in two days This strain is by far and away the fastest and most heavy veg growth in the garden. Seeing some of the harvests on here (AstroBoy) makes me drool. Big thanks to OSS for the tester beans
Likes
148
Share
Boom! Touchdown! I let her dry for 13 days before the trim. The humidity in the grow tent was maybe a bit lower than what I usually prefer, but I wanted to be extra cautious against budrot in the other plant drying in the same tent. It was a breeze to trim her and the final result was 84.4 grams of pure flower with no larf at all. In fact, I didn't even bother keeping the trim as there wasn't all that much of it.
Likes
5
Share
@Libanese
Follow
After the last pruning the plants responded well, the space is already at the limit, I decided to start flowering. The Blackberry seems healthy finally, I just have to select the branches to keep. The Skunk is the one that has expanded the most
Likes
1
Share
This looks ready for harvest, flushing started 10 days ago, smell is so strong especially during the night, buds looks dense , even we still at the 9th week but this monster is ready for harvest.
Likes
7
Share
Day 30: Let grow, no water no feed. Thick stalks, RapidStart making a HUGE difference. Baby + Speed looking good for a baby. Big + Speed taking LST well. Tent Temp: 77º RH: 53º PPFD: 700 VPD: .67 kPa Day 31: Both + Speeds looking really good. Excited to see how they stretch in the coming weeks. Fed 4ml FloraMicro, 4ml FloraGro, 6ml FloraBloom, 2ml CALiMAGic, 1ml RapidStart, 2.5ml ArmorSi, 1ml Floralicious Plus, 1ml Liquid KoolBloom and 5ml FloraNectar. Solution Temp 70º PH: 5.8 PPM: 950 Tent Temp: 77º RH: 52% PPFD: 750 VPD: .66kPa Day 32: Same as yesterday. Good. Tent Temp: 77º RH: 51% PPFD: 800 VPD: .67kPa Day 33: Let grow, no water no feed. Tent Temp: 77º RH: 52% PPFD: 750 VPD: .67kPa Day 34: Both + Speeds doing well. May perform some slight defoliation on the larger + Speed in the next few days. Leaf tucking for now. Removed small bud sights and lower fan leaves from smaller + Speed. Watered .5gl RO water PH: 6.1 Tent Temp: 75º RH: 55% PPFD: 750-800 VPD: .58 kPa Day 35: Looking healthy and happy. Starting to get a slight skunky smell in the tent. Tent Temp: 75º RH: 55% PPFD: 750-800 VPD: .58 kPa Day 36: Ready for feed again. Cutting out FloraMicro on this feed, Cosmo and + Speed(s) showing slight signs of nitrogen toxicity. Fed 4ml FloraGro, 6ml FloraBloom, 2mg CALiMAGic, 1ml Floralicious Plus, 2.5ml Armor Si, 1ml RapidStart, 1ml Liquid KoolBloom and 10ml FloraNectar PH: 6.1 Solution Temp: 71º PPM: 925 Tent Temp: 76º RH: 52% PPFD: 750-800 VPD: .67 kPa
Likes
39
Share
@Mastr
Follow
Day 50 and they are so healthy and bushy I feed them.with 4ml bloom 4ml heaven 4m acti vera 4ml top max Been done finally defoliation yesterday guy this time I cut all lower branches and just leave top branches just want see what different coz I been speaking to someone with experience he told me you need do defoliation very very aggressive I know you get low yield but its top shelf bud you get let see its work or no Day 54 and she is in weeks 5 flowering but still bud wont get fatten up but I know mulost sativa start fatten up week 5 to 7 in flowering let see
Likes
283
Share
D56 - Today is the first day in the eighth week of veg for #2 and the seventh for #1. This will be the final week of veg for the girl as I'm ready to flip in a few days. I did the last heavy defoliation by removing most leaves and branches except the tops. I aim to get the girl to put all the flowering energy into the tops and hopefully result in big colas without popcorn nugs or larf. I did keep a few clones from each girl, though. After defoliation, I sprayed down the girl with my chili tincture to combat the thrips. I took great care to hit all leaves on both sides. This tincture is harsh to work with, and I was coughing like mad, and I damn near filled my N95 mask with snot (yummy!). After all this snot, drool and coughing, I just wanted to be done for the day, so I stressed checking out how my new scrog frame fits. The frame, of course, fell and broke one of the tops clean off. Ugh! I tried to fix it with some tape but the break was in a weird spot and it didn't work. Not a massive deal as it was a corner top, and there will be 15 other tops. Still annoying, but hey, it's my damn fault for stressing. D57 - The girls have bounced back nicely from their heavy defoliation. I just snapped a couple of pics as I hung a blue sticky trap in the tent. I always have regular yellow sticky traps in my tent to monitor pest pressure. However, thrips aren't that interested in yellow but are attracted to blue. D59 - I flipped my lights today from the veg mode to the flower-inducing mode. I have no idea how much these girls will stretch, so better sooner than later. Also, I finally got around to start training one of the tops toward the middle of each girl. (About damn time!) I've thought about it for quite a while but have been ignoring it. The lights are flipped now, so we are almost out of veg time. Now or never! D62 - The girls look healthy, and I can't see any thrip damage on the newer leaves. Fingers crossed that the buggers are gone! I gave each girl around 2.5-liters of water @ pH 6.3.
Likes
5
Share
Defoliated a bit more, feeding sugar royal and green sensation. The smell is really coming through now.
Likes
97
Share
@AsNoriu
Follow
Day 99. Plants are great !!! SUPER Frosty, smelly and bulking up !!! Great strain - no doubts !!! All feeds done, only water for her already last two waterings. Think 10-14 days left. Still take off few leaves here and there to expose hidden buds and all goes very smooth ! Happy Growing !!!
Likes
40
Share
@Peeman
Follow
Trainwreck #1 suffered from bud rot and had to be thrown out. That was unfortunate considering the original bud structure was spectacular. Oct. 24 Trainwreck #2 was trimmed & jarred. Final weight was 4 ounces of smokable bud and 10 ounces for Ice water hash. Thanks for stopping by See ya next season Stay safe
Likes
54
Share
After her intitial trimming , i could see the decent amount of heavy looking buds for the 1st time . I am amazed at her feel and smell too. She has a few days left to dry i think and i know a few weeks in a jar would leave her a champion grow. I am impressed as hell with the strain and it will be in my must do again list for sure. Cannot wait to smoke her delights. I have a sample bud to play with ( in pics) last sample nearly knocked me over and that was a lot earlier in the flowering cycle too !!!.
Likes
47
Share
@GrowGuy97
Follow
Day 63 - Niagara got cut down today, she has a very strong smell & right buds can’t waif to see how she smokes! Will be doing a harvest post once she is dry! I also decided to let the Rock Machine & Doctors choice #1 go another week or two
Likes
16
Share
Germinating 3 Purple Kush Feminised seeds. filtered water in glass, also add 3/5 drops of hydrogen peroxide, stir water well before adding the seeds, and stir again after adding seeds to water. I will leave it for 24 hours The seed coat softens by soaking your seeds in a hydrogen peroxide solution, allowing the seeds to absorb more oxygen. This results in increased germination speed Hopefully all 3 seeds will germinate by tomorrow? Seeds popped today:-)transferred 3 Purple Kush seeds in to small pots 10/09/23 3 Purple Kush seeds, 1 seed in each small pot. Each Pot is Half filled with lite mix compost and Half filled with Vermiculite , watered planting medium before sowing seeds 2cm deep in planting medium. The seed will push through the vermiculite easley with very little effort, in effect increasing higher successful germination rate, the compost will offer the first tap root an immediate lite nutrient supply. Placed 3 pots on top of a Propagation heating mat for correct germination temperature, position in a shaded place, and keep out of direct sunlight. This may seem like a lot of effort? and it is, but it will be highly beneficial by increasing a higher germination rate and higher amount of seeds will germinate from using this method :-) especially if your seeds were expensive. 11/09/23 no sprouts above the vermiculite yet, i will check it again tomorrow. Today 2 Purple Kush Germinate and rise above the vermiculite 3 days after sowing. Purple Kush is going ok, it could be growing faster, unfortunately i can't upload new photos because there is a problem in the GD system, they are doing there best to fix this problem as soon as possible. GMO Cookies where started 16/09/23 filtered water in glass, also add 3/5 drops of hydrogen peroxide, stir water well before adding the seeds, and stir again after adding seeds to water. 3 seeds sprouted, but only 2 survived, it become to hot and one GMO Cookie sprout died. I have now started another strain (Party Monster) 19/09/23 filtered water in glass, also add 3/5 drops of hydrogen peroxide, stir water well before adding the seeds, and stir again after adding seeds to water. I will leave it for 24 hours, 5 seeds of Party Monster have sprouted and are under the same 100W LED grow light. GMO Cookies have all come up above the vermiculite and are now positioned under a 100W LED, there is a small clip on fan blowing and circulating the air. This is my second attempt to grow GMO Cookies from 3 feminised seeds, i messed up on the first 3 seeds, i put them under a 250 Watt LED and it fried them, my folt. Growing from germinating seeds is a very delicate situation, your environment temperature needs good control. 2 Party Monster seedlings are looking good, coming along well under the 100W LED light. 3 GMO Cookies are looking good also under the 100W LED light. Plus i have now started soaking in glass of water 03/10/23, 5 Strawberry Yields fem seeds aka Strawberry Fields. filtered water in glass, also add 3/5 drops of hydrogen peroxide, stir water well before adding the seeds, and stir again after adding seeds to water. I will leave it for 24 hours. The seed coat softens by soaking your seeds in a hydrogen peroxide solution, allowing the seeds to absorb more oxygen. This results in increased germination speed Hopefully all 5 seeds will germinate by tomorrow? The 3 GMO Cookies fem seedlings are coming along well, keeping them under the hood of a propagator, i have many mixed seedlings under the same hood, to keep seedlings protected from this relentless Spanish heat. 5 Strawberry Yields fem seeds have all sprouted and are above vermiculite, keeping them under the hood of a propagator, i have many mixed seedlings under the same hood, to keep seedlings protected from this relentless Spanish heat. Also positioned also under the 100W LED light, indoor temp 29 degrees humidity 65%, still to hot for seedlings to be directly under lights due to high temp in the room. 3 Strawberry Yields sprouts are doing well, gave 2 seedlings away, no space for all 5 plants, coming along well under the 100W LED light. 27 degrees humidity 55% good growing conditions Super Lemon Haze I began soaking 13 feminised seeds SLH since 27/10, after 24 hours soaking 11 seeds opened in filtered water in glass, also added 3/5 drops of hydrogen peroxide, stir water well before adding the seeds, and stir again after adding seeds to water. The seed coat softens by soaking your seeds in a hydrogen peroxide solution, allowing the seeds to absorb more oxygen. This results in increased germination speed! 1 Super Lemon Haze fem seed planted in a 2 ltr pot 28/10, this is the only plant i will keep for flowering. The Pot is Half filled with lite mix compost, and the rest of the pot is half filled to the top with Vermiculite , watered planting medium thoroughly soaking it before sowing seeds 2cm deep in vermiculite. The seed will push through the vermiculite easley with very little effort, in effect encouraging a higher successful germination rate, the compost will offer the first tap root an immediate lite nutrient supply. And i planted the 11 remaining popped SLH seeds in the brown round pot, this is just to see how many will rise above the vermiculite from the 13 SLH fems seeds soaked on 27/10. I will give these away to a friend. Both pots have been placed on a propagating heating mat for consistent and ideal germination temperature until all seeds have risen above the vermiculite. Once my 1 fem seed has germinated! i will cover the pot with a transparen plastic bag and place the pot 20cm below a 100W LED light. Super Lemon Haze feminised seeds Seeds sourced from Satdica Bulk Seeds Soaked seeds 27/10 planted up on 28/10, 12 out of 13 seeds have transformed in to 12 healthy little seedlings. 11 seedlings will be given away to a friend, and i will keep the one seedling you see already planted up in a black 2 ltr size pot. Now positioned under my 100W LED light, distance 15cm above seedlings. Light cycle 24 hours. Keeping them covered with propagating hood for a few days longer to allow seedlings to become better established before removing the hood. The vents on hood are fully open to allow seedling to slowly become accustomed to the outside vege room space. Gelato Cookies 3 Feminised seeds Satdica Bulk Seeds Popped 3 Gelato Cookies Feminised seeds today 06/11 filtered water or bottled water in a glass, also add 3/5 drops of hydrogen peroxide, stir water well before adding the seeds, and stir again after adding seeds to water. I will leave it for 24 hours The seed coat softens by soaking your seeds in a hydrogen peroxide solution, allowing the seeds to absorb more oxygen. After placing on propagating heating mat for 24 hours. This resulted in increased germination speed! and today i can see little white taproot tails protruding out from the seed husk 👌 3 Gelato Cookies seeds, 1 seed in each small pot. Each Pot is Half filled with lite mix compost and Half filled with Vermiculite , watered planting medium before sowing seeds 2cm deep in planting medium. Spoon your seeds into it's planting medium, do not touch with fingers, spoon it in with half spoon of water and a seed, place the seed in the center 2cm deep in the planting medium, water it in again very lightly to help the seed settle into a comfortable position before leaving it to rest covered on your heating mat. The seed will push through the vermiculite easley with very little effort, in effect increasing higher successful germination rate, the compost will offer the first tap root an immediate lite nutrient supply. Watered and fed them in with Plagron Terra Grow 5ml to a ltr of water, i may have added too much, perhaps 2/3ml to a ltr of water would have been enough? placed 3 pots on top of a Propagation heating mat for correct germination temperature, position in a shaded place, and keep out of direct sunlight. This may seem like a lot of effort? and it is, but it will be highly beneficial by increasing a higher germination rate and higher amount of seeds will germinate from using this method :) especially if your seeds were expensive. 3 Gelato Cookies have come through the vermiculite, 09/11 and now they are positioned under my 100W LED grow light. I didn't expect all 3 seeds to pop, because 1 seed looked like perhaps not viable, because i only keep the bad looking seeds for myself and keep the best seeds for customers. I am keeping them covered with transparent plastic bags for a few days to protect them in case it's to hot in the 24/7 grow room which is 24 degrees, this is probably an ok temp for them? but i'd rather not run the risk. Romulan Feminised seeds Germinating 3 Romulan Feminised seeds 26/11 filtered water in glass, also add 3/5 drops of hydrogen peroxide, stir water well before adding the seeds, and stir again after adding seeds to water. I will leave it for 24 hours The seed coat softens by soaking your seeds in a hydrogen peroxide solution, allowing the seeds to absorb more oxygen. This results in increased germination speed Hopefully all 3 seeds will germinate by tomorrow? 27/11