The Grow Awards 2026 🏆 


Processing
Likes
19
Share
@Fire_Farmer
Follow
I'm like 5 days late with this update so I have had to pin videos that I took the same week while I was communicating with TRYHARD so ignore any dialogue that's out of context they aren't diary logs they are simply correspondence between myself And TRY, oh and sorry about my language I'm common as muck me.
The pictures are just random pics I took that week as oppose to my usual more organised method but hey ho I'll do a more tidy job next week.
The week went swimmingly barring some nitrogen deff on the lowers which I initially put down to the hot weather drying the pots too quickly and causing nute lockout with the salt buildup so I flushed then gave them a nice feed after they dried the pot at which point I noticed the most heavily afflicted by the N deff were also the quickest drinkers and had lower EC on the runoff so I have been giving them a slightly stronger feed than the others and it seems to have solved everything so I'm happy with that.
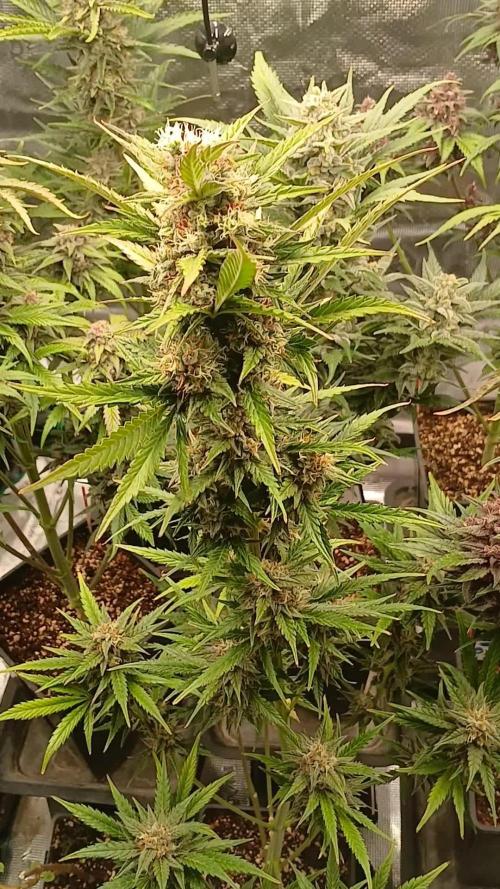
Bud development is nice, frost is nice, terps are through the roof right now.....
Zkittlez ones are really stinking of lime and candy bubblegum
Punch ones are stinking berry berry nice!
Grandpas Crush is smelling kinda hazey right now but I'm hoping the berries comes out of her too.
Little else to report really.
Thanks for reading
One Love 💚
Fire Farmer🔥👨🌾
Likes
9
Share
@TheGreenGroomer
Follow
Hello fellow growers,
I harvested my plant on Day 68 of the flowering stage. The buds are now hung up and drying in an environment with a relative humidity (RH) of 55-60% and temperatures ranging from 18°C to 21°C, I've set up two fans to keep the air moving gently around the drying space. Today marks Day 6 of drying, and I'm aiming for a nice, slow dry to preserve the quality of the buds, followed by a dry trim.
Reflecting on this grow, I can see areas where I could have improved, but considering it's my first time, I believe I've done a commendable job. There are quite a few larfy buds underneath, but the top buds, which were closest to the light, turned out great. I initially thought I had nailed the training techniques, but as soon as I flipped her into the flowering stage, she got out of control. This experience has taught me the importance of being even more disciplined with my training methods in future grows.
Overall, I'm thrilled with the outcome and have learned valuable lessons for my next run. Can't wait to see how these buds turn out after curing!
Wish me luck as I move into the final stages of this journey. Let's Grow!

Likes
24
Share
@BB_UK
Follow
Wow oh wow 🤩 to start I’ll say I’ve been very careful watching the feeds timing them almost perfectly! Also was a struggling week with humidity! Lucky I have my tricks to keep it down (no dehumidifier) 😊 I use air control 😉 (in the house) air control in the tent is perfect or next to perfect anyway! The aromas are continuously getting stronger and I am in for a treat! This time is my best time! It just shows! But every next time is my best time as I only get better at this!

Likes
9
Share


Processing
Likes
1
Share
@Mgn20xx
Follow
Start the week with nutrients and beastie blooms. End the week with semi flush. Repeat for a few more weeks


Likes
10
Share


Likes
19
Share
@eldruida_lamota
Follow
Bueno, empezamos por el final familia.
Gorilla girl, me parece una cepa BRU-TAL , ya partiendo de esa base, mi error, creo que e cometido , es poner estos ejemplares en macetas de 5L, que tonto... mínimo recomendado 7L y a ser posible 11L
Otro error fue no dejarlas una semana más. pero, escasez. (intentaremos curarla un par de semanas).
Cepa con flores muy compactas, hay bastante separación entre nudos pero compensa las flores de verdad.
Sabor muy dulzón a mi me recuerda a melón , es un pepino recomendado para amantes de la hierba que llevan tiempo en esto, un colocón muy fuerte, ahora mismo estoy bajo los efectos de esta vaina, aseguro que con cada frase, leo varias veces y detenidamente por que válgame.

Likes
11
Share
@Hix57
Follow
La 8e semaine avec les LSD 25 se déroule à merveille ! Elles ont complètement récupéré de l'excès d'azote et sont pratiquement prêtes.
D'ici deux jours, l'une d'entre elles sera prête à être récoltée après 48h d'obscurité. C'est fascinant de voir une plante passer de la graine à la récolte en seulement 56 jours, soit moins de 2 mois.
Cette rapidité laisse de la place pour démarrer une nouvelle culture et gagner deux semaines de plus.
Quant à l'autre plante, elle bénéficiera de deux semaines supplémentaires pour observer d'éventuelles différences de taille, d'effets ou d'arômes.
Pour magnifier les saveurs et les huiles des fleurs, je leur offre désormais des nutriments Final Part de Terra Aquatica.
J'ai hâte de voir le résultat de cette attention particulière ! 🌱
Likes
Comments
Share
@Chamed33
Follow
We at week 5 Flower and the buds are still pushing !! From week 1 to now I did not encounter any issues on the plant
Likes
116
Share
@GMSgrows
Follow
The Silver Widow is entering flowering now. Starting to stack up and pistols starting to show everywhere. She is one big bush and the odours coming off of her is amazing.
Received their first dose of Massive Bloom Formulation yesterday. Mixture fed was 400 ppm 0.8 ec of Massive Bloom Formulation, 400 ppm 0.8 ec of Floranova bloom, and 400 ppm of Floranova grow for a total of 1200 ppm 2.4 ec.
Thanks to all my friends who pop by and say hello, and thanks to Kannabia seeds and their reps for some great seeds.

Likes
9
Share
@Hypnogrow
Follow
Recovery week. Last week everything went to hell this week everything is looking up. Squanch Queen is turning into my favorite one of the bunch. She is super resilient and bounced back quickly, the Skywalker and Quarter Pounder are both going to finish early due to all the stresses and stunting early on in the grow. Squanch Queen looks to be going 9 to 10 weeks inspite of all the issues. Definitely a good strain from Night Owl to pick up if your a beginner, much more forgiving. I definitely want to try the Skywalker again with a better setup. Ph runoff is looking much much better.


Likes
35
Share
@SmokingTiki
Follow
- I didn't weight wet buds.
- The trichomes photos have been taken just before the harvest on buds all over the plant.
- The hash ball was a little less than 1cm diameter.
- Drying was made at 20°C and around 50% of humidity.
- Humidity in jar around 50% on the first day, temperature around 20°C.
Veg time : 53 days.
Flowering time : 68 days.
Total time from seed to harvest : 121 days.
Height : 120cm
Pot size : 26l


Likes
44
Share
@Cogollo_eu
Follow
**Encontrarás la traducción a español al final de la descripción**
From/Desde: 22/03/19 || To/Hasta: 28/03/19
From day/Desde día: 29 || To day/Hasta día: 35
You can find the Money Maker Diary here:
** Podéis encontrar el diario de las Money Maker aquí:**
https://growdiaries.com/diaries/25667-gorillamakingmoney-gorilla-vs-money-m
-----IMAGES & VIDEOS-----
Video 1:
Exactly the same video as 2 but accelerated +400% to fix it to 1 minute for instagram.
Video 2:
7 days (29~35) TimeLapse, 1 image each 60 secs @ 30 fps
Video 9:
An overview video not as awesome as it's music 😂💪
Video 10:
Myself working on the babies, lowering tops, topping & training.
Video 12:
Full working on the secondary Gorilla, twisting some branches, topping & training.
-----WEEK SUMMARY-----
Well, now i'm getting a bit scared as i adventured myself into Photoperiod, high training, full topping... in indoors at once. I feel that plants are going good, but i really don't know what am i doing, and if i'm doing well. Also i don't know how much time should i give them of vegetation stage, because i don't want to eternalize myself with this tent, so i'm planning to leave this upcoming 6th week and maybe the 7th of vegetation, but no more. Anyway they look pretty atm 😻. In video 10 the main-linning Gorilla suffered an accident as i grabbed the main left branch from a weak point and it has broken (sec 39 aprox.) so it has one less node than the right branch.
-----WATERING CALENDAR-----
24/03/19 - 1.000 ml with all week nutrients @ 0.9 E.C. PH5.8
*****ESPAÑOL*****
-----IMÁGENES & VÍDEOS-----
Vídeo 1:
TimeLapse, exactamente el mismo vídeo que el 2 pero acelerado a un poco más del 300% para ajustarlo a 1 minuto para Instagram.
Vídeo 2:
7 días (29~35) TimeLapse, 1 imagen cada 60 segundos @ 30 fps.
Vídeo 9:
Un vídeo general no tan increíble como la música de fondo 😂💪.
Video 10:
Trabajando en las pequeñas, rebajando las alturas, haciendo topping y entrenando.
Video 12:
Trabajando a pleno en la segunda Gorilla, girando algunas ramas, haciendo toppings y entrenándola.
-----SUMARIO SEMANAL-----
Bueno, ahora estoy empezando a estar asustado. Me he aventurado a probar con fotodependientes, entrenamiento fuerte y super topping, todo a la vez. Siento que las plantas van bien, pero realmente no se lo que estoy haciendo ni si lo estoy haciendo bien. También tengo dudas sobre cuanto tiempo más dejarlas en estado vegetativo ya que no me quiero eternizar con este armario, por lo que estoy planeando dejar esta sexta semana de crecimiento y quizás una séptima, pero no más. Aun así y con todo, las nenas se ven preciosas 😻. En el vídeo 10 sufro un accidente en la Gorila con main-linning ya que amarré el final del tallo principal izquierdo por un punto débil y este se partió (sec 39 aprox.), por lo que tiene un piso de topping de más en comparación con tallo derecho.
-----CALENDARIO DE RIEGO-----
24/03/19 - 1.000 ml con todos los nutrientes semanales @ 0.9 E.C. PH5.8


Likes
2
Share
@Tropical_Grow
Follow
Harvest time is approaching for the banana purple punch. GorillaZ and West Coast OG are asking for a little more time.
Time to get out the magnifying glass...
Processing
Likes
96
Share
@The_Projexx
Follow
Things are going very well for Obi#2 . She's come a very long way and shes sure showing her ability to endure this nub grower :P :P :) Over all her flowers are swelling up nicely no major signs of stresses or anything like that shes just growing and doing her thing . She smells very pungent I really enjoy the smell . I'm excited to see what the next few weeks are going to be like !
A special thank you goes out to all the people who stop by the diary ! You guys rock . A special thank you goes out to all my followers keep being kick ass guys !! I'd like to wish everyone a happy/merry what ever holiday you celebrate and may you new year be filled with love and joy !
-Happy Growing!
Likes
27
Share
@babyboo
Follow
The looks on this one are sexy! It also burns even.
Effects wise, first 15 mins you perceive a high cerebral rush that peaks at 30 mins. Makes you feel creative and with energy. Later on, the cerebral effect dissipates and leaves you feeling all giggly and relaxed in da body.
The smell is all about sweetness and gas with a funky grapey smell hugging and keeping those close.
Colors didn't showed much cause of the 24/0 light cycle but it ended up showing some purple hues during late bloom.
Overall this girl was so fn grateful with the treatment she received.
Likes
24
Share
@FlynnRyder
Follow
HOLY CANNOLI! seriously man these things won't give me a freaking break. the good news is that I think chalking my first journal up to a failure led me to flip sooner and dang are these ladies tall! I'm talking WNBA tall lol. Don't hate me but I had no choice with the room's size and learning from the mistakes last time this plant will be under this first SCRO for up to week 3 of flower lol. It gets too dang big otherwise and even though it may be dumb I thought it best to try and I ended up breaking a lot of limbs haha. I taped up some though and I figured this would be the best learning experience in the opposite direction to see just how rough I can be with Vegged plant being flipped. I'm also going to be on top of nutrients better and get that Canna PK in there before the top shooter, booster, and bud Xl. I also have the RH on lock a lot better with a bigger drain bucket for the dehumidifier so it can run continuously with so many plants. I also decided to have some fun and bring the SCROG out and work under the canopy to get something bigger. I do regret the way I overlapped a lot of colas in the corners but it can't be helped with their height. Wish me luck and yell at me yall lol. Also, does anyone have a good example of what a bud should really look like throughout flower. a pheno that matches mine really.