The Grow Awards 2026 🏆 


Likes
Comments
Share
@Barzenegger
Follow
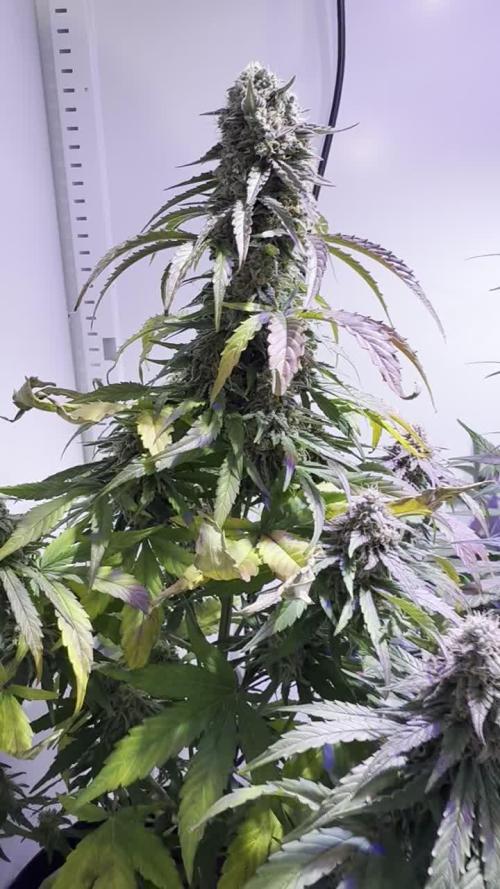
Removed the damaged leaves and topped 4 of the plants.
One of them is looking really light green/yellow-ish. That plant also has some weird growth, some deformed leaves and hardly any branching. The others are fine. Tried using some of my 12 years expired Canna Terra Vega.
Likes
11
Share
@CropHouseLew
Follow
Finally starting to bud, looking good so far with no deficiencies.
Think I might need to start feeding more, cos these ladies are slurping up the water quickly
Lets gooo

Likes
42
Share
@Saul_Silver_Grows
Follow
for my nutrients I have been giving 3.75 ml per gallon of fox farm grow big and 2.5 ml of fox farm tiger blood I feed them every time they need watering... I have not seen any burnt tips so they must be handling the nutes well. More and more preflowers are coming out. I am just going to say we are starting flowering this week, im guessing she will start flowering for sure by the end of this 5th week.


Likes
55
Share
@pifflestikkz
Follow
Day 85
26/07/24 Friday
Big feed today full 5L a little run offusimg de-chlorinated water pH 6.
So we are through her first transition week.
Starting to see sex pistils forming at end of last week.
Picture and video update ✌️💚
Day 88
29/07/24 Monday
Just de-chlorinated tap water pH 6 today, full 5L with just under a 1L run off.
Day 89
30/07/24 Tuesday
De-chlorinated tap water pH 6 today but I'm adding in Plagron Power Buds AND Plagron PK13-14 only 5ml each to 5ml water.
It says to use on every irrigation from early flower so here we go. If I start getting burns I'll cut out a few advanced nutrients extras and go again from there.
She is just ridiculous, robust, never stresses, healthy and just wants to throw arms out everywhere 🤣💚
Day 91
01/08/24 Thursday
End of week
Using de-chlorinated tap water pH 6 only this time.

Likes
Comments
Share
@Kannisho
Follow
C21 Nutrients is the #1 selling brand in Colombia, chosen by the most demanding growers, licensed companies, and those new to the world of home cultivation, achieving results very close to or equal to those of professionals!
Likes
2
Share
@Not_a_tutorial1990
Follow
She's doing great, recover well on each training. Struggling with tent rotation lol, so She's still in the veg tent, one week left in flower tent for current crop but I want change my lights on/off time so waiting on flower tent to be free..
Training has kept her relatively small though.
She topped herself 2 times after I topped her once. Only wanted 6tops currently have 8.. no complaints just worried about maintaining image through flower..
Happy growing everyone
Likes
Comments
Share
@BruWeed
Follow
Se encuentra perfectamente bien. En toda su etapa no tuvo ningún problema.
Los cocos ya se encuentran pesados y con muchos tricomas.
En estos dias estare publicando mas imagenes de como se encue

Likes
6
Share
@agustinnnv
Follow
Una planta criada en excelente condiciones desde el comienzo hasta el final de su ciclo. Nunca demostró carencias ni excesos y tuvo un buen armazón para el momento de empezar a cogollar. Aún así, no salió mucha cantidad pero no tengo ningún tipo de queja respecto a la calidad. Cogollos bañados en tricomas y con un pegue increíble. Excelente genética.

Likes
6
Share
@OSHkosh510
Follow
2 day of flipping to flower 2 gmo seed and 2 blueberry clones 1 jealous clone and 3 grap pie
Likes
81
Share
@UnorthadoxDude
Follow
Hey! Welcome to week 8! Karen is mid way through her flowering stretch. Please check back to last week as I update daily so the week is now complete. I count about 20 colas now.
Day 51: Have reconfigured the tent, see video. Karen is now 36cm and still stretching. Karen has more light now. Smell is still there hits you when you open the tent. Fertigated 2l.
Day 52: Height: 39cm. Karen's scent is heavenly. I have reconfigured again and installed some upgrades. Better reflector. Much bigger carbon filter. Increased airflow. Better config. More efficient pot layout. Karen is lovely.
I am grateful to her and for her, so I wrote her a little poem, I hope she liked it.
"Karen! Oh Karen! The phoenix of flowers,
Three lowly weeks she struggled in vain,
Shadowed and starved for five hundred hours,
He slowly wept to witness her pain.
Karen! Oh Karen! I P-H'd your showers,
and in the fourth week you started to gain,
Hallowed and hard you survived as you cowered,
I thought you meek, I was wrong once again.
Karen! Oh Karen! Forgave me my howlers.
She set a pace, a pace she maintained,
Now shes a girl at the peak of her powers,
And so I'm a geek, with buds on the brain."
Day 53: Approx 48h into a simulated dry spell.
Alright I think it is time for Karen to get her first MAJOR defoliation. I will update shortly with photos and info. I will also be doing some gentle LST to separate the colas a bit.
Day 53.5: Defoliation and LST. Finally got chance to photograph that bunda. Enjoy!
Day 53.75: Bit of a fail. Messed up the timer and the lights ended up being off for about 3 or 4 hours. Because I was cooling the room (open window) to keep temperature in the tent down, without any light the temperatures absolutely plummeted as it is sub-zero outside. By the time I realised and turned the lights on, the temp in the main tent had dropped to 14 degrees celsius. Whoops! How is that for mistreating your girl? Defoliated about 80% of her leaves, 4 nodes, significant LST, then stuck her in the cold and dark for 1/6 of a day. Not to mention she is now almost 3 days into a "dry spell". There do not seem to be ill effects, and Karen has already begun to respond to the LST; all the colas that had been changed in angle are now upright again.
The dry spell I keep mentioning, there is a method behind my madness, I have spotted one or two small flies and I think they may be fungus gnats. I am starting to suspect that the 2nd seedling in the Purple OG Punch Auto grow was actually beheaded by fungus gnat larvae. So I am drying out the mediums as much as I dare. I am closely monitoring the plants, so far the only one I have had to break the drought for is Enigma; all the girls in big pots haven't even noticed it's dry yet. How far am I going to push it? Well I will judge it on a plant by plant basis, but quite honestly I am hoping to see physical signs of thirst before I breakdrought. Of all the plants the two I think will respond most strongly to this will be Karen and Bertha, because of where they are. Karen here is actually probably 4 weeks into flowering rather than two, so about now is a good time to give her a little hydration stress. I do not think I will push it past 5 days, as RH is 34%. By now all the plants will be compensating for the lack of moisture and the high temperatures and low humidity. They will be taking more and more moisture out of the coco, and as the coco dries further and further down, those plants that have space will start desperately growing roots to find moisture. Mark my words, 24 hours after I end this drought, every plant in the tent will throw out crazy growth.
Day 54: Ended drought and fertigated 6l, no run off, I will re-fertigate tomorrow. Karen is still stretching her height post LST is now 37cm. The two tallest colas seem to have stopped but the other colas are still stretching.
Day 55: Alright so it has been 5 hours since lights on, and Karen is looking in good shape, all her drooping leaves have perked back up and she has added quite a bit of foliar growth. The colas are all still rising, except perhaps the two tallest. This girl is absolutely loaded with pistils, I'm starting to see trichomes on the sugar leaves, but trich production hasn't started in earnest yet. She has a least 20 colas, and 6 of them are thicker/taller than the primary cola at her tip. Every one of her nodes has reinforced itself with a bulbous growth and these cola branches are swelling rapidly. I am increasingly of the opinion that, all being well, this girl is going to surprise us all with her yield. My first grow, which was just mucking about really, I got 60-70g of the two main plants, and they were just bare sticks with 2 colas. Although her height is less than theirs was, 2/3 of their height was bare stick... whereas every mm of her is befoliaged and living. So in terms of the height of the actual cola I think they were about comparable in usable space on a per cola basis. The main difference being that Karen has 20+ colas whereas they had 2 primary and 2 lower. I know that it is probably unrealistic to expect more than 70g from a single auto grown indoors. Nevertheless my gut tells me this baby could achieve at least 100g, perhaps as much as 150g. The next few weeks will determine that, but given where we were in week 3 I will be grateful for any yield of quality bud. I have dropped the lights down to 18/6 from 'tonight' onwards.
I really have no idea how long we have left for Karen. According the the "brochure" she flowers for 7-8 weeks, with a total crop time of 9 weeks. The problem is I don't know what a total crop time is? Does that mean from seed to finish? If so Karen is clearly not going to be anywhere near that timescale.I am going to go ahead an assume that, for my plant anyway, the first 4 weeks were veg weeks. I think it is fair to count week 5 and 6 as flowering because pistils were popping out very early in week 5 if not before. So that makes this week four of flowering. I am going to assume 8 weeks rather than 7, so I think we have another 4 full weeks give or take a week. On that basis I am expect harvest week to be around week 12 or so. I am not fixed on this though, I am determined not to harvest this girl early.
Day 55: Photos taken 00:00 9/3/23 Strong 24h of veg growth as predicted.
Day 56: Existing leaves continue to swell. Stretch appears to be slowing. I've taken so many media this week that I cannot scroll down far enough to select a recent thumbnail. Probably Karen's biggest week in terms of changes. She is looking like she is going to impress. Height 39cm.
Likes
3
Share
@Nikki78
Follow
Der Zeitplan sieht gut aus.. die Pflanzen haben wirklich eine kurze Blütezeit und man kann sie wie es aussieht schon nächste Woche ernten. Diesmal auch ein kurzes Video für euch

Likes
7
Share
@Genussmittel420
Follow
had to flip because of the critical already started flowering somehow
Likes
44
Share
@Aedaone
Follow
The temperatures, humidity, height, and watering volume(if measured) in grow conditions are all averaged for the week. The pH is soil pH. Any watering done by me is well water which is 7.6 pH and 50° F. Any listed nutrients are ml/gallon of soil spread evenly across the top of the soil.
Day 1 we had a high temperature of 93°F with sunny clear skies. I watered 4-5 gallons each pot twice, from the well.
Day 2 we had a high temperature of 95°F with clear sunny skies. It was super hot today. I watered each pot 4-5 gallons twice.
Day 3 we had a high temperature of 95°F. It felt like 97°F. We had super clear sunny skies. The girls are loving the sunshine and slightly less humidity. I watered twice @4-5 gallons per pot.
Day 4 we had a high temperature of 90°F with super clear sunny skies. The temperature was more comfortable at 90° today because we had less humidity. I watered 4-5 gallons per pot from the well.
Day 5 we had a high temperature of 81°F with partly cloudy skies. The girls are still thirsty. I watered 4-5 gallons per pot once. These girls roots have tapped through these pots and into the soil. Unless it's just super hot watering once is enough.
Day 6 we had a high temperature of 83° with clear sunny skies. I watered 4-5 gallons once per pot.
Day 7 we had a high temperature of 79°F with clear sunny skies. I watered once 4-5 gallons of well water per pot. The girls are thirsty but the heat isn't sucking the water out of the pots. The girls are in full vegative phase 2 and continue to gain height.
This week was a great success. The girls really stretched and tipped out at 89". That's over 7 feet not counting the pot. The weather was very pleasant. We had a few hot days but mostly cool fall type weather. The defoliation and treatment of powdery mildew with Growers Ally fungicide ended that problem. These plants do have a high level of resistance but not immunity. I'll continue to treat once a week.
Most growers don't talk about their fungal pathogens or treatment of them. Outdoors, if your plants aren't immune (many fastbuds I've grown from seed have been) then this is an issue you'll deal with if you have cool humid nights. There are many treatments and preventatives and some are scarey. My grows are all organic and I carefully chose Growers Ally fungicide as I smoke these plants and don't want anything scarey in(systemic) or on them.
Thanks for stopping by and checking out my grow.


Likes
2
Share
@ao_grows1978
Follow
Week 2 for the solo Afghani went smooth. Looked a little slow to develop her first proper set of leaves, but the root development should help speed up her progression. Still feeding off the slow release 444 and is now regularly drinking about 2oz of water every other day. I also spritz the bottom of the outer cup to keep moisture levels high for stretching roots. She's about 36" from the light. Hoping to get a little stretch to make training easier. Added a couple new pics to get the week caught up. Stay tuned, week 3 starts training.
Likes
38
Share
@DudeGrowsWeed
Follow
Baox plants got topped last week for clone cuttings, so they lost a few inches. I got 5 clones out of the 2 plants. I probably could have cut more, but lets see how these first few turn out first. These girls seem fine since the cuttings.


Likes
8
Share
@Oldwied
Follow
Day 37
Everything is going wonderfully.
The flowers are getting thicker and thicker and the smell is getting stronger and stronger.
Deficiency symptoms from Happiness have not increased any more.

Likes
9
Share
@Dark_Shadow_420
Follow
Fue una exelente cosecha, esta planta en un principio se tuvo en imddor y posteriormente sacada al exterior. Es mi primera experiencia plantando en suelo.
La planta llego a un gran tamaño de la cual se cosechó una gran cantidad superando la cantidad promedio.

Likes
2
Share
@nenenedudu
Follow
lowered the ionbeam lights and adjusted all lighting to get even 20k lux everywhere.
