
Likes
Comments
Share


@pareto
Follow
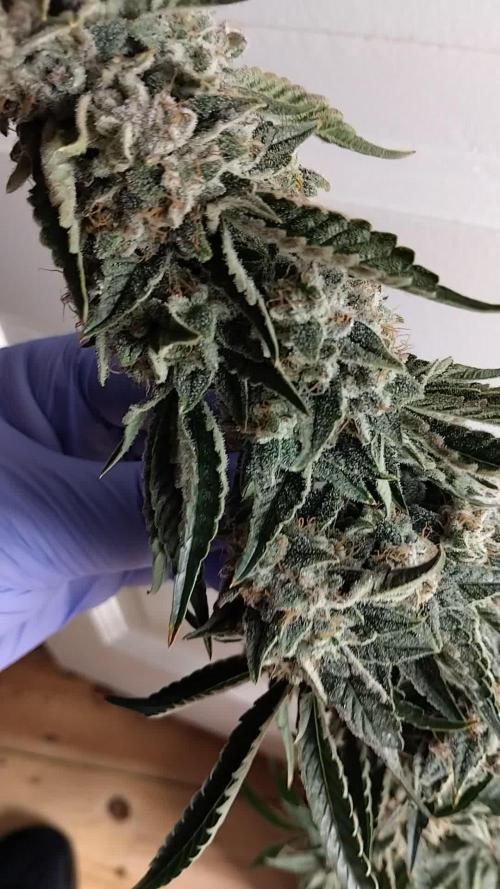
Everything went well appart from the afids in the end. She looks very pretty and smells awesome!
Yield could be a litle higher... Still shooting for less than 1€/g. I think I will stop topping my plants.
Maybe next time.
--------------------------------------------------------------------------------------------------------------------------------------------------------------------------------
Set up cost (fixed costs)
-Lamp: 40€
-Timer: 3,5€
-Pot: 4€
-Total fixed costs: 47,5€
Given 5 years (or 15 grows) usage time translates to around 3,17€ per grow in materials.
Variable costs:
-Seed: 10€
-Soil: 6€
-Fertilizer: 3,50€
-Power (68 days 20h/day): 19,58€
-Total variable costs: 39,08€
-Total costs per grow: 42,25€
-Cost per Gram: 1,63€

Likes
3
Share


@SupaDank
Follow
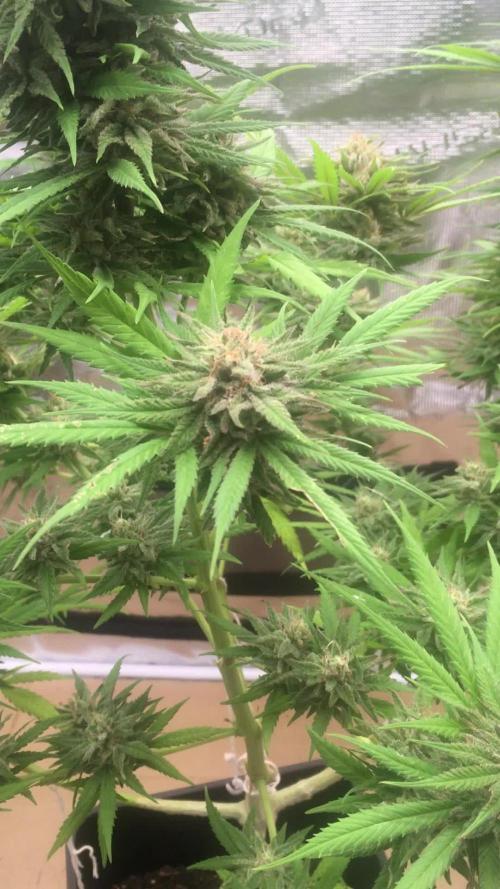
End of day 42 flower.
Her buds are definitely packing on more weight now. Flower time for her is 55 days so it almost time for chop chop. Probably start flushing around day 50.

Likes
4
Share


@805homegrown
Follow
July 7 start of week 9 first week of transition to flowering.
July 8th I sprayed some (FSW) fermented sea water with (FPJ) fermented plant juice and (LABS)lactic acid bacteria as a foliage spray. Sprayed 2 hours before the lights came on.
July 9th the girls loved the spray I made for them on the 8th
July 12th I sprayed with WS-CAPO water soluble calcium potassium
Foliage spray.

Likes
92
Share


@DogDoctorOfficial
Follow
Week 3: TrolMaster Chronicles – Transplanting, Growing Strong, and Thriving in PRO-MIX HP 🌱✨
Hey Grow Fam! Another exciting week has flown by in the grow room, and I’m thrilled with the progress! We kicked off Week 3 with our first set of transplants. The Gorilla Melon was transplanted at the end of the week, while the Papaya Zoap is still patiently waiting for its turn to shine. Each plant that’s been transplanted is now comfortably settled in 15-liter Autopots, filled with PRO-MIX HP BIOFUNGICIDE + MYCORRHIZAE, and wow, I’m loving this mix!
🌱 Why PRO-MIX HP is a Game-Changer
For those of you unfamiliar with PRO-MIX HP, let’s take a closer look. This soil provides superior drainage and aeration, thanks to its high porosity. The addition of fibrous peat moss and coarse perlite creates an ideal environment for water flexibility. It’s been perfect for the girls as they transition into their final homes. Plus, the biofungicide and mycorrhizae are doing wonders for root development, giving them all the support they need for vigorous growth. The plants are showing off a beautiful, vibrant green, each with its own unique characteristics—no two plants are the same, and I love that!
🌡️ Environment Update: Temps, RH, and More
Let’s talk about the conditions the girls are thriving in! We’re sitting at:
• Temperature: 26.7°C
• Relative Humidity: 62.9%
• VPD: 1.30 (I know it’s a bit high, but they’re handling it like champs)
• CO2: 800 ppm
• pH: 6.18
• TDS: 215 ppm
• Solution Temperature: 23.2°C
To make things even more efficient, I’ve adjusted the light height, keeping the PPFD around 360 to 400 to save on energy. These beauties are still soaking in the light perfectly, and I couldn’t be happier with how they’re responding.
💧 Watering and Feeding
At this stage, the plants are thriving with just enough nutrients to keep them happy. I’ve kept things simple with a balanced solution, ensuring everything stays within the perfect range. The PRO-MIX HP, with its mycorrhizal fungi, is really helping with nutrient uptake and boosting overall health. It’s amazing to see how quickly they’ve adapted!
🌟 Transplants Complete – Progress Feels Incredible!
I’m super excited with how everything is shaping up! Most of the transplants went smoothly, and the growth we’re seeing is just amazing. The Papaya Zoap is still waiting for its final move, but it’s growing strong, getting ready for the next step. It’s an honor to work with these genetics—they’re each unique, yet all thriving in their own way. 🌱💚
🌍 Shoutouts and What’s Coming Next
I couldn’t do this without the support of my amazing sponsors and all of you, Grow Fam! A huge shoutout to TrolMaster and Aptus Holland for their top-notch gear and nutrients, and of course, to all my followers—whether you’ve been here from the start or are new to the journey, thank you for the love and support! 💚🙏
Don’t forget to check out my Instagram and YouTube, where the Seed to Harvest Series just kicked off! I’m going deep into all the gear, techniques, and day-to-day grow updates you see here. Exclusive content and more are waiting for you on those platforms, so come by and join the fun!
Growers Love to everyone, and here’s to another epic week of growth! 💚🌱 Let’s keep pushing the limits and making magic happen.
• Nutrition: @aptusholland @aptus_world @aptus_es @aptusbrasil @aptus_thailand @aptus_portugal @aptususa_official @aptusplanttechnz @aptusplanttechaus
• Controls: @trolmaster.eu @trolmaster.eu.support @trolmaster.support @trolmaster.agro
• Soil: @promix_growers_eur @promix_cannabis @promixmitch
P.S. Let’s talk about these new Model One LED bars I’m running. 🌿💡 They’re not just any lights—these are full-spectrum beasts designed to give my plants exactly what they need at every stage of growth. The real magic, though? The dimming feature. With just a quick adjustment, I can dial down the intensity without sacrificing the quality of the light. This means I’m saving on energy costs while still delivering top-tier PAR and maintaining a balanced spectrum. It’s not just about blasting plants with light; it’s about giving them the right light at the right time. By fine-tuning the PPFD (Photosynthetic Photon Flux Density), I’m hitting that sweet spot where the plants thrive, and I don’t have to run the LEDs at full power. So, while I save a bit on electricity, my plants still get the perfect environment to reach their full potential. 🌱✨
This level of control lets me optimize the growth, and trust me, my plants are loving it—just another reason I’m thrilled with the Model One setup.
💚💚💚 Growers Love everyone 💚💚💚


Likes
13
Share

@Crusty_Juggler
Follow
Grown it many times, clear favorite.
Sweet baked gas, spicy, hashy, some have a subtle smooth lemon sherbet aftertaste.
Relaxing happy and mellow effect.
22-28% Rosin return

Likes
2
Share


@Ninjabuds
Follow
Ive got two Skunk Apple Runz plants(tossed 1 when I repotted the plants) with exotic-looking leaves and some great genetics. These are seeds I made and both the parents were top notch. They're both about five inches tall and growing strong they both seem to have the growth strength from the ricky bobby Unfortunately, one of them might not make it because of some damage or mutation im not sure, it just seems to have stop growing upward correctly but the other one's looking really healthy.
Happy late turkey day grow diaries world!!!! It's now day 24 from seed for all the seedlings I have going. The past few days the plants have really started to take off. There roots have really started to dig in. Every other water I am still giving 2ml per gal of fox farm grow big. I keep having to tell myself not to add any more nutes other than that. I don't want to fry my plants but I also want they to start jumping. I'm quite excited for the coming week, I think the next 7 days or so is when the plant really starts to transform and look more like a pot plant than just some random little green thing.
A few days ago I decided to move the plants from under my 55w cheep amazon light to under my spider farmer 100w newer version light with the good leds in it. The plants will hopefully be ready to up pot them here soon and get them in the large tent.
Sometimes when growing multiple different strains it can be really hard to balance giving to much or to little light. You don't want the faster growing plants to get to stretched out waiting on the slower plants to catch up
I spend Thanksgiving day morning transplanting the plants into 2gal pots. I am useing spme promix potting soil it's my 1st time tring this soil. It is actually doing really well the roots were all white and nice looking. I think next time I'm going to add some worm casting, kelp, granular mycos, and a little bit extra perlite. I just didn't have the money with christmas coming to splurge for all the extra stuff. I got rid of 2 plants 1 of the bubble og and 1 skunk apple runtz. There is only room for 10 pots in the 2x4 tent. I will peob only bring 8 of them to flower, always good to have back ups. Yesterday I also stuck the plants back under the 500w medicgrow mini sun 2 in my 2x4 tent. They did great under it the 2nd half the day I was happy they didn't get stressed. I had put them under that light a little early about 10 days ago or so. I am expecting in a week these plants will ge going crazy with growth


Likes
23
Share


@cadur
Follow
She is reaching the end. Leaves browning off and going well.
Trichomes milky but will wait for 30% amber.
Likes
14
Share


@Kirsten
Follow
I took everything out of the tent and disinfected it again.
The pots have made the tent base into a ball 😅 The velcro tags fell off long ago. I decided to put some new ones on.
I have some wider velcro that I would've preferred to use, I have misplaced those. Anyway, these will have to do.
I also made some large pot markers to velcro to the pots, too. I figured it would be easier to recognise the plants in photos if I made some. I laminated them, then attached the velcro to the pots and pot markers. [I get bored] 😅 make everything as fun as possible 💚
I ended up finding some sticky back velcro rolls.
Of course, there's no way that it would stick to a slippery surface that gets wet from humidity.
So, I used my glue gun and added strips to each side of the tent liner and tent walls to hold ot in place.
The 8 gallon pots are very heavy after being watered, and the liner has suffered. Hopefully, this will work to keep it in place, at least for a while! 😅
7.5.25:
I also had to clean my pots, as you can see in the photos (if you want, lol).
They had got very mouldy/mildewy/fungussy. 🤢 also the under side of the tent liner.
So it was very lucky that I decided to clean it at this point. Or else I could have serious issues.
I'll look into the ventilation as I'm not exhausting the tent because I leave the door open with very strong airflow.
I did spray the plants with Trace, and I used a lot of it. So, that probably ran down the walls into the base of the tent before it dried 🤔 that could have easily caused it.
I'll have to make sure I dry off the walls after I use it next time. I certainly don't want to keep cleaning everything.
The plants are delicate, and unfortunately, however I try, it appears I am not.
I'm always snapping branches off by just watering, let alone removing them from the tent to clean! 😅 you can imagine. Accidental defoliation? 😉
I also cleaned the light, but I have noticed on one light that there are brown spots, which won't come off without damaging the LED's.
I really don't want to have to buy a new light. The par isn't great for full flowering. I just can't justify buying a new one right now, as I've already bought 2 in a year.
The light has been turned up to 100%, gradually, over the course of a few days. It has been fairly warm so I moved them further away too, as i don't want them to get heat stress, as I have already noticed a few leaves canoeing and having a taco on my dime! 🤨🤔😅
I'll continue to monitor and adjust again when possible/necessary.
9.5.25:
Hulkberry has certainly started her stretch! I'm really low on space to train her out, and the light has been turned up to full power.
She has begun to drink more, and I gave some more dechlorinated water PH'd to 6.4 with
♡ 1/4 tsp of Greenleaf nutrients Sea K(elp).
PPM: 800
PH:6.4
I am very pleased with the recent growth spurt, so let's hope I can accommodate her! 😅
9.5.25:
It's a necessity to keep the soil moist. That means I need to water more often now.
Today I watered with 1.5 litres of dechlorinated water PH'd to 6.4 which contained:
♡ 1/5 tsp of Sea K(elp). By Greenleaf nutrients
♡ 1/4 tsp Ecothrive Biosys.
PPM: 564
PH: 6.4
12.5.25:
Hulkberry was very dry, surprisingly. Although I guess I've been giving her less.
She was fed with a high dose of Ecothrive Trace: 7ml/7l.
She was fed with 6 litres over the course of the day.
PH:6.4
PPM: 515
I had added this as a foliar spray last week, and it has apparently damaged some leaves. Left some dry orange patches in the leaves.
So, having that happen makes me want to just water with it.
Thanks for checking out my diary and hanging out 💚 ✌️ 🍃 😊 🌱


Likes
46
Share

@DogDoctorOfficial
Follow
Germination Report: Runtz vs. Runtz 🌿✨
Hey there, green thumbs and cannabis enthusiasts! 🌱🌟 I'm thrilled to share the exciting details of our Runtz vs. Runtz germination journey. Buckle up, because this ride is packed with fun, knowledge, and a touch of green magic! 🍃💫
The Germination Journey 🌱🚀
Our Runtz seeds were given the royal treatment from the get-go! We kicked things off with the Cannakan method, ensuring our precious seeds had the best start. Here's a step-by-step breakdown:
Hydration Stage 💧:
Seeds were soaked in water, embracing their first taste of life. This process lasted about 30 hours, allowing the seeds to absorb enough moisture to kickstart germination. Watching those little seeds swell up is always a magical moment! 🌟
Transition to Soil 🌿:
After their water bath, the seeds were gently transferred to soil. This crucial step ensures they have the nutrients and environment they need to grow strong and healthy. Each seed was placed in a cozy, nutrient-rich bed, ready to sprout and thrive.
Understanding Runtz Genetics 🌸🔥
Runtz is a legendary strain, celebrated for its powerful genetics and exceptional traits. Let's dive into what makes Runtz so special:
Parentage 🌿:
Runtz is the love child of two powerhouse strains: Gelato and Zkittlez. This dynamic duo contributes to Runtz's unique flavor profile and potent effects.
Flavor and Aroma 🍭:
Expect a delightful explosion of sweet, fruity flavors with a hint of candy-like goodness. The aroma is equally enchanting, filling your space with a tropical, sugary scent that's hard to resist.
Effects 🌈:
Runtz is known for its balanced high, offering both euphoria and relaxation. Perfect for those seeking a joyful, uplifting experience that melts into a soothing body calm.
What to Expect 🌿✨
As our Runtz plants grow, here are a few things to watch for:
Vigorous Growth 🚀:
Thanks to its robust genetics, Runtz is a strong grower. Expect rapid development, especially in the early stages. Keep an eye on those green shoots as they stretch toward the light!
Resin Production 💎:
Runtz is a resin powerhouse, producing dense, trichome-covered buds. This not only enhances its potency but also contributes to its striking appearance.
Balanced Structure 🌱:
Look for a balanced structure with a mix of sturdy branches and lush foliage. This makes Runtz ideal for various growing techniques, whether you're a novice or a seasoned grower.
The Joy of Growing Runtz 🌿❤️
The journey of growing Runtz is as enjoyable as the end product. Each day brings new growth, surprises, and the satisfaction of nurturing such a phenomenal strain. Whether you're growing for personal use or to share with friends, Runtz is sure to impress with its vibrant traits and rewarding yield.
Stay tuned as we continue this exciting adventure! We'll keep you updated on the progress, sharing all the green goodness and joyful moments along the way. Happy growing, everyone! 🌿🌟💚
Germination method 🌱 @thecannakan
Genetics Runtz F1 @zam.nesia Runtz auto @kannabiaglobal
Nutrition
@aptusholland 🌿
@aptus_world 🌎
@aptus_es 🌍
@aptusbrasil 🌱
@aptus_thailand 🌿
@aptus_portugal 🌳
@aptususa_official 🍀
@aptusplanttechnz 🌺
@aptusplanttechaus 🍃
Ambient controls🎮
@trolmaster.eu @trolmaster.eu.support @trolmaster.support @trolmaster.agro
Soil @promix_growers_eur @promix_cannabis
LED - @lumatekeu
Watering- @autopot_usa @autopot_global
Love and attention- @dogdoctorofficial
#aptus #aptusplanttech #aptusgang #aptusfamily #aptustrueplantscience #inbalancewithnature #trolmaster #trolmastereurope #trolmastersecrets #Autopots #RuntzBattle #KannabiaVsZamnesia #GreenJoy
As always thank you all for stopping by, for the love and for it all , this journey of mine wold just not be the same without you guys, the love and support is very much appreciated and i fell honored and so joyful with you all in my life 🙏
With true love comes happiness 💚🙏 Always believe in your self and always do things expecting nothing and with an open heart , be a giver and the universe will give back to you in ways you could not even imagine so 💚
More info and complete updates from all my adventures can be found ⬆️link in the profile description ⬆️
Friendly reminder all you see here is pure research and for educational purposes only
💚Growers Love To you All 💚

Likes
61
Share


@Comfrey
Follow
Die Blüten wurden zur Hälfte nass getrimmt. Die Trocknung erfolgte im Growzelt mit Ventilator und Abluft bei einer Temperatur von 22 Grad Celsius und einer Luftfeuchtigkeit von ca. 56 Prozent über 7-9 Tage. Bei der täglichen Kontrolle habe ich wenige Blüten gefunden, die ich entsorgen musste. Sie braucht schon etwas Aufmerksamkeit, die Shaman. Anschließend wurden die Blüten trocken weiter getrimmt und zum Aushärten mit Boveda 62% in Schnappdeckelgläsern bei 20 Grad in einem Eichenschrank gelagert. Das Endprodukt und ein abschließender Konsumreport folgen. Ich bin ziemlich happy! 💚


Likes
10
Share


@3footgiraffe
Follow
21 days of flower.. getting some frosting on the upper fan leaves.. happy that the stretch was minimal and the canopy is pretty flat.. I think the super soil is a little hot but there’s a way to go yet 🤞😉👊

Likes
31
Share


@BigBadLion
Follow
Sorry for being late with this update! 😱
Plants are maturing well but I noticed Matcha is developing slower compared to Pistachio and I assume that's because the height of the lights are very different from each plant, but both are still going forward. A clear sign of maturity is Pistachio's brighter color leafs and the amount of "brown" pistils on both plants. Trichomes are developing well too.
Anyway, I think I will give Pistachio one more week and then see how Matcha develops to cut her.
I also started to defoliate my girls, there were tons of dying leaves!
See you all in my next update!
Processing
Likes
3
Share


@MOTB666
Follow
nutrient change 7/18 had to remove scrog net was too difficult trying to move around their to change it out. Another week of explosive growth almost 2 feet tall already and starting to fill up the whole area already. Switched the light to bloom almost out room to move my light up.


Likes
10
Share


@Dr_Green_Thumb87
Follow
10/5/24
Flowering Day 65
Allover day 113
Trichomes mostly cloudy milky i will give her some more days until harvest.
Leafs turn pretty nice colors.
No more nutrients given except some water if needed.
10/7/24
Potential Bud Rot check passed
Since some leafs dry out the last days i wanted to be sure that the lady is doing well on the last couple of days.
Likes
2
Share

@Earthsower
Follow
The Afghan #1 has received a full defoliation and all flower sights are exposed. Leaves showing signs of nutrient deprivation. The is slight bud rot but nothing too concerning. most of the calyxes are swollen with nearly every pistol fading to a reddish brown colour and the try chromes are changing from milky to clear. The Afghan #1 feminised has a sweet pungent floral aroma emanating from her. There’s Stem decay as the lady is dying of the stem colour is fading to a dull green. Feeding is all complete!

Likes
11
Share


@YehGreen420
Follow
Limpeza e primeira rega de nutrientes de floração, que comece 2 fase 🤩

Sour Jealousy Auto · Fast Buds
Pound Cake Auto · Fast Buds
Papaya Cookies Auto · Fast Buds
Orange Sherbet Auto · Fast Buds
Amnesia Haze Auto · Fast Buds
Wedding Cheesecake Auto · Fast Buds
Moby Dick Auto · Fast Buds
Gorilla Cookies Auto · Fast Buds
Lemon AK Auto · Fast Buds

Auto Pineapple Glue · Advanced Seeds
Likes
8
Share


@BruWeed
Follow
☘️ 03/11 - Hidrate la semilla 24hs con agua y 3 gotas de agua oxigenada. (Uso el mismo metodo siempre antes de germinar)
☘️ 04/11 - Coloque la semilla en papel humedo para que comience a germinar.
☘️En menos de 24 hs germino.
☘️05-11 - Ya tiene 1.5cm de crecimiento y la coloque en una maceta de 3L, utilice el producto que uso siempre "AEGIS MICORRIZAS" ya que ayuda mucho en esta etapa de germinacion.
☘️Por el momento se ve bien, su proceso fue muy rápido y hasta el momento todo perfecto.
☘️Voy a dejarla dos semanas en etapa de enraizamiento y estare utilizando cuando la plantula salga "DEEPER UNDERGROUND" de Top Crop.
☘️07/11 - Broto
☘️09/11 - Ya le agregue el estimulador de raiz, Deeper Underground. 1ml por litro de agua, obviamente no le agregue todo, solo lo suficiente.
☘️09/11 - Tiene 5 días de vida.
☘️14/11 - Cumple 10 dias de vida desde su germinacion.
☘️21/11 - Cumple 17 dias de vida.
☘️23/11 - Entra en etapa de crecimiento.
☘️En estos dias subire imagenes de como viene.
🇦🇷😶🌫️☘️Podes seguieme en Instagram como @bruweed_arg🍀🇦🇷😶🌫️
