The Grow Awards 2026 🏆 


Likes
Comments
Share
@TerpTurtle
Follow
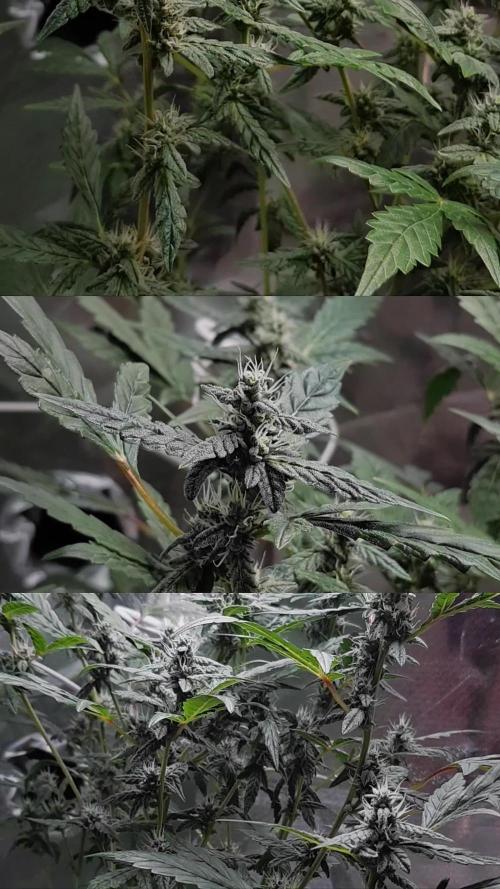
Took nice big clones from the tops
Growing with Strawberry Truffle

Likes
32
Share
@MadeInGermany
Follow
Info:
Unfortunately, I had to find out that my account is used for fake pages in social media.
I am only active here on growdiaries.
I am not on facebook instagram twitter etc All accounts except this one are fake.
Hi everyone :-) .
It develops really strong and beautiful from week to week :-).
In the next 14 - 20 days I will put them in the flower chamber :-).
Until then, I will train you with topping for the last time today 👍.
Otherwise the tent was cleaned and everything checked 👍.
Have fun and stay healthy 🙏🏻
You can buy this Strain at :
https://www.zamnesia.com/de/5165-zamnesia-seeds-kalini-asia-feminisiert.html
Type:
Kalini Asia
☝️🏼
Genetics:
Black Domina x Purple Kush
👍
Vega lamp:
2 x Todogrow Led
Quantum Board 100 W
💡
Bloom Lamp :
2 x Todogrow Led
Cxb 3590 COB 3500 K 205W
💡💡☝️🏼
Soil :
Canna Coco Professional +
☝️🏼
Fertilizer:
Green House Powder Feeding
☝️🏼🌱
Water:
Osmosis water mixed with normal water (24 hours stale that the chlorine evaporates) to 0.2 EC. Add Cal / Mag to 0.4 Ec Ph with Organic Ph - to 5.5 - 5.8 .


Likes
43
Share
@Pearl
Follow
Mixing a ratio of
4ml start
5ml Katana
/ 1 litre water at PH of 6.2
Mix well and spray onto paper towels to soak,
Fold paper towel in half & place seed inside & fold to cover so the seed is in darkness,
Place damp paper towels with the seed inside a zip lock sandwich bag.
I only had to wait 28 Hours and the seed had split
She was planted into her 1st pot last night.
Happy days, looks like a very good start 🏆
😵💫🤘🏼

Likes
2
Share
@Islandbuds420
Follow
I found this strain very easy to grow and responded very well given the hot/humid weather we have here on the island. This strain held up very well to pest and mold/mildew
Likes
10
Share
@Elguacho420
Follow
Muy buenas noches muchach@s.... Bueno, comento!, segunda semana de crecimiento de las lemon cookies kush! 🌱 Cómo ven hoy fue día de selección de las q para mi, novato, fueron las mejores para trasplantar a estas macetas q ya son las definitivas, las regué con ½lts de agua c/u, prendí el otro led y ahora hay una fiesta ahi dentro q no saben, terrible!!.. 😎🕺🏻💡 Bueno, ya las ven, están re lindas... Así q ya no las molesto más... Ahí están trankilamente... La semana que viene les cuento más... Buen finde y buenos humos para tod@s... 🔥 💨💨💨
🇪🇸🤝🏻🇦🇷

Likes
8
Share
@MG2009
Follow
03/01/2022
You can tell which I put in flower room first, buds developing nicely 🙏🏻
Second one is a week behind but starting to flower have to raise the lights this week.

Likes
15
Share
@Daan_Buds
Follow
Good morning everyone😁😁
Day 16 of the flowering period plant is showing me she want some extra nutes. So i raised it with some extra pk and calmag from aptus just to give her an extra boost. Within the week i wanna see results. Now it s time to slowly dry her out so the lv will be at 40. In the end of her day the lv is between 52 and 42 but i want to lower it to 40 and try to keep it at 40 to max 46. Keep ya all posted
Day 19 already, and got some nutes probs. Runtz is going fine but the ww xl is having some major probs i think it' s missing some pk. Looking also at the Runtz i think she is also missing a little pk so raised pk on both ladies. Hope to see some results before the end of the week.
Day 21 has past and things are not in control yet. Raised my watering to 1.5 liter cause she is so thirsty. Hope to see results in the coming 2 days
Keep m green and grow Big Buds😁💚💯
Likes
95
Share
@hannabis420
Follow
Quality strain but my buds could have been denser/chunkier, growers error, my first LST and I stressed her into flower too early

Likes
14
Share
@Budha420
Follow
Dont member what day it is but all going well💚
Nute burns are under control, ph and ec pen are both broken so lil guessing game on that part .

Likes
162
Share
@Lukush
Follow
1 week , hear we go , so excited of this strain, cant wait to see her beautifol buds structur 😎😎
Hope and im shoure yall enjoy
Have a good day growmies 🌲🌲✌️✌️

Likes
9
Share
@fanofCalvert
Follow
31 days into flower, I have slowly upped the cf to 1.8 since my last post, I have added a bit of Cal/Mag and upped the pk and treacle. My lights will come on as I am writing this, so we will see soon if yesterdays biggest feed to date has had any adverse effects.
Video is my run off left to stand in shopvac over night. As you can see it is 'Alive' and bubbling away. What is going on does not smell like yeast or Vinegar, it smells like 'Clean fresh Compost'. So I expect the runoff is producing CO2 and Methane. CO2 is good, roots can absorb it. With the Methane there is possibly some Ethylene being produced, which may have some very positive benefits as far as plant chemistry and suppression of masculine traits? The gases bubbling off the runoff 'Soup' would not be difficult to Identify with a couple of wash bottles and a few readily available reagents. I ain't got the time, or the kit.
There are definitely a few different organisms at play here as you can see different structured plaques forming on the water surface, and different foams forming with the bubbles.
Just took photo's, everything looks good except Blue Sherbalato, Developed a kink in top leaf, that could be a couple of things, I shall work it out. (highered light a bit, dropped c/f, pushed cola away from light centre, and I shall let this pot dry out a touch, it has been happy till now.)
Every thing else is looking OK, all got a touch of tip burn. Canna Coco sometimes does not have enough N for grow, and almost always too much N in flower so I expect a bit of tip burn especially in high calyx to leaf hybrids.
The plants are using around 2 litres of water + food per day with a slight + or - on c/f with first runoff. Ph going in at 5 to 5.5. First runoff is 6.8 I will keep watering till runoff hits 5.8 or lower so it usually takes between 3 and 4 litres of nutes. per day. Hate being this wasteful with nutes , not enough going on in the garden to use it all out there yet, so down the drain it goes. I have thought about re-circulation, if I was bigger and running clones maybe. The Blue Sherbalato has shown me I got to start treating these plants as individuals
and tailor their treatment accordingly.
The GTH have changed their smell, the Lemon is still there but fuel and floor polish is becoming more dominant in 3 of the plants.
My plants are in 10 litres of Coco in 15 litre felt pots rolled down. Maltezerz, Orangesicle GTH 1, . plus the Scott's OG will run out of pot space so I will top them up to the 15 litre.
Got to make decisions on the cuts of these plants soon. I hate culling plants before the parent has finished its cycle.


Likes
13
Share
@Youngicons
Follow
I ordered a new bigger setup as you can see. Switched from LED to HPS. Although it has a significant heat output diff, I can tell the plants love it.
I also noticed I developed some fungus nats in the soil of the smaller plants. I finally got a soil meter to help me know more exactly when go water which should rid the fungus nats if I'm not over watering.
Lastly, I'm going to scrog this week. I know I'm doing it rather late but it's a learning experience and I'll start sooner next time. Will be a lot of weaving. And I'm still deciding if I should cut everything else below the screen.
Likes
11
Share
@Bread_n_Buds
Follow
Here we are again ready to start again, always under the sign of Zamnesia, we make our fantastic plants and we show you what we are capable of. We have 5 autoflowering strains and 5 photoperiodic ones and now we present them to you.
The fifth and last autoflowering for now of this round that we present to you is another classic of the classics always in the Zamnesia version. We have already grown it once and we sincerely hope to find the purple phenotype, Mythical mythological herb really in music and in everything, WE ARE TALKING
To explain my germination method which is a combination of experiences acquired in the field and readings of right advisors, I have chosen to divide it into phases so whoever wants can follow them and understand better step by step.
- Preparatory Phase ---- Check the average temperature in the room, humidity status to understand well whether it is the case to start or wait, I decided for the end of August because the temperatures start to drop towards the 22-25 degrees recommended for germination.
Then another thing more or less credible depending on the sensitivity is the control of the lunar phases. I believe in it a lot, it is a method that ancient farmers used to understand when it was best to plant depending on the attraction of the moon. To make my life easier I use a simple app that advises you on the right time to plant, harvest and put in a jar (depending on the lunar phases).
- Phase 1 --- Soaking in water. There are many authoritative friends who advise against this method due to the risk of drowning, but I have always been fine and I follow the rule if it opens in water almost certainly the seed is healthy and will come out of the ground 90% normally.
- Phase 2 --- Opening of the seed in water. As soon as the seed opens and the root comes out a little you have to be very very careful not to leave the seed in water open for too long. This is why there is a risk of drowning. So as soon as the root has come out it must be planted. Do not wait for it to stretch out too much, in the absorbent paper you can wait a little longer in water no.
- Phase 3 --- While I soaked the seeds I prepared my pots: I use small biodegradable pots (choose the ones with holes underneath for drainage). A few hours before working with the opened seeds I moistened the soil with water adjusted to the right pH (5.8 - 6.2) and Plagron Power Roots. The small root is now open and we can make a little hole with a toothpick, widen it and insert the seed. Not too deep with the root facing downwards. From Serious Seeds we learned the dome technique: if you put a small dome of soil on the seed the water will settle on the sides avoiding overwatering problems.
- Phase 4 --- The plant emerges from the soil. Up to now I have not put the light on, now I turn it on at minimum after half a day of soil to give direction to the seedlings. The first week the light will be gradually brought from 40% to 60% to go to 70% - 75% in the remaining weeks of veg. During the first week maximum, I keep the cycle of 24 hours to avoid stretching. Be careful not to exceed the first week at least with photoperiodic.
- Germination % --- In water 20/20 seeds have opened for good luck I'm waiting to talk when they come out of the ground but it seems that we are going towards an excellent percentage of germination..."Not too bad"...
- Soil and Food --- The soil used is entirely organic in every part and is the Plagron Promix that will be used with the 100% organic pack supplied by Zamnesia complete with all the main fertilizers for your plant buy it at the link --
https://www.zamnesia.io/it/11457-plagron-easy-pack-natural.html
// Strain Description // Have you ever wondered what Jimi played in 1967? With Purple Haze Automatic, it has never been easier to experience the magic of Purple Haze firsthand. In just 65 days, this compact autoflowering will reward you with top-quality sativa buds that will take you on a long creative journey. -
- Get a seed of this fantastic strain --- https://www.zamnesia.io/
- Soil and Fertilizers entirely organic --- https://plagron.com/en
- Growbox --- https://www.secretjardin.com/
- Music and sound --- I made my girls listen to 432hz frequencies and music from www.radionula.com
- Z --- You can find these seeds, much more from the world of cannabis, mushrooms and an incredible series of accessories and gadgets on the reference site not only mine but of many growers ----
https://www.zamnesia.io
Processing
Likes
2
Share
@TinyGrowingAdventures
Follow
This week i defoliated on day 18 because i have way too many top coming out and too many lowbuds that were getting no light from being covered by layers and layers of leaves. All strains but the og Martian have real tight internodal spacing.

Processing
Likes
23
Share


Likes
2
Share
@CWolcott1991
Follow
Day 63 Chopped em down trimmed off all fan leaves and hung em whole plant in closet thay stays around 58% RH and 69°F
Likes
40
Share
@valiotoro
Follow
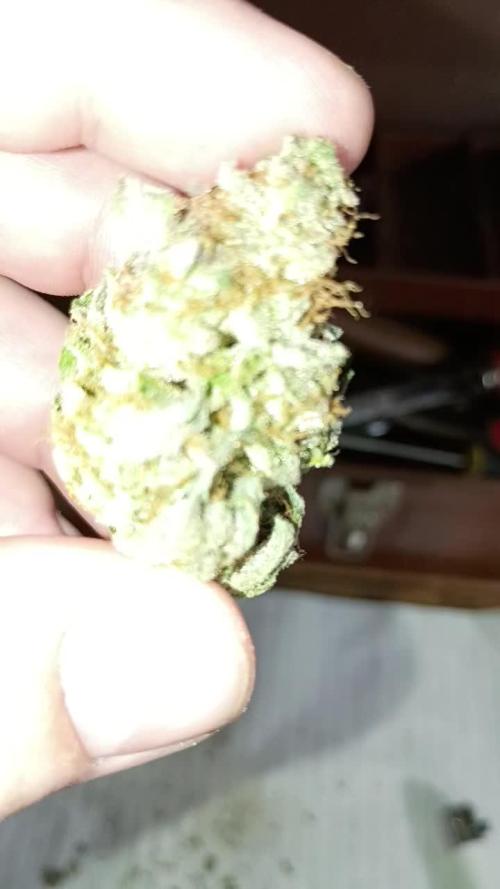
Easy trim✂️
The buds are super sticky & dense⚡️
The smell is Absolutely DIVINE,flowery sweet & orange🤤🍊🌸


Likes
13
Share
@Dunk_Junk
Follow
Looks like she's getting close!
Buds are nicely plump and dense!
Plenty of cloudy trichomes.
I'm looking for the first amber trichome to harvest. I want this to be uplifting not couch lock.
Likes
15
Share
@GERGrowDesigns
Follow
Dear Growers ,
Over the next weeks, we’re excited to share a very special project with you: Sensi Seeds Berliner Automatic 2025 Release
With dedication, knowledge, and hands-on practice, we’ll guide you step by step through the journey—watch with us as growth, development, and small wonders unfold before your eyes.
Whether you're a beginner or an expert, you are warmly invited to join, ask questions, and share your own experiences along the way!
Project Setup & Conditions:
• Brand/Manufacturer: Sensi Seeds
• Tent: 120cmx60cmx80cm
• Light: 2x 200 Watt Full Spectrum
• Humidity: 45%
• Soil: Narcos Organix Mix
• Nutrients: Narcos Products
• pH Value: 5.8
A Special Thanks To
Sensi Seeds
for the amazing collaboration, trust, and generous support in making this project possible. Your contribution is truly appreciated!
Congratulations on Your Own Projects!
We celebrate your growth, your creativity, and the passion you bring to the table. It’s truly inspiring to witness at Each visit .
Stay curious and keep up Growing —we look forward to welcoming you back for the next chapter soon!