
Likes
Comments
Share


@Willies_Organic_Gro
Follow
End of week 3, moving into week 4. The ladies got one of their very last defoliation. And definitely need some water and a feeding. So I top dressed with worm castings, Gaia Green's 284 and a touch of 444. Also got some recharge as well! Super simple! Just keeping my temps and humidity dialed in as good as I can and keeping a good feed schedule and water schedule and they're thriving very easy organic grow!

Likes
3
Share


@CaptonianMoneymaker
Follow
Some plants are still flipping over to flower myb 2 weeks behind the dist Bloomer
Likes
26
Share


@GrowGuy97
Follow
2 of them got cut on day 66 the last one on day 69 but overall I couldn’t be happier with these babies they all put off some amazing buds & didn’t give me much trouble at all! This is by far my favorite auto of this grow & I will be doing another run with them! If you havnt already go get you some seeds from seedsman you won’t be disappointed! Will be back with more pictures, dry weight & smoke report as soon as she is done drying! Thank you to everyone for following & happy growing friends!🙏🏼🙏🏼✌️🏼🌱


Likes
170
Share


@Green_Man_420
Follow
Evening fellow growers. Hope all is well and you’re all doing great!
This has got to be one of the hardest grows i have done. I always knew starting this early in the year was going to be hard and it’s proving that way.
And again a massive shout to James and the team at RQS for supporting me and supplying me with the seeds. 🙌
Here we are week 6 the start of the second week of flower. These ladies are moving along alright (I think) although the cold weather is back and has not been to kind over the last couple days. They are still stretching out which is good, just signs of cold which isn’t the best. The bud sites are forming slowly and the structure of these plants looks good. Let’s see what this week brings. ✌️
Day 37, watered 500mil with some nutrients. Held of on them for the last week so just adding them in slowly. Hoping they pick up a little. Took a few fan leafs off that are covering bud sites but other than that just leaving them to it. No pics as it’s very cold and don’t want them out the tent too long. ✌️
Day 38, warmer today and these girls seem to be ok. Nothing done just a couple photos and a video. ✌️
Day 39, watered tonight with 500mil and a little feed. ✌️


Likes
36
Share


@ReeLeaf
Follow
I upped the feeding schedule to 3x10min from 2x10min. Slight odd wilting at the beginning of some leaves near the stem, it doesn't look like anything of great concern, but I'll be keeping an eye on how it develops.
Likes
6
Share

@midnitrtoker
Follow
Almost at harvest. This is the last week of feeding then on to flush. I have it an extra week as I said before was not really satisfied with the overall performance of drip hydro. Buds seem to small and not dense as other nutrients I’ve used. I will definitely run drip hydro again see if I can get better results. The real test will be at harvest after weighing. See you all soon.
Processing
Likes
7
Share


@HylianGrass
Follow
The flushing phase is on, time to get rid of the rest of those nutrients that got locked up in the plant system, this step will affect almost 60% of the end result bud quality and taste along side with curing and drying properly the buds. The plant will remains in darkness until i harvest to slow the degradation of thc to cbn and to squeeze the most out of thoses resin glands that activates the most at night . Beside a bit of foxtailing due to the heat differences caused by the addition of 3 cfl buld, the buds are looking great


Likes
6
Share


@GoldenWeedGrower
Follow
Legend
Timestamp: 📅
EC - pH: ⚗️
Temp - Hum: 🌡️
Water: 🌊
Food: 🍗
pH Correction: 💧
Actions: 💼
Thoughts: 🧠
Events: 🚀
Media: 🎬
D: DAY, G: GERMINATION, V: VEGETATIVE, B: BLOOMING, R: RIPENING, D: DRYING, C: CURING
______________
📅 D71/B34 - 25/06/24
⚗️ EC: 1.2 pH: 6.6
🌡️ T: 26°C H: 70%
🌊 10L
🍗 Calmag - Bloom A-B
💧pH-
💼 CO2 Dispenser added
🧠
🚀
🎬 4 nice pics and 1 TL video
______________
📅 D72/B35 - 26/06/24
⚗️ EC: 1.2 pH: 5.7
🌡️ T: 26°C H: 70%
🌊
🍗
💧
💼
🧠
🚀
🎬 1 TL video
______________
📅 D73/R01 - 27/06/24
⚗️ EC: 1.2 pH: 5.7
🌡️ T: 26°C H: 70%
🌊 12L
🍗 CalMag - Bloom A-B - B52 - Bud Candy - Overdrive
💧
💼
🧠
🚀
🎬 1 TL video trunked
______________
📅 D74/R02- 28/06/24
⚗️ EC: 1.2 pH: 6.0
🌡️ T: 26°C H: 70%
🌊
🍗
💧
💼
🧠 Last Timelapse videos are pretty useless. I'm thinking to don't them anymore..
🚀
🎬 1 TL video
______________
📅 D75/R03 - 29/06/24
⚗️ EC: 1.3 pH: 5.4
🌡️ T: 26°C H: 70%
🌊
🍗
💧
💼
🧠
🚀
🎬 1 TL video
______________
📅 D76/R04 - 30/06/24
⚗️ EC: 1.3 pH: 5.4
🌡️ T: 26°C H: 70%
🌊
🍗
💧
💼
🧠
🚀
🎬 1 TL video
______________
📅 D77/R05 - 01/07/24
⚗️ EC: 1.3 pH: 5.0
🌡️ T: 26°C H: 70%
🌊
🍗
💧
💼
🧠
🚀
🎬

Likes
55
Share

@Comfrey
Follow
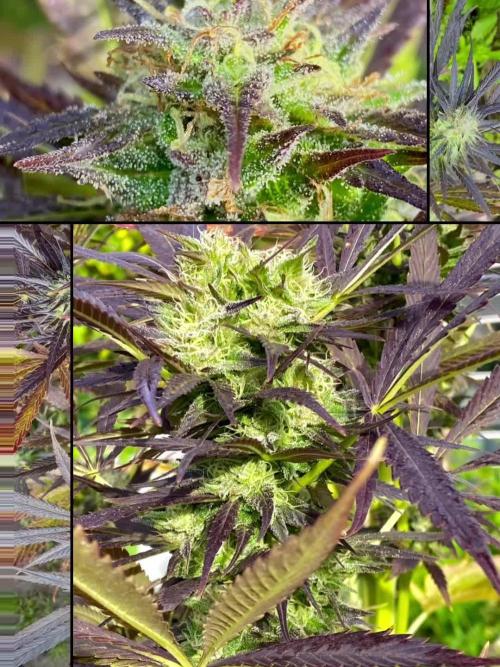
Dutch Passion Shaman
Eine aufregende und intensive Woche liegt hinter uns! Lange lasse ich die beiden nicht mehr stehen, Nebeltau und sehr hohe Luftfeuchte haben beiden Pflanzen etwas zugesetzt. Das tägliche Absuchen ist nun unerlässlich, ich finde regelmäßig neue Stellen an Blütenstielen, die sich im späteren Verlauf zu Fäulnis entwickeln würden. Die betroffenen Stellen befinden sich dort, wo ich während der Regenperiode entlaubt habe. So habe ich den Verdacht, dass ich die Blätter zu nahe am Stiel geschnitten habe. Denn dort, wo etwas mehr Blattstiel stehen blieb, sind die Stengel weiterhin gesund. Insgesamt empfinde ich die beiden als sehr robust und widerstandsfähig, vor allem wenn man bedenkt, dass dieser Sommer und Herbst immer wieder feucht bis nass war. Dennoch sollte man in dieser letzten Phase wachsam bleiben und die Pflanzen wirklich gründlich absuchen. So blieb der Verlust durch Blütenfäule sehr gering. Mit Hilfe einer Taschenlampe zum Ausleuchten von schattigen Bereichen, etwas Aufmerksamkeit und Liebe zu den schönen Pflanzen, werde ich ein sehr zufrieden stellendes Ergebnis in der Trockenkammer aufhängen können.
Der Duft der beiden Shamaninnen hat sich intensiviert. Sie sind noch einmal deutlich frostiger geworden und schön ölig-harzig. Nachdem ich bereits Probeblüten getrocknet und vaporisiert habe, sowie mehrmals einen starken Cannabistee aus den Blüten gebrüht und getrunken habe, bin ich mir sicher, dass ich nun jederzeit beruhigt ernten und eine ausgewogene Wirkung erwarten kann. Es ist ein klares aktivierende Sativa High, dass mich fröhlich und kommunikativ stimmt aber nie laut wird, selbst bei sehr hoher Dosierung im Tee. Die Wirkung setzt jeweils langsam ein. Auf ein fröhliches Gähnen

Likes
4
Share


@CentralCoastGenetic
Follow
Roughly 18 days since they broke soil , had five that sprouted but #4 dried up on me super fast (RIP) #5 is looking like a mutant
Likes
1
Share

@Elron_mc_Bong
Follow
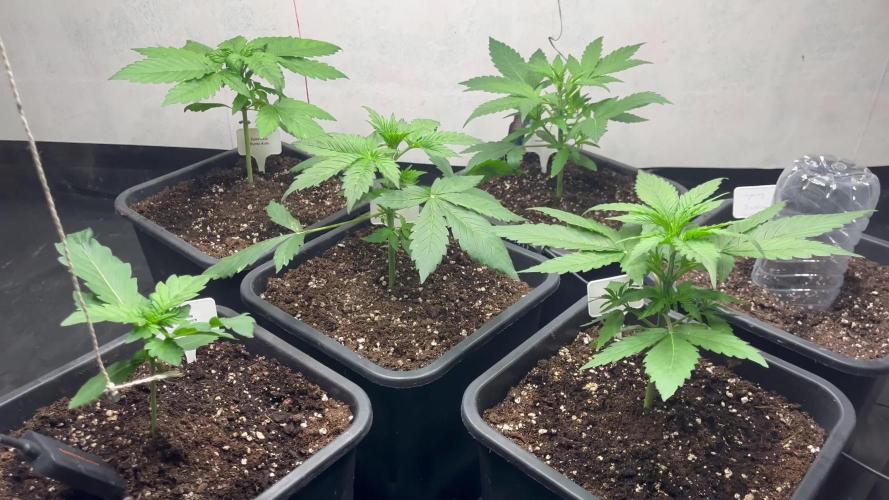
Woche 3 (4seit Keimung) – Vegetationsphase startet richtig durch
Die Mädels sind jetzt offiziell in Woche 4 angekommen und man merkt deutlich, dass sie langsam in die nächste Phase gehen. Das Wachstum hat in den letzten Tagen nochmal spürbar angezogen und die Struktur wird von Tag zu Tag stabiler.
Alle Pflanzen stehen aktuell in 15L Töpfen und entwickeln sich insgesamt sehr gleichmäßig, auch wenn man langsam erste Unterschiede zwischen den Strains erkennt.
⸻
Pflanzenentwicklung
Die meisten Pflanzen zeigen jetzt eine schöne, kompakte Struktur mit kurzen Internodien und kräftigen Stämmen. Besonders die GMO bleibt schön gedrungen, während z. B. Blueberry und teilweise Runtz etwas mehr nach oben wollen.
Die Blätter sind satt grün und vital, das neue Wachstum ist teilweise etwas heller, was aber bei dem Tempo absolut normal ist.
Insgesamt wirken alle Pflanzen gesund und stressfrei.
⸻
Licht & Setup
Die Lampe wird weiterhin schrittweise erhöht (aktuell moderat gefahren), was sich positiv auf den Wuchs auswirkt. Kein Stretch, keine Anzeichen von Lichtstress – genau so soll’s sein.
Momentan steht die SF3000 bei 50% Leistung mit einem Abstand von 45-50cm.
Der Abstand passt aktuell gut, ich werde die Intensität weiterhin in kleinen Schritten steigern.
⸻
Klima
Die Bedingungen sind aktuell ziemlich stabil:
• Temperatur: ~20–23°C
• Luftfeuchtigkeit: ~60–65%
• VPD: ~0.9 kPa
Damit liege ich ziemlich genau im optimalen Bereich für die Vegi.
⸻
Gießen
Gegossen wird weiterhin kontrolliert im äußeren Ring, um die Wurzeln nach außen zu ziehen. Die Bodenfeuchte liegt aktuell bei ~34%, was sich als sehr guter Wert herausgestellt hat.
Man merkt jetzt schon, dass der Wasserverbrauch langsam anzieht. Liege jetzt bei 500ml jeden 3. Tag.
⸻
Nährstoffe
Aktuell läuft noch alles über die vorgedüngte Erde.
Da jetzt Woche 4 gestartet ist, werde ich in den nächsten Tagen anfangen, den Green House Bio Bloom vorsichtig einzuarbeiten, damit die Nährstoffe rechtzeitig verfügbar sind, wenn die Vorblüte einsetzt.
⸻
Ausblick
In den nächsten Tagen wird sich entscheiden, wie stark ich eingreife.
Leichtes LST ist geplant – vor allem bei den etwas streckfreudigeren Pflanzen, um ein gleichmäßiges Canopy zu bekommen.
Ansonsten gilt weiterhin: beobachten, reagieren, nicht übertreiben.
⸻
Fazit
Ich bin aktuell echt zufrieden mit dem Stand.
Die Pflanzen sehen gesund aus, das Setup läuft stabil und alles entwickelt sich genau in die Richtung, die ich mir vorgestellt habe.
Vielen Dank fürs reinschauen meine growmis, Updates folgen 🏻


Likes
2
Share


@Ryno1990
Follow
Begining of week 3 of veg and the Strawberry Banana fast flowering photo from @canukseeds is comming along good starting to pick up some speed an getting some hight on her under this medic grow fold 6 led
Comming to the end of week 3 the Strawberry Banana from canuk seeds is doing good she is the smallest of the plants an is the only one not topped yet I mite not top this one an just let her grow her normal beautiful self
Likes
6
Share

@Radagast_
Follow
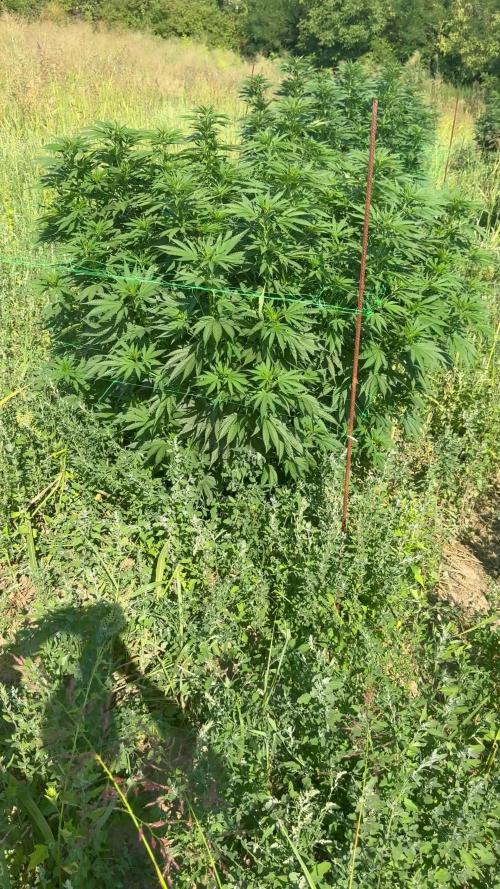
03.08.
OG KUSH
Day 100#
The plants are progressing well, most of them went into preflower a few days ago, the others are slowly entering... I was too lazy to photograph and record each plant separately, so I took a picture and recorded everything together... this grass has grown too much, in some places it is half way up the plant and you can't see how big the plants actually are, these days I will mow it under them and around them and in the next update I will post individual pictures where everything will look nice... yesterday I watered them with clean water, the next watering also with clean water and then I will most likely switch to food for the flower, I will see from the situation.
Two days ago it was the end of their fourteenth week, the pictures and videos are from yesterday.
Stay High and Keep Growing!!!

Likes
11
Share


@Hempshire_Empire
Follow
Some nute burn but I’m not worried, very very minor and she seems happy regardless. Branches are starting to get heavy and really develop amazing buds.

Likes
10
Share


@SubliminalSociety
Follow
Act III - Week 11: The Dame Finally Breaks Bad
Hallelujah, folks! Our dame finally saw the light – or rather, the lack thereof. Flowering has begun, a slow burn that's more like a smoky confession than a fireworks display. Big shoutout to all the growmies out there who kept me calm during this green-fingered fiasco.
Still, gotta be honest, this is some seriously late blooming for an "auto." My outdoor non-autos have also started flowering. Looks like this dame had her own schedule, one that wouldn't be rushed by sunshine or a well-timed trim.
Growth slowed down this week, a respectable 4cm. She's putting all her energy into those precious flowers. Speaking of which, tiny shoots have started popping up all over – another sign our dame's finally embraced her floral destiny. Rain and sunshine, both in abundance this week, seem to have given her the push she needed.
But the question remains, folks – will this late bloomer be worth the wait? Stay tuned for Act III, where the stakes are higher than a penthouse with a bad view, and the harvest moon hangs heavy in the smokey air.

Likes
2
Share


@L8bloomr1008
Follow
Did a bigger defol. Adjusted the trellis. May or may not have been watering with too high of ph (7.2) so hopefully microbes have been doing their job.
Processing
Likes
23
Share


@HanzGrowz
Follow
Well they definitely made progress in the flowering dept over the weekend! I came back home to find a nice amount of bud sites and pistil growth all around.
Bubba ya gotten so big it can’t fit under my lights in the tent with fan & filter, so it’s now been moved to the other tent. Kind of fucks with my auto grow I had planned, but not much I can do