The Grow Awards 2026 🏆 


Likes
Comments
Share
@Chubbs
Follow
Weekly update. Sorry it was a late update this week I was out of town (Bizcon2024). Wow have they grown, I'd say doubling in size. I've upped the watering to 1000ml daily, this week I'll do a major defoliation and lollipoping. All in all Happy Growing


Likes
14
Share
@Terpyboyz
Follow
Alright growmies 🍁🕺 week 6 of veg - girls are starting to get there Colour back into them now 🙌🏻2 girls have a bit off a potassium def but same strain so could be a sign(worst part about running multiple strains) that will clear up with the next few days. Little update on this weeks progress. Start cloning next, and repot will be on cards 👏🏻 light work 💪🏻


Likes
16
Share
@nonick123
Follow
Día 36 (17/02) Riego con 500 ml H2O EC 0,45
Un stretch espectacular!
Día 37 (18/02) Riego ligero con 250 ml H2O EC 0,45
Ha disminuido un poco el consumo de agua
Día 38 (19/02) Riego con 250 ml H2O EC 0,45
El stretch es increíble y precioso 😍💥
Día 39 (20/02) Riego con 500 ml H2O EC 0,45
Hoy se muestra más sedienta después de unos días con menos demanda de riego
Día 40 (21/02) Riego con 350 ml H2O EC 0,45
Día 41 (22/02) Aplicación foliar con Sales de Epsom a 4 g / L (La planta presenta carencia de Magnesio con manchas necroticas en las hojas de abanico inferiores)
Riego con 350 ml H2O EC 0,45
Día 42 (23/02) Lollipopping y defoliación ligera!
Debido a que tiene un stretch espectacular (alrededor de 57 cm de altura) elimino todas los nudos / ramas que no superan el 50% de la altura de la planta
Elimino un par de hojas de abanico grandes
Riego con 400 ml H2O EC 0,45
🚀 FastBuds 15% DISCOUNT code "NONICK" 2fast4buds.com @fastbuds.official
💦 BioTabs 15% DISCOUNT code "GDBT420" biotabs.nl/en/shop/ @biotabs_official
🌱Substrate PRO-MIX HP BACILLUS + MYCORRHIZAE @promixmitch @promixgrowers_unfiltered
💡2 x Mars Hydro FC1500 EVO Led Grow Light (2024 NEW FC 1500-EVO Samsung LM301H 150W LED) - https://marshydro.eu/products/fc1500-evo-led-grow-lights/ - https://www.amazon.de/dp/B0CSSGN5D8?ref=myi_title_dp

Likes
11
Share
@Jays_Not_Here_Man
Follow
A good week for the pink lady, no issues, the heatwaves have subsided a bit and there is a cold front that moved in. The RH has been steady, between 50-55%. I have decreased the nutrients further to just a bit of micro and cal mag. I have begun my process of “flushing” where I increase the water volume to allow for a 10-15% runoff. I find that this does not strip or shock the plant of nutrients it is still needing to fatten up. I do this for the last 4-5 feeds ending with straight phd water.

Likes
23
Share
@AntiGestrecktesGras
Follow
Only water and no water for the last 5-6 days. Also no light in the last 24 hours.


Likes
24
Share
@DeepRootsGrowTrees
Follow
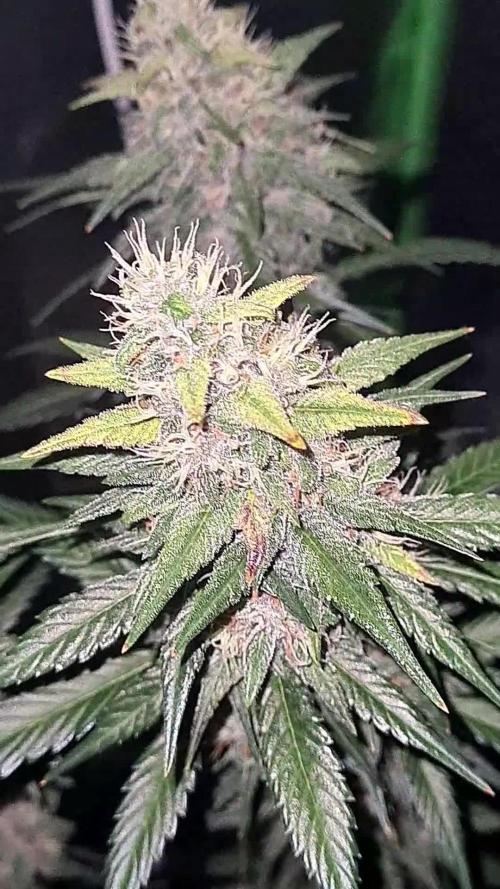
SWISS DREAM ROSE 🌹 CBD AUTO
KANNABIA SEEDS
Week #4 Overall June 16th-23rd
Week #1 Flower
This week she started to flower good thing she stretched to about 13 inches hopefully she'll stretch more to make room for buds. No issues this week.
Stay Growing!!
Kannabia.com
SWISS DREAM ROSE 🌹 CBD AUTO

Likes
8
Share
@Tropicannibis_Todd
Follow
Alrighty Then 👈
Well her first week of preflower is on its way , 😛 the strech is on .....
So far the girls are doing well , been doing alot of LST to pull the lowers out ... looking good 👍
Happy Growing

Likes
233
Share
@Tropicannibis_Todd
Follow
🐶🐶🐶🐶🐶 👉Alrighty Then👈🐶🐶🐶🐶🐶🐶
We're 49 days in and we be moving along great 👈
👉Well my friends we are just moving along well so couldn't be happier 👈
All plants are blooming like crazy 🤪 🙀
We got some great growth right across the board on all plants 👈 All plants receiving at least a min of 850 PPFD
🐶 🐕 🐶 🐕 🐶 🐕 🐶
So we are back for another round 😛 But this grow is special because my big boy needs some love too , he's been getting on the old side of things and his hips have been giving him trouble so I've been buying CBD treats for him and it works great so 😉 👍
I've decided to grow this for my little buddy 🐶 so I can make him some Doggy 🐕 Treats and plus I've never tryed it myself and I really wanna give it a go👈 😊 so let's see what it's all about 👈
I will post the recipes at the end of harvest 👏
So Let's Do This👈
👉Soil Provided by ProMix.ca
👉Nutrients Provided by Agrogardens
👉Lighting Provided by MarsHydro.ca
👉Seeds Provided by Kannabia Seeds


Likes
128
Share
@Tropicannibis_Todd
Follow
💩Holy Crap We Are Back At It And Loving It💩
Growmies we are at DAY 35 and she's just killing💀it👌
👉Added straws within the Tiny pot to help watering in week 4 👈
So I'm starting to see she needs watering every single day and now need nutrients 🙃
Lights being readjusted and chart updated .........👍rain water to be used entire growth👈
👉I used NutriNPK for nutrients for my grows and welcome anyone to give them a try .👈
👉 www.nutrinpk.com 👈
NutriNPK Cal MAG 14-0-14
NutriNPK Grow 28-14-14
NutriNPK Bloom 8-20-30
NutriNPK Bloom Booster 0-52-34
I GOT MULTIPLE DIARIES ON THE GO 😱 please check them out 😎
👉THANKS FOR TAKING THE TIME TO GO OVER MY DIARIES 👈


Likes
12
Share
@GREENPHOENIX6262
Follow
*Week 5 of flowering*
Mimosa 1 & 2 are progressing accordingly, 0 signs of deficiencies.
Though both plants are coming along fine Mimosa 1 is lagging a little behind but not a cause for concern.
Water/Nute feeds have increased and the light cycle remains the same.
Mimosa (2) appears to have shrunk in size but that is incorrect, Main colas were tied down to trellis.
Likes
2
Share
@HuntersQualities
Follow
started flushing this week with ph water at 7.0, until the pistols turn brown, also looking for a 60% amber trichomes with alittle cloudy to less of clear!.
Likes
52
Share
@xbabybitchx
Follow
Flush Day! Well they look good and got amber trichomes on all plants around 20% which im happy with. did a 4L flush per plant!
I did another haircut which took off the rest of the fan leaves, and man my finger were soooo sticky.. ridiculous resin production. woop woop
I am curious how much i'm going to yield off these.. I feel i am still learning, and this grow was better but not perfect. I wish the cola to be a bit more dense n closer internodes. oh well.
Another grow will be on the way so stay tuned? I will flush once more then hopefully have harvested and drying within 2 ish weeks..
anyways stay safe yall n keep it sleeeezy
Likes
16
Share
@AutoCrazy
Follow
Week 6
Well, I finally have 8 tops 😎. Now it’s just a matter of keeping her growing strong and training the tops into the right position. After that is accomplished it’s show time. I am going to guess that it will take a 7-10 days for me to get her where I like it at which point I’ll let her get a few nodes taller and then flip. Main-lining takes some extra time but it is worth it imo.
Cooler internals are:
6.0 pH
0.4 EC
65 F solution temp.
The tent is running 71 F lights on and 68 F lights off. Humidity is 36-38%.
Onward!! 😎🍻


Likes
3
Share
@Dr1delaplante
Follow
14 days since the first little leaves. I started to gradually decrease the humility rate and increase the temperature
14 jours depuis les premières petites feuilles. J'ai commencé à diminuer le taux d'humidité et augmenter la température.

Likes
18
Share
@ApothecAries
Follow
Day 52, stacking beautifully. Got her last kelp potassium boost today. I’m thinking another feed of a Green rush beefy bud on day 56 before starting to flush/ripen. It should be finishing off that 70/30 Gaia feed I gave a month ago. Very eager to smoke some of this medicine. LEMONS! Slowed down to drinking 3L of water every two days again.
I ended up cutting all nutrients out for a ripening. I never went back with a Green rush feed. Im positive there is very little gaia breaking down in the soil if any ! Cloudy trichomes happened this week too ! very eager. Ill be adding a final week photos plus hanging and wet weight photos in a week or two and then in a month you can come back and see what final product and weight looks like with a smoke review!! thanks for making it this far ! i appreciate you guys checking on my progress !
Heres a youtube short i created ! i will do one for every grow just to add to my portfolio! Im hoping by keeping up with all this and show casing my progress, i could potentially find employment in the future under a grower ! https://www.youtube.com/watch?v=lhQWMl7kjLg&lc=UgwRIkWLHVSlsOJWXlx4AaABAg&ab_channel=Apothecaries
youtube video is from day 59 or so
Thanks again !

Likes
104
Share
@Schnabeldino
Follow
_____ Week 10 | Day 71 - 77 | 3rd week of Flower ______
Day 71 🌞
- I mounted a fan below the net for more air circulation i need more defoliation 😅
Day 72 🌞💧
- 24 liters were mixed and distributed among the 8 plants / each plant 3 liter, at the moment I can water them every 4 days
Day 76 🌞💧
- It remains every 4 days 3 liters of water each plant
____________________________________________________________________________________________
Light - 12/12 h - 560 Watt
- 2x 200 Watt Toplight
- 4 x 40 Watt Lightbars
PPFD - 900 - 1000 µmol
Temp. avg. - 22,9°
Hum. avg. - 61 % RLH
