
Likes
Comments
Share


Processing
Likes
30
Share


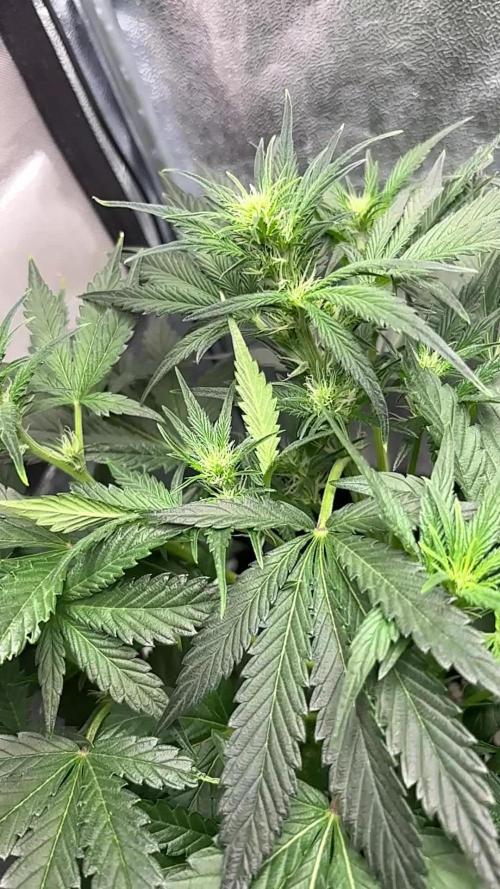
@CBD_Sweden
Follow
2018-04-10 Day 1
I gave the girls water and nutrients yesterday so nothing to drink today.
Turned them 90 degrees today, to give my girls as much lightexposure as possible.
The flowers get bigger and bigger for each day,
Overall the ladies look really good, the colors are very nice, they look healthy.
Sour Ripper nr 1 is 79cm
Sour Ripper nr 2 is 77cm
Added some new videos of the girls, check them out 👌
--------------------------------------------------------------------------------------------------
Strain information
After much effort Ripper seeds can introduce one of the most appreciated varieties by genetic collectors.
They have worked to get one of the few lines of Sour Diesel feminized version preserving the main qualities of a good Sour D: flavor and potency.
Sour Ripper has a sativa structure with a wide distance between branches, little foliage and a more compact and desirable bud than the Original Sour Diesel we work.
It's flowering period is 65-70 days.
The most "undergrown" taste of the United States available for your collection.
Vegetative: 1 to 2 weeks
Genotype: 60% Sativa / 40% Índica
Indoor flowering: 65/70 days.
Outdoor flowering: Mid October
Yield: Medium / High
Effect: Powerful.
--------------------------------------------------------------------------------------------------

Likes
49
Share


@Secretflower
Follow
Hello my friends,
...April 11, 2022....Day N°30...
Beginning of the fifth week of growth for my three Feminized Watermelon Candy.
There are beautiful, the topping working well, the very small plant seems alive..💪
www.zamnesia.com
www.mars-hydro.com
Thank you very much for passing by.
Wish you only the best with your green projects, peace.
See you soon 💨💨💨


Likes
5
Share


@I_Identify_As_A_Dan
Follow
Week 13 for Moby Dick by fastbuds,
She lost a lot of her foliage during the hot weather this week as i also think she ran out of food a little earlier than i wanted her to. At the start of the week i gave her a fairly heavy feeding & she gaining some colour back, but now im back to plain water as she comes to her finish. Actually glad so much foliage has fallen off going to be a lot of an easier trimming job 😂
Likes
2
Share


@Jahasus_Group
Follow
After all research of why plants are going at different rates the only conclusion Conclusion I’ve come to is to do with the fan being too close to the top left Plant and the Seeds to come from different plants but same strain. Will need to go back to royal queen seeds to ask the question???
Leaf burn from wind burn can slow growth of plants

Likes
1
Share


@StonyHemp
Follow
Seriously fruity and frosty strain I’d definitely recommend to anyone, for my third and fourth pants I’m really happy with how they turned out however some issues could have been avoided and I could’ve done a better job myself but overall I’m pretty pleased and a round of applause to Fastbuds 💚
Likes
59
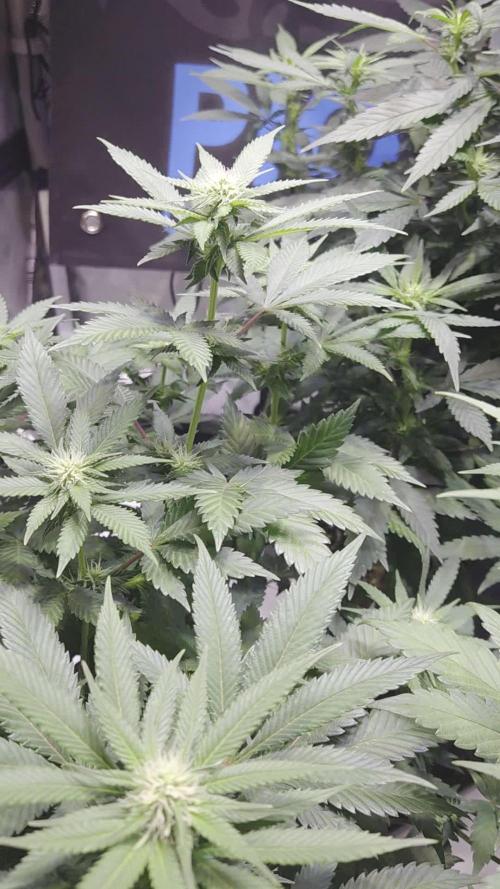
Share


@DaGrowQueen
Follow
Evening, Cannafam and Happy Easter to those of you that celebrate it 🐇
This has been yet another great week with my 3 Green Crack girls. I can't remember if I mentioned it in my last update but I switched out my 300 watt Viperspectra LED for my 600 watt Mars Hydro, also lollipopped the 3 of them and whenever I see a leaf that I didn't notice in my initial defoliation that is obstructing light to bud sites I pop it off but never more than a few leaves at a time. The plants are pretty much in auto pilot right now just cruising. There's no more maintenance left to do on them and aside from feeding them I don't really have to do much except setback and wait on my weed lol

Likes
156
Share


@StarLorr
Follow
Helloing 👋🏻friends and visitors.
Welclone to my Clone diary🙃
Clones are doing very well, did more defoliation trying to get more light to penetrate the plants and exposing bud sites.
Feeding:
Tue 14Nov: 2L each with nuts pH'd 6.35
Thu 16Nov: 2L each with nuts pH'd 6.34
Sat 18Nov: 3L each water only pH'd 6.5
-------------------------------------•
Hope you enjoy the videos and pictures.
Thanks for stopping by, likes and comments are appreciated.
Keep on growin!
Keep on tokin!!!
😙💨💨💨💨💨

Likes
27
Share


@Organic_LarF
Follow
High GD community,
Week 9,
Sweet Thai looking allready better then ĺast week. The topping start to grow gently and a full 13cm in height gained this week.
Since 3 days(friday), the lightcycle changed into 13/11.
Nonetheless spidermites are spotted on this lady, she doesnt back down. After a treathment with orio bugs, who i actually misordered because I didnt had my new microscope yet, trips are definitly gone, and orios do eat/attack spidermites, its not their favorite. So a second army of bugs, this time phyto mytes, its gonna be all about attack and digesting spidermites, Who didnt yet get crowdy so far. But after a check up of some leafs with the new microscope, i can see a lot of eggs and pretty active young spidermites. So the phytos will not come to early. Phytos do eat eggs as orios dont, so thats a big difference.
Thats it for this week boys and girls,
Thanks for reading and passing by,
Grow safe buds and feel free to check out my other ladies doing fine,
🙏🌿🌿🌿🙏


Likes
7
Share

@DeepRootsGrowTrees
Follow
GRANDPA ZOMBIE 🧟♂️ / IZI SEEDS
WEEK #9 OVERALL
WEEK #3 FLOWER
She's doing great as we end week #3 FLOWER she's stacking and starting to get trichomes. She's vibrant green 💚 and looking amazing!! STAY GROWING MY FRIENDS!!
THANK YOU 😊 FOR STOPPING BY AND TAKING A 👀!! IT'S MUCH APPRECIATED!!
THANK YOU 😊 IZI SEEDS!!
GRANDPA ZOMBIE 🧟♂️ / IZI SEEDS

Likes
111
Share


@Salokin
Follow
HI Guys,
she is not doing to well, she seems to have suffered from root rod, due to a clocked air pump filter (totally my mistake, didn't even now that this needed cleaning). Anyhow, very annoying, lots of cleaning and sterilising I hope she will bounce back and will give her another week to build new roots, if she however won't do that, I will terminate this one and pop another one, as I was actually looking forward to smoking her. It looks like she is already setting up a new set of roots, so 🤞. Up top she is now looking a bit droopy showing a few nutrient deficiencies, but still growing, however a lot slower than in the beginning.
Thanks for stopping by and hopefully until next week.
Likes
13
Share


@gr3g4l
Follow
Inicio de floración , fotoperiodo 12/12h. bajo 300W, ATS Pro 2,7 µmol/J.
Por lo que hace al cultivo. Una segunda aplicación foliar con Spider boom 3ml/l para prevenir posibles plagas de araña roja. Todo y habiendo unas temperaturas en el exterior de 0ºC en el interior se está bastante bién. 😋
Así de primeras diria que esta luminaria me parece de lo mejorcito que he tenido nunca, reparte la luz como ninguna otra penetrando mucho mejor. Otra es la comodidad para bajar o subir la potencia y la posibilidad de añadirle un controlador que monitorea la temperatura de la sala de cultivo, el fotoperiodo y la intensidad, así como la atenuación de potencia.
Esta semana cansado de ir bajando o subiendo la potencia del extractor durante todo el año he decidido probar un SMSCom Smart Controller. De esta manera espero no sufrir tanto por las subidas ni por las bajadas de temperatura. Muchas veces son las que por A o por B descuido el interior y casulamente son los dias que el tiempo cambia repentinamente.
Un primer foliar con Delta9 para que se pongan fuertes para lo que les viene.

Likes
14
Share


@9LittleGrow
Follow
Week -3 of flowering Stage
91 Octane is massive and looking the forming of her pistals and trichromes is very satisfying.
Banana Daddy is also starting her blooming phase you can see her pistals in the video.
The last Sugae Cane lates in flowering. She still doesn’t sign or start to see no pistals but she grow healthy and happy.


Likes
Comments
Share


@Cannussy
Follow
6/21/25
She started week 3 and was ready to top for the first time. Her stem reached over 3mm and look at those big ass fan leaves of her. Holy molly. Never going back to soil. For everyone who wants to try dwc or hydro, do it bc there is nothing to fear! Ph is stable between 5.7 -5.9 I only intervene when it would suddenly drop under or over by a lot. Otherwise I just go by how the plants are looking and growing.
6/23/25
She is recovering very well. Starting to smell a little already, thats when you know its gonna be some good stuff. If I dont fuck up that is 🙃
6/25/25
Gotta do a res change soon, she is deinking and thriving
Likes
7
Share


@TripleCcannabis
Follow
Strating the germination process for my latest grow. Im growing white Bhutanese by Mandala Seeds. ■ {{ White Bhutanese: 80% Sativa 20% Indica ~ 12 to 14% THC & CBD (Earthy, Fruity, Lemon, Mint, Nutty, Sour, Spicy / Herbal, Sweet)}} Really into cultivating a highly therapeutic strain, which begins with finding something close to what you want to achieve. Fingers crossed 🤞
September 23. In the rock wool she goes.
September 30 Patricia is officially transplanted to her resevoir.

Processing
Likes
33
Share


@Weird_Jimmy
Follow
✋Wk12:Trichome Hunting and Changes in diet.
👉The week has shown to be not just the usual fun of having cannabis in the flowerings stage, but also the frustration of having cannabis in the flowering stage. The fun is the funky stank that hits me in the face as I open the tent each time, then gazing at the magical flowers as they get plumper and fuzzier. The frustration comes from the seemingly slow motion pace the plants are taking as I dream of harvest day.
👉The 3 gallon plant has reduced its volume of liquid it consumes. However, I have only slightly reduced the total volume of solution given each time. I have kept the EC around 1.3. The run-off has climbed quickly between fertigations, and I have done a couple of H2Only irrigations. The runoff EC spiked on the last day of this week. I did another H2Only irrigation followed by regular nutrients. I have seen issues on the upper leaves that could be nutrient related, or maybe light stress, perhaps its moody and hates me for not spending more time with it. I have been keeping the lights at around 17” from the top of the main cola. The lights driver is turned fully on (light is rated at 150W). Its counter intuitive to me that the light would be causing light stress since its only 150w. I would think a much more intense light would cause that or one kept a lot closer. So I have pulled the light to its max height. I may dial back the driver a tad. The buds are getting very bulky and are very dense. I hope they stay that way and not foxtail like its tent mate is doing.
👉The one gallon plant is starting to fade. Its larger leaves are mostly yellow. I take the yellow leaves when they begin to dry up. Some just fall off when touched. I’ve done some extensive trichome hunting and have only spotted only scant few ambers. Most are still clear, but there are lots of cloudy ones too. Very hard to differentiate if they are in the direct light of one of the grow lights (or any led light). The led light makes them all look cloudy, but indirect light shows most are still clear. I will continue checking each day for the status of the trichomes. I will harvest when almost all are cloudy with only a few clears remain. I have kept its solution volume at 1.5l at the low range EC of nutrient solution. I have also given a couple of H2Only irrigations to lower the EC runoff. The buds are sort of fox tailing but look very much like the breeders picture on the product page. The cola are long and getting bulky, but probably not very dense. They are super frosty and the calix’s are getting very large, much like the gorilla glue I grew was. The aroma of the funky stank is strong enough to be smelled outside (I vent outside). The up close smell is different than the tent smell…still creamy sweet caramel…so weird to me…I can’t wait to try it…in like 8 more weeks…sigh. I will harvest the plant when it says its ready. Almost there.😷

Likes
23
Share


@WolverineGreens
Follow
They r still stretchin they asses off.😁 2 maybe 3 more feedings wit grow nutes.
Other then the mutant alaskan purp, everything looks good. They look loke they r still in the middle of strectching, so im guessin ill average a height of round 5'5"-6ft for the 30 inground.😁😁😁 the short ones r big around tho so im happy.
Gave up trying to figure out the problem with my mutant ap. I cut it way down on nutes and didnt see a change. Will just treat it like the others til harvest n see what happens.


Likes
24
Share


@Mr_Awesome_Badass
Follow
Training has started. I know it's early but this is gonna be a cannabonsi so it's time.
Going to be fun to mess with this thing.
