
Likes
Comments
Share


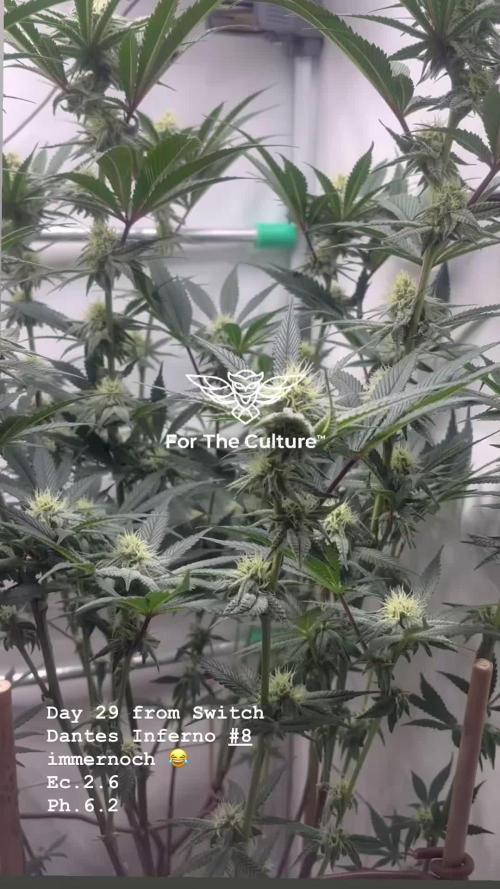
@Ultraviolet
Follow
....Understanding Electrical Conductivity
Electrical conductivity measures a material’s ability to transmit electric current, which in the context of gardening, relates to the soil or nutrient solution’s ion content. In simpler terms, EC indicates how salty the environment is around the roots of a plant. This “saltiness” is crucial because it affects the plant’s osmotic pressure, which in turn influences nutrient uptake and overall plant health.
The Science Behind EC
At its core, EC measures the presence of soluble ions like potassium, calcium, magnesium, and nitrates – all vital nutrients for plant growth. These ions carry electrical charges, and their movement creates an electrical current, detectable as conductivity. High EC levels typically mean a high concentration of dissolved ions, whereas low EC levels indicate fewer nutrients are available.
The Impact of Electrical Conductivity on Plant Growth
The relationship between EC and plant growth is a delicate balance. Just the right EC level can enhance nutrient uptake, bolster plant health, and increase yields. However, when EC levels stray too far from the optimal range, they can lead to nutrient imbalances, osmotic stress, and even plant death.
Nutrient Uptake and EC Levels
Plants absorb nutrients from the soil or water through their roots, a process influenced by the surrounding EC levels. Ideal EC levels help create an optimal environment for this exchange, ensuring plants receive the nutrients they need without exerting excessive energy.
High EC Levels: A Double-Edged Sword
While a certain level of dissolved ions is beneficial, excessively high EC levels can harm plants. High salinity can draw water out of plant cells, leading to dehydration and nutrient lockout – a condition where plants cannot absorb essential nutrients despite their presence.
Low EC Levels: Undernourished Gardens
Conversely, low EC levels can starve plants of necessary nutrients, stunt growth, and lead to underdeveloped or diseased plants. Maintaining an optimal EC range is crucial for healthy plant development.
Measuring and Adjusting Electrical Conductivity
Understanding the importance of EC is one thing, but applying this knowledge in the garden or greenhouse requires practical steps. Regular monitoring and adjustment can ensure that plants remain in a conducive growth environment.
Tools for Measuring EC
Gardeners can use various tools to measure EC, from simple handheld meters to more sophisticated systems integrated into hydroponic setups. Regular monitoring allows for timely adjustments to soil or nutrient solutions, ensuring optimal EC levels.
Adjusting EC for Optimal Growth
Adjusting EC involves changing the concentration of nutrients in the soil or solution. In hydroponics, this might mean diluting or concentrating the nutrient solution. In soil, amendments may be added or flushed with water to correct EC levels.
Practical Applications: EC in Various Growing Environments
The application of EC knowledge varies across different growing environments, from traditional soil-based gardens to modern hydroponic systems.
Soil Gardening
In soil, EC measurements can help diagnose nutrient imbalances and guide fertilization practices. Amending soil with organic matter or flushing with water can adjust EC levels to better support plant growth.
Hydroponics and Aquaponics
In hydroponic and aquaponic systems, where plants are grown in water-based solutions, maintaining optimal EC levels is crucial for nutrient availability. These systems allow for precise control of EC, directly influencing plant health and yield.
Greenhouse Cultivation
In greenhouses, EC monitoring can help manage the nutritional status of various plants, ensuring that each receives the right nutrient mix for optimal growth. Automated systems can provide real-time EC adjustments based on plant needs.
Navigating Challenges: Overcoming EC-Related Issues
While maintaining optimal EC levels can significantly enhance plant growth, gardeners may encounter challenges such as fluctuating conditions, equipment malfunctions, or environmental stresses. Regular monitoring, combined with a solid understanding of each plant’s specific needs, can mitigate these issues.
Conclusion: The Conductive Path to Lush Gardens
Electrical conductivity, though an invisible factor, is a cornerstone of successful gardening and farming. By understanding and managing EC levels, gardeners and farmers can profoundly influence the health and productivity of their plants. As we continue to explore the nuances of plant growth, the role of EC stands out as a testament to the marriage of science and nature in cultivating life. Whether in soil, water, or air, mastering the art of electrical conductivity can unlock the full potential of our green companions, leading to bountiful harvests and vibrant gardens.

Likes
44
Share


@Jays_Not_Here_Man
Follow
The girls had a big week! Started off with transplanting to their 2 gallon pots early in the week. They showed no stress, or signs of slowing down. With the extra room to spread, the girls were clearly loving their transplant home.
Temps were steady around 82 degrees, and RH was kept to a reasonable 60% while they were recovering. I also started with a larger nutrient feed, and will be rotating between regular feed, light feed and then plain water now that they can handle more.

Likes
44
Share


@bSandersWitASteelChair
Follow
5/14: A ended up falling over so I decided to move the dirt around and see what I could see with respect to its root structure. It had one very long, extremely thin dried out root that extended about 2-3 inches and ended in a little tangled up taproot. There was a little worm/nematode/larvae something crawling around in it. I attached video. I'm assuming I need to dump all my water and sterilize, re-ph, etc. Everything is already watered for tonight (should have pulled A first in hindsight) so too late to do anything about the other 2 plants, though they do look pretty healthy still.
---------------------
5/13: Transplanted E into her pot this morning. Same soil mix (3 parts FFOF to 1 part perlite). Seedling C is crushing it, with second set of leaves already forming. E is probably going to go quiet for a day or 2 while it recovers from transplanting. Seedling A looks like it might be overwatered? It feels pretty frail compared to the other 2 plants and the downward curl of the leaves I think suggest too much H20. Will be letting them dry out a bit today.
Also, turned up the lamp to 600W and moved it to about 24 inches from the tops. Temperatures are consistently 74-77F and RH holding right around 50%.
Still no nutrients. I plan to add them around week 3, unless I see signs they need it sooner.
--------------
Out of 5 seeds we started, A, C, and E remain. E a few days behind A and C but growing faster. Planted A and C in FFOF/Perlite 3/1 about 4 gallons total in a 5 gallon bucket. Will do the same for E in a couple days. Moved the light up a bit to account for the buckets. Water ph'd to just about 6.0. Light still on 250W but will be moving up to 400W when they wake up later today. Will go to 600W once all are in pots and at a relatively uniform height. Currently just trying to keep the RH close to 70 and the air temp less than 80. No nutrients for 3-4 weeks unless they look hungry, since FFOF has quite a bit in it to begin with.
If not for me killing seed B and seed D never germinating, I'd say we're off to an OK start. The 3 that are growing, seem to be growing extremely well. I put together my own ScrOG that I will install once the light is out of the way, and plan to top these a few times each and LST. I was hoping to have 4 plants to fill the space but we will do our best with 3.

Likes
18
Share


@BrownsBuds
Follow
Three plants are continuing to grow well and starting to grow a lot more in size. The Dr jack strain is still showing curled folding leaves and marble effect on leaves.

Likes
3
Share


@RunicKevin58675
Follow
Hello everyone growers <3! This has been the most stressful week of all factors for these bad girls... But I see they are acting like: "DragonBall's Freeza when he had his tail cut off and got up off the hill despite all the blows"
Likes
5
Share


@Stickybudz420
Follow
Right back this girl don’t know what to think she’s back to front half of her has been in flower about 2 weeks the other sides just started just hopeing she’s not a dud like most of barneys autoflowers not showing any frost yet so could be getting rid of her will see over the next couple weeks 😤👎

Likes
13
Share


@HIAZ_urbanbudfarmer
Follow
Although these plants might look small for 7 weeks old, it's because of the way I've been training them, to grow horizontally & all the H.S.T I've performed to get a really strong, thick structure & also as I've had to manage the height as they will be in veg until the plants in flower are finished & I can transfer them & start flowering.
Continue tying branches down as they grow & separate growth tips. Also defoliate leaving only top growth as this will be removed later anyway.
Very hardy plants that have handled all the H.S.T & my accidental abuse with no worries. Very thick strong branching.
Finished training & now letting them grow upwards to get a bit of size before they get put to flower.
Looking for great genetics & a great deal then head to the Fast Buds website & use the code GROWEED for a 15% discount off your seed purchase.

Likes
2
Share


@KeemBboomin
Follow
Everything is not as accurate as I would like to say, but I wanted you guys to see what I can do
Likes
7
Share


Likes
16
Share


@70x70
Follow
I wasnt home much for 3 weeks starting this week so i dont have any idea about the exact conditions meanwhile but in the end it was more humid and hotter since i dimmed the light to 100%.
Above/next to the lamp the maximum was 32C and at the leaves max 30C before adding airflow to the lamp. This brought it back down about 2C.


Likes
25
Share


@MadeInGermany
Follow
Hey guys :-)
She is developing great.
This week was poured 2 times with 1 l each (nutrients see table above)
Otherwise, everything was cleaned and the lady sprayed with Fast Plant Spray.
Since there are still 2 weeks left until there is space in the bloom tent, the topping was made again 😃
have fun with the update and stay healthy 💚🙏🏻
👇🏼👇🏼👇🏼👇🏼👇🏼👇🏼👇🏼👇🏼👇🏼👇🏼👇🏼👇🏼
You can buy this Nutrients at :
https://greenbuzzliquids.com/en/shop/
With the discount code: Made_in_Germany you get a discount of 15% on all products from an order value of 100 euros.
👇🏼👇🏼👇🏼👇🏼👇🏼👇🏼👇🏼👇🏼👇🏼👇🏼👇🏼👇🏼
You can buy this strain at :
www.Zamnesia.com
Water 💧 💧💧
Osmosis water mixed with normal water (24 hours stale that the chlorine evaporates) to 0.2 EC. Add Cal / Mag to 0.4 Ec Ph with Organic Ph - to 5.8 - 6.4
MadeInGermany


Likes
7
Share


@Messypies
Follow
Apologies for the lack of update. Personal life things....
Anyway. 3 plants on the road to harvest. Checking trichomes daily and so far clear. Buds are starting to swell. I managed to rectify the defficiency (,a little too late) but better than never ! Yeilds won't be great. Not sure about potency yet however as its my first grow, I'm quite proud to say the least :)

Likes
41
Share


@KilgoreTrout
Follow
Everything looking great. I'm adding pk13/14 starting today at 2ml per gallon for the next two weeks. Leaves starting to sugar up, smells piney and amazing.
Likes
15
Share


@Drtomb
Follow
I dropped the net down a little bit further. I believe I may need to grow more tops for this strain next time.. As well as they need to get much bigger before the flip.

Likes
4
Share


@Ryno1990
Follow
Snow panda is another atlas seeds strain that has amazed me with how awesome she grew an how frosty she got she us ending week 5 an is going into flush to harvest end of week 6 begining week 7
Likes
9
Share


@BudFox
Follow
So far I keep training back the branches to keep the tops even, they’re responding well. I might top the middle plant this week if I am going to top her. Kicked up the base nutrients and added in a few root boosters and bud dandy to prep fo flower. I’m probably 2 weeks from flowering, but I should be transplanting near the end of the week and moving into the flower tent a few days later.

