
Likes
Comments
Share


@PatriciaGant
Follow
Celebrate Mike Tyson's comeback with the exclusive RQS & Tyson collaboration: The Jawbreaker. Limited to just 2,000 units, this special edition blends Gelato #41 and Kosher Kush, delivering 27% THC with pine and earthy aromas. Housed in a bold black and red box, it’s a cannabis collector’s dream, capturing Tyson's strength and vigour.
The Jawbreaker Limited Edition
Gelato #41 x Kosher Kush.
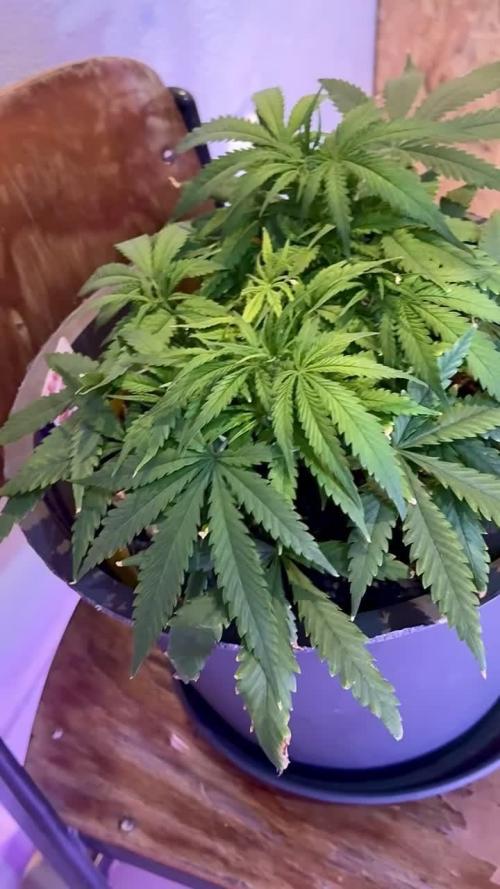
All Nutrients and adding Information in Ger-Section.
Finaly start of her Life, see Ya soon.
One day i wil have my one strain:-)

Likes
4
Share


@TS_Greens23
Follow
This week was full of ups and downs,,smiles and frowns,,,due to some early LST,,I managed to pop a couple branches off,,which is always frustrating but at the same time,,interesting and challenging,,so I will let her do her thing for a week or so,,and then look at how I’m going to shape her,,might be a blessing,,🤞🤞🙏

Likes
2
Share


@ChitownCannaChica
Follow
Honestly— grow diaries screwed up big time here. I have two weeks of this diary completely missing after their update. I delete the pics so I can’t re update the lost weeks they deleted. This is week 8 and I chopped up this tester. Came out beautifully! Love the color. The density is on point, and the terps are pine cleaner.
Harvest update next week. Big yield here!!!


Processing
Likes
3
Share


@mr_smooke
Follow
Here we are on day 28.
On day 23 i spoted Spider Mites. Next day i been spray leavs whit neem oil, for now SM are gone i hope they will not come back. Been spoteted on some leavs some def. I think that is mg, ca.
She coming along nicely😁🤩🤘✌️


Likes
19
Share


@CannabisAprendiz
Follow
Bueno , este es el segundo cultivo que realizó del la cepa "Waka" , el anterior lo tengo igualmente documentado en otro diario .
en esta ocasión cultivamos los clones que habíamos recolectado del cultivo pasado , guardando los fenotipos que nos gustaron más y los clones restantes los pasamos a floración que fueron los que se le hizo seguimiento en este diario.
El crecimiento fue bastante explosivo y reaccionaron muy bien a cada trasplante realizado .
pude observar que los clones de cada fenotipo seleccionado se desarrolló con mucha similitud al de sus madres .
El olor en vegetación es bastante discreto y en floración se pone un más intenso
El desarrollo en floración fue explosivo generando bastante resina y se vieron muy hambientras .
Al fumar se puede sentir un rico toque cítrico en las N° 4 se siente un fuerte sabor a limón en algunas flores mucho mas marcado que en otras,
N° 3 y 13 un agradable toque a naranjas muy rico de sentir en el paladar , La N° 8 con pizcas dulces bastante interesantes.
El humo al fumar es muy suave lo que permite sentir mejor el sabor de cada fenotipo.-
saludos y buenos humos😉
Al momento de cosechar se cortaron los clone y se dejo secando en oscuridad a temperatura ambiente por cerca de 16 días posterior a eso se pasó a curar en frascos

Likes
Comments
Share


@Ctrellis90
Follow
End of another week and dang are these girls going!
The alfalfa Ferment is definitely doing work down in that rhizosphere. It's pretty amazing how well this Ferment does for veging cannabis. I seriously cut my veg time down by almost half when I use it! That's the main objective right there, to be able to continuously flip into flower right after harvesting, and we're basically their now that we have everything dialed in.
These girls will be getting synthetics next week. We're going to start them on a light feed of Athena blended then go from there.
Thanks for stopping by and we'll see ya next week.

Likes
6
Share


@LAShugars
Follow
Getting there! Continuing to feed her Pride Lands Flower and GreenGro flower finisher. Add seaweed, humic acid and silica to the water. I’m thinking one more feeding and then just water and blackstrap molasses.
I sure am going to miss this girl
Likes
16
Share


@OrganicBuds030
Follow
Ich werde am nächsten Tag anfangen zu entlauben und bereite sie auf die Blüte vor.

Likes
26
Share


@pifflestikkz
Follow
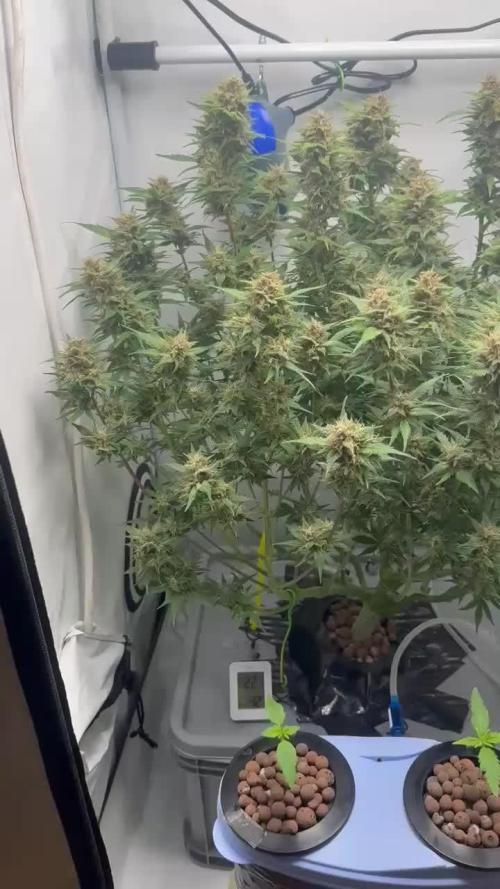
Day 106
14/10/24 Monday
Their colours are really coming through now 🤩
Nearing their end now, possibly another week after this ✌️💚
Picture and video update 📸💚
Day 108
16/10/24 Wednesday
Another run through of de-chlorinated tap water and flawless finish all to pH 6.3.
Giving 0.3L again daily as there not drinking half as much now.
Picture and video update 📸💚
Day 110
18/10/24 Friday
Divine Seeds Overdose has been Harvested. Check her own diary on my page for full results.
I moved the others into my now cleaned down 1.2m x 80cm under 660w hps to finish off.
Day 111
19/10/24 Saturday
De-chlorinated tap water and flawless finish at pH 6 today.300ml
Day 112
20/10/24 Sunday
De-chlorinated tap water and flawless finish at pH 6 again 300ml.
I have had an extremely busy week. I'll upload videos and pictures tomorrow on a fresh week... Wait and see the colours 😋💚

Likes
8
Share


@Gardens_of_Of
Follow
All Girls matured and went to drying this week. I will include an harvest report once dried.

Likes
4
Share

@Simba732
Follow
Week 4 over for wa girl.
Soil PH was off this week and the ppm levels was way too high after I tested my runoff.
So this week was mainly about flushing and trying to get the medium back to ideal conditions.
So far she’s recovered well and been cruising ever since.
There are a lot of new tops showing up so I need to lightly defoliate and tuck in some leaves to allow even light distribution on the canopy.
Temperatures have been assessed, I could see stress on a few of my plants already.
Really interesting plant though, the smell has started coming out and it’s lovely 😍
Let’s see how everything goes.
Take care beautiful people


Likes
10
Share

@IIIStonerIII
Follow
The End. Summary: Extraordinary Performance, Very loud and incredible smell. Loves EC around 1 during early veg. Doesnt like EC above 1.4 during late flower. When i grow it again, ill probably stick with 4 to 8 budsites instead of having like 30. 😅 I'll be back for Dry Weight & Smoke Report. 🍃✌️
Likes
2
Share

@Bear_Grows_Green
Follow
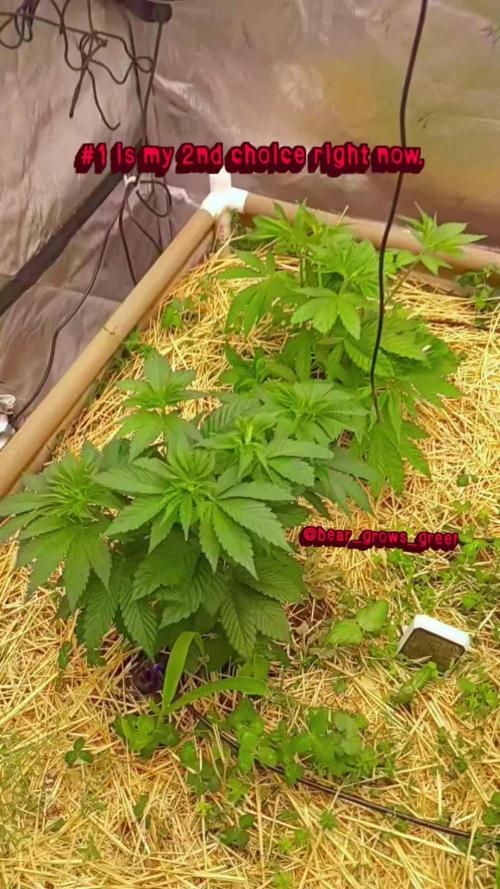
12/18 start of a new week they seem to have really settled into the bed and reacted well to the last feed.
12/21 gave a tea that had worm castings, lobster compost, gnarly barley, craft blend, rolled oats, and molasses 20 hour brew. Added all the goodies to it 3 gallon drench. Defoliated lower leaves touching dirt.
Likes
5
Share


@Foxbud420
Follow
The zipper material is a little cheap i think. Some of the black fabric from the zippers are fall of… lot of light leak.
The velcro from the fabric tape to hang of the front door are to short.


Likes
27
Share


@Bread_n_Buds
Follow
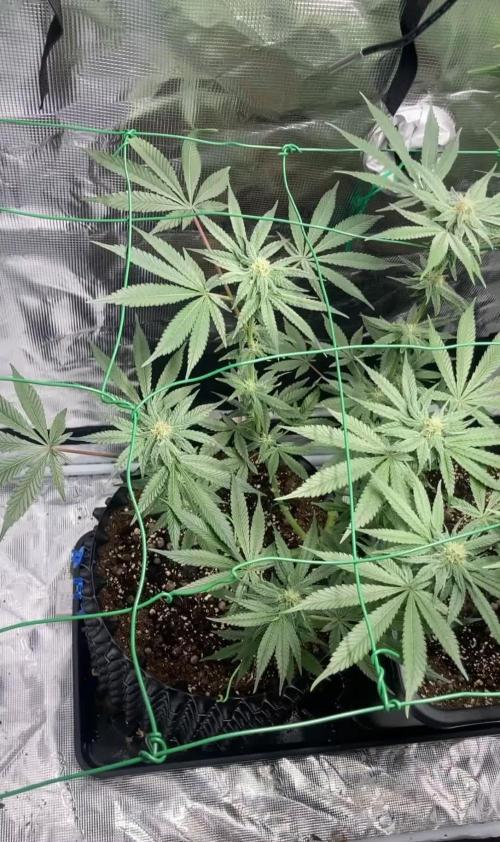
Here we are again ready to start again, always under the sign of Zamnesia, we make our fantastic plants and we show you what we are capable of. We have 5 autoflowering strains and 5 photoperiodic ones and now we present them to you.
The fifth and last autoflowering for now of this round that we present to you is another classic of the classics always in the Zamnesia version. We have already grown it once and we sincerely hope to find the purple phenotype, Mythical mythological herb really in music and in everything, WE ARE TALKING
To explain my germination method which is a combination of experiences acquired in the field and readings of right advisors, I have chosen to divide it into phases so whoever wants can follow them and understand better step by step.
- Preparatory Phase ---- Check the average temperature in the room, humidity status to understand well whether it is the case to start or wait, I decided for the end of August because the temperatures start to drop towards the 22-25 degrees recommended for germination.
Then another thing more or less credible depending on the sensitivity is the control of the lunar phases. I believe in it a lot, it is a method that ancient farmers used to understand when it was best to plant depending on the attraction of the moon. To make my life easier I use a simple app that advises you on the right time to plant, harvest and put in a jar (depending on the lunar phases).
- Phase 1 --- Soaking in water. There are many authoritative friends who advise against this method due to the risk of drowning, but I have always been fine and I follow the rule if it opens in water almost certainly the seed is healthy and will come out of the ground 90% normally.
- Phase 2 --- Opening of the seed in water. As soon as the seed opens and the root comes out a little you have to be very very careful not to leave the seed in water open for too long. This is why there is a risk of drowning. So as soon as the root has come out it must be planted. Do not wait for it to stretch out too much, in the absorbent paper you can wait a little longer in water no.
- Phase 3 --- While I soaked the seeds I prepared my pots: I use small biodegradable pots (choose the ones with holes underneath for drainage). A few hours before working with the opened seeds I moistened the soil with water adjusted to the right pH (5.8 - 6.2) and Plagron Power Roots. The small root is now open and we can make a little hole with a toothpick, widen it and insert the seed. Not too deep with the root facing downwards. From Serious Seeds we learned the dome technique: if you put a small dome of soil on the seed the water will settle on the sides avoiding overwatering problems.
- Phase 4 --- The plant emerges from the soil. Up to now I have not put the light on, now I turn it on at minimum after half a day of soil to give direction to the seedlings. The first week the light will be gradually brought from 40% to 60% to go to 70% - 75% in the remaining weeks of veg. During the first week maximum, I keep the cycle of 24 hours to avoid stretching. Be careful not to exceed the first week at least with photoperiodic.
- Germination % --- In water 20/20 seeds have opened for good luck I'm waiting to talk when they come out of the ground but it seems that we are going towards an excellent percentage of germination..."Not too bad"...
- Soil and Food --- The soil used is entirely organic in every part and is the Plagron Promix that will be used with the 100% organic pack supplied by Zamnesia complete with all the main fertilizers for your plant buy it at the link --
https://www.zamnesia.io/it/11457-plagron-easy-pack-natural.html
// Strain Description // New Strain testing coming soon... -
- Get a seed of this fantastic strain --- https://www.zamnesia.io/
- Soil and Fertilizers entirely organic --- https://plagron.com/en
- Growbox --- https://www.secretjardin.com/
- Music and sound --- I made my girls listen to 432hz frequencies and music from www.radionula.com
- Z --- You can find these seeds, much more from the world of cannabis, mushrooms and an incredible series of accessories and gadgets on the reference site not only mine but of many growers ----
https://www.zamnesia.io
Likes
18
Share


@Wicked_Stix
Follow
Been another smooth week. A few of the plants are starting to show signs that they are moving towards to finish line. Seeing some swelling, pistils starting to brown, and some beautiful purples coming out in some of the buds. Been debating on giving them a dose of dry koolbloom, but I will probably just keep them running on the maxibloom until flush since they look pretty happy. Thos candy cane is popping up a lot of deep purple tones but I'm not really liking the lack of swelling in the calyxes at this point. She has a nice sweet candy aroma, but I am thinking she will be the loser of this grow when judging bag appeal alone. Hoping she puffs up over the next week or so.