The Grow Awards 2026 🏆 


Likes
Comments
Share
@Plantinator
Follow
She is taking shape nicely, but in the meantime I noticed some CalMag and N deficiencies too. On the next feed I will go with 2/3 strenght and the following one will be 3/4 if needed.
At the moment I’m switching from tap water to rainwater, the problem is that Biobizz PH down doesn’t hold the ph for more than an hour. Hence the deficiencies.
I ordered a PH- from Growth Technology, it solved the issue.
The watering regime is as follows:
•Clean water in the tray for 3 days, top up if needed
•Turn off the air pump, drain the water
•Wait 12 hours
•Pour the feed in the tray (4 liters - 1/2 strenghth)
•Leave the feed in the tray for 24 hours, air pump off
•Drain the leftover of feed
•Clean water in the tray, turn the air pump back on

Likes
7
Share
@Adam22
Follow
The plant on the right got chopped down the hairs were 90% dark brown while left was fully white last week when it got taken down it had only one day flush. This plant I will flush for a week and see which is better. It has decent size buds all the way to the bottom but this one growing still doesn't have as many crystals as the harvested plant which was definitely cut down way to early 😕 shame it must have forced to finish early from shock when I snapped a main branch clean off. This plant I will flush with plain filtered water for 7 days and even if it doesn't have as much crystals as the other plant, the bud size is 2x-3x the size of the plant that was cut down last week so I hope they will look a lot better size wise after they shrink when they are cut down and dried. I have also noticed some medium sized fan leads turning from green into a beautiful dark purple colour over the last 2-3 days slowly and it's spreading to other leaves the buds on this plant are also purple bits it's hard to see on here but looking sweet so far I have uploaded pic of the frost one which has been drying for a week now
Likes
4
Share
@Greenbum
Follow
This was a solid week but my PH keeps dropping. PPM dropped from 780ish to 560 so I know she's eating. Buds are forming nice and compact for their first week of actually forming. Other than the PH problem that I'm correcting daily until my fresh res change, my tallest stalk in the back grew into the light so hopefully those buds don't bleach!
Open to constructive criticism btw!


Likes
30
Share
@DankeyeBeaverjuice
Follow
Boom! She's rolling along now.. This definitely my favorite part!
Likes
Comments
Share
@KurtThePlantGuru
Follow
This is actually Week 6, little delayed on this diary.
Grease Monkey is performing beautifully, noticing first signs of fade. Was going to give one more feed before I start flushing, as it could definnetly still use some nutrients!
Buds are bulking incredibly, fat golf ball sized nugs, that real of rubber tires, fastfood/garlic burger, with notes of an oil spill or diesel spill.
Super intoxicating aroma, never smelled anything like this before
Packing on frost amazing, bulking up super well. If it wasn't for the Herm, would've been my best grow yet!
Likes
Comments
Share
@Edgy58
Follow
These plants got off to a slow start, as I can tell by the pony tail root system.
They were scrawny little plants from the get go.
I believe due to a couple reasons.
Colder night time temperatures in my tent and in the reservoirs, creating anthocyanins as a cold defense which has given them some color.
Talk about the smell of blackberries. Did I say Blackberries!
I’m not one to throw things out so I gave them some love and patience.
You can tell these girls are fighters.
Check out the resins drops in the second video.
That's why I rated Blackberry a 10 was because of the resin drops.
Can't wait to grow again, expecting larger yields.
Likes
6
Share
@HUMO_Cultiva
Follow
Day 39 from seed!! I’m exited to watch the explosive grow of this genetics soon i will be take some clones or each pheno to take the best and put in the next batch!!! Stay tuned

Likes
11
Share
@HIAZ_urbanbudfarmer
Follow
This girl is going good , nice & healthy, continue to train her horizontally for main lining.
Likes
207
Share
@PEAKYPLANTERS
Follow
Hi guys, how's it going?
We are out of strength but we want to continue our efforts on the platform
My God! If we continue at this rate....I think next year I will eliminate all types of soil from the list 😄😄😄
We're having so much fun with this tree😎👩🏼🌾

Likes
6
Share
@Aleks555
Follow
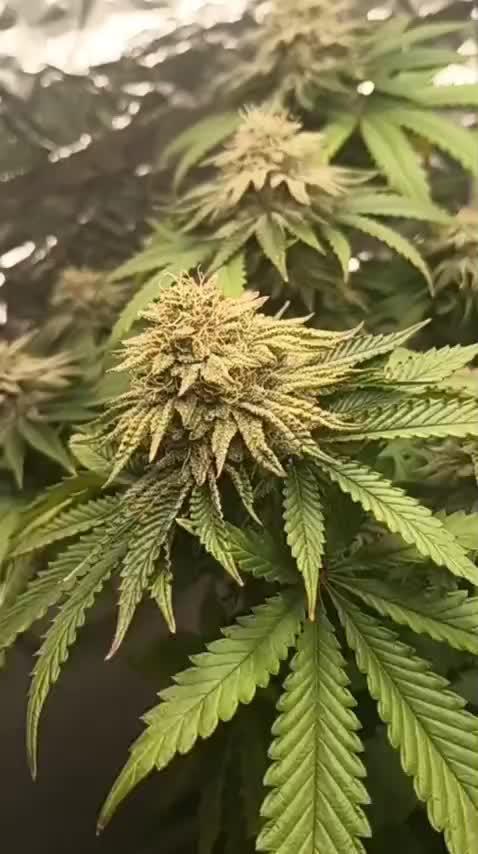
42Fast Buds - Gorilla Cookies Auto - Day 60
At 65 cm tall and 60 days in, our Gorilla Cookies Auto from 42Fast Buds is deep into the flowering phase, and we couldn’t be happier with the progress! The buds are developing an irresistible aroma—sweet and earthy, with a rich complexity that fills the room. What’s even more exciting is that, day by day, we’re seeing the cones swell and get coated in a thick layer of sugary trichomes, giving that frosty look we all love.
We’ve been feeding her with Xpert Nutrients throughout the entire cycle, ensuring she has all the right elements for powerful growth and healthy bud development. The results are incredible, and the anticipation for harvest is building!
Climate: 25°C, humidity 60%
CO2 Boost: Enhancing the size and resin production of these stunning buds!
Stay tuned for more updates as I document this beautiful grow and get closer to harvest. Excited to share the final results soon!
#42FastBuds #GorillaCookiesAuto #CannabisCommunity #GrowDiaries #FloweringPhase #XpertNutrients #MarsHydro #CO2Boost #CannabisCultivation #420Grow #GrowLife #FrostyBuds #SugaryTrichomes
Likes
11
Share
@NoProbation4Weed
Follow
its day 35 since sproud and the plant looks good so far. I removed some leaves and started training her with that bending clips to make the branches stronger.
I collected leave mold from the surrounding woods. a lot of white fungy hopefully usefull mycoriza.

Likes
33
Share
@Damonkey
Follow
All plants are ready to come down now will be harvested in the next couple of days. As it ends in the tent there’s one Banana one 10th and the skunk Hero in joint position for best looking flowers, I really couldn’t pick between them so I guess all have lots to offer across phenotypes and it really is mostly good. The other banana and -0th are by no means bad oh they’re really nice too. The Genetics surely do pass the test for me. If you want to be sure what you grow will be of decent quality Ethos really are worth a try. Harvest this month will be bountiful, beautiful, aromatic and will fuck you up😉😂 all three had phenos that grew really nice dense flowers, the ones that’ll light up your eyes as you open up your stash pot.


Likes
44
Share
@SooSan
Follow
J'ai divisée la 90x60x140 en 3 parties (et donc 3 Diaries) :
1️⃣
🏠 60x60x140
☀️ FC-E 4800 => puissance a 20%
🍁
1x Black Bomb / Philosopher Seed
2x Amnesia Lemon / PEV Seeds
1x Blueberry / PEV Seeds
1x Blueberry / 00 Seeds
1x Wappa / Paradise Seed
1x Dark Phoenix / Green House Seed
1x Quick Sherbet / Exotic Seeds
1x Mango Cream / Exotic Seeds
1x Banana Frosting / Sensi Seed
1x Hindu Kush / Sensi Seed
1x Fast Mix / Sweet Seed
📎 https://growdiaries.com/diaries/122084-grow-journal-by-soosan
2️⃣
🏠 30x60x90
☀️ TS1000 => puissance a 50%
🍁 4x Fast Mix - Sweet Seed
📎https://growdiaries.com/diaries/124052-grow-journal-by-soosan
3️⃣
🏠 30x60x50
☀️TS1000 => puissance a 50%
🍁 4x Quick Sherbet - Exotic Seed
📎 https://growdiaries.com/diaries/122080-grow-journal-by-soosan


Likes
7
Share
@HIAZ_urbanbudfarmer
Follow
These buds are absolutely awesome, very frosty solid dense nugs👍 have been flushing this week as there ready to harvest . Orange pistills cloudy trichomes with some amber's & the clusters have closed up . Will give them 48 hours of darkness before harvest.


Likes
3
Share
@Tremorz
Follow
Lights on at 100%
F15: watered w big bloom 30ml
F16: small defo and watered Afgoo #1
F17: watered Afgoo #2, custom Allen wrench x afghan auto #1 and #2, Dutch treat #1
F18: watered DT #2
F19: watered with plain water. Custom amnesia X afghan auto, Afgoo #1 and #2, custom deathstar X afghan auto
Stretching seems to be mostly done.
F20: watered plain DT #1, custom right middle, AC #1, #2 , DT #2

Likes
37
Share
@Vegetoo420
Follow
Hey hey ! I left my girls during 4 days without watering due a hospitalization !
I discovered this girl like this when I opened the room and she exploded !!
Day 3 : floweeeers comin !
Day 6: little defoliation and 🍭 lollipop on this girl : she’s clean now !

Likes
1
Share
@ZalySk
Follow
This plant is still probably my favourite from all the for autos that I grew. She doesn't have a lot of Bud on her but her main cola is a footlong stick of bud. The stems are pink the leaves are yellow and the bud is green. It's such a pretty plant with nice structure, although this stems are a little weak and I ended up breaking one.
I'm going to harvest my last Northern lights this week and this plant will get the chop next Monday. She's losing all her fan leaves naturally so this looks to be the easiest trim I'll ever do.
D81, still losing leaves. Ngl I actually think I won't have to trim this one haha

Likes
9
Share
@Micro_Grows
Follow
Growing this particular plant was extremely eye opening to me and the future grows I will be doing. It's allowed me to get first hand experience with a different strain, a new substrate, different nutrients and different ways of growing!
I learnt that my yields will be enhanced through the use of a larger pot regardless of the substrate, light or strain, but the pot size I have makes for a very nice little plant with big 4 large frosty colas enhanced by advanced grow techniques.
Damn it. Just missed the 200g dry weight...
I thank everyone who joined me on this grow and specially to all those that commented!


