
Likes
Comments
Share


@gr3g4l
Follow
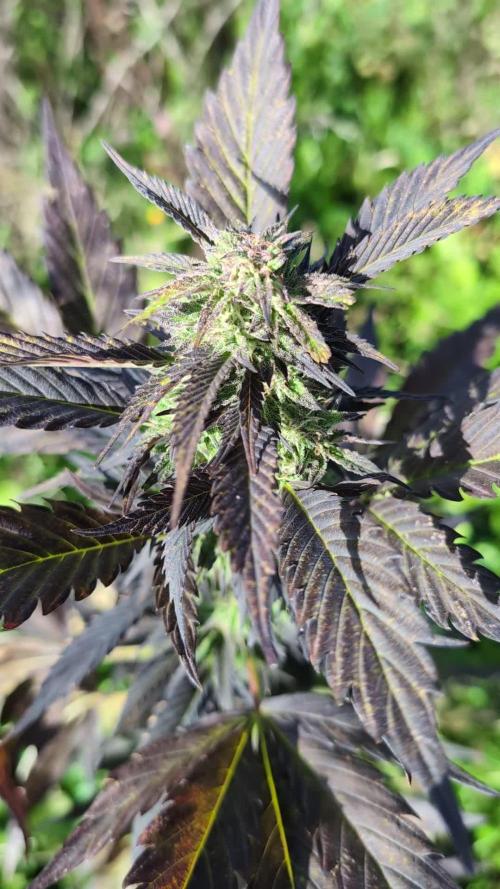
Esta semana a los 73 dias de floracion decidí que ya tenia que cosecharlas. No podia dejar pasar mas dias puesto que se corria mucho riesgo de botritis y los tricomas estaban ya suficientemente maduritos, igual demasiado.
Jamás me habia encontrado con unas jack con tanta cola de zorro pero de oler huelen a gloria.
hasta el último dia estubieron siempre dentro del armario y posiblemente por la extracción no pude percibir el olor tan agradable que desprenden, intenso . Algo mas terroso de lo que pensaba.
Cogollos duros como piedras, algo exsagerado.
Con 74 dias al secadero, calefactor 80w más un par de ventiladores con ventilacion indirecta, extraccion, intraccion pasiva

Likes
Comments
Share

@GoodTimesOrganics
Follow
Hi liebe Community 💚 das Blue Cream Haze Outdoor-Projekt neigt sich langsam dem Ende zu.
Auch die herben und wechselhaften Bedingungen scheine der BCH nicht ganz zu schaden. Die Pflanze steht unter absolutem Stresstest und bis jetzt ist dennoch alles in Ordnung.
Klar ist die Pflanze relativ klein und da die Wachstumszeit nicht sonderlich lange war, sind die Blüten relativ klein.
Trotzdem scheint die Pflanze bis jetzt allen Bedingungen zu trotzen. Auch die erste Nacht mit knapp 0 - 1 Grad Celsius hat sie überlebt.
Ich bin top zufrieden.
🌱💚
Likes
1
Share


@Blaze_With_Haze
Follow
All babies growing up very fast. Very happy so far. Started to use lowdose Advanced Nutrients fertilizer.

Likes
10
Share


@Yolka
Follow
Happy holidays to you guys! 420!
That's it, my first grov of photoperiod flowering and on organic substrate without fertilizer has come to an end.
Today 4/20/2023 is the last day of light, it'll be in the dark for a while, and April 23 will be harvested.
14 full weeks from seed, 8 weeks of flowering.
Looking at the trichomes, I'm worried I'm a little overdoing it on blooming, lots of amber heads on top, the middle and lower ones are milky.
One spill this week for 6L with a little drainage and the flower stopped consuming moisture, got a little cooler in the house.
Waiting for the harvest :-)
Likes
2
Share


@Bncgrower
Follow
Another week almost over, the girls are beautiful and smell great. Apparently everything is under control, I'm really looking forward to the results.
Happy growing! 🌱🌱🌱
Likes
16
Share


@AestheticGenetics
Follow
4/15/25 This plant is blowing my freaking mind. Long stacked colas. Even the lower buds are plumping up like golf balls. This is an exceptional plant so far.
Shes starting to show the classic "sherbert" purple that ive noticed shows up with anything that has sunset sherbert in the lineage. Some of the leaves are starting to fade slightly and the purple is coming in.
The rs11 that this seed came from, produced the most from a single plant out of all plants ive grown and trained and kept that small. She yielded 3.5 ounces or a 1/4lb of top nugs from a plant that was only about 18 inches tall and vegged for 6 weeks before flip.
Once i start to clear out all of the fan leaves later on in flower, its just going to be buds running the length of the stems
4/18/25
I really believe this may be a keeper. She is absolutely stunning. Just everything is perfect. She has super long stacking of buds up and down the stems.
Im actually super stoked to see how she finishes up.
One of the craziest parts is that shes in a plastic 2 or 3 gallon pot and this plant is going to yield insane.

Likes
14
Share


@AGrade_Labs
Follow
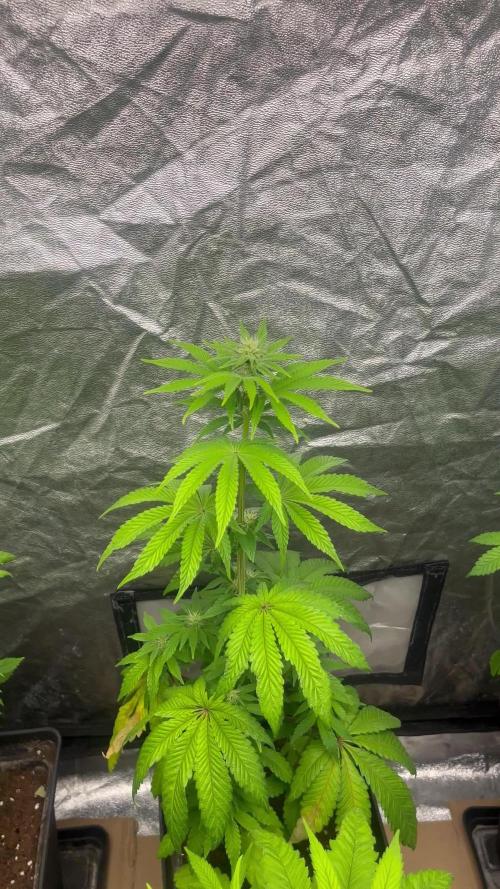
These ladies are doing their thang! One week since sprout. Had to move them to cups to support the stem as they were flopping. Placed a fan for circulation to try and get some strength in them. First feed at the end of week one. Went with half dose of the 1EC measurement as per Pro Line chart.
Processing
Likes
24
Share


@GrowGuy97
Follow
Day 28 - RH 58% Temp 81F . Ladies are growing great, they are really starting to turn into little bushes & the double mainline is going strong 💪🏻 Thanks for following friends & make sure to check back for daily updates! Happy growing✌️🏼🌱
Day 29 - RH 57% Temp 78F . Couldn’t be happier with the growth!
Day 30 - RH 60% Temp 78F . Everything is looking great!
Day 31 - RH 51% Temp 78F . Watered today with PH at 6.5, all 3 ladies are doing amazing!👍🏼
Day 32 - RH 53% Temp 81F . Considering topping the ladies tomorrow not sure yet! Still growing beautifully!
Day 33 - RH 52% Temp is 80F - Bushing out like crazy & growing strong! The double mainline seems to be bouncing back as well! So far very impressed with this strain😍👍🏼
Day 34 - RH 56% Temp is 79F - Decided to top the two bushy plants today, they also got fed today with PH about 6.3

Likes
6
Share


@macrocefalo
Follow
With great joy I will start my second season growing cannabis. I hope to learn from some small mistakes from the first season where I was surprised by my performance as a first-time sailor cultivating the BlueDream strain. This season I left the 4 seeds of GorillaGlue 36hrs in a pot of water to break the dormancy. After that I used the napkin technique for more 42 hrs. So I put each one in a 5-gallon airpot, as they are automatic and go to harvest in the same pot. After 24hrs in the vase the first 2 little leaves came out. I made a homemade dome with a 2-gallon water bottle, cutting it into strips and lining it with plastic with some holes to keep the humidity high during this initial phase. We entered the first week of cultivation and unfortunately due to an oversight I got confused in the fertilizer table and clearly the dreaded overfert happened. I did a watering only with water to try to remove the excess fertilizer let's hope it works.

Likes
10
Share


@BombBuds
Follow
-Cotton Pad method
- before putting them into cotton pads soak seeds in bottled drinking water
- !!! DO NOT SOAK THE PADS !!!
- just give them a few gentle sprays with a mist sprayer then put 2 seeds in 2 cotton pads like a sandwich and spray that sandwich again.
- put cotton pad Sandwich in baggie with little opening for air circulation and spray into baggie one Last time
- everything together in an dark medium warm spot and wait for about 24-48 hrs

Likes
3
Share


@NocturnalGardner44
Follow
Caught up... things are going well, Bruce stretched like crazy and has evened up its canopy to the others idk if it's that big bud in it or what. Lilac has looked a solid week and half ahead of the others since flower, she looks wicked though, trichromes are starting to build. I've done my last training, I usually go hard on thinning but I'm trying to be conservative and only uncover buds under leaves. Still same feeding routine.. looking forward to the finish line but know this is an important time with terms and trichromes beginning to resonate... I sick at this guy's but I want to get better at chronicling my grows.. so hourly I will improve in the process of Journaling.


Likes
4
Share


@Purrple_Haze
Follow
First Flowers & Full Power 🌸⚡️
Here we go—flowering has officially begun! Week 7 marks the start of bloom for this mystery lady, and she's looking absolutely stunning. The training phase is now complete, and from here on out, she’s free to stretch upwards and show off. 💪🌿
I'm loving those slightly reddish tips on the new growth—adds a beautiful touch of color to her already elegant structure. No signs of stress, just a healthy, happy plant soaking in that summer energy. ☀️💨
She’s been treated well this week:
Silica every 3 days before night
Fed with CalMag, BioBizz Grow, Bloom, TopMax & Alg·A·Mic
Effective Microorganisms added 4 days ago
Followed up with a nice dose of compost tea 2 days later
She's thriving under a great mix of sun and fresh air, and it’s honestly a joy to see how well she’s developed. Everything’s balanced, and the transition into bloom feels smooth and strong.
The mystery’s starting to reveal herself—and it’s looking floral, vibrant, and full of potential. Stay tuned, the real show is just getting started! 🌞✨🌺

Likes
2
Share


@902EastCoast
Follow
Easy to grow, beautiful structure and plant. Big frosted, dense buds with very good odour 🤤. Would 100% recommend.

Likes
3
Share


@bk_garbage
Follow
Well global hysteria had me lose my job and computer but kept the growing up and made some trades while demand is high and am back here about to go into week seven.
The Orange Blossom Fizz is really plumping up and is triched out. Seems like its still got at least a week and a half to go till flushing. It is really full of stacks but haven't seen much color coming in yet but it'll show more at the flush.
I stripped a bunch of leaves at the actual week six about a week ago to make sure all the lowers are getting some. The video shows some full shots of the whole plant trained wide and low. Really liking this strain, last round was great and had solid nugs and great purps.
The Krishna Kush is much closer to finish and I'll probably start flushing soon, like halfway through week 7. Its usually about 56-60 day for the chop. This is my pheno 1 and has a real crown shaped small nug structure from its landrace lavender background, but they're nice and frosty. Def a heavy feeder and did get quite a deficiency in the last few weeks here in the spots closer to the light. Couldn't up the nutes too much cause its sharing a res with the OBF, which is already getting nute burn a bit.
Nute wise I cut out the Bud Candy and Grow at week six and switched from Liquid Kool Bloom to Beastie Bloom dry powder for this week's res. The next one I'll switch to some Dry Kool Bloom for 4 days to start the finishing before the flush.
Try and keep this updated till the finish now.


Likes
2
Share

@eldruida_lamota
Follow
Que pasa familia, vamos con la tercera semana de floración de estas Barcelona Puff feminizadas de Seedstockers.
Vamos al lío ,se trasplantaron en macetas de 7 litros definitivamente.
El ph se controla en 6.0 , la temperatura la tenemos entre 24/20 grados y la humedad ronda el 50%.
El ciclo de floración puse 12h de luz, el foco está al 80% de potencia.
De momento van creciendo a buen ritmo y tienen un buen color, estaban muy bien enraizadas al realizarle el trasplante se notaba la abundancia radicular.
Comentar de nuevo el estrés hídrico a sido superado de momento todo bien.
Agradecer a Agrobeta por el envío del kit gold series para la temporada 🙏.
- os dejo por aquí un CÓDIGO: Eldruida
Descuento para la tienda de MARS HYDRO.
https://www.mars-hydro.com
Hasta aquí todo, Buenos humos 💨💨💨
Likes
6
Share


@Canaryweed_tf
Follow
Pues aquí tenemos la tercera semana de las PurpleKush de la familia de Kannabiaseeds. En está semana las he trasplantado a macetas de 12 Litros, todavía se están recuperando del trasplante. 😘😊

Likes
26
Share


@pifflestikkz
Follow
Day 22
22/07/24 Monday
Nothing new to report. Starting to see them beautiful fans appear that's all 😁✌️
Day 23
23/07/24 Tuesday
Feed today, giving them straight all nutes Inc flowering nutes.
I will update the dose as they grow and develop a bigger hunger.
(Not sure what's wrong with Overdose #2, bit mutated, we'll see how she gets on 😅)
Video updates 👌💚
Day 26
26/07/24 Friday
De-chlorinated watering pH 6 with 5ml calmag to 5L water.
Watered each with 250ml and had small run off.
I will continue to feed/water with small run offs to help prevent salt build ups.
Video update.


