
Likes
Comments
Share


@Bread_n_Buds
Follow
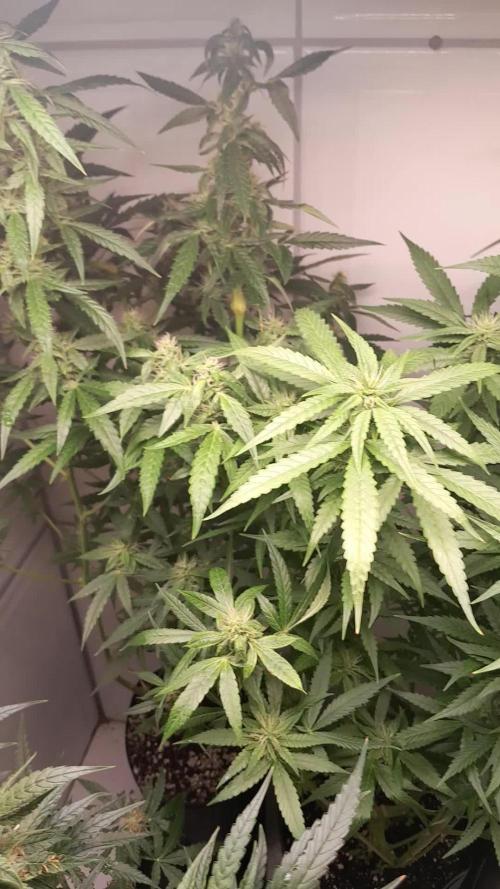
Our Green Cure F1 Hybrid Autoflowering by Zamnesia are currently the best in the growbox, they both started really well and I decided to top the biggest one to give the plant a bigger body result. Come on girl, you have a great life journey ahead of you and it won't be bad after that either.
Applied Techniques - Given the numerous requests from growers, we decided to show you what happens when you apply topping + Lst to autoflowering plants. It is very important to anticipate it as much as possible, autoflowering plants start flowering at about the 5th intenod, you need to anticipate that moment to give the plant the chance to vegetate as much as possible. In general, when you see that there are two good side branches, you can do topping, they will go into veg as much as possible and you will have a split plant, I have seen very nice results, especially in warm periods when the plant tends to vegetate a lot, in winter we could have a bit of dwarfism but with a lot of resin for sure.
So I cleaned everything and cut at the top leaving only the main growth line, called Main Lining, the florets will be lowered during growth and the plant will eventually be like "split" in the main line with the various branches.
On photoperiodic plants, however, we will do topping repeatedly, which is not recommended with autoflowering plants so as not to lengthen the times of plants born to finish in 10 weeks.
The second week (including a few days of germination) we gave Power Roots 1 ml/l, Pure Zym 1 ml/l, Sugar Royal 1 ml/l, Alga Grow 3 ml/l -
Plagron nutrients are available at Zamnesia in convenient pack formats for all growing styles. I used this one with a simple search you can find the other products.
---- https://www.zamnesia.io/it/12119-plagron-top-grow-box-100-naturale.html
Try a seed of this strain that drives us crazy...
---- https://www.zamnesia.io/en/10672-zamnesia-seeds-green-cure-cbd-f1-automatic.html
Zamnesia Description // Zamnesia's breeding team has harnessed F1 genetics to bring you Green Cure CBD F1 Automatic. This autoflowering cultivar is easy to grow, accessible and reliable for all levels of experience. Ready in just 11 weeks, growers can expect impressive yields of tasty buds with a clear-headed effect that's ideal for meditative moments.
Growbox and Air System - Secret Jardin DS120w + fans + exhaust fans and filters DF16 kit ---- https://www.secretjardin.com
All the best that mother nature has to offer is at ----www.zamnesia.com

Likes
5
Share


@Do_it_Dan
Follow
What can I say except this week has gone perfect for this little bubble runtz, nice growth lovely colour 😊 I'm happy that she is happy 💚 happy days 😊

Likes
7
Share

@Jardineiro_Br
Follow
Era pra ser duas plantas, tinha espaço coloquei mais uma , elas estao com uma semande diferença entre elas , da para perceber os estágios nas fotos.
Likes
20
Share


@eldruida_lamota
Follow
Que pasa familia, traemos nuevo diario, en primer lugar dar las gracias a Nara hydro que sin ellos esto no es posible.
Os enseño la primera semana de esta farm cheese de genofarm, una semilla con más de 3 años de conservación, tuvo un germinado en 48 horas sin problemas aparentes.
La introducimos a 0,5 cms en medio del sustrato, una maceta pequeña unas semanas mientras Coje fuerza.
Las vamos a crecer esta vez bajo un led TS-600 de la marca Mars hydro.
.
no olvidéis que comprando con el código an420 en mars-hydro.com obtendréis un pequeño descuento en cualquiera de sus productos.
.
Nos vemos la semana que viene con más familia 💪

Likes
16
Share


@OutdoorRebelGenetics
Follow
Well started flush on out door cheese well greenhouse indoor only just preflowering off site so less pics like the gorilla frisan duck so yeah more pics this week peace ended up chopping cheese 2 as bud rot struck so got rid and got 11.3 grams wet from 1 so quite low yield mould resistances not the best not the most crystals I have seen nor the least it's a 2 out of 10 so far yeah staying at 2 as was fun to grow but yeil was disgraceful 1.6 g dried she had the cheese smell and taste but little vegy so going to cure the remainder try in 2 weeks utterly as for the rest can't wait frisan duck has like 70+branches so she's going to be a nice harvest no pre flower yet peace


Likes
37
Share


@DogDoctorOfficial
Follow
🌱 Germination Journey with Terpyz Mutant Mentha de Croco 🌱
Hey Grow Fam! Today kicks off an exciting adventure with Terpyz Mutant Mentha de Croco genetics. I’ve got 10 regular seeds ready to sprout, and I’m looking forward to discovering some beautiful female phenotypes—and maybe even a standout male for potential future breeding. It’s been a while since I’ve worked with regular seeds, so I’m thrilled to dive in!
Germination Process Overview:
Here’s a step-by-step rundown of the germination setup and process, with a special focus on the equipment and nutrients that are helping these seeds thrive right from the start.
Step 1: TheCannaKan Germination Pod 🌱
For germination, I rely on TheCannaKan—a device I’ve come to love and trust. It’s designed to create the perfect microclimate for seed germination, and within just 24 hours, the seeds started showing signs of life. By the 32-hour mark, they were all ready to be transferred to the next stage! I can’t recommend this gadget enough for anyone serious about getting strong, early growth from their seeds.
• Why TheCannaKan?
• Humidity Control: Ensures seeds stay hydrated without oversaturation.
• Stable Temperature: Maintains an even temperature around the seeds, so there’s no shock or stalling.
• Enhanced Oxygenation: Keeps fresh air circulating, helping prevent mold and ensuring seeds don’t suffocate.
Step 2: Transfer to Root Riots & Aptus Holland Supplements 💧
Once the seeds were sprouted, I transferred them into Root Riots, known for their excellent water retention and structure that encourages strong root growth. Root Riots also have a pH-balanced, spongy texture that makes it easy for roots to penetrate, promoting sturdy, healthy root systems.
At this stage, I started using Aptus Holland’s Regulator and Startbooster at 1ml/L each. Here’s why I chose these products for early growth:
• Aptus Regulator (1ml/L): Helps strengthen the plants against environmental stresses by supporting cell wall structure. It’s a fantastic choice for giving young seedlings an early boost in resilience.
• Aptus Startbooster (1ml/L): This product provides essential microbes and nutrients that stimulate root growth and early plant vigor. Especially for regular seeds, the early root development makes a noticeable difference in later growth stages.
Step 3: Lighting with Future of Grow (FOG) LED at 200 PPFD 💡
For lighting, I’m using a Future of Grow (FOG) 600W LED. For the germination stage, I’ve dimmed it to around 200 PPFD (photosynthetic photon flux density), which provides just enough light for healthy, strong seedling growth without overwhelming them.
• Why Low Intensity?
• 200 PPFD ensures that young plants aren’t exposed to too much light, which could cause stress or stunting. This level of intensity is perfect for encouraging healthy development without risking “stretching.”
• The FOG LED provides a balanced spectrum tailored to plant growth, setting up these young sprouts for success as they grow.
Step 4: Environmental Control with TrolMaster Tent X Controller 📲
For monitoring and control, I’m using the TrolMaster Tent X Controller, which lets me dial in every aspect of the environment to make sure these little ones have the perfect conditions for germination and early growth.
• TrolMaster Benefits:
• Precision Control: Adjust temperature, humidity, and lighting all in one place.
• Notifications: Sends updates in real-time to my device, so I can make adjustments as needed without being physically present.
• Consistency: Maintains stable conditions around the clock, reducing stress on seedlings and ensuring they’re thriving.
Grow Tips & Reflections:
Germination is one of the most crucial stages in a plant’s lifecycle. Starting with strong genetics like Terpyz Mutant Mentha de Croco, combined with a solid germination setup and the right nutrients, creates the foundation for a successful grow.
💡 Quick Tips for Fellow Growers:
• Hydration Balance: Don’t oversaturate! Moisture levels should be high enough for the seeds to sprout but not so wet that they drown.
• Light Management: A low PPFD for young seedlings prevents stretch and keeps nodes tight, preparing them for a healthy vegetative phase.
• Environment Consistency: Use a reliable controller like the TrolMaster Tent X to manage your settings, and consider monitoring tools for real-time adjustments.
Shout Outs to the Community:
Big thanks to Terpyz Genetics for these incredible seeds, Aptus Holland for their top-notch nutrients, Future of Grow for the stellar LED lights, and TrolMaster for the amazing controller. Also, shout out to all of you in the growing community—you make this journey exciting and filled with endless learning. Let’s keep growing and sharing together!
That’s it for the germination update! Next up, I’ll be monitoring growth closely to identify strong females (and maybe a standout male for breeding). Stay tuned for updates on our Mutant Mentha de Croco adventure—this is just the beginning!
Genetics - Mentha De Croco
https://terpyz.eu/products/menta-de-croco-fern-type?_pos=1&_sid=e9237cbcb&_ss=r
DogDoctorOfficial Discount Codes @ terpyz.eu - DOCTOR 15% off
Nutrition - @aptusholland
https://aptus-holland.com/
Led Power @ F.O.G. Future Of Grow
https://www.thefuturofgrow.com/en/online-store/BLACK-SERIES-600-p489093171
Controls @ TrolMaster
https://www.trolmaster.eu/tent-x
As always thank you all for stopping by, for the love and for it all , this journey of mine wold just not be the same without you guys, the love and support is very much appreciloved and i fell honored with you all in my life
With true love comes happiness Always believe in your self and always do things expecting nothing and with an open heart , be a giver and the universe will give back to you in ways you could not even imagine so
Growers Love To you All 💚

Likes
15
Share


@Venabr96
Follow
Estamos aqui começando mais uma semana, algumas folhas apareceram manchadinhas e com uns buraquinhos.
Pode ter sido por causa da queda da lampada ensima delas...
Folhas muitos grandes e desenvolvimento muito bom
A piquena esta crescendo bem,muito forte e linda com belas folhas. Ira crescer para cima reta sem nenhuma tecnica.

Likes
5
Share


@Weedganja420
Follow
Así termina nuestra preciosa Kerosene Krash, llena de flores pesadas y resinosas que doblan sus ramas laterales del peso.
Ahora toca cosechar sus increíbles flores para proceder al secado y curado.
Espero que os guste,un saludo!
Likes
9
Share


@Soskar69
Follow
This strain had a very strange behaviour. It was the first to germinate, and at first had the fastest growth. But at the 3rd week she started flowering. I've done some LST, but after entering in flower, the plant stopped entirely to grow, and I was left with only 5 branches. On the other hand, now the colas are very big, the biggest I had ever grown. They are very thicc, sticky and dense. The smell it's very delicate, a lil minty I would describe it.

Likes
20
Share

@eldruida_lamota
Follow
Que pasa familia, vamos a comenzar con el próximo proyecto, Apple Fritter de RoyalQueenSeeds. Y que ganas tenia de empezarlo.
Agradezco a James por la oportunidad de cultivar variedades así 💪.
Y también agradezco a Agrobeta todos los kits obtenidos de ellos 🙏.
Va pues al lío e germinado 5 semillas y germinaron en 48h, 5 de 5 unidades, un 100% de éxito en el ratio.
Han sido Germinadas con Papel absorbente y un tupper para mantener la humedad, pasadas esas 48 horas, las coloque en macetas de 0.6L directamente en tierra.
Mars hydro:
Code discount: EL420
https://www.mars-hydro.com/
Agrobeta:
https://www.agrobeta.com/agrobetatiendaonline/36-abonos-canamo
Hasta aquí todo, Buenos humos 💨💨💨
Likes
17
Share


@Mr_nugs_lover_David
Follow
It's been a beautiful strain to work with, the flowrs are definitely worth it after all this time, the quality is definitely high. However this pheno of ak420 smells very different from the other 2 phenos I've grown along with her. The flowrs are beautiful, very solid and frosty nuggets, I smoked a few little nuggets when trimming but I'm excited to taste the big buds, hope you guys enjoyed the process. I want to say that this pheno #1 has a different smell compared to the other 2 phenotypes of ak420 that you can see here on my page as well, so stay tuned guys! Overall result is very nice, good quality, strong weed, sticky, stinky. I can say that it's very great and also you can get them for a very cheap price so it's a very good investment if you're looking for a powerful and affordable strain. Cheers growmies! ❤️💚💛💎👨🌾

Processing
Likes
20
Share


@mikemobes
Follow
8/18
-Both plants just look really healthy and strong. Its funny how much you learn over time. I just looked back to my first grow and boy have I learned. Ive at least tripled the canopy of each plant in comparison to last grow. I really like the FIM method.
-Going to increase the water of each feeding by 50 mL. Going to feed today with 600 mL solution and see how the plants respond. Based on past feedings they should respond with only an increase of droop.
-Droop scale developed a few weeks ago still holds true today. Its the way I decide if they need a nice watering.
-Leaves are looking very healthy. Looks like cream cookies is going to start changing colors soon. Excited 🤩
-Time lapse camera is acting all sorts of wonky. Im hoping the issue corrects itself soon--the time lapses are very informative of growth patterns.
8/20
-Both plants absolutely loving life. Doing really well and looking very healthy.
-Every other day watering cycle is working amazingly.
-Cream Cookies is really starting to smell wonderful as the trichomes come in. Small amount of orange hairs spotted on some of the canopy buds.
-Time lapse camera is not working well--unfortunately
8/22
-Got the time lapse camera working *provisionally* although its still giving me issues.
-Cream cookies is really starting to fill out. Most of the branches seem to be "main cola" branches as plant symmetry was broken around week 4.
-No visual signs of stress, light burn, nutrient deficiency, of any other issues that might arise.
-6.2-6.3 pH has been working wonders, plants really seem to respond well to them. Going to sprout 2 more Cream cookie plants during Week 9. Going to build a plant pot platform that can be raised so the new seedlings are close enough to the light.
8/23
-Some defoliation done on both plants, more-so on Cheese, its realllllllly thicc. Like oh boy so thicc im very excited about Cheese. Im smoking some of last harvests Cheese right now coming off a 2 month cure and OH BOY is it nice. Amps me up even more for harvest in 4 weeks 🤩

Likes
16
Share


@drgreentips
Follow
I did low stress training on the girl nice clean smoke with a citrus taste overall happy results with stain
Processing
Likes
5
Share


@Greenbean15
Follow
Getting bigger and bigger... haven’t been feeding her very heavily but her leaves are darkening like the heavily fed mother plant. I think I figured out my problem finally, my pH meter was off and the pH of the water was way too low(4pH rather than the 6pH I thought I was watering).
Buds popping up everywhere; ScrOG’ed her to have a bit more control over the grow. She takes up almost an entire 2x2 area of the tent by herself. I have four other plants in with her that I have to flower out.
Plants in the flowering tent right now: Pineapple Express, two bag seeds(one I think is berry white and the other is either white widow or purple trainwreck... I mixed the bud up in the grinder so I don’t know which seeds came from what bud... I wasn’t expecting seeds at all since it was dispensary stuff but ended up with seeds in all three strains I bought that day)... I also have this purple trainwreck plant and one white widow plant all in varying weeks of flower.
Likes
10
Share


@Uneasy
Follow
14.10--> Their growth accelerated considerably after pot transplantation. Topping tomorrow
15.10--> Topping
17.10--> They got over the topping stress quickly

Likes
4
Share


@DivinePineMan
Follow
I have my Electric Sky 180v2 now in instead of the cheap 40$ for 4 lights i bought on facebook. Which were growing but nothing like this thing has been doing the past week. Im still blown away by the light but back to the plants. Doimg great i took some clones. First time ever so hopefully they root. I been sprayin em 4 -6 times a day. My 3rd g6jetfuel i took out of my tent with es180v2 and put in closet by itself with the 40$ cheap leds. It hasnt grown a whole lot compared to the tent plants g61 and 2...i thought maybe it may of had a male or hermi part but honestly i dont think it did bc i cant find it now. But its still in there bc i decided to throw it on 12-12 in closet to find out sex forsure. Ive been foliar spraying in my tent 3 timez a day. And 2 times a week i get 2 little drops of fox farm grow bif in my 10oz spray bottle of water.
Likes
35
Share


@Chedderbob112
Follow
Awrite troopers am shit at filling in ma diary someone seems to hav noticed ma diary’s hav sad face well Bob has a happy face happy 😃 rite troops waiting for the ladies at the bak to finish hav started to pot up the next run because a just want it started am fighting for space n am working oota wan tent so no got a veg flower system that I had before but enjoy trying new things so revenging and takin clones from flowering plants
Processing
Likes
24
Share


@Saven
Follow
My first grow will be with an autoflower seed from Mephisto Genetics. The strain is Toof Decay. 😁 Planted seed on 06/08, sprouted on 06/12! I'll be documenting everything...including the mistakes. 😅

Likes
24
Share


@EBxAH
Follow
Hey there everyone! Today the reapers are 33 days old!!! I love cultivating peppers! Everything is going GREAT so far!!! Today was their first day outside and they are LOVING it! Again, it's peppers so this will be a long journey, lol. I'm thinking about doing some clones though. Well, that's about it for now. Thanks for stopping by and Happy Growing Everyone
✌️❤️😁🍀🎶👽
EB
Likes
2
Share


@CuriosityWebster
Follow
Very hot weather, girls are managing better than I thought.
Cleaned up all the girls extra leaves, really needed to get some more airflow through it
Cut out 2 small nugs that had a little bit of spiderweb mildew
Done nutrients and done instant compost tea
Likes
24
Share

@MrGrowDiarie
Follow
Day 56
This plant is developing at a steady pace, but it’s clearly not as frosty as some of the others in the tent. The buds are forming nicely and stacking along the branches, but trichome coverage is noticeably lighter compared to the rest. The sugar leaves have a bit of resin, but not enough to make them look really frosty yet. This might be due to genetics or possibly some mild stress earlier in the grow.
One thing I’ve noticed is that several of the larger fan leaves are turning yellow. It doesn’t look like a severe deficiency, but it could be related to light underwatering or the natural process of the plant pulling nutrients from the older leaves during this stage. The yellowing is mostly on the lower leaves, while the top growth and buds still look healthy. The canopy overall looks good, but these signs show the plant might need a little extra attention to keep it on track.