
Likes
Comments
Share


@Organic473
Follow
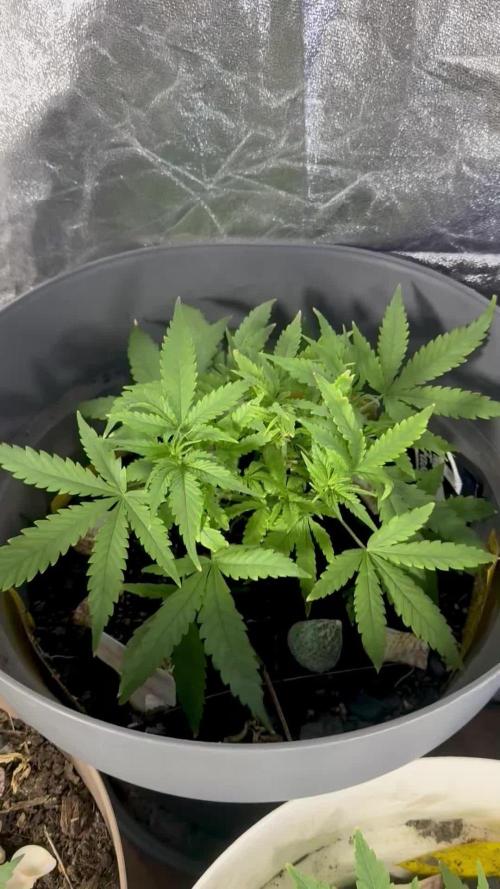
I gave away 1 plant and the other got damage with a broken stem hopefully it recover. This is the only Skunk I am considering for now male or female I’m ready.

Likes
16
Share


Likes
15
Share


@Springbokke
Follow
Доброго времени суток
Сегодня конец первой недели перевода на цвет. Перед переводом поставил сетку, от верхушки растения до сетки было 20 см(нужно было ставить не выше 10см от верхушки растения), девочка моя выросла за неделю 19-20см, что оказалось не достаточным и мне пришлось поднять сегодня горшок на 4-5см. Так же я сегодня поставил железный хамут у основания, но я еще не стал сильно зажимать его. а так сказать подготовил для дальнейшего зажима(и за сетки мне бы было проблематично в будущем это сделать). Планирую зажать хамут где то через недели 3-4, не раньше. Яркость лампы 3500К увеличил до 75%, а 5000К до 100%, через неделю планирую убрать 5000К и поставить 200вт 3500К, и 200вт 3000К.
Поливать стал каждый день, сегодня девочке моей 68 дней жизни.
Полил ( 980ppm )-3л Cal-mag Xtra - 0,5мл/л; Bud Candy - 2мл/л; 1-й день предцвета
Полил ( 919ppm )-3л 2-й день предцвета
Полил ( 903ppm )-3л Bud Ignitor - 2мл/л; 3-й день предцвета
Полил ( 754ppm )-3л 4-й день предцвета
Полил ( 936ppm )-3л Bud Candy - 2мл/л; 5-й день предцвета
Полил ( 872ppm )-3л Bud Ignitor - 2мл/л; Piranha - 2мл/л; VooDoo Juice - 2мл/л; Tarantula - 2мл/л 6-й день предцвета
Полил 3л 7-й день предцвета
До харвеста 9-10 недель, не думаю чтоб заняло больше.

Likes
17
Share


Likes
9
Share


@DeepRootsGrowTrees
Follow
KICKASS AUTO BY KANNABIA
WEEK #3 April 16th-23rd
She's is growing nicely she's starting to stretch this week has 4 nodes no issues this week.
Kannabia. Com Kickass Auto

Likes
12
Share


@PedroAndHisPlants
Follow
Day 43 (Second Grow, Flowering Phase):
Hey everyone!
We’re well into day 43 of our second grow and deep into the flowering phase. 🌸 The transition has been amazing to witness, with our plants showing significant bud development. The plants are producing beautiful, dense buds, and it’s incredible to see the daily changes and the rapid development.
We’ve been maintaining the humidity between 50-60%, but we’re keeping a close eye on it to prevent any issues. We’re considering whether to get a dehumidifier to bring it down to the ideal 40-50%. The SCROG net continues to work wonders, ensuring even light distribution and supporting the heavy buds. Our Timor shield mantis is still patrolling the garden, keeping pests at bay naturally. She’s become quite the guardian!
The plants are looking healthy and vibrant. We're excited to see how they continue to develop over the coming weeks. Any tips or advice for optimizing this stage? Let us know in the comments!


Likes
17
Share


@Bread_n_Buds
Follow
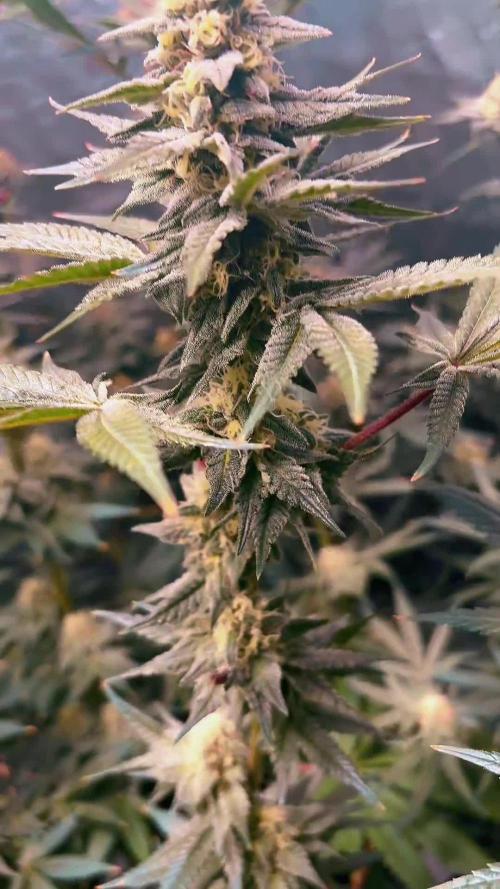
I had some difficulties in the vegetative phase with this passarello strain so even if late I applied a series of techniques to maximize the harvest. I applied a late topping, I did LST on the lower branches and I elegantly widened them and topped x 8 in the center. By doing so the center came out a bit weakened because the power went to all the branches below (that's why the main lining is better), but by eliminating some branches that would not have reached the top I obtained an excellent result, there are really many buds and a result that will exceed 100 grams by a lot I think going closer to 150 grams.
The flowers are very beautiful, nice mature pistils, large calyxes, this plant has really large calyxes that make it a bit difficult to clean or rather it is easy to cut some calyxes here and there. But the grass is so much you can easily make sense of it.
The smell is wonderful I still have to go into more detail but it seems something strawberry, sweet, I'm still trying to understand what it reminds me of and I have to study the terpenes and terpene profiles better.
The trichomes are mostly milky but we honestly have little amber still and a bit of transparency, it could have been another week probably but that's fine.
Zamnesia Strain Description // Yes, Karen, you read that right. Load up a bowl or roll a joint and kick back with Karen Kush, our indica-dominant hybrid. This breathtaking strain was created when our skilled breeders crossed Monster Bud Kush and White Widow. As expected, both parent strains rose to the challenge and passed on their most prized traits to their progeny, such as a solid THC level (24%), great yields and a relatively fast flowering phase.
- Get a seed of this fantastic strain --- https://www.zamnesia.io/it/10780-zamnesia-seeds-karen-kush.html
The plant has eaten the 100% Organic feeding of Plagron: Alga Grow and Alga Bloom as basic nutrients, the rooting Power Roots, the amino acids of Sugar Royal, the Enzymes of Pure Zym that eat the dead parts in the soil, Power Buds that always gives us immense satisfaction with rapidity of start of flowering and composition of the buds, the legendary Green Sensation that now needs no introduction, a name a guarantee.
The fertilizer kits that you can find on the Zamnesia website are perfect for this purpose, there is everything. Choose them based on their mineral/organic composition and the soil you have chosen.
at the link --- https://www.zamnesia.io/it/11457-plagron-easy-pack-natural.html
The quantity was measured using the sheet prepared on purpose on the Plagron website based on the soil chosen: Plagron Pro Mix + Perlite.
at the link --- https://plagron.com/en
Secret Jardin DF16 ventilation system and all the fans too make wind into
at the link --- https://www.secretjardin.com/it/
The light was supplied by Viparspectra
at the link --- https://www.viparspectra.com/
A fantastic selection of seeds, a headshop and a selection of exceptional accessories on the world of cannabis, many other things about mushrooms, health, well-being and all the beautiful things that nature offers only on the Zamnesia website
at the link --- https://www.zamnesia.com


Likes
7
Share


@BigUncGotGaz
Follow
Day 31 in Flower
Did a double dose of everything at a high feed this week. Nutrients are mix with 10gal of Spring water won’t be feeding for the next 2weeks due to high volume. I’ll be adjusting the ph every 5-7days until reservoir is empty.
Also got some pretty long branches on the Oreo Stumper tallest branch got light burn on the buds should I leave it there or cut it off & and how much should I cut off if so?

Likes
4
Share

@Simba247
Follow
Got a hold of CAL-DORA and DORA-MAG.
It’s what’s available in my area and I think it will do the job concerning my plants CAL-MAG needs.
As the days progressed I kept up with my defoliation technique.
The main cola did everything to stay up but I had to keep it at bay.
So far so great!
This all boils down to learning and enjoying while doing it.
Looking forward to the coming weeks
Happy growing 💚💚💚
Likes
16
Share


@Cauli
Follow
Week 4 of little Guava.
She is finally speeding up a bit, but the weather was still far from good. Very cloudy at day, too cold at night – so she still was allowed to sleep inside.
When it's raining she can hide under a table, but it's not ideal.
Started to slowly feed her a bit, seems to take it well.
Hoping for betten weather now.
Likes
3
Share

@Ninjabuds
Follow
It’s day 43 of flower! All of the plants look great! I’m going to start dialing back the light intensity slowly over the next couple weeks. Harvest time is getting close
Likes
12
Share


@OilyEliteOrganics
Follow
Growing full of buds .
Going to be a stench plant i can already smell the oils .
Getting too tall might have to backbud it.
Great posture of a plant.

Likes
Comments
Share


@eldruida_lamota
Follow
Venga familia que ya viene la cosecha de esta Amaretto Tarmac de Seedstockers, que ganas que tenia ya de darles machetazo.
No veas que pinta que tienen estas plantas.
Las flores aparte se ven bien resinosas, y tienen un color rosado púrpura brutal.
a sido una genética con la que disfruté mucho cultivarla, no es complicada de cultivarla pero merece la pena si eres cultivador con experiencia las flores serán increíbles.
Hasta aquí es todo , espero que lo disfrutéis, buenos humos 💨💨.
Likes
2
Share


@Marihumama
Follow
Finaly some more sunshine &she is looking delicious 😛making my mouth water when I smell her 😋Sweet Girl 😍
Lots of work in the rest of my garden but not with this girl ☺️
Sweet &Easy

Likes
12
Share


@BeHappyNtoke
Follow
This week is going good for the beach ball I noticed some nice growth coming in and started LST for the mini pot growth is not as vigorous will most like start feeding next week just to prolong it a little longer this is definitely a experience can’t wait for the next week!
Likes
4
Share

@eldruida_lamota
Follow
Que pasa familia, vamos con la tercera semana de floración de estas GG4 autofloreciente de MSNL.
Vamos al lío, lo primero comentar, que me dieron gato por liebre, porque esto tiene pinta de rudelaris que tira pa atrás…
Van en macetas de 7 litros negras.
El ph se controla en 6.0 , la temperatura la tenemos entre 24/20 grados y la humedad ronda el 50%.
El ciclo de floración puse 12 horas de luz, el foco está al 80% de potencia.
De momento van creciendo a buen ritmo y tienen un buen color, ya tiraron pelos blancos y van empezando a tricomar, estaban bien enraizadas al realizarle el trasplante se notaba la abundancia radicular.
Agradecer a todo el equipo de Agrobeta por el envío del kit gold series para esta temporada, soys unos jefes 🙏.
- os dejo por aquí un CÓDIGO: Eldruida
Descuento para la tienda de MARS HYDRO.
https://www.mars-hydro.com
Hasta aquí todo, Buenos humos 💨💨💨

Likes
8
Share


@Sur_cannabico
Follow
Estamos cursando el día 11 desde el brote.
Tienen buena pinta. Sin duda revisaré el Ph del agua de riego.. tengo la impresión de que está un poco alto.
Continuamos fertilizando lo mínimo.
100 ml en cada maceta cada riego.
Buenos humos 💨


