
Likes
Comments
Share


@pifflestikkz
Follow
Day 1
30/12/24 Monday evening.
Started the seed off in de-chlorinated tap water and calmag 3ml to 5L pH 6.4.
I will use this water for the rest of the week as sprays and transfer water.
Day. 2
31/12/24 Tuesday
Seed has sunk 🙌
Transferred now to paper towel, sprayed with same water. Covered. Left in cupboard 24hrs untill tap root emerges ✌️
Day 3
01/01/25 (Happy NY 🎇💚)
Tap root only just popped!!
I have re applied a spray to dampen, re covered and will allow another 12hrs before checking again.
Day 4
02/01/25 Thursday
Tap root reached 1cm Seed only just cracked. Will leave a further 24hrs for a sustainable tap root.
Day 5
03/01/25 Friday
Tap root has reach 2/3cm and now been potted up in a 1L pot with cannaterra pro, added perlite, added cococoir, and dynomyco, all watered yesterday to dampen off. . Sprayed top soils today to settle in seeds.
Day 6
04/01/25 Saturday
Seed has emerged to top of soil level 😁
Moved all seedlings into the auto tent so they can catch the 600w dual hps.
Day 7
05/01/25 Sunday
The seedlings are here 🙌
She made it through the first week, onwards and upwards 🚀💚
Light spray with de-chlorinated tap water and calmag. Covered with dome.
Picture update 📸💚

Likes
78
Share


@AsNoriu
Follow
Day 67. They grow ! Will need to install bamboo sticks for support, but they grow huge and very nice at the moment !
Mother nature does all the work. So next visit just for installing sticks and anti slug pallets.
Happy Growing !


Likes
40
Share


@TheCannaBrit
Follow
Just time to finish these guys with a flushing agent then we HARVEST!!


Likes
5
Share


@banditman1200
Follow
Added charge as top feed. Have used this product many times and recommend if using coco medium. Just sprinkle on as top dress,, not part of weekly feed, I use it 2/3week then again mid flower
5 days after start of week 3 and a good growth in that period since slight increase in nutrients and charge
Likes
18
Share


@KushSlayer
Follow
All apple og’s are ready to smoke. My favorite was indica, couple hits from the bong and it will put you sleep. Strong strain and good genetics from pure instinto


Likes
62
Share


@DudeGrowsWeed
Follow
Well, the photo period plants are looking great now, but the 2 older BlackBerry's still look like they are struggling. The newer BlackBerry seedling looks fine. We'll see what happens over the next few weeks. The Seedsman Cream & Cheese CBD and DinaFem Critical+ are looking the best overall IMO. I'll be topping and cutting clones in another week or two. I plan on getting the 2nd of 3 tents set up this weekend.👍


Likes
15
Share


@AllieO
Follow
1/19: Not much to report today. Got a good look at lemon autos trichomes under a digital microscope. I guess this is just another week of saying "one more week" 😂
1/22: gave lemon auto a good pH balanced water flush, northern lights got some bloom nutrients to help those buds do their thing. Trichomes look mostly cloudy- a few amber on the sugar leaves which means it's only a matter of time!
1/24: lemon auto update: trichomes on some outer buds are amber! Main cold nug looks like it's about 100% cloudy trichomes. Will evaluate tomorrow for possible harvest?!
Likes
39
Share

@wolfvb
Follow
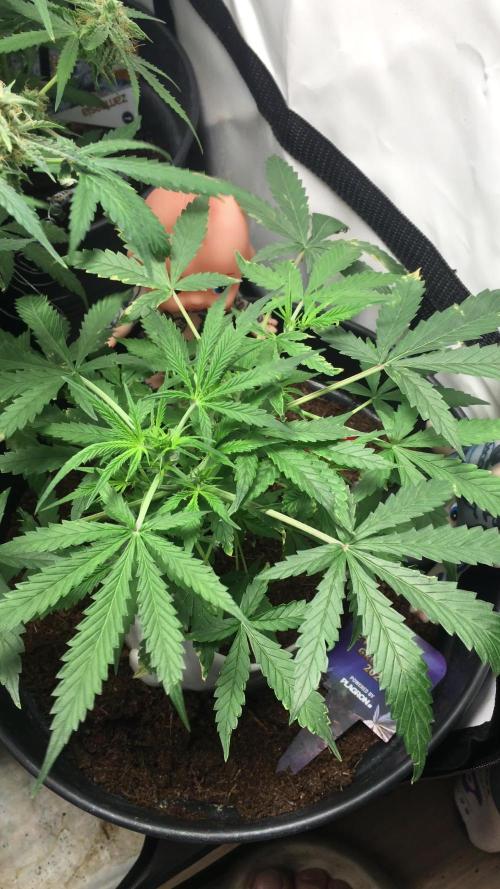
🌿 Week 6: Explosive Side Growth & The Recovery Phase
Strain: Sticky Broccoli Auto 🥦
Stage: Late Vegetation / Pre-Flowering
Light Cycle: 18/6
📝 The General Vibe The "Sticky Broccoli" is really starting to live up to its name not because of the resin yet, but because she’s bushing out like crazy! After pinning the main terminal down last week, the side branches have officially taken over. Despite my shoulder injury, the garden is thriving, proving that a little bit of LST goes a long way.
🍽️ The Menu (Nutrients) Still staying consistent with the Plagron and BioBizz regimen.
Root-Juice: 3ml (Finalizing the root base)
Bio-Grow: 2ml (Supporting the leafy explosion)
Bio-Down: 1ml (Keeping that pH stable around 5.9 for the coco mix)
Observations: The redistribution of auxins worked perfectly. I now have 4-6 secondary tops that are all competing to be the new main lead. The stem is thickening up nicely, and I’m starting to see the first signs of "pre-flower" pistils.
👽 Final Thoughts Gardening with one hand was a workout, but seeing these results makes it worth it.
The "Kewpie" Garden Managers are still on duty and seem happy with the progress. Next week, I expect a significant vertical stretch as she prepares to flower!

Likes
63
Share


@Targona
Follow
Targona: 57 days since my little girl sprouted from seeds🌱
Eighth week of growing my Apple Fritter Automatic 🍎🍏🍎
Nutrients:
As I mentioned last time, I switched to mostly organic nutrients from Plagron and Biobizz💓 -
Plagron Alga Bloom - is a complete fertilizer designed exclusively for the flowering phase. It contains all the important substances that the plant easily absorbs 🌸🌾
----------------------------------------------------------------------------------------------------------------
Plagron Sugar Royal - Sugar Royal is a supporting enzymatic fertilizer designed exclusively for the flowering phase. It contains hormones, enzymes, vitamins and trace elements necessary for proper flower development🍭🍭🍭
----------------------------------------------------------------------------------------------------------------
Plagron Green Sensation - Green Sensation is a professional flower stimulator and activator. It contains all the necessary ingredients to support flowering and also the formation of sugars, and thus the overall yield 🌊🌿
--------------------------------------------------------------------------------------------------------------------------------------------
JUNGLE X Environ is a highly effective complex preparation for stimulating flower formation. 🌸🏵️
---------------------------------------------------------------- -------------------------------------------------
BioBizz Bio pH - is an organic pH regulator. An aqueous solution of citric acid, which is naturally found in citrus fruits 🍋🍋 - I didn't use it this time, because the pH of the dressing was 6.5 +
---------------------------------------------------------------- -------------------------------------------------
BioBizz Calmag - 100% vegan and certified product Calmag is made from calcium carbonate and magnesium sulfate, supplemented with humic acid. Unlike other products, the all-natural Biobizz CalMag does not contain any nitric acid and therefore does not affect the NPK values or EC of the solution 💩💩
------------------------------------------------------------------------------------------------
Terra Aquatica pH test kit - Very reliable, easy to use and inexpensive. The pH Test Kit conveniently replaces expensive pH meters. It includes a wide range from 4.0 to 8.5. 🌈
General:
Apple Fritter Automatic 🍎🍏🍎 - The plant is getting more and more beautiful, its buds are getting thicker, they are really all white, as if they are covered in sticky resin. The stem, leaves and buds have turned a little pink. I wondered if it was a lack of phosphorus, but based on the nutrients I give them and the overall pH, which is 6.5, I assume that this is the classic coloration of the plant during maturation. 🌱🏵️💚Nevertheless, I preferred to add Calmag to the watering yesterday and also feed it with Alga Bloom in case it lacks important elements.
Training:
The plant is very tall. Sometimes I turn it all over so that the light also shines on the side branches on the side of the tent. Otherwise, I don't do any training, I just cut off some excess leaves in the classic way. Plus, this girl doesn't have many leaves, she's a beautiful genetics as usual with strains by Zamnesia 💚🌞🌞
Light: Mars Hydro TS1000
The plants respond effectively and the light is technically very well managed - I try to have 18 cm between the light and the plants, so I move it up regularly 💡💡💡
Thanks for the likes :)
See you soon 😍😍
Likes
57
Share


@Roberts
Follow
This is a amazing autoflower. She grew very well under the Medic Grow Mini Sun-2. She has some big huge colas on her. She smells great, and has a great frosty resin over her. I didn't have any major issues during the grow. looks like a excellent auto, and I am gear to test her. Thank you Medic Grow, and Seedsman. 🤜🏻🤛🏻🌱🌱🌱
https://www.seedsman.com/?a_aid=Mrsour420.
This is my affiliate link to seedsman. Thank you
Thank you grow diaries community for the 👇likes👇, follows, comments, and subscriptions on my YouTube channel👇. ❄️🌱🍻
Happy Growing 🌱🌱🌱
https://youtube.com/channel/UCAhN7yRzWLpcaRHhMIQ7X4g


Likes
31
Share


@MxGrow
Follow
Siguen muy bien las plantas, sigo encontrando hojas manchadas por araña roja pero decidí no aplicar nada de químicos, dejaré que las plantas sigan su proceso y trataré de controlar la plaga solo eliminando las hojas donde encuentre arañas o huevos, la plaga no pone en peligro la producción.
Sigo aplicando Advance Nutrients 2 veces por semana con 3 litros de agua por planta los martes y viernes, los domingos riego con 1 litro de solo agua a cada planta.

Likes
8
Share


Likes
15
Share


@BlaKX
Follow
Ajoooooo das ist bzw war mal ne lange check Liste..Gefällt mir definitiv:)
Die WW muss noch trocken habe sie Komplett Manikürt da vielen 30g Zucker Blätter nass ab und zu Butter verarbeitet
Schätze werden so 75g trocken.


Processing
Likes
14
Share


@mrekansh
Follow
3 ml npk in 2 l water
And given half of it! Plant seems to like it
And pruning worked wonder! Leaves are healthy and getting much bigger in size! 15 cms+ excited!!
Likes
14
Share


@Fullmeltalchemist
Follow
d43 - 9.26 - Recovering quite nicely. Was able do just about all the training and trimming I want to before I switch to flower around the end of week 8. My Fast White Widows are definitely more ground hugging, while the Black Sugars are reachers, but still manageable. They have all been trained to best fit the recovery of each individual plant, so my canopy definitely isn't going to be even 😅Nonetheless, grateful they have been resilient little buggers and happy for the chance to take them flower, regardless of whether I'll have the picture perfect tent. 🙏
D47 - 9.30 - I lied. I had to train a little more. One BS cola was really outgrowing the rest, and the opposite side of plant had taken for damage from bug treatment two weeks ago so i HST'd it back and spread the other. Still planning to flower them in 7-14 days!