The Grow Awards 2026 🏆 


Likes
Comments
Share


Likes
10
Share
@StickyFingah420
Follow
Ganadora del primer lugar en la categoría autofloreciente de la copa Litoral de Los Poetas en Chile.🏆🥇
Definitivamente en mi top 5 de preferencias ⭐️⭐️⭐️⭐️⭐️
Una genética muy estable, ya que es segunda vez que germino de estas semillas y se expresa exactamente el mismo fenotipo; tonalidades hermosas y caractericas, frutos muy apretados y macizos cubiertos de una capa de tricomas lo que le da una visual espectacular.
El aroma en frasco es una mezcla de frutilla ácida y tierra con un fondo dulce 🤤 es realmente exquisito. En la fumada se repiten gran parte de los aromas pero menos dulce y más cremoso y especioso, detodas formas es un humo genial que querrás fumar todo el día..

Likes
3
Share
@FlowerOasis420
Follow
Ich musste den Filter tauschen und etwas gegen den Geruch unternehmen. Die Sorte duftet ordentlich stark. Eine Mischung aus süße und sehr erdigen/ Kieferartigen Gerüchen.
Dies ist mein 3. Durchlauf mit dieser Sorte Do Sweet Dos, sie ist manchmal etwas zickig aber bringt gut was an Harz und Geschmack mit.

Likes
11
Share
@Majeranek86
Follow
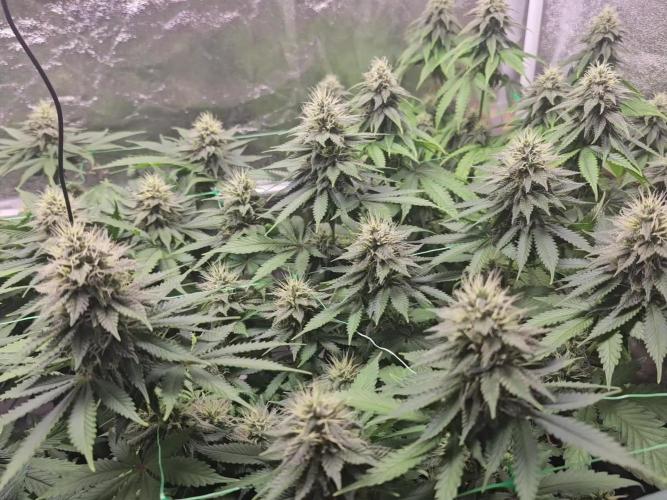
I'm impressed best looking auto I've ever grown,dens,frosty and big colas 🍀🤩
Wait for it to dry slowly and update the smoking and dry weight report

Likes
16
Share
@Naujas
Follow
107 days!! Here is another great experience :) The girl has matured, 330 grams of wet, full of sticky, resinous shiny, pleasantly smelling flowers :) I think it will be about 90 dry :) although the girl is definitely not the biggest, but she looks great, the smell is also amazing :) I also got some sugar leaves from which I will make bubble hash, For me personally it is really beautiful and good growth, which I think will definitely be confirmed by the dried and cured flowers :) there will be a smoke review, as well as the total dry weight. good luck to everyone :).

Likes
13
Share
@quigley
Follow
Cruising. Kept the nutrients the same as last week as the plants are going a bit slower than advertised by crop king and Sonoma seeds. Looking like flowering will take ~10 weeks when all said and done.
Minor amount of defoliation done. Will be the last time to make sure I don’t stunt these autos. And ONLY defoliating. No pruning as I’m too afraid it will stunt the plants.
Lots of buds forming now. Plants looking great. Noticed that the sun shines through my windows for several hours and directly onto the plants so I have started opening up the tent everyday and letting the sun shine on them. Helping to ripen the lower buds and have them be less larfy when all said and done. This does cause the plants to drink water like no other so have had to up the volume on fertigations.
I’ve been using a LUX meter to check and make sure top colas aren’t getting too much light. The thing works great! Well worth the purchase.
My mothers on the other side of the tent are big so need less light and as a result I have been able to move two of their lights in close to the flowering autos. The additional light is definitely helping bulk up the plant. Currently over the two plants there is (as listed) an HLG 135w Rspec, an HLG 100 V2 3000k, an HLG 65 V2 4000k and a Mars Hydro TS600. Tons of light!
I’m in isolation as 2 of my housemates got COVID. As a result, I have a LOT of time to spend babying these plants and it is paying off.
See you next week!


Likes
10
Share
@valiotoro
Follow
Photoperiod buds 🤩
The smell is absolutely divine very fruity,sweet & tropical🍋🍊🍉🍌
Solid like a diamond 💎
Bay harbor butcher’s trim to show the density
Likes
14
Share
@Do_it_Dan
Follow
She's come along way now in the flush and hopefully chop this week, shes swealling now and oh my does she stink so gassy yet fruity, remember happy growing and stay green 😀 💚✌️
Likes
2
Share
@LittleBigTrees
Follow
Picking the odd leaf off but it's pretty much just doing its own thing other than having to feed her . She smells really nice with lots of bud sites and has some visable trichome production now .

Likes
145
Share
@Salokin
Follow
Hello Growmies,
The final chapter of this incredible journey has unfolded, and it's time to share the bountiful harvest and reflections on the entire cultivation process. Trimming the plant was a joy, and with gentle fingers, I removed all the large fan leaves. The precision in this process revealed the true beauty of the buds, setting the stage for a smooth harvest. With care and gratitude, the plant was chopped, and the buds were hung to dry. The anticipation for what lies ahead only adds to the sense of accomplishment. The wet weight, excluding fan leaves, stands at an impressive 782 grams. The buds are massive, a testament to the efficacy of the nutrients used, particularly the Power Buds. The name seems apt, as the result is a collection of sticky, dense buds with subtle lemon notes and sweet pungent undertones. In the final moments, the plant unveiled some delightful purple hues. While I wish I could have allowed them to intensify further, it's a reminder that each grow is a learning experience. In hindsight, a slightly longer fading period would have accentuated those beautiful colors. We live and learn, and that's the essence of this journey.
A heartfelt thank you to Plagron and Zamnesia for hosting this amazing contest. The quality of the products and the support throughout the journey have been invaluable.
As this chapter concludes, I'm left with a sense of fulfillment and gratitude for the collective experience we've shared. The plant's growth, from seed to harvest, has been a testament to the art and science of cultivation.
Feel free to check out my other adventures in my bigger environments, until then...happy growing!
Stay Lifted
Salokin
Processing
Likes
8
Share
@FoxyLoxy
Follow
i dont know, this plant appears so weak. like the leaves are flimsy and floppy growth is slow the bottom is maybe burnt? but ive defoliated those leaves because they really werent receiving light anymore. anyone have any suggestion to what i might do to liven this plant up? i really dont wanna see it not flower however its transitioning very slowly if at all.

Likes
53
Share
@cheetah844
Follow
The tent is definitely overcrowded, they're starting to really take-off. I need to get the females I'm going to force pollen outside but it's still too cold. I may have to make a makeshift grow area for a month.
Aquarium water:
6.82pH
395 PPM
73.4⁰F
I used Bloom City pH Down until I hit 6pH
Likes
22
Share
@RDWCGrowing
Follow
12/25/2023-Germination Day 1
Merry X-mas 2023 I decided to start a run of SolFIre Gardens Hoodz Candyz S1. I am going to do a cup filled with RO water a touch of Hydrogen peroxide and let it sit for 24-48 hours until I see tap root then I am going to put it into a rapid rooter.. Tap root Down and put it about 1/4 of the say down the Rapid rooter.
I made some modifications to my basket on this run.. I have taken a few Pods that I use for my cloning machine and decided that I am going to try and use them as sure plants, so that I can take my water right up to the bottom of the basket this time and see if these can make my planting more consistent.
12/26/2023-Germination Day 2
Tap root achieved Planting Commencing
12/27/2023-Germination Day 3
Misted the dome lightly misted the rapid rooter and added a little water to the bottom of the pan to encourage root growth to the pan.
12/28/2023-Germination Day 4
Ground Hogs day
12/29/2023- Germination Day 5
She is up, she has broken surface, I misted the root riot, and around the bottom of the tray to try and entice root growth down rapidly.
12/31/2023- Germination Day 6
Ground Hogs Day
1/1/2024-Germination Day 7
HAPPY NEW YEARS!!.. I did it I planned it out so my planting day would fall on New Years and it worked.. Yay!!!
1/2/2024- Germination Day 8
Since the roots are not to the water yet, I am pouring one cup of water lightly on the hydroton around the lady to try and encourage root growth down to the water..
1/3/2024- Germination Day 9
Ground Hogs day, will continue until roots hit the water.
1/4/2024- Germination Day 10
Ground Hogs day, will continue until roots hit the water. I will just continue to top feed until roots are in the water.. Shouldn't be more than a few more days.
1/5/2024- Germination Day 11
Ground Hogs day, will continue until roots hit the water. I am going to change the water Sunday and kick off Week 1, I will just continue to top feed until roots are in the water.. Shouldn't be more than a few more days.
1/6/2024- Germination Day 12
Ground Hogs day, will continue until roots hit the water. I will just continue to top feed until roots are in the water.. Shouldn't be more than a few more days.
1/6/2024- Germination Day 13
Ground Hogs day, will continue until roots hit the water.
1/7/2024- Germination Day 14
Ground Hogs day, will continue until roots hit the water.


Likes
46
Share
@LittleBigTrees
Follow
Defoliated and trimmed lower fluff from The plant day 20 flower ,
Lots of air and light can now get to the plant and hopefully grow some nice buds

Likes
15
Share
@Siriuz
Follow
I think she is all set now
But I could have waited one more week
But I ran out of soil foxfarm ocean forest
And some other stuff which makes me
Recycle this pot and transplant red poison auto who is right now flowering very fast and good so it is the end for sweet Gelato our first sweet Gelato from sweet seeds
Thanks a lot guys for helping me out. Thanks a lot grow diaries for all your support blessings and lets get this girl harvest alright my dudes will be uploading more content soon at the mean time we will be showing you the bud quality against Quantity and hopefully you will see how STRESS this girl was for an auto we know now that they are good for LST and HST better than any other techniques and just some auto like the ones you mix with thai Legendary genetics will grow very fast and recover very good reason why its better to apply fimming to autos that can run fast over recovery because without that gap you Cant use those techniques since the plant wont allow you its genetics are going to get STRESS and wont yield as much as it is supposed to
But other than that is the real fact that this lady was under phlizon lights 600W
And sadly we found out those are not
Full spectrum lights so we are
Very eager to join contest and try to win
With the support of the whole community
So we can continue to grow and show
The world ah educational and real
Pot smokers team all active in all social networking to point out this is love
For all the world back and forth
Thanks a lot please join me
Please like share Comment
Leave your thoughts
I do appreciate every single one
Hope you guys have a happy growing and happy harvest as well
Enjoy SuMMer will come soon
Are you ready?
Processing
Likes
70
Share
@CBD_Sweden
Follow
Illuminauto 21 - Sour Crinkle (Grape Crinkle x Sour Crack)
Two of our fastest and frostiest varieties collide to make a sweet and sour delight!
Expect super frosty, compact nugs that won't be a toke for novices.
Destined to be a great strain for extraction work too!
Plant size - Small - Medium
Cycle time - 60-65 days from sprout
Indica/Sativa - 80/20
Frost level - Extra Ridiculous
https://www.mephistogenetics.com/product-page/illuminauto-21-sour-crinkle
--------------------------------------------------------------------------------------------------------
2017-10-18. Week 8 day 56 from germination. She is 33 cm high and really frosty and have nice buds. Maxed the nutes and hope she will grow a little more in the buds.
Added video and pics.
Its getting close to harvest i think.

Likes
74
Share
@AsNoriu
Follow
Day 82. First of two is down.
Day 88. Second down. Both will be decent by weight and structure, but smell and taste .... maybe after cure ? ;)))
Day 92. First went to jars. Will be hard to keep fingers away ... ;)))
Day 98. Both in jars ! 170 g of my very likeable smoke ;)
Will update later
Happy Growing !!!


Likes
2
Share
@hinterhofgrower
Follow
🌱: Day 1 after 108 h
💧: tap water: Day 1 50ml, Day 2 100ml, Day 4 250ml, Day 6 250ml
💡: Dli: 15 mol/m²/d
🤔: really smooth germination, going for this: https://www.youtube.com/watch?v=Fldi-U-kpnA
Likes
98
Share
@Tropicannibis_Todd
Follow
💩Holy Crap We Are Back💩
Well i took the summer off to do some outdoor but thats all done so , we are back indoors and at it again 😁
So super happy to be trying this one out , can't wait😝 ..... it's been awhile since I've grown some BubbleGum so looking forward to it ..👍
We are 7 Days in and everything is going great 👌
Lights being readjusted and chart updated .........👍rain water to be used entire growth👈
👉I used NutriNPK for nutrients for my grows and welcome anyone to give them a try .👈
👉 www.nutrinpk.com 👈
NutriNPK Cal MAG 14-0-14
NutriNPK Grow 28-14-14
NutriNPK Bloom 8-20-30
NutriNPK Bloom Booster 0-52-34
I GOT MULTIPLE DIARIES ON THE GO 😱 please check them out 😎
👉THANKS FOR TAKING THE TIME TO GO OVER MY DIARIES 👈
Processing
Likes
38
Share
@STAYINGONMYMAINCBATORUNTWO
Follow
Still forming her delicious buds had a lot of heat problems can’t seem to keep them down below 34 reaching 36c highest! 😮 I’m trying different things everyday but I think if I don’t fit ridge vents or tile vents I’ll be having more dramas with this heat! Unless typical UK gives us rain then I’ll be happy lol
I’ve added some examples of my heats in the tents the blue one (blue illuminate) is the bananan glue the first yellow one is the fast flowers second is the autos! I have 2 coolers an extraction fan and another fan to blow the heat towards the extractor but still can’t bring it down! I think I’ll go back to my old way until the summer passes on the next ones which are in germ btw! Looking to rotate a harvest every 4 weeks from when I harvest the autos! Wish me luck please buddies the struggle is real!
