The Grow Awards 2026 🏆 


Likes
Comments
Share
@eldruida_lamota
Follow
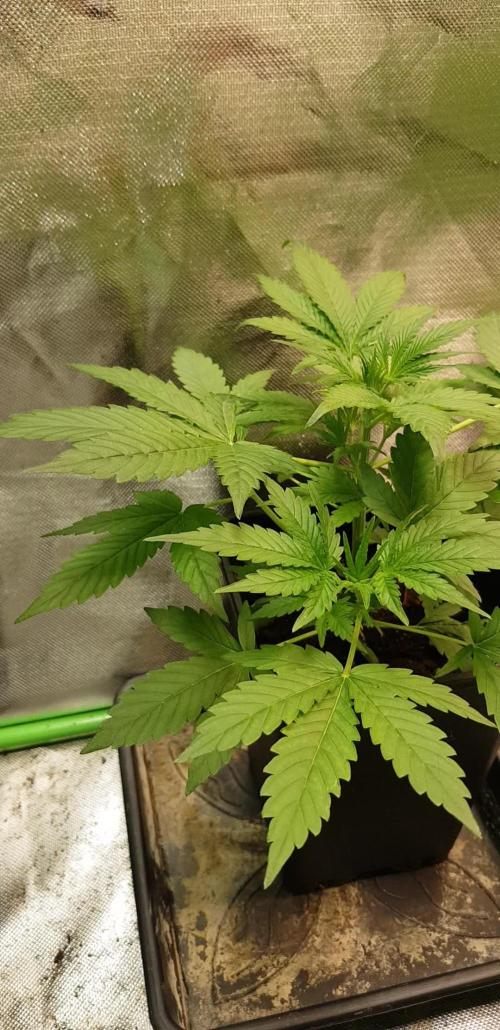
Que pasa familia, vamos con la quinta semana de crecimiento de estas Lemonpaya feminizadas de fastbuds.
Vamos al lío, de las 3 plantas, me quede con 2 por espacio, siempre pongo alguna semilla de más por si no abriese alguna por no perder ese hueco del indoor.
También se trasplantaron a su maceta definitiva, en este caso de 7 litros que además provocó un shock que también solucione.
El ph se controla en 6.2 , la temperatura la tenemos entre 20/22 grados y la humedad ronda el 50%.
Hasta aquí todo, Buenos humos 💨💨💨

Likes
7
Share
@BushDoctor740
Follow
These girls are taking off like a 🚀.Day 21 I’ve noticed all really healthy strong plants with min stretch as I now have the SE7000 set at 50 percent.So I did some LST and I expect to see some really good growth this week 🔥
Likes
19
Share
@GoldenWeedGrower
Follow
All new in this 4th week !
Thx to my friend @YYCannabis I completly changed the way to grow.
1) new pot with a new water level (10 liters just below the basket)
2) only few nutrients for now: micro, grow and calmag
3) a low EC (for now is 1 but Im ready to raise it if needed)
4) new policy about grow management based on the changes of water, EC and PH following a chart for corrective actions
5) more control on Temp and Humidity
👍👍👍👍👍👍👍👍👍👍👍👍👍👍👍👍👍👍
Lesson Learned:
WATER JUST UNDER THE BASKET
FOLLOW THE PLANT NEEDS. IF SHE ASKS FOOD THEN GIVE HER FOOD, BUT IF SHE DOESN'T THEN DO NOT.
PAY ATTENTION TO PH, TEMP, HUMIDITY
START WITH A LOW EC AND ADD NUTS ONLY IF NEEDED
GET A ROOT PROTECTOR AS HYDROGUARD
👍👍👍👍👍👍👍👍👍👍👍👍👍👍👍👍👍👍
I will see how she will react to this new method and I will make correction if needed
20/04 - Added fertilizers, raised EC, lowed PH.
21/04 - Added fertilizers, raised EC, lowed PH.
22/04 - Made Defoliation and LST
23/04 - Made Defoliation and LST

Likes
5
Share
@GERGrowDesigns
Follow
Welcome to Veg Week 3 of Divine Seeds Auto White Widow
I'm excited to share my grow journey with you all as part of the Divine Seeds Autoflowering Competition 2025. It's going to be an incredible ride, full of learning, growing, and connecting with fellow growers from all around the world!
For this competition, I’ve chosen the Feminized Automatic strain: Auto White Widow
Here’s what I’m working with:
• 🌱 Tent: 120x60x80
• 🧑🌾 Breeder Company: Divine Seeds
• 💧 Humidity Range: 50
• ⏳ Flowering Time: 58 Days
• Strain Info: 20%THC
• 🌡️ Temperature: 26
• 🍵 Pot Size: 0.5l
• Nutrient Brand: Narcos
• ⚡ Lights : 200W x 2
A huge thank you to Divine Seeds for allowing me to be a part of this amazing competition and Sponsoring the Strains. Big thanks for supporting the grower community worldwide! Your genetics and passion speak for themselves!
I would truly appreciate every bit of feedback, help, questions, or discussions – and of course, your likes and interactions mean the world to me as I try to stand out in this exciting competition!
Let’s grow together – and don’t forget to stop by again to see the latest updates!
Happy growing!
Stay lifted and stay curious!
Peace & Buds!

Likes
15
Share
@MadeInGermany
Follow
Hey guys :-) .
Today the plant was sprayed again with neem oil.
There weren't any more trips to be seen after the second application, but to be on the safe side, you did it again today get a cure.
That's why the beautiful dark shimmer on the leaves :-).
It was poured this week 1 time with 0.2 l because the roots are from clones should only spread in the substrate.
(For nutrients see table above)
The fact that the lady gets a very long time in the veggie phase I started topping for the first time today after taking the pictures.
in the coming weeks LST and will certainly be used topping a few times.
Otherwise everything was cleaned and, as always, everything was checked.
Have fun with the update and stay healthy 🙏🏻
👇🏼👇🏼👇🏼👇🏼👇🏼👇🏼👇🏼👇🏼👇🏼👇🏼👇🏼👇🏼
You can buy this Nutrients at :
https://greenbuzzliquids.com/en/shop/
With the discount code: Made_in_Germany you get a discount of 15% on all products from an order value of 100 euros.
👇🏼👇🏼👇🏼👇🏼👇🏼👇🏼👇🏼👇🏼👇🏼👇🏼👇🏼👇🏼
You can buy this strain at :
https://www.amsterdamgenetics.com/product/kosher-tangie-kush/
Water 💧 💧💧
Osmosis water mixed with normal water (24 hours stale that the chlorine evaporates) to 0.2 EC. Add Cal / Mag to 0.4 Ec Ph with Organic Ph - to 5.8 - 6.4
MadeInGermany

Likes
64
Share
@Roberts
Follow
Baked Bomb autoflower is flowering good. She has shown some potassium deficiency signs. I been adjusting her feed. She has been super thirsty as well. It's going fairly well at the moment. Thank you Spider Farmer, and Bomb Seeds. 💣 🤜🏻🤛🏻🌱🌱🌱
Thank you grow diaries community for the 👇likes👇, follows, comments, and subscriptions on my YouTube channel👇. ❄️🌱🍻
Happy Growing 🌱🌱🌱
https://youtube.com/channel/UCAhN7yRzWLpcaRHhMIQ7X4g


Likes
28
Share
@eldruida_lamota
Follow
Venga familia que ya viene la cosecha de estas Apple Fritter de ZamnesiaSeeds, que ganas que tenia ya de darles machetazo.
No veas que pinta que tienen estas plantas.
Las flores aparte de prietas se ven bien resinosas.
a sido una genética con la que disfruté mucho cultivarla, es algo complicada cultivarla pero merece la pena si eres cultivador con experiencia no te será problema cosechar.
Agrobeta:
https://www.agrobeta.com/agrobetatiendaonline/36-abonos-canamo
Mars hydro:
Code discount: EL420
https://www.mars-hydro.com/
Hasta aquí es todo , espero que lo disfrutéis, buenos humos 💨💨.

Likes
13
Share
@TPBzh
Follow
The flowers start to grow and are getting well whites.
My first plant got a problem, he got yellow tip of leaves probably too much nutriment, but it is strange, because he get exactly the same as the other. Maybe I defoliated too much...i give him a stand-by.
Otherwhise everything is ok, not easy to keep them in shape
Likes
3
Share
@thefrozenking
Follow
-good week of bulking up
-NYC Sour D is still getting taller, gonna have a good canopy
-both plants gulping a gallon a day out of the sip pots.
-Growdots and recharge. so weird not putting nute in the water.
Likes
16
Share
@valiotoro
Follow
Glad I flipped to flower with those small pots,buds are stacking up quick!
Here’s another part of my cacti in bloom
Likes
17
Share
@Naujas
Follow
She is much prettier than she was a week ago :) I remembered that I have my first grow light, which is more compact and it will give me more space, so I changed my light, now the girl's side branches get light too:) I add a lot of video memes, because I really want to win Iphone16 pro ;) and those who don't take risks don't drink champagne:) good luck to everyone.
Likes
49
Share
@LockDownGrow
Follow
Ok just finnished a blunt of this a out an hour ago, and I do not smoke blunts lol
But it seems only right too do a real smoked reveiw ,
So the fbt7 has been dry now for about 2 weeks and in a jar and today was the day too take the first bud too try so I rolled a fat one " fat one in photos lol ,
So for me the flavour just isn't there yet and am hoping that will come after a cure ,
So I smoked this all too my self and qiukly ,
Within a few minutes I went white as a ghost as was twitching the the corner hehehe,
This is very strong bud and I would go as far as saying it's probably the strongest bud I've had in years ,
I am what I would describe as a joker smoker , as I turn my bud into oils and do not smoke it ,
But any serious cannabis smoker will absolutely love this strain ,
Well done fast buds and thank you :)
Likes
2
Share
@kerby
Follow
This plant is fo amazing I can’t hardly wait it’s just dripping with rezon and just gleaming in the light just about to stop feeding I’m going to probably flush with just water for 3-4 days then stop watering completely for 3-4 days then early mourning on that last day of dehydration chop chop chop


Likes
4
Share
@Greenbum
Follow
Since correcting the PH the plant has done wonders. It only sadens me to see how much better this could have been if I wasn't bouncing around 5.0 ph for a little over a week in weeks 3 and 4. Harvest still looking good though coming up in the next 2 weeks. Buds are still extremely compact so I hope mold doesn't become a problem since my humidity is staying around 55, 60%. Trichs are everywhere, the pictures don't do it justice. Everytime I touch the plant my hand comes back sticky lol
This will probably be like my first time growing this strain. Not a huge yield but quality bud 100%.


Likes
6
Share
@Chuckwaggon420
Follow
Stuff looks awesome cant wait to try it. Almost been hanging a week! Will come back for update after days and I do a trim!!
Likes
18
Share
@Eljardindemargarita_grower
Follow
Gran experiencia como siempre
Contento con el resultado y con ganas de seguir probando y experimentando en este gran mundo.
Cultivo facil de inicio pero que a finales por culpa de una plaga que no supe tratar a tiempo y sus consecuentes caos en esas dos semanas ... Fueron en la 4 y en la 5 semana , y desde ahí , pàrecio que cause unas carencias que ya se lastraron hasta el final del cultivo ...
Aun así , en mojado pudimos sacar , nada mas que 530 gramos , y que ya luego en seco antes de pasarlas a los botes el peso total fue de unos 190 gramos de flor seca y ya lista para ir curando..
Likes
11
Share
@wheedtobeus420
Follow
Day 45 for this beautiful lady. She’s very impressive. I’m happy with how she’s turning out. Fast buds really knocked this one out of the park. Can’t wait to watch her swell and bulk. She isn’t too stinky yet can’t wait to find out what she will smell like. She’s big and bushy which is awesome because she was just a little baby I wasn’t sure about her potential but boy oh boy she’s grown up.
Likes
26
Share
@TheCannaProphet
Follow
Week 4
8/9 - All the girls are still moist so no water today as I'll let them dry out a bit until tomorrow when I'll check them again in the morning. The FastBuds Purple Lemonade and Seedsman Gelato OG girls are ALL getting it done! They are all 8" and bushy as hell! I've been tucking leaves, gently bending branches and doing my daily LST on all the girls to stay on top of them in this stretch before flower.
8/10- Checked the soil on all the ladies and it was very moist down deep, but fairly dry in the top 4" so I gave all the ladies a small drink (1 quart each) of de-chlorinated water ph'd to 6.8 @ 77deg. OMG they are really starting to bush out and stretch now, especially the girls in the Fox Farm/Natures Living Soil Autoflower Concentrate mix, they're literally exploding! FastBuds Purple Lemonade and Seedsman Gelato OG's continue to lead the pack with growth and overall looks although the rest are now looking like they're gonna give them a run for their money!
8/11- No water for the girl's today. Mail Call! The Nematodes arrived today, 10 million of them, goodbye Fungus Gnats!😀 Temp's, RH and VPD all remain on point with day temps running 75-84 deg. and 68-74 deg. during the 5 hour dark period, RH maintaining @ 50-55% (I've been running the humidifier set @55% and I'm adjusting the ph to 6.5 on the water in it as well and the VPD runs from .90 to 1.18. Started a batch of Compost Tea ( 4g de-chlorinated 6.9ph water, 4 cups Worm Castings, 2/3 cup Kelp Meal, 2/3 cup Alfalfa Meal, 1/4 cup Bat Guano, 2 scoops Great White Mycorrhiza, 4 tbsp. Neptune's Harvest Seaweed Extract, 2 tbsp Alaskan Fish Extract and 1/3 cup unsulfured molasses) for the girls breakfast in 2 days. They're all growing like crazy now and the FastBuds Crystal Meth is beginning to flower along with one of the FB Purple Lemonades, the rest shouldn't be far behind.
8/12- Applied the Nematodes to all the girls this morning mixed into 2 gallons of 75 deg de-chlorinated 6.8ph water divided equally among them. I continued with my daily mild LST on all the girls, continuing to spread them out to allow light to reach all parts of the plants. I also cranked up the HLG 650R's to 450 watts each for a total of 900w @ the wall hung @ 36" from the soil. After I eventually have them cranked to max during flower I may drop them slightly depending on how the girls react.
8/13- Compost Tea for breakfast! Fed the girl's 1/2g each through the top with tea (840ppm, 1780EC, 7.6ph @ 81 deg), tucked shade leaves and LST'd where needed. FastBuds Purple Lemonade's and Crystal Meth's are all in flower, still waiting on Seedsman! Growth is phenomenal, girls are healthy looking with the exception of the Seedsman Gelato OG in SOHUM Living Soil - she is getting what appears to be tip burn, I'll be keeping an eye on her.
8/14- Well well...almost the end of Week 4 and I thought it would be prudent to calibrate my Blue Labs Soil PH Pen and TDS/EC Pen, which I did. I then proceeded to check all of the ladies mediums ph and OMG am I glad I did! All of the Natures Living Soil/Happy Frog mixes ph'd between 6.2 and 6.8 which is perfect! The SOHUM Living Soil with the Seedsman Gelato OG in it also had an acceptable ph of 6.4 ----BUT, and I mean a BIG but, the SOHUM Living Soil with the FastBuds Crystal Meth #2 in it had a ph of 5.2-5.4 checked at four places around the pot!...WTF! I double checked everything and same result. The plant looks generally healthy, although not as robust as it's sister in NLS/FF mix. Gonna sleep on this and ponder my next move. The rest of the ladies are on FIRE😍 They are all in flower now with the Seedsman Zkittles the furthest behind and the FastBuds Crystal Meth #1 and both of the Purple Lemonade's are the furthest along so far. No water today as they got a healthy dose of compost tea yesterday but I did do my daily leaf tucking and light LST to keep the light penetration good into the lower bud sites. Speaking of light penetration, I cranked the HLG 650R's up to 450w at the wall each for a total of 900w hitting my girls now and lowered both of the 650R's 4" from 36" to 32" and will see how the ladies respond.
8/15- Well, I slept on what to do with the Crystal Meth #2 in the SOHUM Living Soil with the ACIDIC ph. Today I ran 4 1/2 gallons of de-chlorinated water @ 7.7 ph to try to get some ph back. I measured the ph and PPM/EC of the runoff and more surprises awaited. The runoff had a PH of 4.2, repeat FOUR POINT TWO, 1480 PPM and an EC of 6550 @ 77 deg. I don't know how this girl looks as good as she does considering that she's basically living in ten gallons of between black coffee and tomato juice! I'll check the ph of her medium tomorrow and see where we go from here. I gave all the rest of my girls 1 gallon of de-chlorinated water ph'd to 6.9 @ 76 deg. and defoliated a couple of leaves on the OG's, Zkittles and lightly LST'd everybody, even the girl living in a pot of coffee!...LMAO😂 ONWARD to Week FIVE!!! Whoo Hoo!!!👍💪
