The Grow Awards 2026 🏆 


Likes
Comments
Share
@Shivashamboom1
Follow
Iniziamo bene con mister Barney farm...poi con la runtz non si sbaglia mai... forza 💪belle piantine mie datemi tanti fiori 😂😂😂.la runtz è sempre una buona scelta


Likes
3
Share
@AestheticGenetix
Follow
She's starting to grow upwards finally and looks happy in her new home. Sadly the tent isn't the best and is lacking ventilation
Likes
6
Share
@Naujas
Follow
for the girl, several yellowed leaves were removed :) everything looks not bad, maybe I would even say very beautiful :) I already increased the light intensity to 85%, I'm a little afraid that there might be a problem due to excessive heat, well, you have to watch :) the girl drinks a lot ,in a week I poured her 12 liters :) I also gave the girl a really strong food mixture with almost 1100 ppm, but I also gave completely clean water with 20 ppm and 6.3 ph :).

Likes
6
Share
@DE_BW
Follow
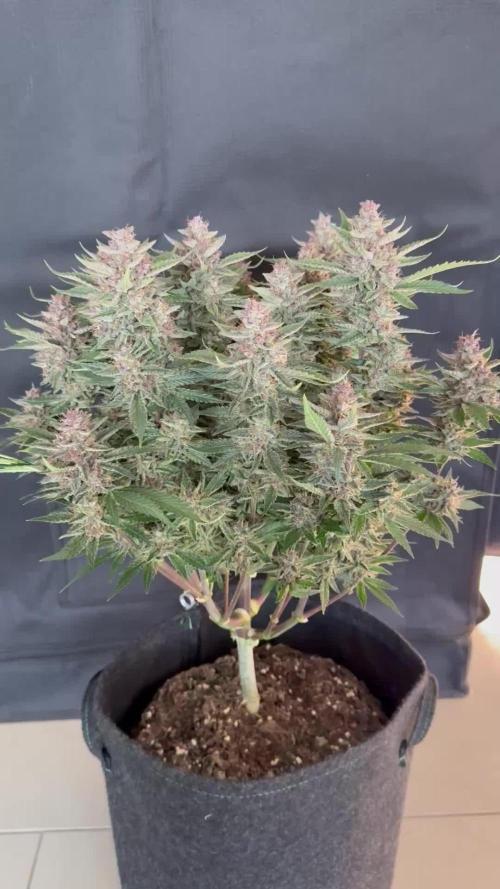
The plant continues to progress steadily and looks very healthy overall. Buds are stacking nicely across the canopy, with clear increases in density compared to last week. The beautiful pink coloration is spreading further down the plant and becoming more pronounced. Aroma is intensifying day by day, now strongly reminiscent of sweet apricot jam and very pungent.
Likes
16
Share


Likes
6
Share
@Spliffi
Follow
Germination 07/09/2022
Hi to all the old and new growers out there. Spring has barely started but I'm so AMPED to start again. My first grow attempt was a disaster. I started to early for the season. I wasted some good seeds and those Blasted 🐌 🐌 snails messed up everything. Got up started again and took it as a learning curve. I had 1 seed left from the previous attempt and this had to be the golden ticket.
The first important thing I learned was getting to the correct pH. Used a 1 liter jug not knowing that the pH down was very concentrated substance. Added 1ml of pH down to tap water with a base of 8.5+ pH and brought it down all the way to less than 4.5 pH. I probably tried like 5 times and realized that a single drop made a difference of about 2 pH. I got the feel of it and had to source a better water supply. I had the option of using tap water but didn't have the time to do a 24 hour airstone run ever time I wanted to water the plants. The local water supply shop was a better option. I got a consistent 6 pH and the price was decent.
The Snail 🐌 Problem... I have a plan
for those F**kers.
We have 2 very nice hydroponic shops in my city. Here's the supply list:
Freedom Farms Seed Starter
GHE pH Up
Kushy pH Down
GHE pH Test kit
Freedom Farms 10 liter fabric pot
Simba Genetics: White Widow auto
🌱🌱🌱🌱🌱🌱🌱🌱🌱🌱🌱🌱🌱🌱🌱
"I find it quite ironic that the most dangerous thing about weed is getting caught with it."
Bill Murray
🌱🌱🌱🌱🌱🌱🌱🌱🌱🌱🌱🌱🌱🌱🌱
Thanks for reading


Likes
16
Share
@IQuSX
Follow
^^Now moment is retime 12/12 & SCROG.
The second branch is equal in thickness to the main one and this pleases!
Defoliation 60 % of the green mass>>

Likes
29
Share
@valiotoro
Follow
The nose is like a green gummy bear come to life LOL
Sweet, tangy, and fruity, with that unmistakable candy-like aroma. Very intense, with layers of sugary green apple, a hint of citrus, and a subtle herbal undertone that adds depth.


Likes
62
Share
@Santica_Garden
Follow
So apart from the really low yields.... Which I expected from 80% Indica dominant strains just not that low considering how dense the Budz were. But I can say my growing skills have been consistently improving and it is showing with each grow.
With these ladies I should have definitely put them in a 12Litre pot or smaller and still would have gotten the same results if not better. So I lesson learnt for future grows..... To take into consideration the size pots I'm using on the strains I'm running! 👍🏾
But in all very great smoke, even more excited for the next rows that I have coming with the improvements I will be making. 👍🏾🌱💚
Another thing I will say is that I will be putting more effort into how I document my harvest for you guys.... More pictures, better videos showing off the Budz.... Not many pictures because I done smoked it all 😅😅🔥🔥🔥 but still I want to do better for you guys, I want to give people the best view/review of the strains that I run... The information will help someone that decides they might want to run this strain in the future!
Any questions guys just ask away 👊🏾😎

Likes
25
Share
@Grower_Of_Persia
Follow
week intel:
its time for second pruning they grew up too fast and need second pruning as below :
first i remove big fan leaves and only leaves then let them rest for 1 day then the second part of pruning will get done that is removing branches based on these conditions:
1-if the branch is very low and never can make it to the top ,
2- if branch is in shade even after pruning fan leaves ,
3- if there are too many branches at the small space then non of them will get resources so if there is no space for branch then , they must get remove.
everything is perfect!
stresses :
pruning big fan leaves and lower branches + a little E.C stress around 1.7 once a week
feeding:
i feed them 3 times this week with this order :
day 1 : i feed them heavy with silicate +base nutrients(calcium & micros + Bloom) about 884 ppm - 1.7 e.c to cause a little stress.
day 3 : i feed them low dose of Feeding Booster + Karbo Boost around 325 ppm - 0.6 e.c to let them recover a little but not fully recover still a little stress will caused.
day 5 : i feed them with low dose of Top-Max + B-52 around 213 ppm - 0.4 e.c to let them recover the stresses to get ready for another stress next week.
guide of the week :
no more stresses from now on till the end and from next week i'll reduce the amount of nitrogen and calcium to below half to the end.

Likes
3
Share
@Krautbauern
Follow
Papaya cookies are incredible! All the pistils turn purple, incredible beauty of this plant. We are so happy to have caught this extraordinary phenotype and are looking forward to an early harvest in about 2 weeks time.
Likes
17
Share
@Mr_nugs_lover_David
Follow
It's been a beautiful strain to work with, the flowrs are definitely worth it after all this time, the quality is definitely high. However this pheno of ak420 smells very different from the other 2 phenos I've grown along with her. The flowrs are beautiful, very solid and frosty nuggets, I smoked a few little nuggets when trimming but I'm excited to taste the big buds, hope you guys enjoyed the process. I want to say that this pheno #1 has a different smell compared to the other 2 phenotypes of ak420 that you can see here on my page as well, so stay tuned guys! Overall result is very nice, good quality, strong weed, sticky, stinky. I can say that it's very great and also you can get them for a very cheap price so it's a very good investment if you're looking for a powerful and affordable strain. Cheers growmies! ❤️💚💛💎👨🌾

Likes
7
Share
@Salokin
Follow
Hi Growmies,
Can’t really see any swelling anymore and therefore started to flush her. PPM‘s are already down to 100 and will change the reservoir two more times during week 12 to try and bring it down to 0, followed by two days of darkness and harvest. This plant is saving my overall yield of this box, as the Mazaar has performed subpar, probably because she was sharing the box. The afghan, however delivered in terms of production, as promised by ganja farmer seeds.


Likes
26
Share
@Probation2Propagation
Follow
Day 35! One week from transplant and we started our first LST which was topping today. After topping we watered with recharge to help combat any of the stress woes.

Likes
14
Share
@nine666
Follow
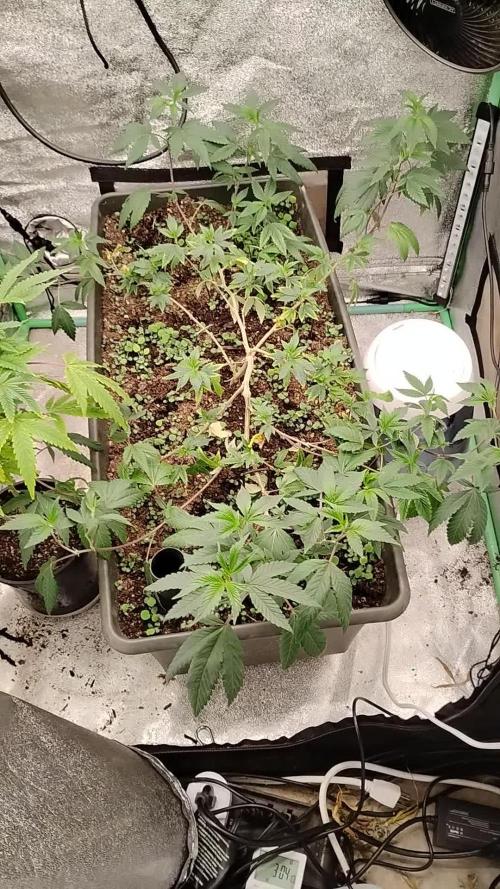
Hi growers! this is my first grow and I will try to be as detailed as possible.
The first video is day 2 and the second video is day 6. The first pot is the Fast buds BlackBerry Auto, second pot is the Fast buds Zkittles Auto and the Two at the back are the SweetSeeds Honey Peach CBD. originally the back left pot was meant to be a Fast buds Tangie'matic but the seed didn't germinate so around day 4 of the grow I decided to germinate another Honey Peach CBD Seed.
Equipment using is:
2 x 300w Viperspectra LED Lights
4 x 12L Fabric Pots
2 x 9" Clip Fans
1 Standing oscillating fan
1 Thermostat with RH reading
and a cheapish Carbon Filter kit from EBay.
As this is my first grow i have been on quite a tight budget but if things go well I will be slowly upgrading all of the equipment over time.
Notes:
As you can tell by the video I am very limited to space, I can't remember the exact measurements but I think its 48inches cubed

Likes
15
Share
@JeyGanesha
Follow
Seconda settimana di fioritura...anche la Apple strudel sta bene.inizio a sentire dei buonissimi profumi di fiori di ganjah 😂😁😉💪💚💛
Stanno entrando nella 3 settimana di fioritura