The Grow Awards 2026 🏆 


Likes
Comments
Share
@HighOhioAn
Follow
Rainbow melon has stolen my heart From day one the plant was bigger as nice strong stock handles low stress training well some of the biggest buds I’ve ever had. I am truly in love with this plant fade is absolutely one of the Most beautiful like an Indian summer Cannot wait to see what they come up with next💪🔥💯


Likes
10
Share
@Jerrza
Follow
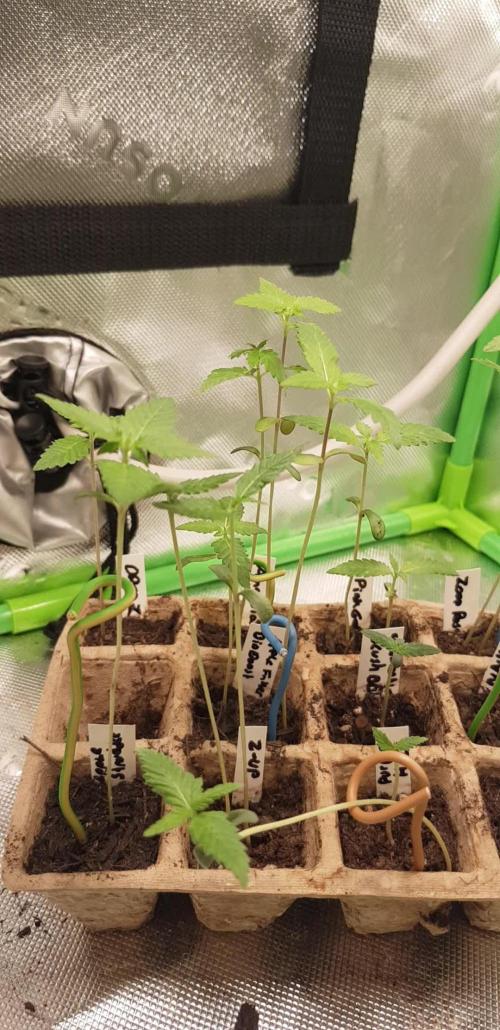
Mann writing this it feels like so long ago, anyway this our first grow ever this was back in like january ish right before i started LTS like i said it Is our grow ever i didnt wanna fuck up so i never really thought of transplanting cuz yh first timer but as you guys will see the process ngl proud of myself


Likes
Comments
Share
@undermink
Follow
She really drinks a lot less than the weeks before.. I guess she's almost ready now :) *.* can't wait... She smells super strong really sweet... She's covered with raisin and starts to get brownish trychomes. I still give her only water - no more nutrients...

Likes
14
Share
@FlavoursUk
Follow
Girls are stretching so are basically transitioning into flower. Still healthy and impressed at the growth rate.
Last foliar feeds given as pistils will start developing.
Stay tuned


Likes
20
Share
@BCbuds76
Follow
This strain looks absolutely amazing. I ended up keeping the other purple punch going . I didn’t continue it in the diary . I had intended to kill it because of the way it looked. I guess it had wrinkly leaf syndrome . It ended up turning out 🤩. 1000 grams from two plants. The smell from them while harvesting was overwhelming.


Likes
Comments
Share
@Tony2jewerlyseeds
Follow
Las lluvias diarias están empezando a atrofiar mi cultivo en especial las plantas grandes que se les encontró un poco de oidio está semana les pondré un ventilador para controlar o disminuir la humedad igual limpiare toda la área afectada

Likes
4
Share
@GizaWRZ
Follow
Hi, 2x of my purple punch died 🤷 and another 2x they looks weird i think its bad genetics(mutants) the rest of the girls looks nice 👍
Likes
93
Share
@PEAKYPLANTERS
Follow
ladies and gentlemen
Welcome to peaky house gardens
Have you seen the rainbow of colors that entered my house?👩🌾🏼
Guys....it's spectacular
Likes
12
Share
@mikejm
Follow
Not much change. Seeds take time. If I had not pollinated these plants I'd probably go ahead and harvest this.
I included a video.
Suggestions are welcome.
I can't shoot without the grow light so sorry for that.

Likes
8
Share


Likes
66
Share
@LoveGrowWeed
Follow
Well, here is the harvest.
I looked through a jeweler's magnifier, saw yellow trichomes and cut down the plants. 2 days trimmil, tired. Cool groove turned out.
I'll post the weight later when it's dry.
Let's try to pull the diary of the month?
So what did we get.
In the general photo, dense buds - 720 grams. (3 cans and a container).
There were still small buds , did not weigh.
And sugar trim - in the photo, with small small cones.

Likes
8
Share
@GERGrowDesigns
Follow
Welcome to Veg Week 1 of SuperStrains Amnesia
I'm excited to share my grow journey with you from my
SuperStrains Project . It's going to be an incredible ride, full of learning, growing, and connecting with fellow growers from all around the world!
For this Project , I’ve chosen the Feminized Photo Strain Amnesia :
Here’s what I’m working with:
• 🌱 Tent: 120x60x80
• 🧑🌾 Breeder Company: SuperStrains
• 💧 Humidity Range: 90
• ⏳ Flowering Time: 10 Weeks
• Strain Info: 25%THC
• 🌡️ Temperature: 26
• 🍵 Pot Size: 0.1
• Nutrient Brand: Hy-Pro
• ⚡ Lights : 600W x 2
A huge thank you to SuperStrains for allowing me to try my Best with this amazing collection from Photo Strains they managed to Sponsore side by side with theyre Hy-Pro Nutriets . Big thanks for supporting the grower community worldwide! Your genetics and passion speak for themselves!
I would truly appreciate every bit of feedback, help, questions, or discussions – and of course, your likes and interactions mean the world to me as I try to stand out in this exciting competition!
Let’s grow together – and don’t forget to stop by again to see the latest updates!
Happy growing!
Stay lifted and stay curious!
Peace & Buds!

Likes
5
Share
@Kinghaze
Follow
- End of week 5
I topped them and they seem to react very well to it.
Looking nice healthy and green , exept for the blue zushi on the right.
It's growing really weird, but it seems to keep up with the other plants.
I don't know if i will put it into flower.
The 2 blueberry cupcake ( back row) on the right, are bigger then the rest.
I bend one of them so it will be more even .
Most of the plants have a different structure.
They are f1 seeds , So there's a good chance you'll have different phenotypes
Now i will train them a litte untill they are big enough, and then place a trellis net.

Likes
25
Share
@DrGanj
Follow
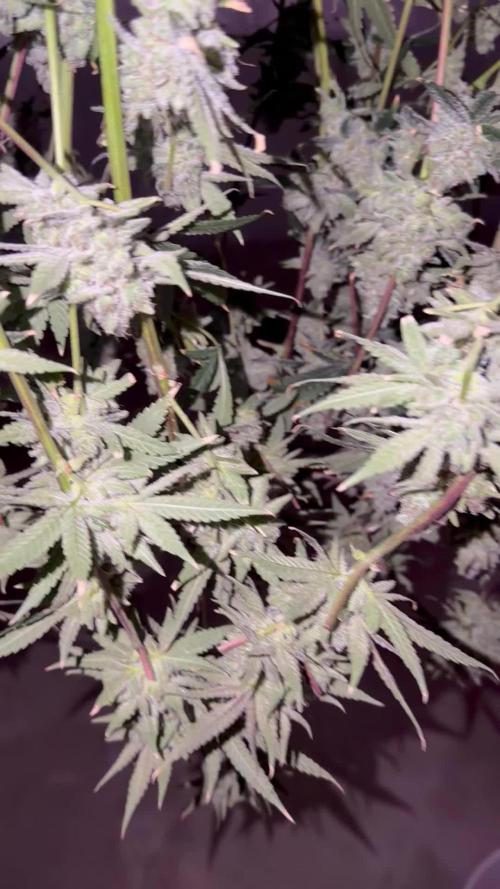
Some mild defoliation this week. Budding up nicely and starting to frost. This girl was having a foliar feed of algae last week but this week she's getting light foliar sprays of the Lacalva stress treatment from madame grow on top of her other feed. I'll do this every 2/3 mornings and I'll only lightly mist the top. I'll concentrate most of my foliar feed on the lower growth and undersides, away from the buds. This is the main reason I kept so many lower fan leaves this time.
Likes
4
Share
@Adkguerrilla44
Follow
So far so good they are starting to fill out the 1/2 and 1 gallon velcro transplant bags with roots very nicely. I still havent fed them any grow nutrients just some mammoth mycos,hardy gro ultra-bio and a liquid soil inoculant i got from ebay. I will them some NPK raw grow and cal/mag next week.
Likes
22
Share
@Aeromax
Follow
Hey guys ! 40th day of veg 👽 The mothers are getting big
They're enjoying the 2.4 EC for real 😤
I also put the Migro Aray 4 to 100% intensity so that was quite a good boost together 😊
I fimmed & made some LST on almost every plants, which is nice to enhance growth !
The Perfect Tree Seeds are the ones with FloraCaps 👌

Likes
86
Share
@DogDoctorOfficial
Follow
Greetings, fellow cultivators and celestial gardeners! Week 6 marks a cosmic milestone in our Apolo F1's journey, as she gracefully enters her second week of flowering. Join me in this week's botanical odyssey, where our green companion ventured to the moon, and we unleashed the floral symphony in spectacular fashion.
Our Apolo F1 reached for the stars this week, prompting a decision to release her from the supportive wires that once guided her dance. Like a lunar explorer exploring newfound terrain, she responded with an astounding display of growth. The shackles are off, and our green companion is free to unfurl her celestial beauty.
As we embark on the second week of flowering, the floral symphony is unveiled in all its glory. Buds are forming and growing, a testament to the vibrant energy our Apolo F1 gathered during her lunar sojourn. Each petal, a note in this harmonious botanical composition.
In this week's horticultural performance, a new player graces the stage. Aptus Holland Topbooster joins the nutrient ensemble, replacing the Startbooster. This strategic move is a testament to the rich soil we've crafted, teeming with vitality. The botanical orchestra is now playing a new melody, and our green virtuoso is responding with grace.
The nutrient-rich serenade with a TDS of 420 ppm and a pH of 6.3. The transition from the last veg mix water to the flower mix, coupled with the addition of Topbooster, ensures our Apolo F1 is receiving the tailored nourishment needed for this stage of her celestial bloom.
A heartfelt thank you to Aptus Holland for being the orchestrators of this botanical symphony, and to Royal Queen Seeds for providing the stellar genetic star of our green opera. The journey to the moon and back has been nothing short of magical, and we're just getting started!
Join me in the next chapter of our Apolo F1 Mission Diary, where we'll witness the continued celestial bloom and the unfolding drama of a truly lunar harvest. Until then, may your gardens flourish, and your green endeavors be ever cosmic!
As always thank you all for stopping by and for supporting me on this journey, i am super passion about growing and fell blessed to have you all with me on this new journey