The Grow Awards 2026 🏆 


Likes
Comments
Share


Likes
21
Share
@BLAZED
Follow
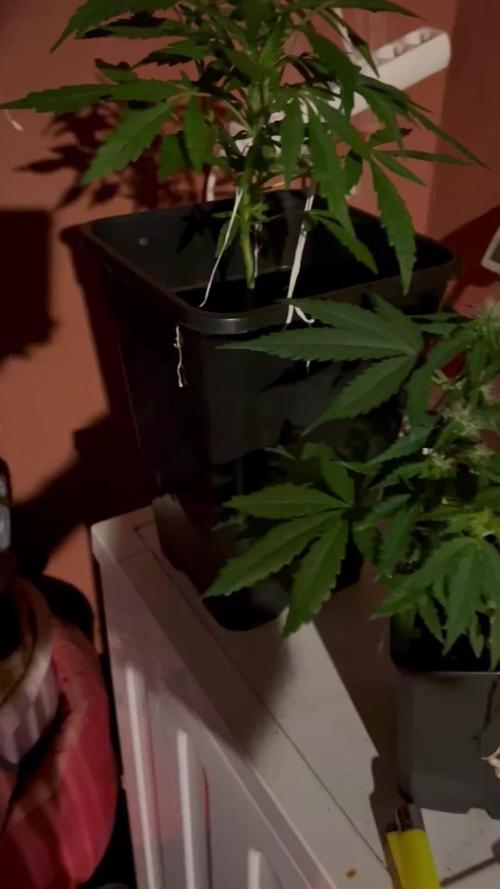
Week 17 (23-6 t/m 29-6)
23-6
Temperatuur: 31.2 graden (licht aan) 23.2 graden (licht uit)
Luchtvochtigheid: 71% (hoogste) 53% (laagste)
Dit is de laatste week bloei, dus geef ik geen voeding meer.
Watergift: (Flush) 1100 ml EC: 0.0 PH: 6.4
24-6
Temperatuur: 31.5 graden (licht aan) 24.2 graden (licht uit)
Luchtvochtigheid: 67% (hoogste) 50% (laagste)
Watergift: (Flush) 1100 ml EC: 0.0 PH: 6.4
25-6
Temperatuur: 32.9 graden (licht aan) 25.2 graden (licht uit)
Luchtvochtigheid: 72% (hoogste) 47% (laagste)
Watergift: (Flush) 1100 ml EC: 0.0 PH: 6.4
26-6
Temperatuur: 33.5 graden (licht aan) 23.1 graden (licht uit)
Luchtvochtigheid: 68% (hoogste) 48% (laagste)
Watergift: (Flush) 1100 ml EC: 0.0 PH: 6.4
27-6
Temperatuur: 31.2 graden (licht aan) 21.7 graden (licht uit)
Luchtvochtigheid: 61% (hoogste) 47% (laagste)
Watergift: (Flush) 1100 ml EC: 0.0 PH: 6.4
28-6
Temperatuur: 30.1 graden (licht aan) 22.4 graden (licht uit)
Luchtvochtigheid: 75% (hoogste) 47% (laagste)
Watergift: (Flush) 1100 ml EC: 0.0 PH: 6.4
29-6
Temperatuur: 31.4 graden (licht aan) 23.7 graden (licht uit)
Luchtvochtigheid: 75% (hoogste) 53% (laagste)
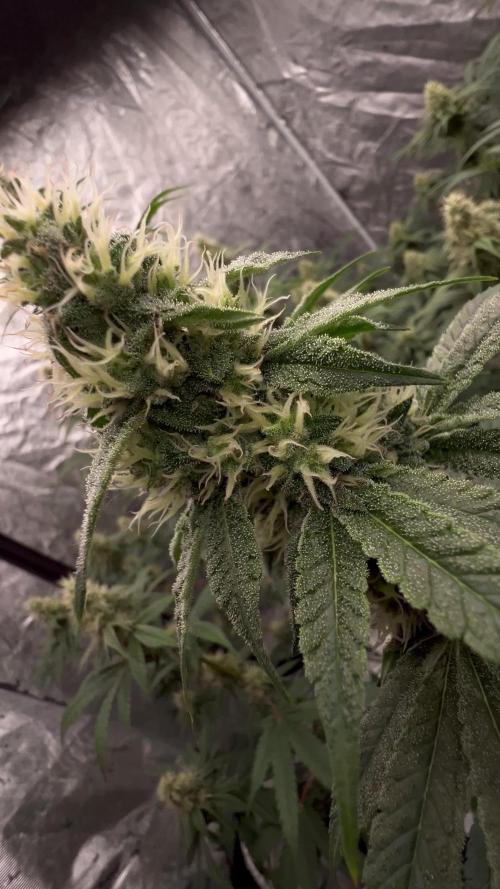
Yes! Ze kan geoogst worden!
Watergift: (Flush) 1100 ml EC: 0.0 PH: 6.4

Likes
3
Share
@DanisgrowD
Follow
Hey growmies!
Yay winter just started around here, nights are getting coldder around 12C degrees at night.
Sweet skunk is huge now and looking good with the lst i applied ive to water her once every 2 days cause she is drinkin A lottt. Not much happening for the gorilla i suppose she got stuned a lot, lets see if she comes back, still lots of time.
I’ll see you guys next Sunday as always much love and goodsmokes❤️🏻💨


Likes
27
Share
@adam_pawloski87
Follow
This week went really well ! Today we are at day 79 from seed an looking beautiful! One Forbiddin Runtz got chopped an hung to dry out an the rest are still flushing out through the rest of this week! Very nice looking fades coming along on the fan leafs from purple to green , so beautiful ! So happy with these genetics from @fastbuds_genetics! Super sticky an smell is so amazing, room full of purple punch’s an Forbiddin Runtz the smell you can’t beat, so many berries!!! Well stay tuned for next week! Cheers y’all


Likes
199
Share
@CRiSPrGrow
Follow
First full on flower week for these, they seem really f-ing quick for some reason, maybe it's the smart protein ... At this rate i'm gonna have an august harvest fully 12 weeks from seed lol, i'm not holding my breath because i'm realistic, but that would be f-ing nice as shit lol anyway i'm just following these ladies' cycle and giving some flower nutrients as well as some flower specific micro , had some bioflo around so just used that - didnt really over think this one, i'm just enjoying the show, sneaked into their room while they were sleeping to snap some pics , pretty dramatic with the lighting , hope you enjoy these ! Just a word before I let you go : i do "touch up" these photos by clicking the magic wand on my phone's camera function, so if these appear "too much" or "too light" or whatever, just let me know i'll save time and effort , like i said, hope you enjoy these 🚀


Likes
25
Share
@Mrs_Larimar
Follow
When I started this Grow, i never expected such a vigor Plant, and i havent been reading about the
XL-Versions.
But now its clear, by incrossing the Ruderalis, the Plants grows explosive and extremly Strong
I had to move them out of the small Cabinet
after i took them into the Floweringroom, they continued to Grow and in the End the Plants got
130 cm Hight
I wished i had grown them in bigger Pots
But i started them into 5l ( fitting into my Growbox)
and it was to late to transplant them
3 of 4 Plants turned darkpurple-one was pink.
Harvesting was an easy Job, because of those lovey Budshape, they are growing symmetric konic
along the Branches
they were Smelling like Peach, and some musky Undertone
while Harvesting them ,i got a Smell of fresh pressed Applejuice and some " green smell"
Plants were covered with sticky trichomes,
very courious to the endproduct
Its an easy to grow Plant, if you know about her vigourness 😂
Iam very pleased with the grow
welldone @Sweet_seeds
Likes
574
Share
@TOTEM
Follow
Okay, she’s still stretching (and she loves techno music as you can see 👅), but she definitely slowed down. Of course she’s not gonna fill all the grid, as I expected. What a pity! Now I just want her to grow a little more, especially those colas at grid level. If they don’t grow a little, I’ll get the worst colas ever!
I’ve just bought a 600W COB panel with 6 Cree CXB3590 (3500K). It should be delivered next week! Can’t wait to try it, and finally give this princess the real power she deserves: DOUBLE SUN POWER!!!! 🤯
What do you think about this pheno? Do you think it will be that “strange” one? I love those stretching colas! 🤩
Day 70: Watering with 8L of tap water.
Day 72: Feed @ 1ml/L, 6L of tap water in total. It’s very strange I’m using full strenght nutes with Dr. Grinspoon. I’m still alternating one watering with nutes and one without. Leaves are ok and pointing up to the sky, tips are perfect and colors too, so she should be just very hungry. This week I switched Biomassa with Florastimo. Florastimo increases the synthesis of natural hormones of plants, the metabolism and assimilation of nutrients, the production of essential oils and resins, and maximizes the production of flowers and fruits.
Day 75: Watering with 8L of tap water. Runoff PPM is 700.

Likes
42
Share
@Ukfarmer420
Follow
So starting the shogun dragon force for 2 weeks now as I got recommended this instead of the final part ripener, so I hope there's a nice difference, the plants are smelling amazing now. I will keep you all updated and add more pics soon.


Likes
17
Share
@eldruida_lamota
Follow
Vamos familia, estamos en la séptima semana de floración con estas Purple Og Kush de DutchFem.
Las vemos con un buen color, bien sanas y van engordando y progresando correctamente.
A subido un poco la altura pero no afecto tanto, ya imagino que seguiré dándole de comer porque pedir piden, una semana más por lo menos.
Agrobeta:
https://www.agrobeta.com/agrobetatiendaonline/36-abonos-canamo
Mars hydro:
Code discount: EL420
https://www.mars-hydro.com/
Las maximas de temperatura no superan los 26 grados y las mínimas no bajan 20, así que no me puedo quejar.
Los niveles de humedad también son los correctos van entre 50%/55% de humedad relativa.
Por supuesto el Ph lo estamos dejando alrededor de 6.
Hasta aquí es todo, buenos humos 💨💨💨.

Likes
9
Share
@ProfesorExplicito
Follow
Hermosa y sutil. Tiene un ligero olor a fruta en las hojas. He visto alguno que otro pulgón verde, no prosperan luego del baño semanal. Ya me muero de ganas de cortar unos clones y hacerle LST.

Likes
43
Share
@Humble_Lion
Follow
Weather was better than before. A couple of sunny and warmer days.
Installed the lights with the timer in order to support a 16/8 light cycle with a 1 minute burst of light every two hours at night.
Mid week i transplanted them, super happy about that. Cover crop looks great. The placeholder pots have been filled with horsetail, alfalfa, bokashi and worms. Cleared them out to use it as mulch on top. Watered them in with fresh brewed vermicompost tea.
The Jamaican Dream CBD will later move into the garden, so the roots can connect with the soil through the bottom of the bag.
Plants looking great by the end of week, but still in flower.... started a new run for back up and a friend of mine would give me some very nice seedlings and clones if things go wrong.


Likes
18
Share
@Pokan187
Follow
This week went by well, I will start checking the trichomes on the Runtz at the end of this week. It should be ready for harvest in the next 2 to 3 weeks
The G13 is still smelling like magic, looking majestic.
The GDP buds are starting to put on weight

Likes
16
Share
@Love420bluedream
Follow
I'm very happy I've already got 107 grams out. I still have 2 plants drying and I'm excited to see how they turn out😊😊💚


Likes
10
Share
@eldruida_lamota
Follow
Que pasa familia, aquí andamos que vamos actualizar una semana más
Fumándonos un troncho de haribo con Rosin de Le Xupet Negre .
Mientras tanto os comento ya en la recta final de estas Red Cookies Gelato, siendo sinceros están muy pepinas y bien resinadas, los cogollos van muy tricomados y están súper hinchados, pero comento también que la variedad no es del todo estable, es algo complicada tienes que estar pendiente de ellas cada día observar que no salga un macho porque de 100 plantas habrán salido 3 machos y alguna hermafrodita , son frágiles.
Fue mi primer proyecto de cruce que aún así dentro de ser el primero a salido demasiado bien porque no esperaba ni resultados positivos pero ahí están y toda la gente que la probó, todos los que se molestaron en conocerla o interesarse por ella se agradece ,porque todos habláis muy bien de ella aún siendo así de frágil, se agradece y valora mucho vuestra opinión, Fieras.
Voy hacer estrés hídrico, cada vez regaré menos cantidad para que no se mueran las plantas pero si dejen de comer de las raíces de la parte de abajo, aparte van amarilleando las hojas más rápido y mientras terminan de madurar.
Hasta aquí es toda la semana y casi todo el cultivo como quien dice, así que buenos humos y hasta la semana que viene 💨💨💨
Likes
58
Share
@Wastent91
Follow
So are you guys okay? You know so much to me! My situation as a grower is growing and many possibilities are opening up for me for new fantastic projects, to which the first thing for me is the mega-passion that I have for these girls, who at the same time give me fun, well-being, social life, introspection, meditation, high if necessary, I would really do everything for her if I lived in a country where this is legal, but unfortunately I can't and you don't know how much I envy people in America who can freely grow and show their results on Instagram and many other social networks that I hate but in So if people follow you you can even survive this, this can't be done in Italy, I can only live on the sidelines and I'll be happy in my only experience of myself producing the best possible weed on the planet where I am! Apart from this rant, I wanted to say that the new grow box is the intelligent ventilation system that regulates the air in relation to the humidity and temperature in the box, I must say that for me it is a huge leap in quality that I am sure will also be reflected on my girls! Thanks for everything Mars Hydro you are my source of pride and happiness for trusting me that I can have the same professional home tools as anyone else on this planet who wants good and natural weeda! Mars hydro = excellent quality in everything! For now, the light is set to 50 x one hundred, we'll see later how the girls develop and we'll make some adjustments, thanks to Barney 's farm for the opportunity to test yuor seeds! I love yuo GD i love yuo all! Buon 420 a tutti! 😼😋😽😻💖🧑🌾🌱🌿🌲💨😝
Likes
5
Share
@LeedsCityFarmz
Follow
Plants Flipped to flower on a 12/12 light schedule. EC dropped slightly to try and reduce any major stretch. These plants should have been lollipoped last week before putting them into a scrog but unfortunately I was unable to, so I have to remove the Scrog to make it easy to lollipop and then place them back into a Scrog once lollipoped. When the Scrog was placed back on it was more for support as I'd already built the structure of the plant the prior weeks. Although a few lanky branches did get bended back over. Another Scrog layer will probably added later in flower for further support when buds start forming.