
Likes
Comments
Share


@Growandroots
Follow
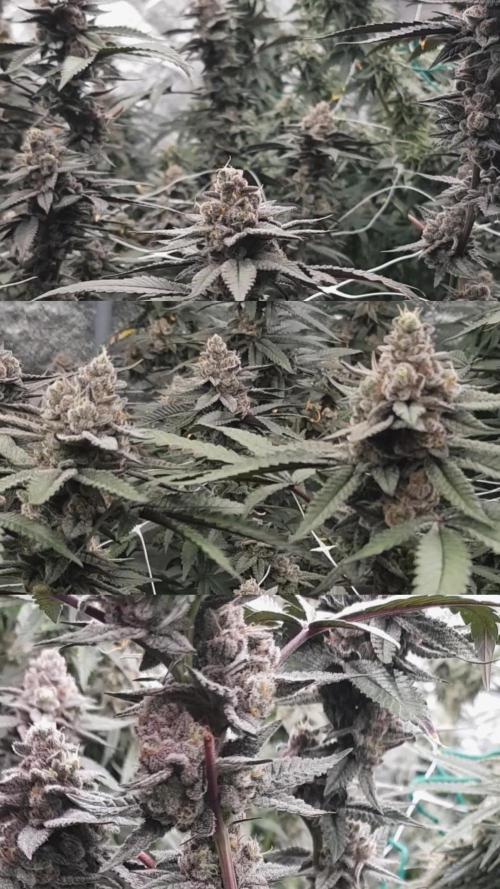
Wochenbericht – Pflanzprojekt (4. Woche)
In der vierten Woche haben die Pflanzen einen deutlichen Wachstumsschub erfahren. Sie haben nicht nur in der Höhe stark zugelegt, sondern auch die Blätter sind kräftig gewachsen. Die Entwicklung verläuft weiterhin sehr positiv.
Um die Pflanzen in ihrer Form zu optimieren, wurden die Köpfe getoppt, was zu einer noch dichteren Struktur führen soll. Die Pflege beschränkt sich weiterhin auf das Gießen mit Wasser, da die Erde ausreichend Nährstoffe bietet.

Likes
85
Share


@Organic_G
Follow
Die Babys haben die 10. Woche abgeschlossen und den Tag 71 erreicht.
Die meisten Trichome waren Milchig, eher wenig Amber, ich wollte einfach mal die Wirkung testen und Sie nicht noch weiter reifen lassen, beim nächsten mal warte ich auf einen 20/80 mix.
Geruch ist super, süß, Fruchtig, Creamy echt was besonderes.
Die Ladys haben 5 h Dunkelheit vor der Ernte bekommen.
Sind nun als ganze Pflanzen für die nächsten 10 Tage bei 18-20 C und 60 % RH am trocknen, bevor Sie in die GrooveBags kommen.

Likes
14
Share


@LokalGrenz
Follow
Still just water and some fish shit
Jan. 1 Happy New Year welp to start new year off drop my very cheap PH meter in the bucket water and now the readings are off and I probably watered them today with wrong pH water Sour diesel looks cool didn’t water today soil was still moist but the amnesia haze be

Processing
Likes
24
Share


@Cogollo_eu
Follow
**Encontrarás la traducción a español al final de la descripción**
If you like this week, please hit a like, it costs you nothing! 👊. Thanks in advance 😉!
From/Desde: 19/08/19 || To/Hasta: 25/08/19
From day/Desde día: 28 || To day/Hasta día: 34
-----IMAGES & VIDEOS-----
P5 - I'm loving this photo, is the first complete cool photo of the AK i've taken. With the structure, the fixing rods with the same length as the diameter of the AirPot, and those beauty rubbered green cables 😍.
P8 - I'm feeling that those branches looks too weak, and slim for what's coming. From next week i will use Rinho Skin to see if it can help them to get fat in upcoming weeks and before flora time. I'm also minding to create some branch supports with the 3d printer that will be placed on the LST structure, I need to twist my mind a bit with it.
-----WEEK SUMMARY-----
Another super heat week. While at home i'm at 34~36º in the street things are worse :(. Also humidity fluctuate from 50~65º.
At last I removed those ugly & dangerous cables from the branches and used a rubber covered one. For now i only need to fix her in 4 points, 1 per each main branch, as you can see, at about 13 cm of the main branch. Later i will fix her with another 2 points per branch, one in the border of the pot from inside, and the last one also in the pot's border but outside.
This week i removed the first horizontal internode on each main branch, and also removed the branch that grows vertically down from the second internode leaving in place the one that grows totally up.
At the end of the week i will fix the SCROG mesh, but it's not going to be permanent until later, or maybe not at all due to dark photography, as if i place the mesh i will not be able to move the plant (i need to think about it). For now, I just need it 3 or 4 days to test it as i never placed this 60x60 mesh before, and also i had to cut the central rods for the mesh.
About Alice K. she's growing beauty and healthy, some week ago i found a little white spider that i killed, @time (week 7) I didn't noticed any insect signs more. Also remark that she's standing well those temperatures and some days of very low humidity some hours 35% inside the tent. And also the equitative distribution she's developing.
As i said on previous week, i will kill those clones at mid week as i'm going to plant 4 more seeds in a week, and all is going to be too much work 😞to compatibilize it well with my job.
-----WATERING CALENDAR-----
23/08/19 (Day 32) - 3,000 ml with all week nutrients @ 1.1 E.C. PH5.8
*****ESPAÑOL*****
Por favor, si te gusta esta semana dale un like, no te cuesta nada 👊. ¡Gracias por adelantado 😉!
-----IMÁGENES & VÍDEOS-----
P5 - Me encanta esta foto, es la primera foto completa guay que hago de la AK. Con la estructura, las barras de aluminio de la medida del tiesto y esos cables cubiertos de goma verde, me empieza a encantar el aspecto de la planta 😍
P8 - Tengo la impresión de que las ramas son demasiado endebles y finas para lo que está por venir. A partir de la semana que viene, usaré Rinho Skin para ver si las puedo ayudar con el engorde antes de que llegue el tiempo de floración. También estoy pensando en crear unos soportes para las ramas con al impresora 3D que irían enganchados a la estructura para LST, necesito darle unas cuantas vueltas a esto último.
-----SUMARIO SEMANAL-----
Otra semana super calurosa. Mientras que en casa estoy entre los 34~36º en las calles la cosa es mucho peor. También la humedad está un poco loca ya que a diario me fluctua en casa del 50~65º.
Al final he quitado esos cables feos y peligrosos de las ramas y he usado un cable con goma en condiciones. Por el momento sólo he tenido que atar la planta a 4 puntos, 1 en cada rama que he dejado, como se puede ver a unos 13 cm del tallo principal. Más adelante usaré otros dos puntos de fijado en el borde del tiesto, uno de ellos en la parte interior y otro por fuera del tiesto.
Esta semana he quitado el primer nodo de cada rama y también la rama que crece hacia abajo del segundo nodo, dejando la rama que crece totalmente hacia arriba.
Al final de la semana colocaré la malla de SCROG, pero no va a ser de manera permanente, por lo menos hasta más adelante. Voy a empezar a hacer fotografías de fondo oscuro, y el tener la red me va a imposibilitar la tarea ya que debo sacar la planta del armario para las sesiones (necesito pensar en ello). De momento la quiero montar 3 o 4 días para probarla ya que nunca la había montado antes y también tenía que cortar las barras horizontales para la malla.
Sobre Alice K. está creciendo super bonita y sana, hace un par de semanas encontré y maté una arañita blanca (Requiescat In Pace), a día de hoy (semana 7) no he visto más signos de insectos. También debo remarcar lo equitativamente que está creciendo y lo bien que soporta las altas temperaturas y la escasa humedad, hay alguna vez que he mirado el higrómetro y estaba al 35% dentro del armario.
Como dije en la semana anterior, mataré los clones a media semana, voy a plantar otras 4 semillas la semana que viene y va a ser demasiado curro 😞para compatibilizarlo con mi trabajo.
-----CALENDARIO DE RIEGO-----
23/08/19 (Day 32) - 3.000 ml con todos los nutrientes semanales @ 1.1 E.C. PH5.8


Likes
36
Share


@BrigadeDesTerps
Follow
Petite taille effectué, j’ai coupé l’apex et j’ai laisser seulement le noeud juste en dessous de celui qui étais le plus développé, pour vois si les deux repousse de l’apex et celle du noeud en dessous arrive à la même taille/croissance , afin d’être le plus symétrique possible.
Car avant tous je suis passionné par l’art végétal et le bonsaï, j’ai commencé à cultiver du cannabis il y a maintenant 3ans, un été j’ai planté une petite graines dans un bête terreaux vide de nutriments, et là tout a commencé. Mais comme dis précédemment j’aimais l’art, et ce plant en question je l’ai transformé en bonsaï, un magnifique bonsaï, un chef d’œuvre, au quel j’ai perdu toutes photos. L’année d’après j’ai recommencé le même scénario, une graine et on recommence, la se fut un échec, plant trop gourmand et trop sensible au stress, il m’a lâché à 3/4semaine de floraison, puis maintenant 1ans que je cultive en intérieur a rechercher une bonne recette de living soil, toujours à la recherche de perfection jusqu’à couper avant même la fin de floraison car j’étais pas satisfait du résultat. (C’est pour ça aussi que j’ai supprimé tous mes journaux) J’ai coupé deux cultures comme ça et j’ai fais qu’une récoltes sur la troisième. Maintenant celle qui m’excite le plus est la petite graine d’extérieur, oui comme on dit jamais deux sans trois, plus de 1ans que j’attends cette variété, la Frosty purple freak. Le mutant violet de chez Khalifa Genetic. Que je vais bien évidemment travailler comme un bonsaï, mais symétrique , je vais éviter de trop le stresser comme j’ai eu du retard sur la croissance du a certain imprévu de type limace et temps catastrophique. (2 graines bien planté dans mon derrière.) je vais essayer de bien le diriger tous en essayant d’avoir une certaine récolte, en faire un bonsaï crée d’énormes stress au plant et ralenti considérablement la croissance, pour essayer de récolter 50/100 grammes sur le plant en extérieur faudrais approcher les 3/4 mois de végétation si tu implique des haut stress training et de la coupe a gogo. Et j’avoue que j’ai pas payer plus de 50litre de living soil juste pour 15/20 grammes de récoltes sur le plant, même si la satisfaction d’avoir fait une œuvre d’art, ça ne vaut pas le coup, je ferais mieux l’année prochaines, je dois accepter cette défaite.
J’ai mis des vidéo de mon deuxième bonsaï, il étais en début de floraison et il avait environ 4mois, sans nutriments ,je lui estimais 30/50 grammes en fin de Flo, mais il m’a lâcher.
Dans les deux dernières vidéo, il y en a une où on voit bien le dépôt bactérien et nutritifs du thé de compost oxygéné.
Recette du thé pour la semaine
15litre d’eau de pluie
30 gr guano guali
15 gr Meal wormcastings
15 gr nettle
7 gr spirulina
7 gr Hydrosolat Kelp
225 gr wormcastings
15 gr hydrolysât de poisson
15 gr Comfrey
10 gr levure saccharomyces cerevisiae souches lycc 6420
60 gr Zeolit of chabasit
15 gr Azomite
45 ml de mélasse
15ml d’acide Humic et fluvic
J’ai arroser 6 litre pour la purple freak et le reste a d’autre plantes
Et un autre arrosage avec 500ml d’eau neutre avec 1gr bacilllus amyloliquefaciens x5 qui a été effectué le lendemain du thé
La culture se passe bien, du côté de la purple freak
Aucun problème à déplorer, plant très résistant, au changement de température et condition climatique supporte très bien les orages et les temps pluvieux et chaud, pas de signe de maladie, j’ai actuellement des ravageur depuis le début de la culture, pas un signe de problème. Réagit très bien au coupe, j’en suis plus que ravie, elle fait partis de mon top1.
Seul truc qui m’inquiète, c’est ce mauvais temps. Un mélange de chaleur et de pluie, qui a amené de l’oidium sur certaine de mes plantes extérieur, j’ai peur que cela se propage sur la purple freak. Je vais devoir traiter tous cas, sans traitement agressif bien sûr.

Likes
7
Share


@Smokesomeweed
Follow
Here we are guys.
Finally I changed led, it suits for blooming /flowering. Now have 130w- full spectrum, 100w- warm white (3000k) and 30w- deep red. Gonna change last one cause it has 630nm, so I think it useless.
Last feeding was extremely strong, 1000ppm! WW ate without problem, but NL overdosed a bit. There is not a problem if you use organic feeds as A.C.T.

Likes
37
Share


@DaddyPrime2
Follow
5/27 curious to see where this week ends up at
5/29 the one plant indoors is packing on weight. The one I put outside to finish (possibly stupid) seems to be maturing faster but bulking slower. She's seemed healthy this whole time. Not even a burnt leaf tip
5/31 attempting to take pictures in different lighting to get a better idea for yall viewers

Processing
Likes
10
Share


@Mongo28
Follow
Week 7 and shes looking like she will be ready any day to come down. Has so many different fragrances, from piney and earthy to sweet and watermelony to an almost rotten pungent smell. Hoping these all transfer over to the taste aspect. Some of her leaves also have the most beautiful purple edging to them. I've really enjoyed growing this strain. Shes super easy. Doesn't beg for nutes, but will take what you give her. Looks pretty, smells awesome, solid nugs from top to bottom. Shes probably gonna earn a spot in my tent for always and be one of the few that I will keep around as long as i can.
Side lights-
Mint led is the macro replacement from the old Kind led line. They have upgraded to newer versions of these lights, but those newer versions don't suit my purpose of side lighting like these older models do. They(newer) also aren't as waterproof as these older models are.
I still run my old Micros from the kind lineup cause I can't seem to find the all thise same color spectrums and ultraviolet lights anywhere else. I'm a firm believer that this setup is 110 percent the reason for all the amazing smells and flavors I get from these ladies. Along with the soil and organic nutrient regiment I keep them on of course. If you are just not getting the yields you thought you would or should be getting, try adding a little side lighting, I bet you'll be surprised by how much it can help!

Likes
31
Share


@LockDownGrow
Follow
Ok so I'm going too only feed pH water from here on out too force the plants too use up all that's in the soil , I am hoping I can carry them on now for the next 2 weeks like this before they are ripe ,
Processing
Likes
2
Share


@Valedor
Follow
semana de crecimiento de tricomas, ademas las flores presentan un crecimiento muy bueno, ya están madurando de verdad, el próximo cultivo lo documentaré con fotos mas claras, he aprendido mucho de tenerlas en hidroponia, me gusta y lo voy a seguir usando y explotando

Likes
2
Share


@BoooBooo
Follow
plant is in mid-flower stage. height got out of control, and tent is too small for it, but I hope, it won't cause too much poblems. plant looking good and deliciois. advanced nutrients doing its job 😍

Likes
50
Share

@GERGrowDesigns
Follow
Dear Growers, Welcome to my Dutch Passion Diaries Competition 2025 entry!
For this competition, I’ve chosen the Indoor Feminized strain: Orange Bud 2.0
Media from Week 15 or Flower week 6-7 After Moving into the New Tent for the flower weeks. Stage.
Here’s what I’m working with for the Final Tent after Moving for the Flower time in the Future :
• 🌱 Tent: 220x150x150
• 🧑🌾 Breeder Company: Dutch Passion
• 💧 Humidity Range: 50
• ⏳ Flowering Time: 8W-10W
• Strain Info: 20-25%THC, Sativa
• 🌡️ Temperature: 26
• 🍵 Pot Size: 0.5l
• Nutrient Brand: Narcos
• ⚡ Lights : 720W x 2
Dimmed to 400w Each at the Moment. Because of Heatwave ⭐
A huge thank you to Dutch Passion for allowing me to be a part of this amazing competition and for supporting the grower community worldwide! Your genetics and passion speak for themselves!
Curious to try these strains for yourself?
You can check them out and support me at the same time through my personal link:
https://dutch-passion.com/?a_aid=GGD
I would truly appreciate every bit of feedback, help, questions, or discussions – and of course, your likes and interactions mean the world to me as I try to stand out in this exciting competition!
Let’s grow together – and don’t forget to stop by again to see the latest updates!
Happy growing!
Stay lifted and stay curious!
Peace & Buds!

Likes
18
Share


@VI_Cannabis
Follow
June 28 - They are doing great, We switched to the recommended amount of nutrients for flowering, Also 2 air stones I ordered have come in so now those are on 24/7 with the nutrient water in a 5 gallon bucket.
June 29 - Still just growing away, I am still feeding roughly 3L per plant of nutrient water every 24-36hr depending on how dry they feel.
June 30 - Totally forgot to take pictures/videos today. I gave them there daily watering and they are still just growing away. They are in flower now I believe!
July 1 - Awesome to see this amount of progression. Tons of hairs and a decently even canopy. There is a small smell coming from in the room!
July 2 - Again I forgot to take pictures, But as always they are still just growing away. so far so good!
July 3 - Tons of growth and they are starting to become uneven. I don't have a ton of time so I think I will leave them for another week before doing some LST or HST. Tons of colas forming, lots of hairs and they are starting to have a heavier smell! So far so good!
July 4 - Same thing as yesterday, still growing away, Ive turned the lights up to 100% now and I have removed the SF-1000 as I needed it for another project! (be sure to check out my other diary's which I will be uploading today!
Likes
13
Share


@YOUNGSTERBR
Follow
acho que ainda consegui produzir uns tricomas com as correções da água, mas como o estágio da floração já estava bem avançado, as folhas começaram a descolorir muito cedo, tive que colher 3 plantas precocemente, as outras 3 menos vou tentar seguir mais 2 semanas, não estão mostrando tricomas Ambar ainda!


Likes
67
Share


@Canna96
Follow
Hey Now, this week went pretty good for the Acid Dough Auto, I started feeding her some PK booster/Kool Bloom, and also did a very light defoliation. I think I trained her out a little too far, because she only grew to about 30 inches. I think the sweet spot will be right in between what I did with the Wedding Cheesecake and this Acid Dough Auto. Not much to do now except wait for the buds to swell up and develop. I also posted a short video with a few pics from all my grows over this past year. Thanks for stopping by, I hope everyone has an amazing weekend, be safe and Blaze On!!!


Processing
Likes
23
Share


@Joni2017
Follow
Day 80, this week the buds are already taking density 👏🏻👏🏻😋 she continues the very healthy flowering 🙌 size 82 cm👏🏻👏🏻 temperature 24º C ☀️, humidity 60% 💧 watering 750 ml alternating one day with nutrients and another without nutrients with osmotized water 💦💦 Session 45 min. of binaural sounds for growth and healing 🎼 and music 😉👍 Merry Christmas 🎅🏻