The Grow Awards 2026 🏆 


Likes
Comments
Share
@UnitedStrainsGermany
Follow
Es läuft alles nach Plan die Blätter sehen gesund aus kein Ungeziefer also alles guuut.

Processing
Likes
2
Share
@MephodMan
Follow
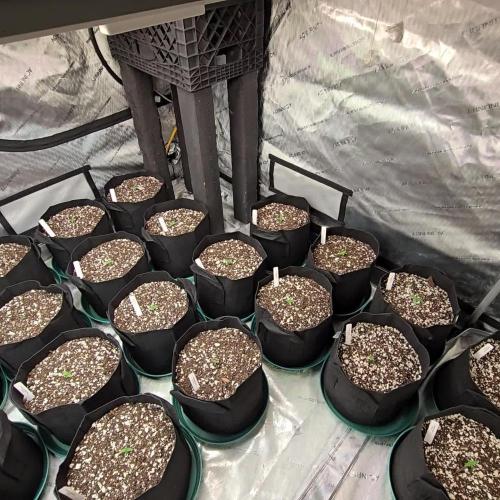
Tap root issues - too long in jiffy block
Still working on dialling in VPD


Likes
3
Share
@Krautbauern
Follow
Papaya cookies are incredible! All the pistils turn purple, incredible beauty of this plant. We are so happy to have caught this extraordinary phenotype and are looking forward to an early harvest in about 2 weeks time.
Likes
10
Share
@CURATI_DA_SOLO
Follow
Allora.... Questa settimana ha ripreso veramente tanto! La settimana scorsa era rimasta un po' indietro rispetto le sue amiche (diverse genetiche) ma adesso ha veramente dato il suo scatto è ha rivelato che è all'altezza delle sue compagne di crescita! Anche lei sembra che si stia iniziando a riempire bene e ho deciso di togliere qualche internodo centrale per favorire l'areazione ed evitare eventuali sorprese di muffe più in là( anche se non ho mai avuto problemi meglio prevenire che curare)...non vedo l'ora che si inizi a gonfiare un po' perché sono molto curioso di questa genetica! Ha un 29% di THC quindi dovrebbe essere adatta a me .... speriamo bene e incrociamo le dita! Nel frattempo volevo ribadire la potenza di questi prodotti di Cannaboom! Sto usando tutta la linea full cream (con qualche aiuto della linea minerale tipo il loro CALMAG(SI) ) che oltre ad essere un semplice Cal Mag contiene anche silicio e ferro! Veramente adatto a le piante per fare assimilare meglio potassio e fosforo! Credetemi che con solo due applicazioni ho potuto vedere delle differenze esuberanti! Infatti speromtanto di continuare a usare i loro prodotti perché mi stanno veramente aiutando a spaccare questa growbox da 100x100! Quindi ancora grazie a CANNABOOM!
Un grande grazie speciale a tutto il team di anesia che mi ha fornito questa splendida nuovissima e potente genetica! Spero che piaccia come uscirà il diario! Ma alla fine ci saranno delle sorprese per tutti quindi rimanete sintonizzati! 💪🏼💪🏼💪🏼💪🏼
Seguitemi anche su Instagram sul mio profilo curati_da_solo🔥🔥🔥🔥

Likes
59
Share
@OutForReal
Follow
Song of the week : Ray Charles - I've Got A Woman VS
Kanye West - Gold Digger ft. Jamie Foxx
------
Day 8 - It's a new week and I'm so happy to deal with a recent slight over watering 😒 , I could not expect a better surprise as all of us growers likes to give extra care in attempts to save a grow 😤. Anyway , the ladies are thriving and It's the only things that matter ✌️😛
-------
Day 11 - They looks better today so I decided to transplant them in 3L pots. I did not water a lot to let the soil dry after the over watering 👍✌️. As I am a Lucky man , after the nice over watering here comes the white flies , this tiny little bugs that only want to suck the plants , bring fungus and put plenty of eggs under my leaves , you can't imagine how happy I am to already deal with 2 issues 😒, it will bring a lot of fun to try to get rid of them 😖😩😧


Likes
6
Share
@Barcelona_Farmers710
Follow
Aplicamos recientemente jabón potásico por problemas con trips... estamos controlando todo a tiempo, en 3 semanas ya pasaremos al armario grande para continuar dándole crescimiento para las nenas farmers!🍁

Likes
16
Share
@cheetah844
Follow
She was always thirsty! She drank almost as much as my 10ft tall plant & she was under 2ft tall?! Handled LST very well. She had an abundance of leaves which looked like a beautiful canna-bush growing but come trim time ugh not so much. Her leaves started turning darker purple the last two weeks, making her even prettier! She was only 14 inches tall (LST) & wound up having 65 bud sites.
Likes
7
Share
@Skynets_Growing
Follow
Week 14 and it will be the last week for Tamara. Maybe she could live one or two longer, but my vacations starts in 10 days …and at the pic‘s you see …Tamara is in my eyes ready to Harvest… thanks for 98 days growing with you 💚
Likes
6
Share
@UnorthadoxDude
Follow
Wow what a week this has been, the plants have all undergone fair dramatic changes. A real flurry of leaf yellowing, pistil darkening/curling, and bug swelling. The smell is really coming along now, I think we're really quite close to harvest. On the assumption that pre-flowering was two weeks, this strain should be ready at the end of week seven flowering, so in the case of this diary the end of week nine (i.e. one week to go!).
Pistils are about 70-80% amber, and the lower pistils on buds have started curling inward.
Trichomes look to me to be something like 10% clear 80% Milky 10% White.
I have smoke tested a small bud off the lower part of plant 3 today after quick-drying overnight in the airing cupboard, taking into consideration the obvious chlorophyll from the fast dry, the high was much closer to what I am expecting than the last smoke test. It came on at the normal pace, was quite effective, and lasted a good while. I am really hoping I can navigate my way through the next process, as I feel quite close now to having some home grown bud for the first time.
The plants are being well watered this evening with just water, and this will be the last time that I water them until harvest.
I will continue to monitor these daily, I intend to harvest at the first sign of any amber trichome.
Advice and comments welcomed.
P.S. Exciting news! My order from Green House Seeds arrived today for my next diaries! :)


Likes
Comments
Share
@Anon73
Follow
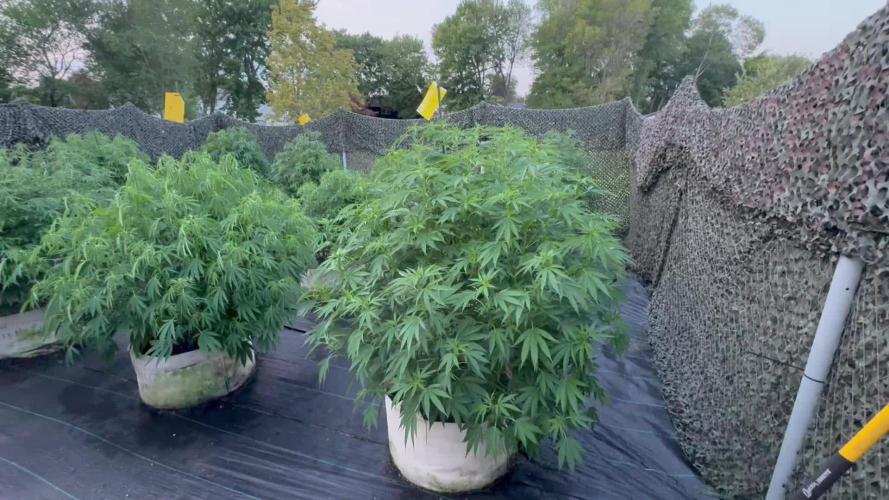
Growth is still excellent.
Very little insect activity.
The copper antennas are working well along with the weed blocker. It’s so much cleaner without grass growing in between the plants. Pruning continues.

Likes
35
Share
@DjDaveAtHome
Follow
Blueberry Headband Grow Week 04 Flower Feb 29
In a state of transition. Started using 'Hygrozyme'. An enzyme that will supposedly keep my roots clean and root rot at bay. Wasn't quite the case. PH went up 10 fold and brown slime reappeared.
Rinsed the roots, added more Hygrozyme and a dose of Tarantula tea. 24 hours later, PH is up the same. No sign of rot.
RePHed and all is ok. Plants aren't blinking. Aroma is strong. Trichromes appeared last week and are everywhere, now! Little bundles of calyxes are all excited to pop out this coming week!
Think this will be a 'beginners luck' grow. Trying to be diligent.
Blueberry Headband (2) from Humboldt Seeds.
https://www.humboldtseeds.net/en/blueberry-headband/
Lighting
https://www.horticulturelightinggroup.ca/products/260w-qb-v2-led-kit
DWC Nutients
https://generalhydroponics.com/floraseries
FloraGro .5 ml/l
FloraBloom 2.5 ml/l
FloraMicro 1.5 ml/l
Cal Mag 1.5 ml/l
https://generalhydroponics.com/calimagic
Diamond Necter: N/A
https://generalhydroponics.com/diamond-nectar
SuperThrive: .5 ml/l
https://superthrive.com/
Epsom salts
Tarantula
https://www.advancednutrients.com/products/tarantula/
https://hylineproducts.com/products/hygrozyme/#one
Grozyme: 2.5 ml/ltr
Brown Slime Root Rot Organic Microbe Tea
4 liters RO or tap water
5 ml (1 tsp) organic sulphur free molasses
5 ml Alaskan Organic grow fertilizer (or something comparable)
5 ml Alaskan bloom fertilizer (or something comparable)
5 ml Seaweed or kelp fertilizer
2-4 ml Advanced Nutrients Tarantula

Likes
18
Share
@cheetah844
Follow
Getting very tall, I thought this one would stay shorter?! This is my go-to night time pain relief with good sleep strain. She will be staying indoors for safekeeping so hopefully I can guarantee to have some flower from her.

Likes
7
Share
@Chubbs
Follow
This strain should be called FrostWinner because every time I've grown it,it's come out like a winner. So I hope this time is all the same. Been a great start since I got 10/10 to sprout and all are looking happy and healthy. All In all Happy Growing.


Likes
30
Share
@Grower_Of_Persia
Follow
at last we are in harvest week. im happy at all it was a good experience.
my dry and cure style is this:
4 days of hanging upside down to get water activity lower to around 0.6 in 50% humidity and 26 C temp (i know its a little high but we are in a hot summer right now and i cant get it lower even with air conditioner) and then after 4 days of drying i remove leaves and stalks, trim buds and move them to jar for the rest of their life :D . and in the first 4 days of curing i open the jar door and let hem get some fresh air in the jar for about 5 minutes and close the jar door again, after 4 days of curing like that buds are smokable but they will get better as they getting cured about 1 month.
buds are dense and frosty but very little in size!
i had some mistakes and problems with this grow so i admit i wasted them .
lesson from this grow :
grow autos far from fems and always give them 20 hours or more light per day to get good weight in little time.
Likes
33
Share
@Southwest_budders21
Follow
She seems to be bulking up still but aiming to chop her down with the rest then I can use my tent to dry and hopefully improve the taste ✌️🏻🏴💚
Likes
10
Share
@Weedbadk
Follow
Día :1 iniciamos este seguimiento de estas variedades toda germinaron en 3 días
Día 5 desde puesta en sustrato
Solo pulverizó 1 no sobrevivió pero las 2 salieron sin problemas