
Likes
Comments
Share


@Kirsten
Follow
14.1.25:
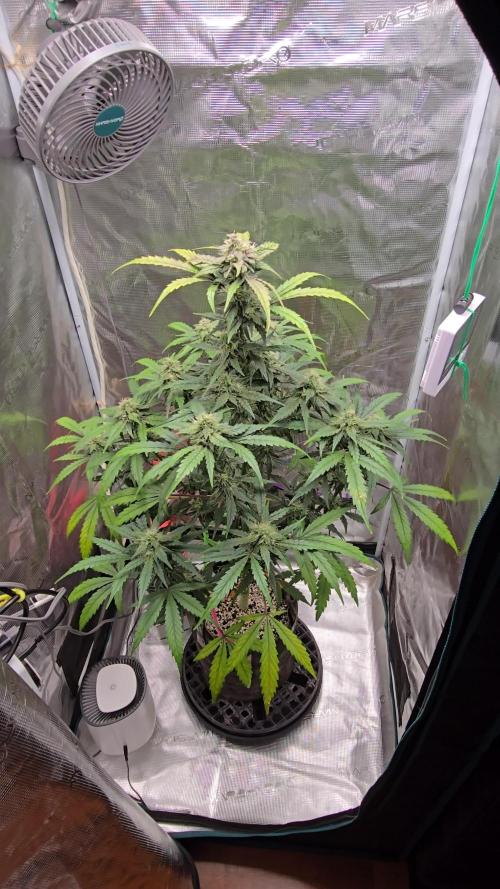
I've been readjusting the LST. I just took all the pegs out and reshaped her.
I got some new LST equipment in the mail today, have been glad to have more pegs. I got some clips too, but they don't seem to stay on 😕
I'm currently only using the pegs, I have some thicker soft wire, but I forgot I don't have pliers to cut it!
Also I'm running very low on Biobizz nutrients, so that could be bad 🤞
18.1.25:
I have done another large defoliation on PPP1 and PPP2.
Also, moderate defoliation on all other plants today. All LST ties and pegs are readjusted.
I have turned up the light to 90%. Same distance of between 24-28 inches, depending on height of specific plant.
I have increased the dosage of Biobizz Bio-Grow and Fish Mix to give an extra boost of Nitrogen as several plants were showing yellowing. They have responded very well to this. Unfortunately I ran out of my Biobizz nutrients and PH UP. I'm currently using Bicarbonate of Soda to increase the PH after the nutes PH comes out to about 4.1. Obviously, that uses a lot and I only had a 250ml bottle, which I used last run too.
This run I have 9 plants. The only thing I'm worried about is the salt build up.
Have you used it before? Or any other natural way to increase PH? Please let me know!
I've also added Biobizz Fish Mix to help with the extra Nitrogen needed.
Watering with 1ltr of dechlorinated water PH'd to 6.3 with the following nutrients;-
♡ 4ml Biobizz Fish Mix
♡ 4ml Biobizz Bio-Grow
♡ 2ml Biobizz Bloom
♡ 2ml Biobizz Top Max
♡ 2ml Cal-Mag
♡ 2ml Ecothrive Flourish.
I water with this every 3 days.
I did order some more Biobizz Bio-Grow and Bio Bloom.
I found some at a reasonable price on Amazon. I still have about 800 ml of Biobizz Fish Mix left, too.
It is fairly expensive this time as the plants are hungrier this run.
I also got a new bag of Canna coco, which I may use to add a top dress with some dry amendments.
Which hopefully will save some cash on the bottled nutrients and stretch out until the end of this run without having to buy anymore.
I have purchased a funnel to pour the water. It is difficult, due to the shape of my LST, to water precisely. I have spilt it all over the tent several times 🙄
I've also ordered a 2 litre jug. Currently, I'm mixing water for 9 plants individually in a 1 litre jug. It's tideous. Hopefully, this will solve the issues.
Cleaning the tent after watering every time isn't my idea of efficiency 😅
Thanks for checking out my diary 🍃 ✌️


Likes
202
Share


@CrazyHorse
Follow
Hello my friends 😇
Purple Lemonade had been flush today !! She looks beautiful that purpul-dark buds are amazing. In next 3 or 4 days I will cut her 😇
Cinderella and Bruce Banner drinking less from a avg. 1.7l/day to 1.25l/day, so end of flowering for this two will be in around 2 weeks.
Cinderella looks really good, she should give a good harvest.
Update:
Day 67
Happy time !! Harvest time !! Finally Purple Lemonade get to the final point.
At this moment there is 0% of lemon scents, BUT !! There is a beautiful smell of berries, chocolate and leather in the air. I can't wait to try it
All the best, You Lovely Girls Growers 😇 💪 🙏

Likes
7
Share


@Johnjah
Follow
Week 7: day 49-55
Day 51: 2 ml/l bio grow, 3ml/l bio heaven, 2 ml/l bio bloom, 1ml/l top max
Day 54/55:
It rained quite a bit last night, let's hope the buds don't form mold!
Likes
34
Share

@Hempface86
Follow
Ladies and gentlemen, here we are on day 63 and as you can see, this girl is a beauty...Kannabia Seeds thank you so much for this grow and others so far so good.. this girl starting to get purple hues everywhere and I think there's more purple to come as I dropped the temperatures near the end of flower.. a few weeks back, I noticed she had too much nitrogen, so I completely switched Plagron nutrients green sensation, and i've been using that only.. i think the flush should start soon and hopefully she is done in the next few weeks .. And I have, to be honest, I am very excited for this one.She looks like she's gonna be some really good smoke... I hope everyone is doing well and so are there ladies. God bless and happy growing ✌️

Likes
19
Share


@MrWolfe
Follow
Had to support the trellises, definitely need a middle support next time. This will work for the last few weeks

Likes
12
Share


@GREENPHOENIX6262
Follow
Fastbuds - Mimosa (2x) 08/27
Coming into week 4 Veg, User error stunted them lightly but things seem back on track.
Exhale 365 C02 bag introduced last week to setup for early flower.
No signs of concern or any deficiencies.
Early flowering has begun
*Mid-Week Update* *08/30*
Both plants have recovered nicely, and placed under trellis net.
Introduced NPK Phosphate
Purged Pure Blend Pro Grow
*End of week recap*
Flowering has begun
Stopped veg nute feed
Introduced Raw NPK Phosphorus and Potassium
Likes
9
Share

@trustno1
Follow
Hi 👋
Blüte Tag 35
Lady Broccoli ziert sich noch ein bisschen, aber so langsam aber sicher steckt sie ihre Energie in die Blütenproduktion.
Es scheint so, als hätte sie etwas Chanel Canna No 5 aufgelegt. Sie duftet fantastisch.
Während sich die Dame sich in der künstlichen Sonne entspannt, werden reichlich Green Sensation Cocktails gereicht.
bis zur nächsten Woche
Gruß M.

Likes
Comments
Share


Processing
Likes
15
Share


@eldruida_lamota
Follow
Buenas tardes familia , de vuelta actualizamos una semana más estás crazy cookies, es una variedad bastante sativa con cogollos bastante grandes, no creo que les quede muchas semanas pero una de ellas partió por el peso y tuve que poner más tutores.
Seguimos controlando el ph, la humedad y la temperatura están bien.
Tallo medio, pero es una genética bastante frondosa y con muchos brazos laterales.
Tienen un aroma muy peculiar, estoy deseando que estén listas para ver los resultados finales pero, son de floración bastante lenta, un saludo nos vemos la semana que viene fumetillas.

Likes
7
Share


@Stickygreens420
Follow
2/21/2023 - Day 50: Starting pre-bloom this week. Changed the light from 18/6 to 16/8. Also, started adding my bloom nutrients. Watered about 3.5 gallons and threw a little bit of everything in today. Started with Jay Plantspeaker Quillaja as a wetting agent, then added Rootwise Micro Complete, Enzyme Elixer, and Bio-Phos, BuildASoil Big 6, BuildABloom, Coconut Powder, Pure Protein Dry, Yah-Whey, Fermented Comfrey and Fermented Peach. Also top dressed with some BuildAFlower.
2/23/2023 - Day 52: not much to report. Plants are doing great, and seem to like the slightly cooler temps lately. Mainly just been tucking branches under the scrog screen and doing some super cropping in an attempt to keep my canopy even.
2/24/2023 - Day 53: gave the plants their weekly IPM, with a foliar spray at lights out of warm distilled water and BuildASoil EM-5. This is also to clean the leaves in preparation for the flip to flower next week.
2/26/2023 - Day 55: last day of veg. Officially flipping to flower tomorrow. The scrog screen is pretty full, other than the Frozen White Runtz, which is barely reaching the screen. Hoping it will catch up more during stretch. Also, plan to put a second layer of trellis on.
Likes
9
Share


@HUMO_Cultiva
Follow
Update day 10 of transition to bloom this Goofiez 2 it’s soy strong !!

Likes
28
Share


@PrairieFrostGrow
Follow
*
***************** Week 4 - May 2 to 8, 2020 - Days 22 to 28 from germination **********************
*
It was a good growth week for her....compared to the other girls😀 Killer Kush is taking the higher pH better than some of the other girls. End of veg coming soon so starting to introduce Rezin this week. Overall there was not a lot of activity this week as life was busy outside the tent☹️
Slit cut in the bottom of the bag has noticeably allowed the moisture to run off quicker leaving less time in the bag to mess with things.........so why still battling high pH issues? Tried tp keep things lighter this week as not sure what is happening to the medium?? Thinking there is an issue with the fabric bags because nothing else has changed?? All that is in the medium is coco and perlite....I am controlling the pH at 5.0 with a calibrated pen?? There are 4 plants all suffering the same issue so going to transplant 2 of them into plastic pots and work on ruling out the fabric pots.....there isn’t anything left. Killer Kush has been pushing through this better than others and growing better so deciding to leave her in the fabric bag.
Since acknowledging there is a pH issue I reacted with regular, heavier waterings and she seemed to be in a good enough pH range to uptake most of the base nutrients and has been growing. I will keep up the regular watering to runoff and work on controlling the pH through these increased feedings.
Little more detail.........
May 2/20 - Day 22
- 2L feed - CalMag @ 0.5ml, Vitathrive, Sensyzime, Pranha, Voodoo @ 1ml, Dual Fuel @ 1ml
- 625ppm and 5.0pH.
- Bringing ppm closer to 700 by end of week.
May 3/20 - Day 23
- 2L feed - Vitathrive, Velokelp, Densyzime, Rezin, Dual Fuel @ 1.5ml
- 685ppm with 5.0pH
- runoff numbers - 480ppm with 7.2pH
- she is eating but the pH is not coming down.
- leaves wider and looking happier this morning
- Been hitting them with a fair number of enzymes with the intent of helping to cleanup any issues building in the medium.
May 4/20 - Day 24
- dry out day
- she is still not taking off vertical in her growth
- her leaves are getting bigger.
May 5/20 - Day 25
- 2L plain watering pH to 5.0 with 40ppm
- just plain watering with low pH to keep working the medium down.
- leaf color is nice.....not overly green....no burnt tips
May 6/20 - Day 26
- 1.5L feed - Dual Fuel, Vitathrive @ 1ml, CalMag, VeloKelp @ 0.5ml
- 675ppm and 5.1pH
- She is still slow overall
- stem is getting thicker....good sign
- twisted, rolled, and moved around most branches on the girl. Was fairly abrupt on purpose.
May 7/20 - Day 27
- 1L light feeding - VeloKelp @ 1ml, Sensyzime @ 2ml
- she is looking a little bigger all around
- branches thickened more this week.
May 8/20 - Day 28
- Dry out day
That ends week 4. Half the girls in fabric pots and half in plastic. Giving lots of water to keep pH from drifing. This grow is not flowing on autopilot hmmmmmmm👌👍🙏

Likes
14
Share


@UnkleSkunk
Follow
Ed arriviamo ad "oggi"
Sono le ultime foto che ho fatto
La pianta inizia a bere di più...
Sto passando alla fertilizzazione x la fioritura...
Guardando le dimensioni delle foglie la pianta dovrebbe darmi molte soddisfazioni
Defogliamento leggero come sempre


Likes
101
Share


@Grey_Wolf
Follow
Winter Greenhouse grow #1
Dinafem seeds Cheese
6th May 2020
Last night we had a severe storm here with wind gusts at or above 100kmh an hour and heavy rain of about 45mm in the rain guage this morning.
The temp is currently 8 degrees outside at 12 noon and the minimum was 2 @ 630 am this morning.
I was half expecting to see the greenhouse had been smashed to pieces but luckily it seems to have survived so far relatively unscathed,
apart from the odd rip in the roof that is letting in water from the rain.
The little cheese plant has grown a tiny bit despite the rain but I'm really iffy about whether it will ever come to much 😏
Its just been too bloody cold and wet .
Time will tell I guess and I'll try to patch up the greenhouse when the weather improves other than that not a lot I can do.
Cheers for stopping by again 😀👍

Likes
24
Share


@TerpTurtle
Follow
BAD APPLE WEEK 7 | DIRTY BIRD GENETICS
The color on these buds are beautiful, you see new growth swell in light green spots and within 24 hours goes to a deep velvet color like pictured.


Likes
19
Share


@MadeInGermany
Follow
Hi all 🤗.
Wonder Pie did the topping very well :-).
She grows nice and bushy, and hopefully becomes a monster 😍👍.
This week will be topped again. I wish you all a nice week, stay healthy 🙏🏻 and let it grow 🌱
Type:
Wonder Pie
☝️🏼
Genetics:
Wedding Cake x OG Kush
👍😍
Vega lamp: 2 x Todogrow Led
Quantum Board 100 W
💡
Flower Lamp : 2 x Todogrow Led
Cxb 3590 COB 3500 K 205 W
💡💡☝️🏼
Earth: Canna Bio
☝️🏼
Fertilizer: Canna Bio
☝️🏼🌱
Water: Osmosis water mixed with normal water (24 hours stale that the chlorine evaporates) to 0.2 EC. Add Cal / Mag to 0.4 Ec Ph with Organic Ph - to 6.0


Likes
18
Share


@SkunkyDog420
Follow
Hallo zusammen 🤙
Habe sie heute am 63 Blütetag geerntet.
Wir sehen uns in 3 Wochen mit der Bewertung
