The Grow Awards 2026 🏆 


Likes
Comments
Share


Processing
Likes
8
Share
@eldruida_lamota
Follow
Que hay familia os traemos la 3 semana de nuestras green ak xL, y es que están bastante sanas, tuve que atar las puntas a las esquinas por que la altura se nos fue de las manos.
Tienen muchos brazos laterales, que espero que en unas semanas sean largas colas de flores.
Ph controlado y humedad dentro de los parámetros aconsejables, regamos cada 2 días, y todos los riegos llevan nutrientes.
Esta variedad me tiene personalmente desconcertado, es bastante sensible a los cambios así que procuramos tenerla en una rutina alimentaria y lumínica sin nada de cambios, veremos cómo apremia en unos meses.

Likes
9
Share
@newenglandgrowers
Follow
Starting my flush this week using 10ml of Clearex per Gallon of water flushed down to 450EC or 225ppm, going to now continue watering with ph'd balanced water when dry with about 10-20% runoff. Going to keep an eye on the trichomes but I'm thinking I'm gonna harvest early to mid of next week. I'm going to try and bring out even more of the colors in the flowers this last week or two and I'm going to start watering with ice cold water not sure if it'll help or not but I'm gonna give it a shot. End of Week 13/Week 8 of Flower it went well the plants are flushed and are fading, going to chop in a few days.


Likes
53
Share
@MrSpooky882
Follow
Eigentlich alles bestens sie entwickeln sich sehr gut ich bin sehr zufrieden morgen wird beschnitten, Triebe und Blätter entfernen die überschüssig sind und Licht weg nehmen👌😊
Actually everything is fine. They are developing very well. I am very satisfied. Tomorrow will be pruned, removing shoots and leaves that are excess and taking away light😁😊👌


Likes
Comments
Share
@Catawbiense
Follow
Startschuss für den nächsten Run 🌱🔥
2× Red Hot Cookies sind erfolgreich gekeimt und seit ein paar Tagen über der Erde. Aktuell stehen sie im 60×60-Zelt, bis mein laufender Frosted Guavas-Run durch ist und das 80×80-Zelt (voraussichtlich Ende März) frei wird. Ziel: das grosse Zelt komplett mit RHC füllen. Geplant ist intensives Training mit Topping, Mainlining und LST – mal schauen, wie lange der Platz im kleinen Zelt reicht. Wenn es zu eng wird, werden einfach je 2 Stecklinge geschnitten.

Likes
14
Share
@JamieKnolliver
Follow
In Woche 9 Netz in 1m2 growbox gespannt.
Beginn von LST durch anpassen an das Netz um die Pflanzenoberfläche zu vergrößern.
Einige größere ‚Fanleaves‘ entfernt
Likes
7
Share


Likes
8
Share
@Piro420
Follow
Triming a bunch of leaves and branches 10mins in morning ten at night before co2 kicks on.
I flipped sooner then normal because they where very aggressive. And they are hitting the lights at day 21 :(
I was able to to creep the light up 3 inches with some temporary straps touching the light.
I hope that 3 inches is all I need (that's what she said)..
Otherwise plant is amazingly aggressive and smelly lots of tops and sites..


Likes
21
Share
@Bncgrower
Follow
We've reached the end of this journey, the result was good, a very good strain to cultivate, a little sensitive at first, but then it reacted very well. The buds had a very good aroma, dense and resinous, now just wait for the drying and curing process to complete the cycle.. ✌️✌️✌️

Likes
19
Share
@ProfessorAutoflower
Follow
This plant has recovered from nutrient deficiency and is growing great. Doing lst everyday and plant is responding great. This is going to be a big girl. Still no signs of flower. The other NL from growers choice I grew took forever to flower also.
Monday update - did a little defoliation. Looks a little thin. Should get fuller in a few days


Likes
Comments
Share
@PapaTerps
Follow
British Delight - Wizard Trees
Day 34 - I've watered her with 1500ml of RO tap water with nutrients, mixed individually, in order, and finally pH'd to 6.3.
She has vegged really well and is at point now where I'm preparing her to go into bloom. I wanted a nice even canopy to work with, so I've decided to top her at the main stem, to force her to grow in a more uniform manner - as I grow for my own personal supply, I won't top her more because I don't need a huge yield and I like variety, so I want to be able to grow up to four plants at once... I've also removed a couple of her inward facing fan leaves to improve airflow and light penetration 👌🏻

Likes
38
Share
@Roberts
Follow
Fruity Pebbles autoflower growing in Athena is doing okay. She is still showing signs of too much nitrogen at this moment. I will likely do a solution change soon and resove this if it continues. I added water to dilute out the solution some. She is still advancing in flowering. I will fix this soon when I have more time. Everything else is looking good. Thank you ILGM. 🤜🏻🤛🏻🌱🌱🌱
Thank you grow diaries community for the 👇likes👇, follows, comments, and subscriptions on my YouTube channel👇. ❄️🌱🍻
Happy Growing 🌱🌱🌱
https://youtube.com/channel/UCAhN7yRzWLpcaRHhMIQ7X4g

Processing
Likes
5
Share
@Drtomb
Follow
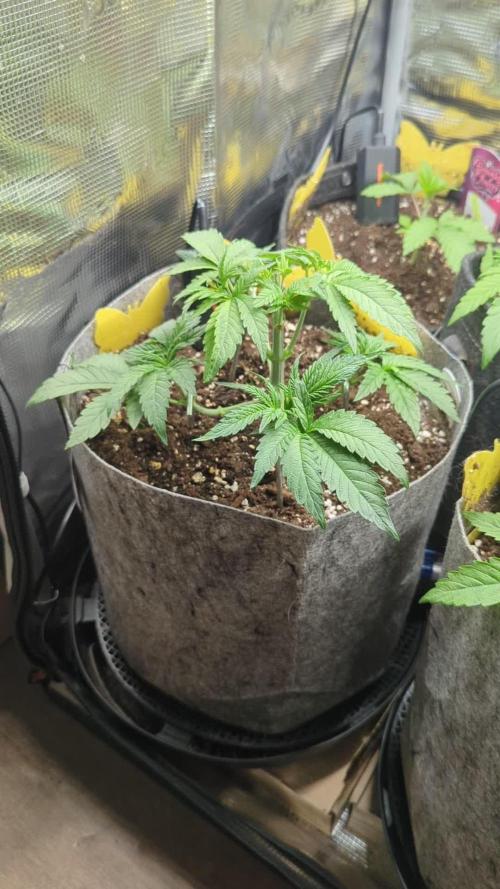
I'm 4 days into flower.
Topped all the plants nice and even. Then removed all bud sites below the top 4 on each branch. Leaving fan leaves intact. I allowed them to recover for 2 days. Then flipped the lights.
Saskatoon Berry is stacking nodes very closely. I'm thinking these will be nice big colas.
Likes
79
Share
@DogDoctorOfficial
Follow
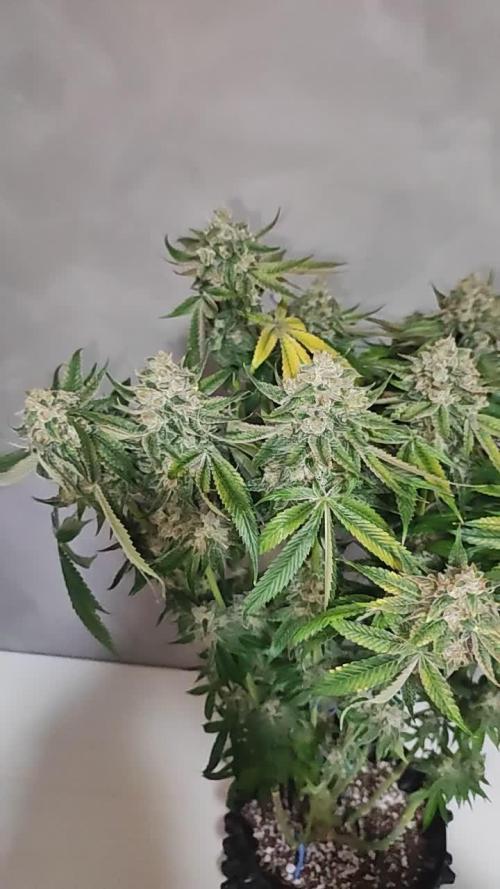
Week 8: Flourishing in Week 4 of Flowering!
Greetings, fellow cultivators! Prepare to be dazzled as we embark on a journey through the enchanted realm of our beloved Epsilon F1. In this week's installment, we witness the culmination of four weeks of flowering, a spectacle of botanical brilliance that leaves us in awe.
Our Epsilon F1, like a celestial goddess, continues to captivate with her unparalleled beauty and grace. Each day brings new wonders as she flourishes under the tender care of her devoted grower. The once delicate buds have now swelled into majestic colas, adorned with a blanket of trichomes that glisten like a galaxy of stars against the night sky.
But let us not overlook the journey that has brought us to this moment of splendor. From the humble beginnings of a tiny seed, our Epsilon F1 has weathered the trials and tribulations of growth with unwavering resilience. With each passing week, she has unfolded her true potential, reaching ever closer to botanical perfection.
As we gaze upon her now, we are reminded of the magic that lies within the cannabis plant – a medicine that heals both body and soul, a gift from nature to be cherished and revered. With each puff, we are transported to a realm of tranquility and euphoria, where worries fade and serenity reigns supreme.
But let us not forget the hands that tend to this earthly paradise. To Royal Queen Seeds, we extend our heartfelt gratitude for bestowing upon us the genetic marvel that is the Epsilon F1. To Aptus Holland, our steadfast companion on this journey, whose nutrients have nourished our plant from seedling to harvest. And to the grow diaries community, whose support and camaraderie have made this journey all the more rewarding.
Ah, but there's a twist in our tale! As our Epsilon F1 enters this crucial phase of flowering, we've made a strategic adjustment to her nutrient regimen. We've stopped the addition of phosphorus (P) and increased potassium (K). Why, you ask? Because at this stage, our plant's demand for potassium is at its peak. Potassium plays a vital role in flower development, improving bud formation, density, and overall quality. By prioritizing potassium over phosphorus, we're ensuring that our Epsilon F1 receives the nutrients she needs to produce those big, frosty buds we all dream of.
As we bid adieu to Week 8 and look ahead to the weeks to come, let us revel in the splendor of our Epsilon F1's flowering phase. May her beauty continue to inspire and her harvest be abundant. Until next time, happy growing, dear friends!
#EpsilonF1FlowerPower #Week8FloralFantasy #BotanicalBrilliance #RoyalQueenSeedsGenetics #AptusHollandNourishment #GrowDiariesCommunityStrength
Genetics -Epsilon F1 @rqs_esp @royalqueenseedssp @rqsglobal
Food - @aptusholland @aptus_world @aptus_es @aptus_portugal @aptusbrasil @aptusplanttechaus @aptus_thailand @aptusplanttechnz @aptususa_official
LES @lumatekeu
Controls - @trolmaster.eu @trolmaster.agro @trolmaster.support
As always thank you all for stopping by, for the love and for it all , this journey of mine wold just not be the same without you guys, the love and support is very much appreciated and i fell honored and blessed with you all in my life
With true love comes happiness , Always believe in your self and always do things expecting nothing and with an open heart , be a giver the universe will give back to you in ways you could not even imagine so
#aptus #aptusplanttech #aptusgang #aptusfamily #aptustrueplantscience #inbalancewithnature #trueplantscience #rqs #ApoloMission #MoonHarvestAdventure #playwithlego #lego #legotime #legovideo #tothemoonandback
More info and complete updates from all my adventures can be found Link in the profile description
Friendly reminder all you see here is pure research and for educational purposes only
Growers Love To you All
Likes
4
Share
@sensistar9
Follow
The plant is absorbing the last nutrients and coming to her end,beautiful strain if you love the dutch classics ❤️
