
Likes
Comments
Share


@Bread_n_Buds
Follow
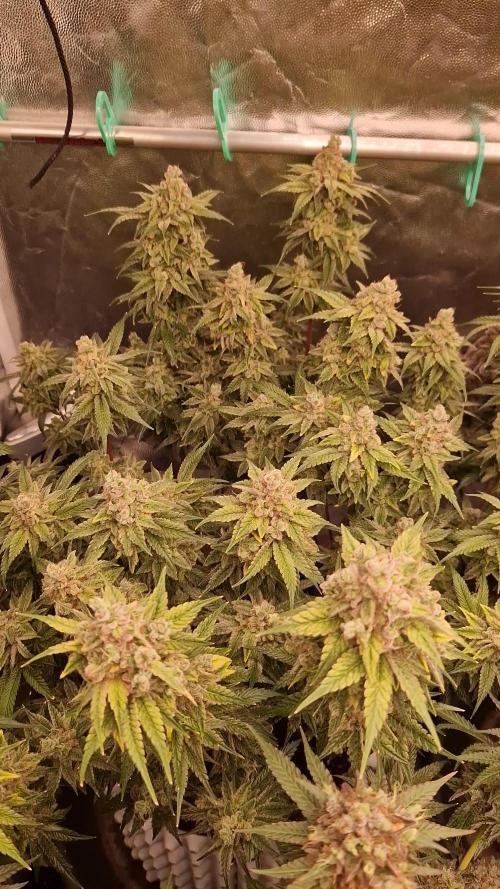
Our Rainbow Sherbet of course from Zamnesia like all my plants has been the territory of realization for an exceptional mainfolding.
After a topping that would seem very premature at the second internode (But that in autoflowering is also appropriate to delay flowering) I managed very well to make the lateral branches grow parallel to the ground. They form a T with the main stem that comes out of the ground a little. It seemed like it should be low, some joker even joked about it and instead it is becoming a nice little monster. It made the lateral branches start and all that then worked with a successful main lining on which I made the only mistake of leaving a little too much stuff at the bottom that I am cleaning up little by little as I understand that it will not see much light or will not produce satisfactory flowers.
The main stem that runs parallel to the ground is very beautiful to look at and is from the main lining manual.
The structure created with mainfoldindg, mainlining, topping and lst vari is very pleasant, the plant is at medium internodal distance and flowers quickly so it is a plant on which I would feel like recommending these techniques that it is true that they can slow down the harvests but they give a satisfaction to the sight and an unparalleled fun in making them.
We are still using soil, fertilizers and all the additives recommended by Plagron 100% organic. We are still in the early flowering program that maintains the same additives Power Roots, Sugar Royal, Pure Zym and adds the flowering stimulant Power Buds. Obviously the basic fertilizer is now Alga Bloom.
The Green Sensation hero of the late flowering will arrive and at the same time it will be time to remove power roots and a week later the enzymes. (The plant left to grow straight and straight ahead of time has been taking it for a while)
---- Decide on the right soil and calculate your fertilization schedule according to your soil on the official website.
-- www.plagron.com
Try a seed of this variety that drives us crazy..
---- https://www.zamnesia.io/en/11230-zamnesia-seeds-rainbow-sherbet-automatic.html
Zamnesia Description //A cross between Pink Guava, Sunset Sherbet and a hint of ruderalis, Rainbow Sherbet Auto offers a wide range of flavors, effects and more. This 70% indica-dominant strain reaches considerable THC levels (24%) and is suitable for both experienced growers and those taking their first steps in the world of cannabis cultivation.
All the best that mother nature has to offer is on ---- www.zamnesia.com

Likes
19
Share


@Osrsbuddy
Follow
This is the home stretch!! Buds had their final little burst in size and all the trichomes are nice and cloudy, so for me, it’s time to harvest. I’m doing one more flush with ice water and putting her in total darkness for 48 hours. Gonna chop her in a few days once the soil has dried out and just take off some big fans leaves and hang her up to dry for a few days!

Likes
27
Share


@RDWCGrowing
Follow
4/1/2023
Week 7- Day 1 of Veg (Day 59 overall)
Water Change Day!!!
Water was really low it was just above the hump in the Res cutting it close to not having enough water in the system to keep it going. They drank a lot making it close going the full 14 days. I am still going with the previous grows and adding 36 Gallons but even looking at the root I think the SILICA is working and the roots are further along at this point than in previous grows. This next two weeks will watch how much they drink and how low my Res starts getting, and will make a decision on changing the water weekly from here on out or still keep on the plan of every other week until Week 4 of Flower.
Added 36 Gallons
Mammoth SILICA= .5Mil/Gal = 18Mil
CALMAG= .5Mil/Gal = 18Mil
Root Drip= 1Mil/Gal = 36Mil
FloraMicro = 5.4Mil/Gal = 194Mil
FloraGrow = 4.2Mil/Gal = 151Mil
FloraBloom = 4.6Mil/Gal = 166Mil
ORCA = .5Mil/Gal =18Mil
PPM= 536
PH=5.84
PPFD=500
Tent Temp= 76.5
Water Temp= 71.4
Humidity= 58%
4/2/2023
Week 7- Day 2 of Veg (Day 60 overall)
Not much today, PH was at 5.81, I brought that back up to 5.90. I took care of some badly needed defoliation in each of the back sides .. I was able to see some really good clone material to use on the lower backside of each of the plants. I will be taking two clones from each to breed over the next few weeks depending on when I am going to flip them.
4/3/2023
Week 7- Day 3 of Veg (Day 61 overall)
A little FIMing, A little Topping, and a Little bit of defoliation.
Might have to take my clones during the week this week, I am trying to wait until Saturday to hit week 8 but again they are getting all over the place and I need to trim some of the sides and lower areas.
4/4/2023
Week 7- Day 4 of Veg (Day 62 overall)
I decided to take my clones and clean up the lower half of the plants. I took 2 clones from each plant to go into the cloning machine.
4/5/2023
Week 7- Day 5 of Veg (Day 63 overall)
Water Temp is sitting at 73. Right in my ideal range for my setup.
Ideal range 70-74
My Temp Tent is my ideal zone75.6
Ideal for this grow 70-78
The lights are still waiting the switch to flower to get maxed out...
The Humidity is coming in right at 60% I love it..
I took so much off yesterday I figure it was a good day to let them rest.
4/6/2023
Week 7- Day 6 of Veg (Day 64 overall)
I needed to Defoliate some and I topped a little. The plants might force me to flip them soon. Next Wed is the 10 week mark half way through the 20 weeks. The net is Bingo... Which means that If/when the plants hit the net I will have to flip them. The Net is set to the max height that I can let them get based on the Breeders Stretch report 75%.
4/7/2023
Week 7- Day 7 of Veg (Day 65 overall)
#3 is 22 inches Tall, #2 is 19 Inches Tall.
Net is set at 24 inches. Net is also set as my Bingo point, if they hit the net then I have to flip no matter what to account for the Breeders recommended 75% Stretch allowance. I think I am going to have to flip right at the 10 week mark of the Competition which is Wed 12 Apr.
I topped a little, I de-foliated a lot to start getting it ready for the anticipated Flip.


Likes
13
Share


@tresplantes
Follow
They looking Fire all over smell is amazing
Bluezy has not the bud Strukture im looking for and does Not Look Like the biggest yielder but man the smell is Crazy like really Crazy chemical sour blueberry light bleaching on one bud
Dante’s Inferno buds are Rock Hard and slowly reaching the size of soft drink cans, and the node spacing is insane golfballs all the way down
The smell is like a tropical runtz super sweet fruitmix
Tomb raider has just amazing plant structure amazing bud Structure is a trych Monster and the smell goes towards sweet sour gelato Kinda direction


Likes
3
Share


@123Grow
Follow
1. LABS - I suggest using distilled water for the entire process ( no chlorine or chloramine). I also suggest the type of rice product shown ( 1/2 cup), it has red, brown, white, and black rice blended together. You get the benefits of each type.
2. Take the rice that was used in making the rice rinse for labs and boil it in 3 cups of water for 30 mins. Strain the rice out. Add 1 TBSP molasses per 300 mls.
Use 300 mls of the above mixture during your watering cycles. It contains starches, b vitamins, aminos, trace minerals, calcium, magnesium, iron, phosphorus, potassium, and some nitrogen. The ppm’s are not higher than 200 ( if using distilled water). This is ONLY used if your plants are healthy. If your plants are sick…this will NOT help them. It will make stuff worse!!!
The Hulk-Berry got a new home. 1 tsp 7-3-1, 1/2 tsp 0-12-0, 1/2 tsp Langbeinite, 1 TBSP 2-2-2, 3 TBSP 4-3-3, worm castings, recharge (1/32 tsp) into the soil ( Mother Earth).
The 3 RuntZ are coming back from slow growth at the outset. I added LABS, Lentil SST, Photosynthesis Plus to the media. I did a foliar spray with recharge. 24-36 hours later the leaves exploded with growth and height. I added ZERO nutrients!!! I only used natural inputs and bacteria to get the root zone back in order.
11-3. Things are all in check! The LABS, SST’s and Rice wash have gotten the 3 RuntZ back on track. The Hulkberry is in full swing. I think I can get to 3 feet by flower time with the Hulkberry
11-5 All is well today!!! Everyone is very happy after the cal-mag, Photosynthesis Plus, kelp bath

Processing
Likes
39
Share


@Jubiedude
Follow
Day 1 (day I got plant)
-Placed clone in cup of soil with bottom cut off in larger pot for easy future transplanting. (Pics. 1&2)
-Cut 2 bottom fan leaves off
-Sprayed leaves and soil with water
Day 3
-noticed tiny white spots on some leaves. Looks like spider mites but probably not since I'm in a grow tent and I couldn't see evidence of mites under the leaves (UPDATE Day 5 I added a video of the white dots)
Day 4
-Didnt get to see plant today. Received first watering to overflow of the smaller cup
Likes
8
Share


@Sobreruedas
Follow
This is week 9, and I’ve started dialing things down as we approach the final stage.
I reduced the light intensity to around 600–650 PPFD to keep things a bit softer towards the end of flowering.
From here on, it’s just a matter of maintaining stable conditions until harvest time 🌸✂️💪

Likes
8
Share


@WeeDay420
Follow
Good Day i think check my profile!! Like4like 🤙😜 Merry Christmas & Happy new year !!! BIG BUD for you !! Thank you i Learn and text me all 😅💚

Likes
27
Share


@adam_pawloski87
Follow
First off I just want to say for some reason it’s not letting me change the right temperatures on my diaries ! Each time when I put it in they stay at 50. My day air stays 75 degrees an , night degrees is 70 !
Today is day 58 for all these ladies! This week has been really great ! Girls really progressed a lot , especially for one the Forbiddin Runtz, looks like is gonna finish up in a week or 2 ! Other then that they are coming along well! Keep those eyes peeled for next week! Cheers😶🌫️💨💨💨💨

Likes
34
Share

@TrickzGrowz
Follow
Servus Moin!
Die Pink Poochie ist fertig, sie bekommt jetzt nochmal 2 Tage Licht, dannach 2 Tage Dunkelheit. Sie wird dann zum trocknen im Zelt aufgehangen.
Likes
4
Share


@Brothersfromweed420
Follow
Origen: Afganistán
Tipo: Indica / Sativa
Floración: 63 Días
THC: 29%
Cosecha: 400 g / m2
Altura: 150-205 cm
Clasificación:####

Divine Seeds desarrolló Opium como una nueva cepa campeona. Las variedades autóctonas más potentes y resinosas de Afghani Indica se crearon junto con una poderosa sativa brasileña, de la que Opium hereda su brillante sabor a bayas. El genotipo de Opium es un gran trabajo: los criadores estaban decididos a obtener el nivel más alto de THC, hacer que Opium fuera lo suficientemente fuerte para cualquier condición de cultivo y superar los límites de la productividad. Sus creadores describen Opium como la hierba con la que siempre soñaron cultivar.
En el interior, estas plantas se mantienen en su mayoría de altura media (1,5 m), alcanzando hasta 2,0 m en el exterior. Dependiendo de sus limitaciones de altura, Opium se puede cultivar universalmente en cajas de cultivo, balcones, invernaderos y terrazas. Debido a su ascendencia afgana, Opium puede soportar el clima cálido si se le proporciona suficiente agua y algo de sombra. Responde bien a cualquier técnica de entrenamiento: ScroG y SoG, LST, topping y FIM, supercropping. El inicio de la floración se marca con una oleada de crecimiento, cuando las plantas se estiran casi 1,5 veces. El opio desprende un penetrante hedor terroso con matices afrutados. Listo para cosechar en exterior en octubre.
El impacto psicodélico de lapidación con el que te golpea Opium es como estar hipnotizado. Lo suficientemente fuerte para matar los dolores, Opium también es médicamente eficaz contra el insomnio, las náuseas, los trastornos del apetito, los espasmos musculares, los dolores de cabeza, la irritación, la fatiga, los ataques de pánico y la epilepsia. El uso recreativo de Opium significa viajar silenciosamente de una visión a otra. Se consume mejor por la noche.


Likes
10
Share


@iLoveGoodWeed
Follow
The plant has recover won't be the biggest but that is fine with me as it's for RSO/CBD oil
Likes
53
Share


@SativaSteve88
Follow
3 weeks into flower and all seem to be doing very well, getting a nice smell now when i open my tent, can not wait till these are ready to harvest, started to frost up now and all covered in trichomes, impressed with both the mimosa evo and tropicana banana upto now both seem to be forming nice dense flowers and the both strains have grew well from the start other than my wrong doing giving them a early shock and stunting them but theyve bounced back lovely and from how its looking its going to produce some nice smoke, cant wait thanks again barneys for suppyling me them to test out and create a diary on, see you next week for the latest update 👊

Likes
16
Share


@goodcall
Follow
First things first, the smell coming from the lemon is absolutely delicious! Super super, almost like candy with a super sour hint to it. I am so keen to taste her!
LSD-25;
Fattening and fattening, she's starting to stack on the weight now, I'm hoping for another 3 weeks before chop.
Lemon OG Haze;
The buds are really starting to form now, I'm hoping to have some nice looking colas come next Friday. Imma giver her probably 5 weeks at this stage, but she is a bit of a slow grower so we'll see.

Likes
44
Share


@Buffynuffy
Follow
It’s amazing watching these plants grow, it’s been an experience already and so much to go with this grow and with all the learning to come I hope it looks okay to you guys anyone who would like to comment please do I’d love to hear other’s thoughts!
Processing
Likes
4
Share


Processing
Likes
17
Share


@GardnerXXI
Follow
Day 25 . This bitch hermied. Gonna keep her few more days to see the progress
