
Likes
Comments
Share


@BombBuds
Follow
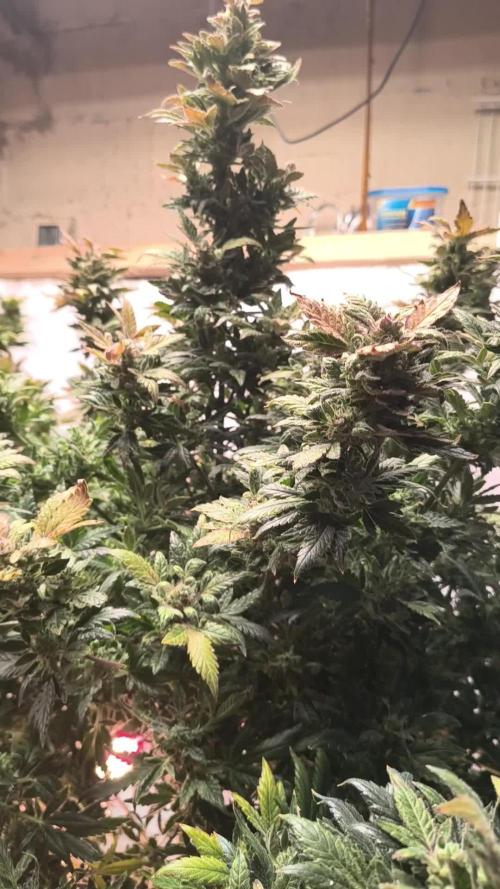
Letzte Woche!
Einmal noch gießen aber nur wenig damit die bissl trockenstress haben und trichome nochmal anziehen.
Keinen Dünger mehr und nur noch ph neutrales Wasser.
Geruch ist super geil! Aussehen ist auch ne 10/10. bin sehr gespannt aufs Endprodukt!
Likes
12
Share


@russrahl
Follow
We ended up harvesting on day 55 of flower for these girls. 2 of these girls stayed shorter and gave a more spaced out bud stucture, while the other 2 took over the tent and were twice as big and gave a more normal compact bud stucture. 1 plant in particular(front left one) took over the main area of the tent on its side and produced about half of the total weight over all. We ran into some problems with stretching this go round as I’m still trying to figure out these light movers. But trial and error will prevail in the long run I’m sure, just takes so long once you make a change to see the results sometimes it’s tricky. Lol we haven’t cured yet but already it is some nice smelling and tasty buds. Got that classic OG kush kinda smell and taste. I will update more on this once we get some curing time in on it. We ended up with just over 10 ounces of bud and a little over an once of smaller popcorn buds, although with the exception of the one that gave us half the weight, most of the buds on the other 3 girls once broken up where all smaller with a few exceptions. But for an early version strain that is crossed with the ruderalis plant for fast flower it didn’t turn out to bad all things considered. 11 ounces off 4 plants in 55 days is ok in my books. Lol we also got a crap load of trim and just the lower fluffy stuff we will use for baking and oil making. Overall it was very easy to go, took some good ph swings like a champ and really didn’t give me any trouble with the exception of my mistakes and experimenting with my light rail movers.

Likes
2
Share

@Mrdub
Follow
This girl is almost done about another week left on you can see the fade coming in heavy colas not to big but they reek of fermented fruit super sticky super bushy I gonna have to buck a lot of leaves before I hang her gonna cut the nutes out hit her with the carboflush I check checking the trichomes not to many amber yet but I keep checking haven't checked my pH being in late flower and my water has been pretty consistent lately turn the lights down to 75 percent to keep from burning her the under canopy lighting is rocking u can see from the colas so here to another week of growing lfg


Likes
Comments
Share

@madlangs
Follow
All going well. No problems
I 22.11.25
WW 56cm and 36cm
Pineapple 38
Afgooey 61
n lights 70cm & 80cm
Sleepy Joe 70cm
Papaya zoap 70cm
Pure glitter 49cm


Likes
73
Share


@Rwein93
Follow
Ciao ragazzi e bentornati qui con me le sorelle Mimorange.🍊😉
Ci siamo! Fra un paio di giorni taglierò loro. I buds sono estremamente compatti, profumati e di un colore favoloso, come potete vedere nei ravvicinati delle apicali.😍
Ho eseguito un lavaggio delle radici massivo nel giorno 92 con ben 20 L di acqua ciascuna per pulire bene e poi dopo aver aspettato che asciugasse per bene, ho innaffiato loro nel giorno 96 con 1,5 L di acqua.💪
Nel giorno 98 ho eseguito anche una voluminosa defogliazione per dare concentrare le energie suo buds negli ultimi giorni.👍
Eh niente ragazzi! Anche per questa settimana è tutto. 👊
Grazie a tutti per aver guardato e restate sintonizzati per nuovi aggiornamenti.🙏
Buona settimana e felice crescita 🌱 🌱 🌱


Processing
Likes
32
Share


@www_dot_allgrownup_dot_co
Follow
Old 75L ph6.0 650ppm 22c
New 100L tap water ph6.5 100ppm
20ml sil ph8.6
Ph dwn 7ml 😤 (should have been 6.8ml) ph3.8 150ppm
Roots 150ml ph4.6 ppm150
B2 400ml (4ml p/L) ph4.2 500ppm
A2 400ml ph4.3 800ppm
Last had a dif ph0.7 & 100ppm at 2nd check
Checked this morning Ph5 800ppm will check again tonight and adjust to ph5.8 if still low

Processing
Likes
9
Share


@Kushizlez
Follow
Harvest:
Everything dried up to 347 grams + 96 grams of super high quality trim. Overall I am not too pleased with the smoke of the product. Although the bud size, bag appeal, smell and taste are pretty much all there, the shitty burn is a deal breaker for me and the majority of this weed is quite frankly useless. Another downside is while smoking I’ve found 4 seeds in an ounce from almost every strain. Light leaks? At least I learned a ton, including how to get super good burn for my next crop. I’m hoping that curing for a month or so will improve the burn but I wouldn’t really count on it. I have seen weed dried for 4 days with no cure and no flush smoke clean and not go out once. I have been told that the key to white ashes/clean burn is proper mineral content in the soil and there is tons of scientific studies on cigar ash going back 100 years. Plants grown in a medium with high levels of decomposing organic matter, phosphorus, magnesium, chlorine and heavy metal ratio tend to produce black/grey ash. Whereas plants grown in a medium with a higher ratio of trace minerals like calcium carbonate and potassium in the form of wood ash, rock dusts, oyster shell flour and lower levels of decomposing organic matter will produce a dense, uniform white ash that rarely goes out. But this is still all theory until I test it to confirm for myself a few times. My last few outdoor harvests did not improve with curing at all so I’m hoping this will be the missing link. Plain peat moss and coco clearly lack essential minerals that help burn. If said theory is correct I should find a synthetic nutrient line with more trace minerals. Makes me wonder if growing if rockwool/basalt rock could improve burn in a hydro setup.
I think I did a fairly decent job for my first grow. I went wrong in a million different places but I still stuck it out and got some decent herb. Things went wrong early when I got black spot mold, nitrogen/magnesium deficiencies and powdery mildew. I corrected most of it but things didn’t get really bad until mid veg when I intentionally skipped a few feedings and defoliated quite heavily stunting the plants. I also didn’t even top or start LST until the 6-9th node which was really stupid and hurt my yield. My temperatures were all over the place from the learning curve. I was severely overwatering without realizing it. 100% peat moss is a shitty medium. I also fed way too late in flower (not what caused shitty burn). I also used synthetic nutrients in soil.
Zkittlez bonsai
Yield: 1.9g
Smell: 7/10 - sweet, candy, berry, gassy, piney hints
Bag appeal: 7/10 - slightly leafy/stemy
Crystal coverage: 7.5/10 - very impressed
Ash: 6/10 - flaky, mostly white/grey
Fire holding: 4/10 - stays lit for 10-30 seconds
Smoke: 6/10 - taste is decent, needs curing
High: 6/10 - indica dom
Comment: looks nice, smells nice, tastes nice, burns like shit.
43.5/70 = 62% 👎🗑️
Black Garlic #1
Yield: 53.6
Smell: 8/10 - gassy, piney, earthy, skunky
Bag appeal: 7/10 - slightly leafy/stemy
Crystal coverage: 7.5/10 - very impressed
Ash: 8/10 - thick, uniform white ash
Fire holding: 7.510 - stays lit for 45+ sec
Smoke: 7.5/10 - taste is good until the end
High: 7/10 - sativa dom
Comment: looks nice, smells nice, tastes nice, burns great but quite leafy.
52.5/70 = 75% 👍🔥
Black Garlic #2
Yield: 42.3
Smell: 7/10 - woody, earthy, tea
Bag appeal: 6.5/10 - slightly leafy/stemy
Crystal coverage: 7/10 - impressed
Ash: 6/10 - flaky, mostly white/grey
Fire holding: 4/10 - stays lit for 10-30 seconds
Smoke: 6/10 - taste is decent, needs curing
High: 8/10 - sativa dom
Comment: looks nice, smells nice, tastes nice, burns like shit.
44.5/70 = 63% 👎🗑️
Zkittlez
Yield: 39.4
Smell: 7/10 - sweet, candy, berry, gassy, piney hints
Bag appeal: 6.5/10 - slightly leafy/stemy
Crystal coverage: 7.5/10 - very impressed
Ash: 8/10 - thick, uniform white ashes
Fire holding: 8/10 - stays lit for seconds
Smoke: 7.5/10 - taste is decent, needs curing
High: 7/10 - indica dom
Comment: looks nice, smells nice, tastes nice, burns great but smalls didn’t fill out.
51.5/70 = 73% 👍🔥
Blackberry Breath #1
Yield: 57.5
Smell: 9/10 - sweet, grape, berry, gassy, earthy, hashy
Bag appeal: 8.5/10 - dense, sparkly buds
Crystal coverage: 9/10 - super impressed
Ash: 5/10 - flaky, mostly grey/blackish
Fire holding: 4/10 - stays lit for 10-30 seconds
Smoke: 5/10 - tastes like chalky shit
High: 6/10 - indica dom
Comment: looks amazing, smells amazing, tastes like shit, burns like shit.
46.5/70 = 66% 👎🗑️
Blackberry Breath #2
Yield: 76.1g
Smell: 6/10 - musky, tea, berry, herbal
Bag appeal: 8/10 - slightly leafy/stemy
Crystal coverage: 7.5/10 - very impressed
Ash: 5/10 - flaky, mostly grey/black
Fire holding: 4/10 - stays lit for 10-30 seconds
Smoke: 5/10 - taste is shit
High: 6/10 - indica dom
Comment: looks nice, smells shitty, tastes shitty, burns like shit.
41.5/70 = 59% 👎🗑️
Slurricane #4
Yield: 34.5g
Smell: 8.5/10 - gassy, deep piney, fuel, earthy,
Bag appeal: 8.510 - slightly leafy/stemy
Crystal coverage: 7.510 - impressed
Ash: 6/10 - flaky, mostly white/grey
Fire holding: 4/10 - stays lit for 10-30 seconds
Smoke: 6/10 - taste is decent
High: 6/10 - indica dom
Comment: looks amazing, smells amazing, tastes nice, burns like shit.
46.5/70 = 66% 👎🗑️
Badazz OG Cheese
Yield: 43.5g
Smell: 6.5/10 - musty, woody, cheesy, piney hints
Bag appeal: 6/10 - slightly leafy/stemy
Crystal coverage: 6/10 - very impressed
Ash: 5/10 - flaky, mostly white/grey
Fire holding: 4/10 - stays lit for 10-30 seconds
Smoke: 6/10 - taste is decent
High: 6/10 - sativa dom
Comment: looks like shit, smells decent, tastes decent, burns like shit.
39.5/70 = 56% 👎🗑️

Likes
35
Share


@SantaStone
Follow
Health to everyone! 👋
🌿1 week has passed since the big defoliation and switching the timer to 12/12 mode.
-Pre-flowering stage, stigmas have not yet appeared. We are waiting for the flowering to begin.
-Very thick stems.
-Appetite was restored by watering 5 liters per day (water 2 times a week).
-No problems or shortages were found.
-Every 3-4 days I remove several large burdocks (no more than 5), which greatly block the light.
-Added Bud Ignitor and Bud Factor X to the diet.
🤙In general, a strong and large plant with good resistance, which is pleasing to the eye.
Likes
4
Share


@WulfBlud
Follow
Ph issues resolved end of Week 10 with multiple applications of lime and 2 flushes with PHd water at 7.5
Just waiting to chop the El Chemi Kiwi at this point which is very close and most likely can be chopped right now. My drying tent is currently in use as I wait the weather to turn around so I can harden them off and plant in the back yard.
The strawberry nuggets is likely 1.5 weeks away at least but it is really fattening up more than the chemkiwi.

Likes
10
Share


@valiotoro
Follow
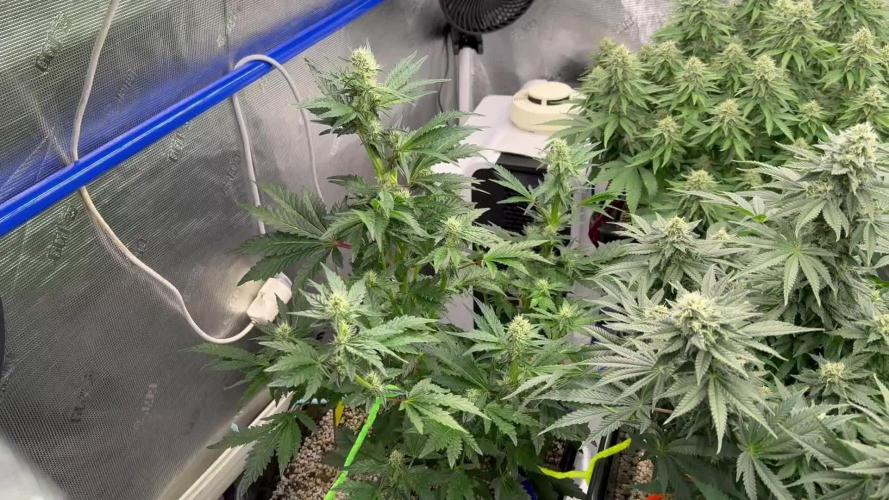
Hello everyone 😎
Week 2 of flower for the Purple Lemonade auto from Fast Buds 💥
She grew fast with a beautiful green color,for the nutrient 4ml/L terra bloom & 1ml/L power buds from Plagron
Spider Farmer SE-7000 60%
Have a nice day 😋


Likes
49
Share


@Roberts
Follow
The Mandarin Squeeze sisters smell just like Mandarin oranges. Hence the name. She has been busy bulking. She is looking pretty good, and full of frost. I am rather eager to try them when the time comes. For now she will work on bulking some more. It's already looking like it will be a killer flower. Thank you again Spider Farmer, and Terpyz mutant Genetics. 🤜🏻🤛🏻🌱❄️
Thank you grow diaries community for the 👇likes👇, follows, comments, and subscriptions on my YouTube channel👇.
Thank you Happy Growing 🌱🌱🌱
https://youtube.com/channel/UCAhN7yRzWLpcaRHhMIQ7X4g

Likes
24
Share


@Mastr
Follow
She is so big 😍I'm not even kidding she is growing in 6L pot and. she is today 53 and 80cm tall with lots off main cola not couple over 6 main colas im immersed can't be anymore happy thanks alot too fastbud
Day 54 I start too feed her with monkey bloom nutrient bloom A bloom B
And I add bio heaven(bud denser)recommend by grower friend 💚
Likes
11
Share


@Vegasgrowermx
Follow
Well one month of life for this hopefully female i was supposed to top thos weekend but got busy so im gonna have to top next weekend she already has 5 nodes and still getting natural sun light with no vegetative nutrients yet only pest prevention SNS 209
Likes
8
Share


@BuddyBudster
Follow
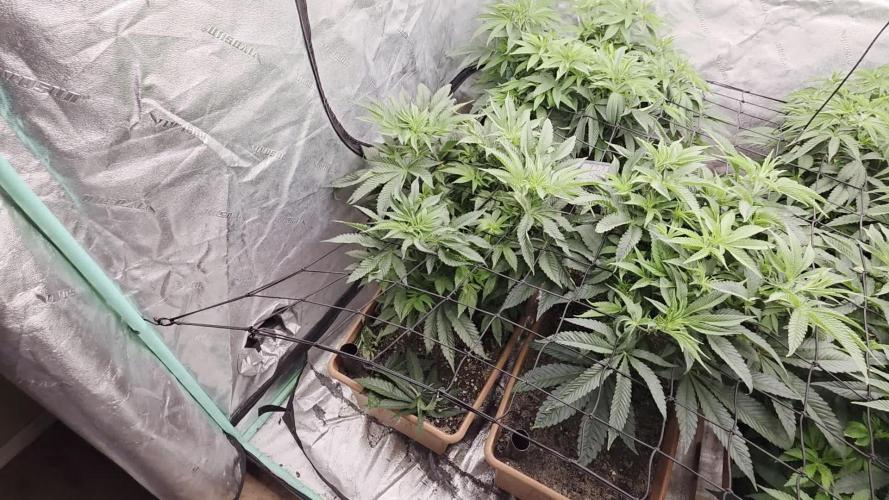
Hi there peeps,
This week went great and they are really growing vigorously. The GSC is really stalky and is the hardest to controle but I'm managing. On the other hand, the Runtz requires little care to grow uniform and is a breeze to grow so far. The Monster Zkittlez has recovered nicely from her stress and is catching up with the other 2. I could not be more pleased atm.
I also found out that if I feed with BioCanna Vega, the solution's ph levels out at 6.6 so that is one less worry.
Next week it's switching time so stay tuned.
Have a good week growmies!

