Likes
9
Share


@Franco123
Follow
hello this week the plant has developed the male flower well I'm waiting for it to be ripe to collect the polyne and freeze it to wait for the next cycle I'll do to mix it with my don Diablo, the plant is yellowing the low leaves but I think we're lacking furniture for the end of flowering which will come soon


Likes
9
Share


@pascal_dop
Follow
Das Umtopfen war erfolgreich und die Pflanzen wächst und wächst und wächst .... und das obwohl ich sie ein paar Tage nicht gießen konnte 👏


Likes
96
Share


@Swollen
Follow
During the harvest I've collected lot of trims. I think this genetic will be great for extractions.
I've dried all the buds in the tent at 50%rh, 23°C with indirect ventilation for three weeks. Now are curing in a dark room at 21°C inside a jar with a 58% Boveda.
Thanks to everyone who followed and liked this diary! I hope you enjoyed 🙏
Likes
16
Share


@valiotoro
Follow
Hello everyone 😎
Time for harvest my Tropicana Cookies auto from Fast buds after 10 weeks she looks beautiful with some purple color and amazing smell
The buds are fat & frosty
Have a nice day
Likes
12
Share


@gr3g4l
Follow
Os recuerdo que no hay que hacer mucho caso de las dosis, es orientativo.
Por ejemplo: dia 43 tocó riego de BUD, solo con bud hasta llegar a 1,6 EC Añadiendo hasta llegar a 1,6
sin mirar los ml que son.
Se recomienda no pasar del 1ml/L y este fué con algo más. Más adelante veremos si se sobrefertilizaron o no.
Likes
18
Share


@cheetah844
Follow
Getting very tall, I thought this one would stay shorter?! This is my go-to night time pain relief with good sleep strain. She will be staying indoors for safekeeping so hopefully I can guarantee to have some flower from her.

Likes
24
Share


@nonick123
Follow
Día 108 (16/09) Tras el flush las plantas muestran tímidamente nuevos pistilos blancos! 😍
Hoy no es necesario regar!
Día 109 (17/09) Me he encontrado a OnionOG #1 y a Purple Punsh completamente sedientas! Con las hojas caídas!
Riego con 1,25 litros de H2O a cada una de ellas (el resto no necesitan riego)
Día 110 (18/09) Riego con 500 ml H2O
Las plantas con el bloqueo empiezan a mostrar nuevos pistilos, sobre todo en las partes inferiores
Día 111 (19/09) Riego con 250 / 500 ml H2O
Se vuelven a formar pistilos blancos en todas las plantas que han sufrido el bloqueo! 😍💥
OnionOG #1 va como un cohete formando y apilando flores 💪 🚀 😍
Día 112 (20/09) Día lluvioso. Riego ligero 250 ml H2O
Día 113 (21/09) Otro día lluvioso. Riego ligero con 250 ml
Día 114 (22/09) Detecto algunas moscas blancas apoderándose de las plantas y decido hacer una aplicación foliar de piretrinas (Spruzit a 15 ml / l)
Riego con 1 Litro de Té Floración de Lurpe Solutions. Preparación: 24 horas con bomba de aire (oxigenación) con ingredientes:
Healthy Harvest 8 ml/L + Insect Frass 16 ml/L + Kelp Hidrolizado 0,3 g/L
💦Nutrients by Lurpe Solutions - www.lurpenaturalsolutions.com
🌱Substrate PRO-MIX HP BACILLUS + MYCORRHIZAE - www.pthorticulture.com/en/products/pro-mix-hp-biostimulant-plus-mycorrhizae


Likes
21
Share


@DeepRootsGrowTrees
Follow
SATIVA DREAM by KANNABIA
WEEK #17 Overall
Week #3 Flower
This week she's looking good starting to flower and dealing with the elements she's definitely got that sativa build!! Stay Growing!!
Kannabia.com SATIVA DREAM

Likes
12
Share


@GanjaReaper
Follow
Hello Everyone,
I didn't felt like updating last week, sorry for that.
It was like 25 to 30 degrees celcius for the last time this summer. I enjoyed the beach, bars and restaurants.
The plants had a good sunny week as well.
Photos for this week are made at the end of week 5 of flowering. 3 of 6 plants are ready for harvest.
Somehow it didn't suprised me, the plants stayed small and developed fast. I was thinking about a flowering time of 7 to 8 weeks but
those 3 only needed 5. Why? Well they didn't drink that fast anymore, pots stayed heavy for a long time, all the Pistils on the buds started to get brown and the thc was looking milky and the buds are full with it.
Gues i will keep flowering the other 3 for 1 or 2 weeks. Lets see how it goes.
I did run out of PK 13-14 last week and Green sensation at the end of this week, So a kind of good timing.
I will just increase the base nutrients a little bit to compensate it. I know many growers just growing with base nutes and get good harvests as well lol.
As long as the 3 remaining plants like to drink their feedings fast and the Pistils stay white, I will keep giving them nutes for another 1-2 weeks. When they start to struggle I will start flushing.
Until next week!
Processing
Likes
7
Share


@Yukagrls
Follow
She is growing so fast! Already 19 days old.
So far she's had light 24/7 and every time it rains I get some of that water. I think they get more nutrients from that water straighr from heaven, lol!.

Likes
Comments
Share

Likes
120
Share


@DogDoctorOfficial
Follow
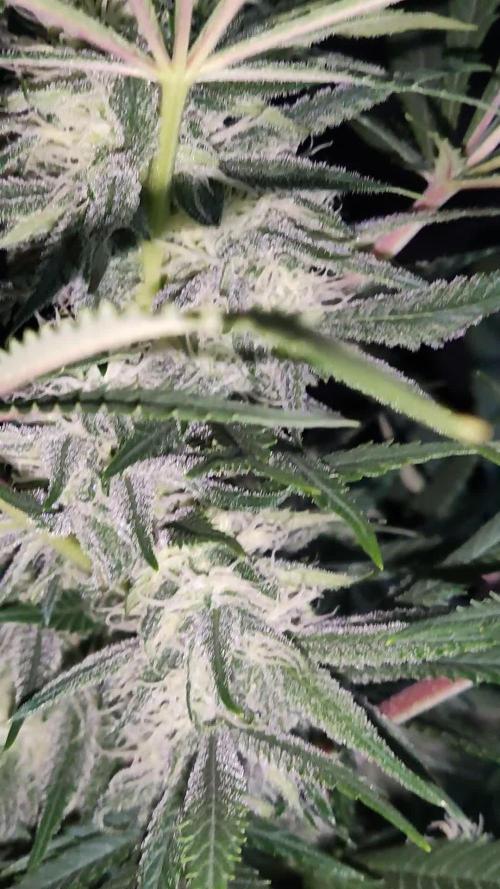
Welcome back to another thrilling chapter of our Tropical Tangie's journey, now in Week 5 of flowering.
This week, our lovely lady continues to enchant with her graceful growth and mesmerizing beauty. The trichomes have developed into a spectacular sight, glistening like tiny diamonds under the grow lights. These little crystal-like structures hold the essence of her strength and character, and they are, without a doubt, a testament to the diligent care we've provided.
I want to take a moment to apologize for the missing videos. Unfortunately, I'm currently experiencing some technical difficulties with Grow Diaries that are preventing me from uploading them. Rest assured, I'll rectify this as soon as the situation is resolved. The videos are an essential part of this journey, and I'm excited to share them with you.
As always, your support and enthusiasm are deeply appreciated. Our quest for botanical knowledge continues, and we'll explore every facet of this captivating journey together.
Stay tuned for the next chapter in our research, and in the meantime, I wish you all a blessed and beautiful week.
GD Still playing hard on me, ASAP i will upload the videos but for now is not allowing me to do it, and to upload photos it takes me hours i will upload all missing wen possible <3 <3 <3

Processing
Likes
9
Share


@Divs_darkroom
Follow
This girl looks waaaaay better than the last blue toof I grew. Gave her a tea yesterday and she is loving life. Decided not to top her so I'm hoping she produces a little bit of weight.

Likes
22
Share


@BDar_medicine
Follow
defoliating bit by bit, never sure how far to take things
day 20, this i think is the last of the defoliating, they keep getting bushy and covering lower bud sites.
okc is starting to get sticky.


Likes
10
Share


@GermanHydroponics
Follow
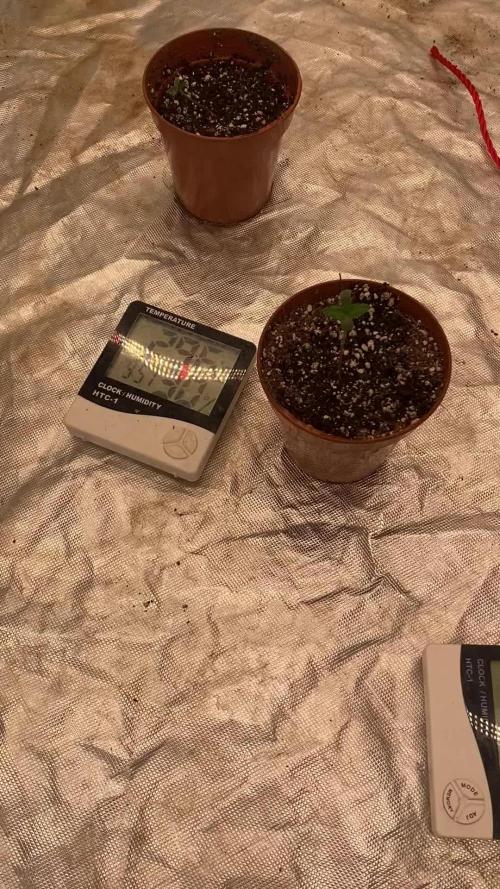
Mein ersten Grow von 2Fast4Buds. Alle Pflanzen sind Automatics und sind erfolgreich gekeimt.
Als nächstes kommen alle 4 in Steinwolle und dann nach 24std. In Netzstöpfe.
Likes
72
Share


@DreamIT
Follow
🐩👤Sirius Black👤🐩 by 🌍🌱WeedSeedsExpress🌱🌍
👤 22.3 ...
👤 23.3 ...
👤 24.3 ...
👤 25.3 beautiful plant, large and vigorous, I hope it takes a dark / red color, it would be fantastic. but I'll try with other seeds eventually 😀 the lamp is really cool, the plants look just fine under Viparspectra
👤 26.3 ...
👤 27.3 All very well, I can't wait for it to start releasing perfumes
👤 28.3
__________________________________________
👀Are you looking for a good lamp to start?👀
Viparspectra in my opinion has something more than the others, take a look at their site.
➡️ http://bit.ly/pro-seriesproductspro-series-p1500
⏩Use " GDVIP " for an extra discount💯
____________________________________________________________________________________
📜👀 A look at the details of what I'm growing 👀📜
🐩👤Sirius Black👤🐩 by 🌍🌱WeedSeedsExpress🌱🌍
📋 Details 📋
⚧ Gender
▪️ Feminised
➰ Genes
▪️ 70% Indica / 30% Sativa
🎄 Genetics
▪️ Sirius Black
🚜Harvest
▪️ 450 g / m²
🌷Flowering
▪️ 63 - 70 days
✨THC
▪️ 25.0%
✅CBD
▪️ 0.5%
🏡Room Type
▪️ Indoor
🌄Room Type
▪️ Outdoor
🕋Room Type
▪️ Greenhouse
🎂Release Year
▪️ 2020
____________________________________________________________________________________
👀📷 Follow the best photos on instagram 📷👀
https://www.instagram.com/dreamit420/
🔻Leave a comment with your opinions if you pass by here🔻
🤟🤗💚Thanks and Enjoy growth 💚🤗🤟