
Likes
Comments
Share


@TGriner420
Follow
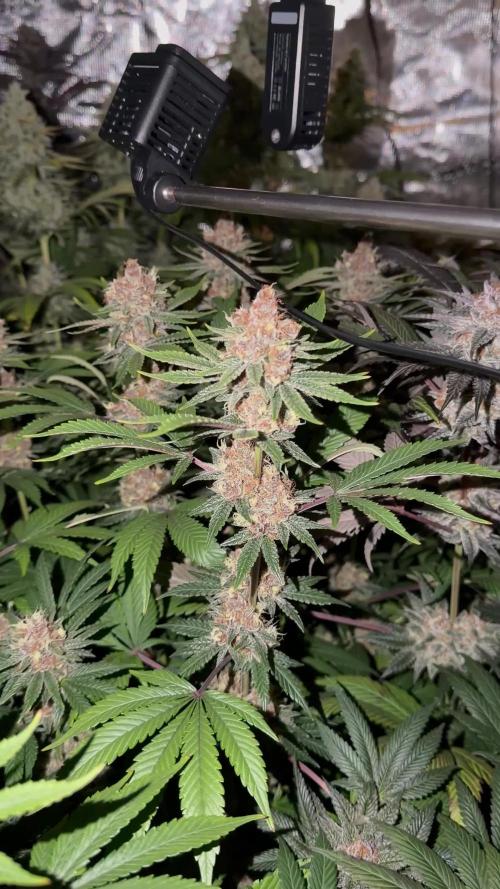
This week was a real breeze! She's gaining a ton of weight on the bud sites and she's really growing nicely! She's starting to bud around the flowering sites and really finishing nicely. The formation of bracks and the formation of the buds is my favorite part because that's when you get to see somewhat of the final picture and the time the flower is most colorful! Now the second best part is harvesting the flower for smoking which will be occuring soon! The smell on these girls is very invigorating!! She's putting out a smell of a Lemon Cherry Now n Later! You can smell the Lemon and Cherry right away when you open up the tent! I can't believe how big she's got and how beautiful they are coming along! I have to say that this is one of my favorites to grow and my favorite smelling strain! I also love the way the flowers are stacking on the colas!!! The frost on top of the cola leaves is insane! During the day I drop the humidity down to 45-50% and then at night I raise the humidity up to 60-65% which helps a ton with flower promotion during the flowering stage! Also, I raise the temperature during the day to 80° and at night I lower the temperature to 55°-60° which helps mimic the autumn temperatures that aids a ton in flower production in the flowering stage!!! I'll be stopping the two Lemon Cherry Cookies Auto's from receiving any synthetic nutrients and flushing them now since harvest will be within the next two weeks or so! I'm doing that because they stop taking nutrients in and start to self canabulize as a normal (ending) part of plant life. Then I'll give the two ladies plain pH balanced H20 for the next 2 weeks to flush any and all nutrients out of them. Then three days of darkness. Finally I'll chop them down to hang in my harvesting closet for 7-14 days with a dehumidifier on at 65% humidity. Then I'll place the flower into the trimmer and then into the grove bags for the last step in harvesting! The grove bags will keep the flower at 58-62% humidity. They also help keep the flower fresh longer, the Terpenes fresh, the Terpenes flavors, and from becoming moldy or dried out! I've used both these and the mason jars with boveda humidity packs but to me the grove bags are a must and a go to fail safe!!! All you do is hang your buds upside down at 60/60 or 65/60 for 7-10 days or until the braches snap and make that noise. Thanks and as always stay safe, stay high, and stay blessed!


Likes
22
Share


@Strega
Follow
This is the last week 😍💚💚 I really want to say thxs to Sweet seeds for the wonderfull seeds. I love my mandarine and now, when this grow is at the end, I just have to wait


Likes
31
Share


@The_Doctor_Green
Follow
Esta semana fue bastante positiva en el desarrollo de la planta,los riegos con un ph más bajo y la ec en valores óptimos, lograron mejorar un poco el color de las hojas.Tambien a los nutrientes que veníamos regando se le sumo el big bud, veremos que es lo que pasa en el transcurso de la siguiente semana.
Creo que en términos generales la planta va creciendo saludable. 🤞🤞😅

Likes
4
Share


@xANICx
Follow
“Everything is going great, but my big problem now is that all three plants are in different stages—one of them feels like it’s three weeks ahead of the others. But apart from that, everything is perfect and I’m very satisfied so far. I think for my next grow, I’ll switch to photoperiod plants, since I can control them a bit more than autoflowers. But for my second grow ever, I’m already really happy with how it’s going.”

Likes
16
Share


@DrAnandamida
Follow
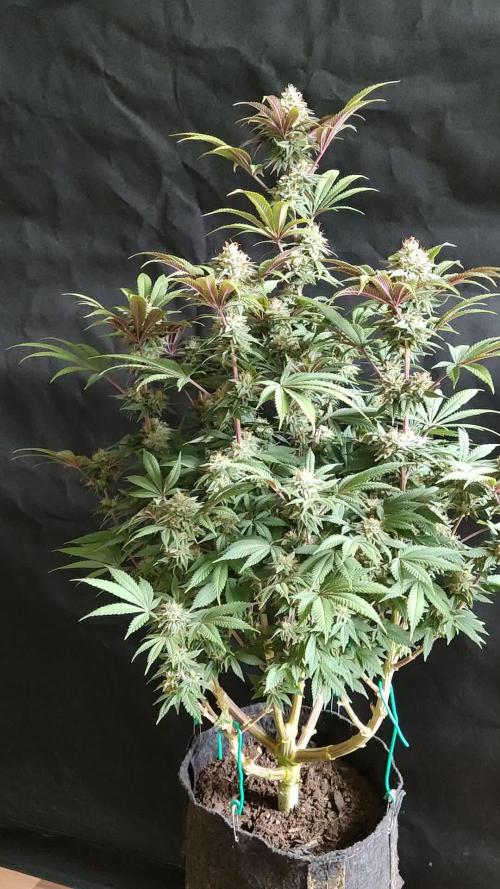
La floración sigue su curso y nos sigue regalando colorido y aroma para nuestros sentidos. El contratiempo con las pequeñas orugas solucionado y parece que el proceso sigue "viento en popa y a toda vela" 🌬️🌿 Los pistilos han inundando toda la planta y siguen aumentando su tamaño. Además, algunos pistilos van adquiriendo un tono ámbar. Las flores continúan oscureciendo, las hojas y sus tallos ya muestran un claro color rojizo/púrpura que tiende rosáceo con la luz directa. 🌿 El tallo tiene un tamaño y consistencia considerable, alcanzando una los 42cm y la otra 50cm. Se perciben bastante mejor los aromas de las floración. Seguimos aumentamos la cantidad de agua, progresivamente, según van pidiendo/necesitando las plantas. Se están amarilleando parte de las hojas inferiores 🍁 Si no me fallan los cálculos, se debe a la falta de nitrógeno pero no le añadiré porque ya debe está en las últimas semanas 🤞😅
Sigo intentando no utilizar ningún tipo de "ayuda extra", salvo la tierra enriquecida de BioBizz All-Mix donde están plantadas. Seguimos con el agua mineral, luz solar, mucha paciencia y mucho amor!🤞😍 Aunque para controlar la aparición de pequeñas orugas he añadido: 20g de tierra de diatomea (Diatical de TRABE), directamente sobre el sustrato (1-2 veces/mes y se puede aplicar en cualquier momento del cultivo). 50ml de Super Kukulus (fitofortificante ecológico)/1 litro de agua para riego foliar, tanto en el anverso como en el reverso de las hojas (2-3 veces/sem y se puede aplicar en cualquier momento del cultivo has 2 días antes de la cosecha)... Y lo mejor es que FUNCIONA! 💪😅


Likes
10
Share

@WaffleTerps
Follow
Flowering Week 6 – wrap-up and transition into Week 7
We’re closing flowering week 6 with a very solid overall state: stable plants, buds stacking consistently, and a clear increase in resin production. The main goal this week was to finish the active bulking phase, keep metabolism high without forcing, and set everything up properly for the transition into maturation.
🌱 Environment & lighting
Throughout the week, conditions were kept very stable and within optimal ranges:
• Day temperature: 24–25 °C
• Night temperature: 18–19 °C
• Relative humidity: 50–55 %
• Day VPD: ~1.30–1.35 kPa
• Night VPD: ~0.95–1.05 kPa
• Average PPFD: 900–930 µmol/m²/s
• Ambient CO₂: ~550–600 ppm
These parameters allowed efficient transpiration, proper nutrient uptake, and the beginning of color expression without slowing down bud development.
⸻
💧 Irrigation schedule (exact recipes)
Base feeding (no PK) – 22 L
• Sensi Cal-Mag Xtra: 30 ml
• Bio·Grow: 6–6.3 ml
• Bio·Bloom: 115–133 ml
• Top·Max: 23 ml
• Bio·Heaven: 21 ml
• Bud Candy: 38 ml
• Atazyme: 25 ml
• EC: ~1.55–1.60 mS
• pH: 6.3
PK feeding (single, targeted application) – 22 L
• Sensi Cal-Mag Xtra: 30 ml
• Bio·Grow: 6 ml
• Bio·Bloom: 115 ml
• Top·Max: 23 ml
• Bio·Heaven: 21 ml
• Bud Candy: 38 ml
• Atazyme: 25 ml
• PK 35/60: 6 ml (pre-dissolved)
• EC: ~1.64 mS
• pH: 6.3
End-of-week adjusted feeding – 22 L
• Sensi Cal-Mag Xtra: 25 ml
• Bio·Grow: 5 ml
• Bio·Bloom: 105 ml
• Top·Max: 22 ml
• Bio·Heaven: 20 ml
• Bud Candy: 36 ml
• Atazyme: 22 ml
• EC: ~1.37 mS
• pH: 6.2
PK was applied once, at the correct moment, as a metabolic trigger. It will not be repeated.
⸻
🔍 Current plant status
• Calyxes are still swelling, not fully closed yet.
• Trichomes are mostly milky, with clear room for further maturation.
• Slight yellowing on some leaf tips, normal at this stage due to high demand and controlled senescence.
• No active deficiencies or nutrient lockouts observed.
⸻
▶️ Next steps
We’re now entering flowering week 7, maintaining stability and precision.
Over the next few days, we’ll start working with controlled drainage during irrigations to balance the substrate and progressively guide the crop toward the final stage, without aggressive flushing or rushed decisions.
📲 Daily content on Instagram, with real-time updates, photos, and videos of the grow.


Likes
5
Share


@Insaniac_0
Follow
Thank you.
Growing cannabis is an art that seems to evolve as you learn it. While it may only take a little knowledge to get started, It seems that this may take a life-time to perfect (doubt I'll ever make that category, but I will certainly try).
So thank-you to the community that Shares, Comments, Follows, and Likes. Your efforts in any of these actions make these journals a worth-while and perfect way for us all to learn and track our efforts. I personally appreciate it.
Also a huge Thanks has to go out to Grow Diaries for making this community even possible. Your efforts to supply the data storage alone is more than enough, but you the fact that you dont stop there and constantly try to improve the experience even more makes this my favorite community to to share on.
And then lastly, but certainly not least, a heartfelt Thank-you to Royal Queen Seeds for your branding/research while making these seeds available to people like me. It gives me confidence in knowing that I am working with great genetics before I even start my grow.
----------------------------
Germination Start and incubation period 3/12/24 to 3/26/24
Transfer Day to Veg Day 6
3/27 to 4/2
Germination:
First note was about the appearance of the seeds. They were smaller than I am used to seeing, but no damage or deformities and look to be in good shape. Germination took 14 days from dropping in water to transplanting into 1 gallon pots. 23hours in a glass of 6.3ph room temp RO water. 2 cracked open a little and I placed them both in paper towels wet with the glass water and pasted to the sides of the glass for 2 days then checked, no progress. So I freshened the water then waited another 2 days and checked, little to no progress. Then checked again 1 day later and finally was able to move them. One looked fully ready and the other seemed less ready. I placed in rapid rooter pods and closed with toothpick tips. 1 popped out of the pods in 1 day but the other did not. So I gave it 1 more day and started my spare seed. After 4 days of water and towels I replaced the dead pod with a growing sprout. Transplant occurred on 3/27
Veg Day 0 to 6
1gal hard tall pots. Transplant went well. The sprouts are smaller than I would like and seem to be stubborn in growth to start but hoping htat changes with soil. One pod was overgrown in the pods and Im hoping it doesn't reflect in the overall plant production.
Video:
Transplant ease.
Transplant to 1 gal pots:
I am using a 50/50, 50%perlite/50%soil with a .5lb of dolomite lime and a .5ml of flora micro added to .5 gallon of RO water (Im mixing 2 gallons of soil total so the water to soil ratio is 1/4 of the total medium volume) to achieve a soil tested ph of 6.4. I am using a 50/50 soil/perlite mix because I plan to use these in auto pots. I also used about 1 cup of the same soil mix water to pour around the plant after transplant; you can see how the perlite rises to the top where I did this. I sprayed two domes and covered - I plan to leave covered for the first week.
Feed:
I kept them under the domes and sprayed every day that I didnt feed them, to keep humidity up while I let them find water in the soil. By the end of the week I took the domes off and took pictures.
Feed this week was another 1 cup of 6.3ph water 5 days after transplant.
Feed plan next week will increase the amount to 2 cups of plain-no-nute water with about 4 days between feeds. I want to see the water run through so if I need to use more than 2 cups I will. The idea is to water deep and through, but then make them search for more before the next feed, hopefully spreading the roots out while doing it.
Veg Plan:
I plan on 8 colas for each plant. So that will be 3 topping days and a total of 7 cuts.
I will want to cut the first time on day 21 if I have 5+ nodes. I will transfer to 5 gallon auto pots with-in 1 week of the first topping. Once I have 3 nodes of new growth past the first topping, I will top those two branches to the first node again. (that's 3 cuts total by this point) Then, after 3 new nodes of growth after that, I will do a last topping on the 4 branches. (4 new cuts added to make a total of 7 cuts and 8 colas)
I will train the branches using LST/HST with tie downs as soon as I can after the first topping day to help maintain the branches growing where I want them to. I will also introduce an adjustable tomato ring after they have settled into the 5 gallon forever pots to provide support and mobility
Hopefully all goes well, and I will have 1 to 2 weeks of growth before flip after week 8.
I think it sounds more ambitious than it really is, but if you follow this journal, we will see together.

Likes
7
Share


@Evil89
Follow
Here we are with the 5th (and last) week of veg!
Finally I transplant the Queens in their definitive home.
Queen #5 wants to be different, so she decide to top herself in a particular way. I really like her shape and all the branches all around!
I have to change the light setup for the flowering stage, but I don't know if the box will be able to hold up two cooltube reflectors: I hope it won't implode for too much weight.
See you for the 1st flowering week :)


Likes
5
Share


@Lazuli
Follow
Final 2 weeks when the soil is dry i will pour finalpart trough it for a nice fade


Likes
55
Share


@MistaOC
Follow
06.05. Day 100
60 Days of flowering
Harvestday
May 6th — what a day. Back from vacation in the afternoon and wrapped up the Grow Cup in the evening. It was a long, exhausting day, but one I’ll never forget. Those five legendary ladies made it truly unforgettable!
Likes
9
Share


@Nruperti78
Follow
This is the first aerogarden grow I’ve done that I actually had to remove the light and place it in the closet with my other plants. Had a little foxtailing because of that but a great grow otherwise.

Likes
18
Share


@BufoAlvarez
Follow
Saw first amber trichomes today and im sure there are more that i missed. But I feel they are behind, keeping eye and will most likely be a few more weeks.

Likes
12
Share

@Borberad
Follow
Woche 8
Sie ist wirklich fast. Das Blümchen streckt sich fröhlich, und die ersten Blüten haben sich bereits entwickelt. Beleuchtung weiterhin bei rund 36 DLI.


