The Grow Awards 2026 🏆 


Likes
Comments
Share
@Creme_De_La_Creme
Follow
day 70 was harvest day !!
really fast strain, 24h light ON really played a big role as well
frosty buds and amazing strawberry smell, now lets dry it !!

Likes
40
Share
@KingSalomonsWeed
Follow
Hallo Tag 55/29 Blüte.
Sie lebt!
Ich denke der Ertrag wird sich zwischen 1,5-2 kg trocken ergeben.
Die Knospen sind jetzt schon so gross wie Tennisbälle.
Sämtliche Knospen sind so Klebrig, das mein Insektenproblem beendet ist.
Wie Sonnentau fängt sie die Insekten und verdaut sie.

Likes
12
Share
@Chubbs
Follow
Weekly update on these big girls. I decided to take out some of the lower branches, giving more airflow at the top of the pot level. Overall they've exploded with growth this week. I'd say they're getting close to 4ft tall. I sprayed some BT spray for ipm this week since I don't want catapillers showing up unannounced. All in all Happy Growing.
Likes
11
Share
@Ninjabuds
Follow
The Blackberry moonrocks plants are beasts. They're so thick and sturdy, and they're covered in buds. They're not stretching much, so it's gonna be a really tight bud on top. I'm excited to see how they turn out.
Well, it's Christmas again. This year feels a little different, though. Maybe it's the snow blanketing everything, or the way the tree lights up the whole living room. Either way, it's cozy and warm, even when it's freezing outside. I'm really looking forward to seeing what Santa brings. I hope I get that new video game I've been wanting. But most of all, I can't wait to spend time with my family. We always have so much fun
This past week was a good one for the plants. They started the first week of their stretch, and they've already grown a decent amount. I can really see them filling out. It's cool to watch them grow so fast. I can't wait to see how big they get by the end
I always get a little worried at this stage, like they're not gonna get as big as I want them to. But then I remember how they always end up surprising me. By the end, they're always perfect.

Likes
9
Share
@Canadian
Follow
Day 50 and the plant seems to be growing very fast very strong .not too much leafs which is a relieved and very nice for light penetration but be aware with the flowering stretch if your lack of Headroom other than that the plant seems to be growing without any problems developing a very lovely smell.
Day 53 I have to Super crop several branches Unfortunately they were growing straight into the light becoming burned by the intense light I hope the plant doesn't react to bad to HST and still deliver awesome buds. Also I will stop to give her any nitrogen nutrient like the micro and the grow and I will only gave her the bloom and other additives when I feed.
Thank you for reading I will continue to update have a happy grow

Likes
14
Share
@NuttyYeti
Follow
This is my second Big Bud grow but my first outdoor grow. The buds aren't as dense and the indoor with my CO2 bag. The bud is still very potent though.

Likes
3
Share
@Nikki78
Follow
Das wars. :) Habe nun geerntet und die Pflanzen 8 Tage in der Hazelbox getrocknet. Ich habe mit den Titan Samen am 5. Oktober (Seeding) angefangen und bin praktisch am 1. Januar mit Trocknung fertig. Das ist wirklich super schnell. Die Pflanzen hatten zum Schluss ca. 60-65 cm Höhe. Die Pflanzen hatten richtig, richtig viele Blätter, was man auch beim Schneiden nochmal gemerkt hat. ;) Ich habe getrocknet 176 Gramm aus den 3 Pflanzen insgesamt. Die Buds sind richtig fest und klebrig.
Es riecht sehr süßlich (bisschen in eine Bubble Gum Richtung) und die Buds glitzern sehr stark. Eine tolle Genetik. Für diesen Grow habe ich wenig Zeit und Arbeit reingesteckt. Die Erde ist vorgedüngt, das Bewässerungssystem funktioniert, die Box macht die Programme automatisch. Ich musste also nur maximal 2 mal die Woche den Tank auffüllen und ein bisschen extra gießen. Kaum Arbeit, aber ein echt solides Ergebnis in der kurzen Zeit auf so kleinen Pflanzen

Likes
17
Share
@Naujas
Follow
it's amazing, this growth looks much better than my first attempt, my decision was to put a smaller pot and change the light - the girl really liked it, FastBuds goriilla cookies with a small space manage perfectly:).
Likes
10
Share
@Chubbs
Follow
Week 6 update:
What up Grow family. These testers are growing fast and strong. Where in week 6 now and the swelling and ripening of flowers are going amazing. Still feeding 500ml/16oz daily as I've found that's the sweet spot for 3gal fabric pots for these. I'd say these probably have about 2 weeks left until they'll be finished.
All in all Happy Growing.
Likes
47
Share
@FreddyGrows
Follow
This is gonna be the last week of my babies.
Monday i gave them 10L water with sugar royal that was the last time they het anything.
From now on straight water with lowered ph to under 7
Anything between 6.3 and 7 ec is oke always worked good for me.
The buds are very sticky,some are bigger then others but overall very very nice.
Some look fuckin frosty as fuck cant wait to taste sum.
*********************edit************************
After questioning my own methods i found out that i better keep going on with 2 weeks more of flowering. So this week i just keep giving them the nutrients and from next week on i will be flushin them
!!!!Thanks everybody for answering my questions !!!!
!!!!Thats what we call love man!!!

Likes
5
Share
@GanjaGecko
Follow
Alle 5 Samen wurden in ein Glas mit Wasser und 2 Tropfen Seedbooster von Plagron für ca 20 Stunden eingelegt. Nach ca 20h im Wasserglas ging es für die Ladys in kleine Anzuchttöpfe. Nach 3 Tagen in den Anzuchttöpfen haben 4 Ladys und nach 4 Tagen hat dann auch die 5 Lady das Licht der Welt erblickt. Nächste Woche werden die Ladys dann in jeweils 8l Stofftöpfen Platz finden. Durch die kurze Vegetation sollten die 8L Töpfe ausreichen. Die 4 Ladys die den stabilsten Eindruck machen und sich am meisten im Wachstum ähneln werden behalten.
Das Substratgemisch besteht aus ca 70% BioBizz Lightmix und ca 30% Cocos mit Perlien. Ich gebe bei dem Run etwas mehr Cocos hinzu damit das Substrat noch etwas luftiger wird und die Ladys es etwas leichter haben ihre Wurzeln zu bilden und damit vielleicht einen kleinen Wachstumsschub zu erhalten.
Auf das ganze kommen dann noch ca 10% Megaworm von Plagron und ein wenig BioGrow das es den Ladys anfangs an nichts fehlt.
Die Ladys haben leider etwas weniger Zeit für ihr Wachstum, weil der Contest zeitlich begrenzt ist. Der letzte Grow hat leider auch etwas Zeit in Anspruch genommen. Mal gucken, ich hoffe das es reicht. Mit FarRed als Einschlafhilfe in der Blütephase kann man vielleicht ein paar Tage einsparen.
Ich hoffe auf das Beste. Am Ende muss man ja auch etwas Glück mit den Phenos haben.
Angegossen wurde mit 1g/L BioEnhancer und 1ml/L PowerRoots. Der ph-Wert wurde vor dem gießen auf 6.0 korrigiert. Jede Lady bekam für den Anfang ca 30-40ml in die Anzuchttöpfe.
Mit einer kleinen Heizmatte und den Kuppeln auf den Töpfen wird für das warm/feuchte Klima gesorgt, das die Ladys anfangs benötigen um zu keimen.
Am Tag an dem die Ladys das Licht der Welt erblickt haben, kamen die Kuppeln ab und die Ladys spüren dann auch ihre ersten Luftzüge.


Likes
12
Share
@The_Good_Twin
Follow
The harvest of my dear Stella was supposed to happen on August 4th, but didn’t begin actually until August 9th. I decided to allow her to dry out a bit before beginning the harvest, but I had some other difficulties which made her dry out a whole lot before I ever even got started. You can tell how dry by looking at the pics and video. Luckily, the dryness was limited to her larger leaves.
She was already quite dry on the 9th when I started, and was more so by the 12th when I finished. Even after the advanced drying, her wet trimmed weight was still quite a bit. I’ll list the weights all together in a bit.
It took 4 days to get the whole plant trimmed, weighed, and hung up for final drying. She was hung up from August 12th till Friday, August 19th. I got busy harvesting another plant while she was hanging up, and just let her be.
On August 19th I took all of her branches down and removed the buds to get the true harvest weight of her buds alone.
Let’s get to the weight of the whole thing. The overall wet-trimmed weight of the plant was 18.329 ounces with the buds and branches combined.
I was a forgetful idiot and forgot to get the weight of the dry buds on the branches before removing the buds. So all we’re left with is the actual harvest weight of the dry buds alone.
The overall dry bud weight, or actual “true” harvest weight of the smokable bud is: 7.317 ounces. That’s a wonderful amount of freshly harvested bud to cure.
All of the buds were put into 8 quart sized jars filled roughly 3/4 full, and 1 pint sized jar, also 3/4 full.
Each jar has a hygrometer as well as 58% bóveda packs to help aid the curing process.
This is the 2nd DarkStar plant I’ve harvested, and both were very large plants. I used a scrog method the first time with a net that spread the whole plant out taking up the entire 4x4 area of the tent.
This time I wanted to let her grow more naturally. She got so large that I had to bend almost all of her taller branches over using HST methods. I had to bend 3-5 branches over more than once. By doing that, once her buds began to fatten up she got too heavy and needed to be supported just to stand upright. Toward the end she had to literally be tied up to the side of the tent.
Stella (DarkStar) was a wonder to grow, and she gave me a good amount of clones that will soon be harvested themselves.
It has been a journey with Stella, and I’m happy that the journey is now complete. Happy growing everyone!


Likes
35
Share
@Ganjagrandaddy
Follow
Yay! video is back up again..
Day 22 flowering: Well what a week this has been for the Amnesia Haze. She began the week intact and showed the many bud sets throughout her frame. I have been waiting until day 19 to defoliate her and get as much of the light down lownas I can
she has some perfect stacking developing now and all of her quadded limbs are top to base with flowering sites. Her speed and progress has been excellent from the off and I am now preparing to run 3 Sweet Seeds Autos of this strain with their Amnesia Haze XL alongside 3 Gorilla Girl XL and 3 Sweet Cheese XL , I cannot wait to see what these genetics can throw up.
The amnesia has got a nice fruity smell starting to be noticeable as i open the tent. She is 3ft across inn parts and has a lot of mains vying for top spot . I am hoping she will be a great yielder with the way I have trained her out.
She is feeding well and not showing signs of any issues at all so its a head for the finish line now in about 5 weeks time.
S.a.d is alive but not looking the best still , she is in flower but her initial poor start has effected her too much. power toner for keeping going though, same with the red hot cookie really. gutted to have lost so many in the heatwave issue and be left with so few to show this breeders genetics. Thankfully the Amnesia will be a star and the next Sweet Seeds run will be a roaring success.
Until next time . Be safe and well.
Thanks for the visit.

Likes
24
Share
@Newbiegrower420
Follow
Day one of week five! 19th September!
Small amount of defoliation today as some leaves had been laying on the soil and were turning yellow. Other than that the girls look good I think. A little more LST but think Ive got a good even spread so far.. 🤞🏼
Nutes gone in today Biobizz: Grow/Bloom/TopMax all at 1ml per litre..
Day 3 of week 5! Update 21st September:
Nutes gone in again today BioBizz Grow/bloom/Top Max all at 1ml per litre...
Starting to see signs of filtered water deficiencies so CalMag going in on next feed @ 1ml/l. Wasn’t sure if my water filter was much cop but looks like it’s better than I thought. Wish I’d gone with my gut and started the CalMag earlier! Other than that I’m giving them a couple more weeks of veg and then we’re going to flower 🌷 all being well 🤞🏼❤️
Day 4 UPDATE: 22nd Sept.
More LST to keep things all the same height and encourage more new growth sites..
Day 5 UPDATE - 23rd Sept:
Last lot of Nutes for the week - BioBizz Grow/Bloom/Top Max @ 1ml/l and now that CalMag has gone in @ 1ml/l I’m hoping to not see anymore brown spots on my leaves 🤞🏼🍁
Happy growing everyone!! 🍃 🍁

Likes
20
Share
@Frank_cultiva
Follow
Las hojas están con manchas, creo que fue a causa del último riego con nutrientes, no fui cuidadoso y llegó de esa agua a las hojas... A causa de eso también quiero prevenir una sobrefertilización y está semana he decidido no regar con nutrientes, sólo con Bio up para subir un poco el pH del agua... A pesar de las hojas con manchas creo que van bien con el crecimiento teniendo en cuenta que esta es sólo mi segunda experiencia cultivando.
Se me olvidaba mencionar que las pasé a su nuevo hogar esperando un mejor desarrollo para ellas

Processing
Likes
4
Share
@mikolajgrows
Follow
Growing good, haven't noticed any worrying signs, RP is happy I guess in it's tent ;)
Likes
Comments
Share
@Lewdawg11
Follow
8/8/24
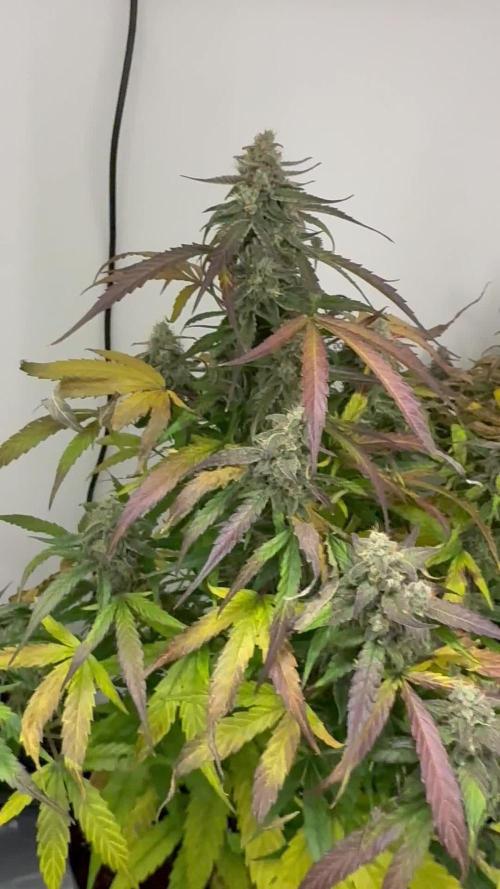
New leaf growth starting to turn purple. Not sure if this is bad or not?!
Buds are getting bigger
Likes
12
Share
@SSKNFbyHAZE
Follow
** COST **
TO RUN
- Used previous ⛺️ setup : $0.00
- Monthly electricity : $36.73 <-- other ladies sharing ⛺️
- 1 Gallon Fabric pot : $0.10
- Bonsai wire : Apx. $0.03
- Reused soil from last run : $0.00
FOR NUTRIENTS
- Jadam Microbial Solution : $0.00
- Fermented Plant Juice : $0.00
APPLYING
- JMS : 30ml / 1 Litter
- FPJ : 30ml / 1 litter
TOTAL COST : $36.86
Throughout the week, I give JSM, and fermented plant juice once each ^^
Hope you guys have a wonderful day today ^^v
*** Please Like, comment & share ***
Highly appreciated -----/-----<@

Likes
16
Share
@Geili_Seili_fireinfireout
Follow
Wir neigen uns dem ende zu.
War ein kleiner kampf mit den ladys. Da ich eher mit einer sativa gerechnet habe. Aber ne indica bekahm.😅😅 somit hab ich sie leider 2 wochen zu früh in den 12/12 modus geschickt. Das nächstemal weis ich beschrid😋😁😇
Aber alles in allem bin ich zugrieden. Duften seeeehr lecker und obwohl so klein. Schaut es aus als ob sie trotzdem ein wenig etwas abwirft.
Werd sie sicher bald weeder fahren. Aber dann richtig😁😇😋
Die besten und saubersten stecklinge gibts wie immer bei ROOTS-FARMS. the best in austria and maybe europe👌💚🌱
