The Grow Awards 2026 🏆 


Likes
43
Share
@TheBulldozerSicily
Follow
Questa settimana non abbiamo aggiunto ne acqua ne nutrienti, abbiamo controllato sempre ph ed ec e sono sempre corretti, fatto il secondo e ultimo trattamento contro OIDIO, la settimana prossima passiamo in fioritura, cambieremo la soluzione quando inizieremo a vedere i prefiori.
Per il momento sta andando tutto bene,
Mercoledì 14/02/2024
Inizio controllo ec 1607 ph 5.5
Aggiungiamo 30 lt acqua osmosi
Ottenendo ec 1208 ph 6.5
Aggiungiamo nutrienti per 40 lt
72 grow 48 micro 24 bloom
40 sensizym 40 calmag 40 rhino skin 40 bud candy
Ottenendo
Ec 1972 ph 6.5


Processing
Likes
Comments
Share
@Greenbean15
Follow
Growing really well, still think this one will be my heaviest yielding! She’s covered in a thick resin and continues to push pistils out, this one may have the density I’ve been trying to get. I think I’ve finally figured this strain out, looking forward to the bud off this girl.
The bud that was pollinated is beginning to yellow, I will likely go ahead and snip that off towards the end of the week when the seed pods begin to open but before the seeds actually drop. Some of the other plants that had buds that were pollinated have already been harvested for the seeds. I left the remainder of the plants to finish up.
Likes
11
Share
@McShorty
Follow
Another week gone by and the plants are growing nicely. I had some yellow coloring of the lower leaves at the beginning of the week and so i increased the fertilizer a little bit and the plants are responding well so far. Since they are in the bigger pots i also dont need to water them every day anymore, this week i only watered them twice.
I also picked some of the lower leaves which dont receive so much light anymore, topped the remaining strains and tried to bend down some of the branches with some garden wire but didnt work as good as i hoped it would. i still have a scrog-net which im going to use later, but i think the plants are still too small. in the future im going to try different techniques and materials, for now i'm not going to overthink it and just let them grow now,.


Likes
69
Share
@Natrona
Follow
*****DIVINE SEEDS *****
*****FRACTAL*****
SPONSORED GROW
Week 4 This week 4/28-5/4
Germination April 6.
Week 1 water only
Week 2 water only
Week 3 added recharge and TPS1 increased ppm to 570.
Week 4 continues with recharge and TPS1. I added Fox Cal mag increasing ppm to 685 - 805.
5/1 That was a fun feeding week. I got heavy handed with the TPS1 which put the ppm to 1600= so I had to dilute with more water which changed the ph. So I carefully added the smallest amount oh PHdown..then the PH was 5.08 so then added ph up. Oops too high, let’s try again. Ok finally within range with 6.02. Am I the only one??
Hopefully next week I have better control on the nutes.
With my AC controller in charge of the humidifier, I must add 3-4 gallons of water a day. (Getting my lifting exercises in regularly).
Girls are fed 2 liters of water every other day.
Nutrients: TPS1 7ml per gal
Recharge 5 ml/gal
Fox Cal-mag 5 ml/gal
Took pics /51 and 5/3 which show the vigorous leaf growth after only 2 days following defoliation and training. Divine Seeds recommends keeping its Fractal profile wider and flatter. To achieve this, I am aggressively pinning down each branch coming off the main stalk while defoliating regularly to keep the top open. Today 5/4, she is only 9inches tall but has a beautiful, mounded canopy showing multiple bud sites.
With my upcoming vacation, I am going to be hardening off these ladies to relocate to their outside location.
Until the plants are big enough to go outside, I will be using my AC Infinity tent and equipment. Once outside, I will be watering with well water and recharge and any additional fertilizers or amendments will be determined at that time.
Thank you @DivineSeeds
Thanks for the likes and comments, I appreciate all the plant love💚.
Have fun & love what you grow 💚
Sending love and light 💫
💫Natrona 💫***FRACTAL***
Rating:
Fractal is an especially psychedelic strain that Divine Seeds developed for esoteric and mystical experiences, meditation and creativity. A potent and vivid landrace variety from Southern India was crossed with a sticky leaning Indica (mostly Afghani), then Skunk #1 joined this company. Their progeny underwent multiple selection experiments, until its massive built, resin concentration and hypnotizing powers reached an ultimate level. The result is now known as Fractal – resinous, spicy and productive. Best choice for commercial growing: a compromise between bigger yields and fast ripening! A great source of hashish that has something incense-like to its musky smell.
Indoors expect 170 сm height, out of doors plants grow up to 200 сm. Fractal fits for all types of growing environment: grow boxes, hydroponic or aeroponic setups, outdoor plantations, balconies, terraces and green houses. For more weight it is recommended to train Fractal plants to broaden their structure and limit their vertical growth. For that purpose use ScroG or SoG, LST, FIM or topping, supercropping or mainlining – there are no limitations for the strain itself, but certainly low-stress methods are recommended to smaller samples. Fractal has an inherent immunity to molds and insect pests, but since its colas are thick, protect your plants from stale air. Also during rainy weeks your plantation may need to be covered. Ready for outdoor harvesting in October. Big and dense buds the color of olive, hunter green heavily coated with crystals.
Whole Fractal buds smell hashy and earthy, while cedar and fruity hints are noticeable on breaking. Measure your portion carefully: the potency is above average! With Fractal you experience an overall stoning that either keeps you put or slows your motion down, also vertigo is possible. However, in moderate dosage the impact is described as a pleasant sensation of well-being and placidity. Perfect for spending a night by a bonfire without talking, therefore is more often enjoyed as a solo smoke. Efficiently relieves muscle spasms and seizures, inflammations, combats insomnia and increases your appetite. Up to 3 hours of altered state of mind can be expected. Best consumed at night time.
Pots: 5gallon Air pots
Soil Fox Farm Happy Frog Amended with worm castings, dolomite lime and mychorihiza
👉👉Seeds provided by Divine Seeds
Divine Seeds breeding company
The link to Fractal Feminized Seeds
Fractal - Divine Seeds breeding company
The link to Fractal Auto Seeds
Auto Fractal - Divine Seeds breeding company
=================================
Equipment: AC Infinity
CLOUDLAB 844 – Advance Grow Tent 48”x48”x80”
CONTROLLER 69 PRO – Grow Tent Controller
CLOUDLINE LITE 6 - Inline Fan 6"
IONBOARD S44 – LED Grow Light Board 400W
CLOUDRAY S6 – Oscillating Circulation Clip Fan
Carbon Filter 6”
Nutrients: Total Plant Solution
TPS1
Canopy
Signal


Likes
20
Share


Likes
12
Share
@Flavors
Follow
Everything is looking good. Continuing to water as usual. The Tropical Cooler had high PPM of nutrients so I flushed it. Other than that just checking the trichomes to see when I want to harvest. (4.2) Smell update Blueberry Swirl has a deep lemon smell, Fat Banana has a buttery lemon scent. Tropical Cooler still smells like a fruit salad that description is dead on! Lemon Haze x Gary Payton has a fruity smell with a lemony undertone. ( 4.4) Flushed all plants to about 250ppms (Parts Per Million) plan on harvesting soon. Have never flushed before bud smoke has been harsh previously so I’m giving it a try.
Likes
11
Share
@RegularWizardCo
Follow
Summer is happening at full speed so a short entry here. Getting close anyways so wont be too much to cover.
7/15/2024 Day 55
Temp: 70.3 F
RH: 64.3%
VPD: 0.89 kPa
Plant #1 Height: 37” inches
Plant #2 Height: 31” inches
Light distance 10” & 16”
I’m going to water 2.5 gallons an hour before the lights come on tonight I’ve already prepared my water jug with a half a teaspoon of bio-phos, about five ML actually put a little more of the elixir in today and then the Q so I put all those things in the water and will give it to him before the lights come back on.
7/17/2024 Day 57
Temp: 81.8 F
RH: 63.7%
VPD: 1.31 kPa
Plant #1 Height: 37” inches
Plant #2 Height: 31” inches
Did some work in the tent to try and alleviate some of the heat stress. Bent over the main cola to even out the canopy. Fed the regular feeding and some Oly Mtn Fish Compost.
Likes
10
Share
@Nimbus
Follow
Hello dude's
This week we are switching to 20 lt reservoir. A little training and defoliation. I am very satisfied with the development.
Keep in peace ✌️

Likes
9
Share
@HighKing
Follow
Defoliated them yesterday. Everything looks good so far. They are very hungry. Now I am going to wait for them to bounce back. I hope we will see some big colas 💪👍

Likes
5
Share
@Lagriculteur420
Follow
The two first topped plant show good start of flower but i don't think this will be my best run, i've started tobguve them more nutrients

Likes
18
Share
@DjDaveAtHome
Follow
Nov 9, 2019
Orange Juice (1) – Day 42 Veg/Day 0 Flower
(30% Indica/70% Sativa)
(63-70 days)
Blueberry Headband (2) – Day 42 Veg/Day 0 Flower
(70% Indica/30% Sativa)
(65-70 days)
Cheese (1) – Day 42 Veg/Day 0 Flower
(60% Indica/40% Sativa)
(50-60 days)
Plants got a strong tea as well as a final leaf strip and tie down to spread the canopy. Flipping today. 12/12. Drying the medium more. Day and night temps will go down by 5°F to 70°F at night/75°F during the day.


Likes
Comments
Share


Processing
Likes
20
Share
@Excalibur
Follow
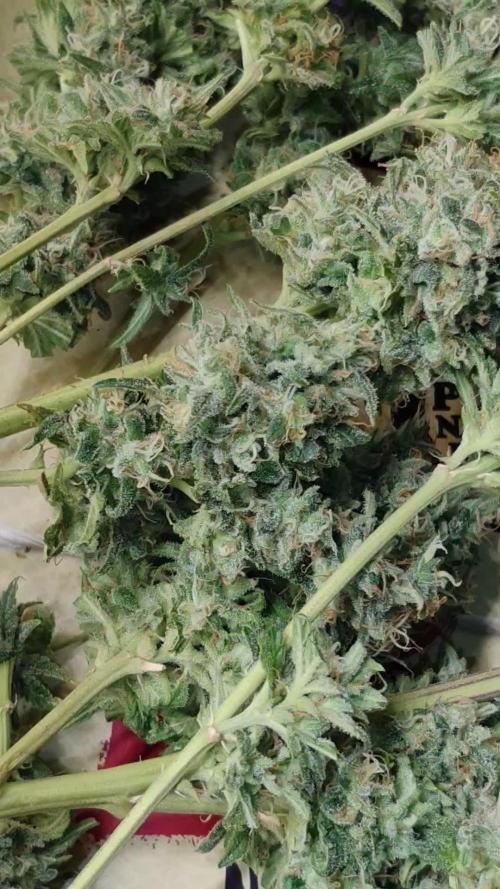
2nd October 2018 -
Day 99
Burn slows down
Third day of flush and she starts to thicken up.
Day 100 -
Sweet smell begins as she starts to mature.
Day 103 -
Begining to mture and dense.
Day 104 -
Water added and pH balanced 5.4
Day 105 -
Last week of Flush

Likes
5
Share
@DariaFarms
Follow
27/09: I just came back from a 3 day trip so I am just very grateful to see her alive! I immediately watered her (2L, ph 6.3). She is a bit limp and she has purple-ish leaves but I am going to try and figure out what is is and fix it :)
30/09: She just keeps getting more yellow & pink :/ I gave her 1,5/2L of water (ph 6.4) with all listed nutrients. I hope it will help her.
03/10: Gave her 1,5L of water (ph 6.2) with nutrients, she is smelling really nice :)

Likes
8
Share
@KingBong_Guerillas
Follow
Welcome the KingBong's first GrowDiary!!🦍🌱
The grow box is still being finished off but I'm happy with results so far. I'll be adding a custom carbon filter In the top corner and also a small intake fan low down... also a door!!
This is going to be a fun experiment hopefully you all enjoy ✌️🇬🇧
Processing
Likes
3
Share
@TheNug
Follow
recently discovered she is an auto aswell, so whats gonna have to happen is, this lil lady and the northern lights are gonna go outside when my criticals come in and start taking up room and then im gonna switch, itll allow the other indicas which are bushy as hell to get some bigness on get them and criticals mature enough to veg.
these AUtos the shortstuff and the Northern lights will do good getting the light from indoors till they need to be thrown outside where we got 16 hours plus of good light and some smashing conditions
