


Likes
Comments
Share




Likes
8
Share


@ktkoi
Follow
Day 30: Just got back from vacation, left the girls on their own for 4 days. Watered before I left, came back and they look fine. BL is at 19cm and PB is 10cm. BL's stem is getting thicker, and stray spiders and ants are becoming more and more attracted to her. Odour is still weak and no signs of flowering. I may have to keep an eye out on her leaves starting from now and consider adding some liquid fertilizer. While I was on vacay I kept them at 12/12 artificial light. Usually I give them 3hrs of supplemental sunlight on the windowsill.
Day 33: The foliage is starting to show signs of nutrient deficiency, spotting on the top leaves and yellowing on the bottom leaves on both plants. I'm adding a low dosage of orchid fertilizer and a bit of chamomile tea. Will also sprinkle some coffee grounds to the top layer of the soil. (7PM: I am seeing white pistils come out! Thinking it will start flowering very soon.)
Day 34: Sprayed with a neem solution last night night and turned on the fan. Removed the yellowing leaf, looked like a powdered mold growth, and seeing if the spots are from bug meals. Hoping that the fan and the neem will reduce bugs.
Day 35: The white spots definitely look like bugs taking bites out of the leaves. I'm going to spray her with neem daily and look out for critters now, and do all the rest of the household plants too. Started doing LST on PB as well. Looking forward to seeing BL enter her flowering phase as she is clearly pre-flowering now.
Day 36: Might have been a bit too intense with PB's first LST session, she needs some recovery. Good thing I can just keep her in vegetative for a while. Neem spray went well, no new leaf damage. BL has done her pre-flower stretch. Will be able to keep these girls pretty small. Landlord may visit this week so I'll have to hide them.


Likes
39
Share


@GrowWiththeBro
Follow
Growing & growing.
Watering about every 4/5 days now. I believe I had some deficiencies in the amended soil so I added some calimagic to the mix.
I felt I had some nutrient issues earlier in the week, so I used some epsom salt spray and it appeared to help a bit.


Likes
109
Share


@MadeInGermany
Follow
Welcome to the
Green House Seeds Company Cup 🏆.
Today is day 48 since the time change to 12/12.
Hi everything 🤗.
I can't describe how good it smells this week .
You have to try them yourself 👌.
There is nothing wrong with this genetic 😎.
The growth, the color, the smell and the buds, everything is perfect.
I can't wait to try it for the first time 😃.
This week she will be flushed, so that after the flush she still has 10 - 13 days to utilize the remaining energy.
Until then, I wish you a lot of fun with the new update, stay healthy 🙏🏻 and let it grow 🌱🍀
You can buy this Strain and Nutrients at :
https://greenhouseseeds.nl/
☝️🏼☝️🏼☝️🏼☝️🏼☝️🏼☝️🏼☝️🏼☝️🏼☝️🏼☝️🏼☝️🏼☝️🏼
Green House Seeds Company Cup 🏆
Type:
Wonder Pie
☝️🏼
Genetics:
Wedding Cake x OG Kush
👍😍
Vega lamp: 2 x Todogrow Led
Quantum Board 100 W
💡
Flower Lamp : 2 x Todogrow Led
Cxb 3590 COB 3500 K 205 W
💡💡☝️🏼
Earth: Canna Bio
☝️🏼
Fertilizer: Bio Grow Feeding ( GHSC ) , Enhancer ( GHSC ) , Bio Bloom ( GHSC)
☝️🏼🌱
Water: Osmosis water mixed with normal water (24 hours stale that the chlorine evaporates) to 0.2 EC. Add Cal / Mag to 0.4 Ec Ph with Organic Ph - to 6.0

Likes
47
Share


@Targona
Follow
29 days since my seed sprouted a little girl🌱
Fourth week of growth of my Dosidos Auto 💚⭐🌱
Nutrients:
Nutrients - transition to flower:
Plagron Alga Bloom is an organic flower fertilizer for growing in soil. The fertilizer is algae-based and contains amino acids, proteins and a balanced ratio of phosphorus and potassium 🌺
------------------------------------------------------------------------------------
Plagron Green Sensation is a flower booster. Green Sensation is a 4-in-1 product, so you don't need to add additional fertilizers. Suitable for all types of substrates and systems 💚💜💚
------------------------------------------------------------------------------------------------------------------
Bud Candy is a carbohydrate supplement from Advanced Nutrients that maximizes the growth and aroma of flowers. It supports strong root activity by providing food for beneficial microorganisms.
------------------------------------------------------------------------------------------------------------------
BioBizz Calmag is a 100% organic, but also vegan fertilizer with BIO certification. Biobizz Calmag was designed for professional growers and home growers who need an extra dose of calcium and magnesium. It contains added humic acid 💩☘️- I only apply it once a week.---------------------------------------------
Biobizz Bio pH-/ Biobizz Bio pH+ is a 100% natural and vegan pH regulator. Suitable for all types of substrates and crops. For use in growth and flowering. 💩🍋🌱
----------------------------------------------------
PRO-MIX CONNECT MYCORRHIZAL POWDER - for substrate
General:
Dosidos Auto 💚⭐🌱
The girl is already fully blooming 🌺🏵️, she is the most beautiful girl in the tent for me so far and if she continues to do well like this, she may even be among my TOP. She has beautiful green leaves, a thick main stem and branches. At the ends, the basis for large buds is already forming, the flowers are slowly joining and now long bud bases are starting to form. I'm really proud of her ☘️🌱
I use the new pH and EC meter Aqua Master Tools P110 PRO, the measurement is fast and accurate 👌 So far I've managed to keep the pH and EC as they should be. Although my EC has jumped a little more now, I diluted the watering so that the EC drops. I use Biobizz Bio +/- to correct it. The excellent mycorrhizal powder PRO-MIX Connect to support the roots certainly works very well. All the girls have been very strong and stable from an early age 💚🌿🌲
Training:
I did 2x defoliation and 2x LST to all the plants in the tent this week, so it was the same with Dosidos. The girl is a bit taller though and not as leafy 🍃

Likes
2
Share

@Ensign420
Follow
|»» LOG DISCLAIMER: Not intended as a grow guide. Grow log entries are usually posted 3-4 weeks later and are for my learning reference. ««|
Introduction - Week 23 Summary -
Ensign's log, stardate 17759.5,
Another grow week..
In the main tent, nothing but general checkups and straight RO water.
In the veg tent, been tending to solo cup waterings. Also transplanted rooted Coco Coins and topped the garden.
Furthermore, started the next grow cycle and cut more clones to begin my first breeding project.
Peace & Good Memories Father..
Onwards to next week..
[START OF WEEK 23]
==========================================================
---------- [ 3x3 VEG TENT - GR3 ] ----------
Heady OG BX1 #1 - WEEK 15 - Full Veg
TKO #2 - WEEK 05 - Full Veg
Chill Out OG #3 - WEEK 12 - Full Veg
Chill Out OG #2 - WEEK 08 - Full Veg
---------- [ 4x4 MAIN TENT - GR30 ] ----------
Chill Out OG #2 - WEEK 23 - Full Bloom Wk9
TKO #2-2 - WEEK 17 - Full Bloom Wk9
Heady OG BX1 #1 - WEEK 19 - Full Bloom Wk9
04/06/26 → 04/12/26 [WEEK 23]
This Week's Estimated Goals
----------------------------------------------------------------------------------------------
DLI: ~16 mol/m²/d
PPFD: ~400 μmol/m²/s
VPD: ~1.2 kPa
This Week's Meter Readings & Averages
----------------------------------------------------------------------------------------------
Light On/Off: 16:00 - 10:00 | Wattage: ~268.6W [LV03]
Distance From Canopy: ~[19”, 3”, 3”]
Plant Height: ~[33”, 49”, 49”]
Max Plant Height: ~52” [Lamp-to-Soil Distance]
DLI: ~14.73 mol/m²/d
PPFD: ~372 μmol/m²/s
VPD: ~0.61 kPa
Soil %: ~[53.7, 43.9, 47.6, 43.3, 50.0, 56.1, 49.0, 58.3, 50.7, 89.4]
==========================================================
Day 01 - Monday - 04/06/26 - Total Days: 152
-----------------------------------
Daily Averages ~[+01:00]
- Temps: 77.7°F [25.4°C]
- Humidity: 81.1%
- VPD: 0.61 kPa
- Soil %: [52, 41, 47, 41, 51, 57, 48, 59, 51, 88]
-----------------------------------
- [22:19]: Night check on the 4x4 tent.
--- Wow the garden is looking incredible and smelling even better.
--- The under canopy is looking great.
--- Harvest day is now 9 days away.
- [22:24]: Checked the Ecowitt soil moisture sensor data:
------------------ [ 3x3 VEG TENT – GR3 ] ----------------
------ 52% - [CH01 » M1 » VBL – Heady OG BX1 #1-1]
------ 41% - [CH02 » M2 » VBR – TKO #2]
------ 45% - [CH03 » M3 » VFL – Chill Out OG #3]
------ 41% - [CH04 » M4 » VFR – Chill Out OG #2]
----------------- [ 4x4 MAIN TENT – GR30 ] ---------------
------ 50% - [CH05 » P1 » FLT – Chill Out OG #2]
------ 57% - [CH06 » P1 » FLB – Chill Out OG #2]
------ 48% - [CH07 » P2 » BLT – TKO #2-2]
------ 59% - [CH08 » P2 » BLB – TKO #2-2]
------ 51% - [CH09 » P3 » FRT – Heady OG BX1 #1]
------ 88% - [CH10 » P3 » FRB – Heady OG BX1 #1]
--------- Veg: ~38%-45% | Flower: ~45%-55%
--------- General: ~30% [Dry] «| ~45-60% [Moist] |» ~70% [Wet]
- [22:38]: Checked the 3x3 veg tent.
--- Veg garden is looking great.
--- Two solo clones need watering.
- [22:44]: Here are the starting initial watering ranges:
------ Heady OG BX1 #1-2 » 255.4g → 335.4g
------ Gorilla Goat #1-2 » 294.4g → 325.4g
--------- General Weight Range: [Dry] ~275g «| [Dryback] ~300g |» ~325g-400g [Wet]
--- Both cups were last watered 2-4 days ago.
--- Took the starting weight of both clones before watering,
------ Heady OG BX1 #1-2 » 286.3g
------ Gorilla Goat #1-2 » 292.4g
--- While on a scale,
--- Evenly misted the top of both cups with RO water.
--- Did not spray the top growth.
--- Misted 10-20 sprays. Waited a moment, then misted again.
--- Repeated this process until both cups weighted at least 300g.
--- There was no runoff.
- [23:04]: Took the saturated weight of both cups after watering,
------ Heady OG BX1 #1-2 » 365.4g
------ Gorilla Goat #1-2 » 365.4g
--- Updated the wet weight and watering dates for both cups.
--- Placed both cups back into the tent.
--- Woah veg cuttings in the propagation tray look under-watered.
--- Misted each Coco coin with 10-15 sprays of RO water.
--- Also misted the top growth and added more RO water to the bottom drip tray.
- [23:19]: Checked the humidifiers.
--- Tanks are still full and no leaks found.
Day 02 - Tuesday - 04/07/26 - Total Days: 153
-----------------------------------
Daily Averages ~[+01:00]
- Temps: 77.7°F [25.4°C]
- Humidity: 82.2%
- VPD: 0.58 kPa
- Soil %: [52, 41, 46, 41, 50, 56, 48, 59, 50, 89]
-----------------------------------
- [20:39]: Night check on the 4x4 tent.
--- The garden is smelling incredible and buds are stacking weight.
--- The terpenes are definitely on the fuel-side (from fuel, earthy, floral, fruity/sweet).
--- Unfortunately based on terpenes, Chill Out OG is probably not for me. Although still have both the #2 and #3 as mothers in the veg tent.
--- More impressed with the growth of the #3 pheno which seems to express more broad-leaf growth (similar to the TKO #2 pheno) and may decide to flower her later. Will keep both mother plants for now, but unfortunately, probably won’t be breeding with them.
- [20:45]: Checked the Ecowitt soil moisture sensor data:
------------------ [ 3x3 VEG TENT – GR3 ] ----------------
------ 52% - [CH01 » M1 » VBL – Heady OG BX1 #1-1]
------ 41% - [CH02 » M2 » VBR – TKO #2]
------ 48% - [CH03 » M3 » VFL – Chill Out OG #3]
------ 41% - [CH04 » M4 » VFR – Chill Out OG #2]
----------------- [ 4x4 MAIN TENT – GR30 ] ---------------
------ 49% - [CH05 » P1 » FLT – Chill Out OG #2]
------ 56% - [CH06 » P1 » FLB – Chill Out OG #2]
------ 48% - [CH07 » P2 » BLT – TKO #2-2]
------ 59% - [CH08 » P2 » BLB – TKO #2-2]
------ 51% - [CH09 » P3 » FRT – Heady OG BX1 #1]
------ 89% - [CH10 » P3 » FRB – Heady OG BX1 #1]
--------- Veg: ~38%-45% | Flower: ~45%-55%
--------- General: ~30% [Dry] «| ~45-60% [Moist] |» ~70% [Wet]
- [20:46]: Checked the 3x3 veg tent.
--- Veg garden is looking healthy.
--- Clones don’t need watering and propagation cuttings are looking a lot better.
- [20:58]: Checked the humidifiers.
--- Tanks are still full and no leaks found.
--- With harvest 8 days away, have already started to plan out the next grow cycle which will also be my first long-term breeding project.
--- Need to ultimately decide on mother plants to breed to the keeper pheno of the Heady OG BX1 (#1).
--- As of right now, plan to do a full tent pollination in the main tent with 4 mother plants. Currently the mothers will be:
------ Heady OG BX1 [Mendo Dope Farms] (#1 pheno)
------ TKO [James Loud Genetics] (#2 pheno)
------ Garlic Budder [Humboldt Seeds Company] (original #1 pheno)
------ Gorilla Goat [Irie Genetics] (#1 pheno)
Day 03 - Wednesday - 04/08/26 - Total Days: 154
-----------------------------------
Daily Averages ~[+01:00]
- Temps: 78.8°F [26.0°C]
- Humidity: 81.6%
- VPD: 0.62 kPa
- Soil %: [53, 41, 48, 41, 48, 56, 49, 58, 50, 89]
-----------------------------------
- [16:05]: Evening check on the 3x3 veg tent.
--- Veg garden is looking great.
--- TKO #2 needs watering.
- [16:09]: Here is the starting initial watering range:
------ TKO #2 » 252.5g → 335.5g
--------- General Weight Range: [Dry] ~275g «| [Dryback] ~300g |» ~325g-400g [Wet]
--- Been 3 days since the last watering.
--- Took the starting weight before watering,
------ TKO #2 » 252.5g » 284.9g
--- While on a scale,
--- Evenly misted the top of the cup with RO water.
--- Did not spray the top growth.
--- Misted 10-20 sprays. Waited a moment, then misted again.
--- Repeated this process until the cup weighted at least 300g.
--- There was no runoff.
- [16:22]: Took the saturated weight after watering,
------ TKO #2 » 252.5g » 365.7g
--- Updated the wet weight and watering date.
--- Placed the cup back into the tent.
--- Going to start cutting clones for the next grow cycle.
- [16:47]: Filled a measuring cup with 1 cup of RO water.
------ Added 1/8tsp of Horticultural Aloe
--- Mixed the solution and poured it straight into a clear solo cup.
--- Placed the PVC rig into the cup just above the aloe water.
--- Okay! Time to take the cuttings!
--- Using a pair of clean trimmers,
- [17:35]: Cut several clonal cuttings.
--- Only need one cutting to root, but took extra cuttings of each cultivar.
--- Made sure to trim most of the branches leaving a top node or two.
--- Did not cut any leaf fingers and made sure to cut the tip of the stalk (about 45-degree) before placing each cutting into the cup of aloe solution.
--- Made sure each tube on the PVC rig had the correct names labeled.
- [17:36]: Also topped and defoliated the entire veg garden.
--- Mulched the trimmings.
--- Placed the cup into the veg tent.
--- Have the cup resting on top of the drip tray (front center pot).
--- Will change the water out tomorrow and plan to start rooting in two days.
--- The current rooting Coco Coin cuttings probably need to be transplanted into solo cups by now.
- [17:44]: Checked for roots and all Coco Coins had roots.
--- Going to transplant one of each pheno.
--- Planting into clear cups with bottom holes cut out for drainage.
--- Will also be using opaque red cups (without holes) to keep the roots protected from light damage.
--- Partially filled the clear cup with recycled BuildASoil 3.0 potting soil.
--- Made sure the soil at the bottom of each cup was well compacted and had enough room for the Coco Coin.
- [18:04]: Inoculated each cup with Great White mycorrhizae along with a bit of Beauveria Bassiana.
------ Sprinkled 1/16tsp of Great White
------ Sprinkled 1/64tsp of Beauveria Bassiana Plus
--- Mainly tried to dust the center of each cup.
- [18:07]: Placed a rooted Coco Coin into each inoculated cup.
--- Made sure each cup still had enough room for more soil.
--- To fully hydrate all Coco Coins, misted each with about 20-30 sprays of RO water.
- [18:17]: Gently filled each cup with more soil.
--- Completely covered each Coco Coin making sure to tuck the sides in.
--- Each Coco Coin is about 1/4-1/2 inch below the top soil.
--- Marked the names on each cup with blue painter's tape.
--- Also defoliated both cups and removed the lowest fan leaves.
- [18:35]: Covered the soil with BuildASoil Organic Straw Mulch.
--- Made sure the top soil was completely covered.
--- Culled the extra Garlic Budder and Chill Out OG phenos.
--- Mulched the trimmings.
- [19:01]: Filled a measuring cup with 2 cups of RO water.
------ Added 1/64tsp of Quillaja Saponaria Extract [60]
------ Added 1/16tsp of Horticultural Aloe
------ Added 1/16tsp of Horticultural Coconut
------ Added 1/8tsp of Mycrobe Complete
--- Mixed and poured the solution straight into a spray bottle.
- [19:03]: Took the initial dry soil weight before watering,
------ Garlic Budder OG#1 » 276.8g
------ Chill Out OG #3 » 260.0g
--- While on a scale,
--- Evenly misted the top of both cups with the wetting solution.
--- Did not spray the top growth.
--- Misted 10-20 sprays. Waited a moment, then misted again.
--- Repeated this process until each cup weighted at least 300g.
--- There was no runoff.
- [19:36]: Took the saturated weight after watering,
------ Garlic Budder OG#1 » 335.4g
------ Chill Out OG #3 » 335.3g
--- Marked the date, pheno names, and weight ranges on each red opaque cup with blue painter's tape.
--- Then placed both clear cups into their corresponding red cups.
- [19:41]: Placed both cups into the 3x3 veg tent,
--- Removed the seedling plug tray and have both cups resting in the propagation drip tray.
--- As for PPFD, at the lowest light intensity (and raised ~14 above the tray), the PPFD is around 40 μmol/m²/s which gives a DLI of 2.59 mol/m²/d under an 18/6 light cycle.
- [19:45]: Checked the Ecowitt soil moisture sensor data:
------------------ [ 3x3 VEG TENT – GR3 ] ----------------
------ 58% - [CH01 » M1 » VBL – Heady OG BX1 #1-1]
------ 42% - [CH02 » M2 » VBR – TKO #2]
------ 48% - [CH03 » M3 » VFL – Chill Out OG #3]
------ 41% - [CH04 » M4 » VFR – Chill Out OG #2]
----------------- [ 4x4 MAIN TENT – GR30 ] ---------------
------ 48% - [CH05 » P1 » FLT – Chill Out OG #2]
------ 56% - [CH06 » P1 » FLB – Chill Out OG #2]
------ 48% - [CH07 » P2 » BLT – TKO #2-2]
------ 58% - [CH08 » P2 » BLB – TKO #2-2]
------ 51% - [CH09 » P3 » FRT – Heady OG BX1 #1]
------ 89% - [CH10 » P3 » FRB – Heady OG BX1 #1]
--------- Veg: ~38%-45% | Flower: ~45%-55%
--------- General: ~30% [Dry] «| ~45-60% [Moist] |» ~70% [Wet]
- [19:47]: Checked the 4x4 tent.
--- The garden is smelling and looking great.
--- Buds are all ripening and smelling gassy and dank.
--- The under canopy is looking clean and all pots look good.
--- Took the trimmings from earlier and top dressed each pot.
--- Tried to spread the trimmings evenly.
- [20:07]: Quickly checked on the RO reservoir and auto-watering system.
--- Everything looked good and no leaks detected.
--- The gravity feed was holding steady at ~2 psi of pressure at ~22” from the floor.
--- Checked the humidifiers.
--- Tanks are still full and no leaks found.
Day 04 - Thursday - 04/09/26 - Total Days: 155
-----------------------------------
Daily Averages ~[+01:00]
- Temps: 79.2°F [26.2°C]
- Humidity: 80.7%
- VPD: 0.65 kPa
- Soil %: [57, 46, 51, 43, 49, 56, 49, 58, 51, 89]
-----------------------------------
- [19:06]: Night check on the 4x4 tent.
--- Garden is smelling dank and buds are looking frosty.
--- Bud growth is finishing up quite nicely and terpenes are louder than ever. Nice.
--- The under canopy is also clean and pots look good.
- [19:11]: Checked on the BluMat soil moisture sensors:
------ Chill Out OG #2 » 99mbars
------ Heady OG BX1 #1 » 59mbars
------ TKO #2 » 84mbars
--------- Watering Range: [Too Wet] ~25mbars «| [Ideal Target] ~40-80mbars |» ~125mbars [Too Dry]
--------- BluMat Max Values: [10mbars «||» 750mbars]
- [19:14]: Decided to make a slight adjustment to Chill Out OG #2’s watering carrot.
--- Using the BluMat key, increased the water moisture by rotating the tension cap slightly counter-clockwise.
- [19:15]: Checked the Ecowitt soil moisture sensor data:
------------------ [ 3x3 VEG TENT – GR3 ] ----------------
------ 56% - [CH01 » M1 » VBL – Heady OG BX1 #1-1]
------ 47% - [CH02 » M2 » VBR – TKO #2]
------ 50% - [CH03 » M3 » VFL – Chill Out OG #3]
------ 44% - [CH04 » M4 » VFR – Chill Out OG #2]
----------------- [ 4x4 MAIN TENT – GR30 ] ---------------
------ 48% - [CH05 » P1 » FLT – Chill Out OG #2]
------ 55% - [CH06 » P1 » FLB – Chill Out OG #2]
------ 49% - [CH07 » P2 » BLT – TKO #2-2]
------ 58% - [CH08 » P2 » BLB – TKO #2-2]
------ 52% - [CH09 » P3 » FRT – Heady OG BX1 #1]
------ 89% - [CH10 » P3 » FRB – Heady OG BX1 #1]
--------- Veg: ~38%-45% | Flower: ~45%-55%
--------- General: ~30% [Dry] «| ~45-60% [Moist] |» ~70% [Wet]
- [19:18]: Checked the 3x3 veg tent.
--- Veg garden is looking healthy.
--- Two solo clones need watering.
- [19:21]: Here are the starting initial watering ranges:
------ Heady OG BX1 #1-2 » 255.4g → 335.4g
------ Gorilla Goat #1-2 » 294.4g → 325.4g
--------- General Weight Range: [Dry] ~275g «| [Dryback] ~300g |» ~325g-400g [Wet]
--- Both cups were last watered 3 days ago.
--- Took the starting weight of both clones before watering,
------ Heady OG BX1 #1-2 » 296.9g
------ Gorilla Goat #1-2 » 262.8g
--- While on a scale,
--- Evenly misted the top of both cups with RO water.
--- Did not spray the top growth.
--- Misted 10-20 sprays. Waited a moment, then misted again.
--- Repeated this process until both cups weighted at least 300g.
--- There was no runoff.
- [19:39]: Took the saturated weight of both cups after watering,
------ Heady OG BX1 #1-2 » 365.4g
------ Gorilla Goat #1-2 » 365.5g
--- Updated the wet weight and watering dates for both cups.
--- Placed both cups back into the tent.
- [19:47]: Time to swap the aloe water out for the cuttings.
--- Filled a clear cup with fresh RO water (1.5cups).
--- Gently lifted the PVC rig out of the cup of aloe water and set it gently into the RO cup.
--- Going to let these soak for another day before transplanting into Coco Coins for rooting.
--- Solo cups in the propagation tray look good and no need to water.
- [19:58]: Checked the humidifiers.
--- Tanks are still full and no leaks found.
Day 05 - Friday - 04/10/26 - Total Days: 156
-----------------------------------
Daily Averages ~[+01:00]
- Temps: 79.1°F [26.2°C]
- Humidity: 82.0%
- VPD: 0.61 kPa
- Soil %: [55, 47, 47, 45, 52, 56, 49, 58, 51, 89]
-----------------------------------
- [20:44]: Night check on the 4x4 tent.
--- Five more days until harvest and the garden is looking and smelling great.
--- Buds are ripening and terpenes are smelling loud and dank.
--- Under canopy is looking clean and pots are all good.
- [20:48]: Checked the Ecowitt soil moisture sensor data:
------------------ [ 3x3 VEG TENT – GR3 ] ----------------
------ 55% - [CH01 » M1 » VBL – Heady OG BX1 #1-1]
------ 46% - [CH02 » M2 » VBR – TKO #2]
------ 46% - [CH03 » M3 » VFL – Chill Out OG #3]
------ 45% - [CH04 » M4 » VFR – Chill Out OG #2]
----------------- [ 4x4 MAIN TENT – GR30 ] ---------------
------ 51% - [CH05 » P1 » FLT – Chill Out OG #2]
------ 56% - [CH06 » P1 » FLB – Chill Out OG #2]
------ 49% - [CH07 » P2 » BLT – TKO #2-2]
------ 58% - [CH08 » P2 » BLB – TKO #2-2]
------ 51% - [CH09 » P3 » FRT – Heady OG BX1 #1]
------ 89% - [CH10 » P3 » FRB – Heady OG BX1 #1]
--------- Veg: ~38%-45% | Flower: ~45%-55%
--------- General: ~30% [Dry] «| ~45-60% [Moist] |» ~70% [Wet]
- [20:55]: Checked the 3x3 veg tent.
--- Veg garden is looking healthy and good.
--- The next grow cycle of cuttings are ready to be rooted in the Coco Coins.
- [21:04]: Filled a measuring cup with 2 cups of RO water.
------ Added 1/64 of Quillaja Saponaria Extract [60]
------ Added 1/32tsp of Horticultural Aloe
------ Added 1/16tsp of Mycrobe Complete
--- Mixed the solution thoroughly.
- [21:05]: Dropped 6 Coco Coins into the measuring cup.
--- The coins immediately started to expand.
------ [» ~5 MINUTES LATER «]
--- Placed each fully saturated Coco Coin into half-cut clear cups.
--- Using a squeeze bottle filled with Clonex,
- [21:16]: Gently filled each pre-made hole with Clonex rooting gel.
--- Using a pair of clean trimmers, made a final 45° cut.
--- Also stripped and scrapped some of the stem’s outer membrane.
--- To help with planting, gave each Coco Coin a squeeze to loosen the coco.
--- Made sure to insert each stem straight and snug with the tip about a 1/4 inch from the bottom of the Coco Coin.
--- Also secured the stem by pinching and pressing in the top of the Coco Coin.
- [21:39]: Once each cutting was planted,
--- Placed each Coco Coin into the propagation plug tray.
--- Made sure to keep each cutting properly tagged.
--- Did not spray the top growth with any water.
--- As far as PPFD,
--- At the lowest light intensity (and raised ~14 above the tray), the PPFD is around 42 μmol/m²/s which gives a DLI of 2.72 mol/m²/d under an 18/6 light cycle
--- Culled the extra cuttings.
- [23:00]: Checked the humidifiers.
--- Tanks are still full and no leaks found.
--- Since the next grow cycle is going start off my first breeding project, plan to reverse Heady OG BX1 (#1 pheno) to pollinate TKO #2
--- As this will also be an open air pollination, plan to include Heady OG BX1 #1 as a pollen receiver along with Garlic Budder (original #1 pheno) and Gorilla Goat (#1 pheno). Regrettably, have decided to not include Chill Out OG #2
--- If successful, plan to pheno hunt through the Heady OG BX1 to TKO seeds for keeper phenos to begin trait stabilizing.
--- Anyways.
--- One impossible task at a time..
Day 06 - Saturday - 04/11/26 - Total Days: 157
-----------------------------------
Daily Averages ~[+01:00]
- Temps: 77.9°F [25.5°C]
- Humidity: 81.8%
- VPD: 0.59 kPa
- Soil %: [54, 46, 46, 46, 50, 56, 50, 58, 51, 90]
-----------------------------------
------ [ » NO GROW LOG ENTRIES FOR TODAY « ]
--- Peace & Good Memories Father.. 🖖
Day 07 - Sunday - 04/12/26 - Total Days: 158
-----------------------------------
Daily Averages ~[+01:00]
- Temps: 77.2°F [25.1°C]
- Humidity: 81.3%
- VPD: 0.59 kPa
- Soil %: [53, 45, 48, 46, 50, 56, 50, 58, 51, 92]
-----------------------------------
- [20:03]: Night check on the 4x4 tent.
--- Garden is looking great..
--- Under canopy is clean and pots look good..
- [20:09]: Checked the Ecowitt soil moisture sensor data:
------------------ [ 3x3 VEG TENT – GR3 ] ----------------
------ 53% - [CH01 » M1 » VBL – Heady OG BX1 #1-1]
------ 44% - [CH02 » M2 » VBR – TKO #2]
------ 47% - [CH03 » M3 » VFL – Chill Out OG #3]
------ 45% - [CH04 » M4 » VFR – Chill Out OG #2]
----------------- [ 4x4 MAIN TENT – GR30 ] ---------------
------ 52% - [CH05 » P1 » FLT – Chill Out OG #2]
------ 56% - [CH06 » P1 » FLB – Chill Out OG #2]
------ 50% - [CH07 » P2 » BLT – TKO #2-2]
------ 58% - [CH08 » P2 » BLB – TKO #2-2]
------ 52% - [CH09 » P3 » FRT – Heady OG BX1 #1]
------ 93% - [CH10 » P3 » FRB – Heady OG BX1 #1]
--------- Veg: ~38%-45% | Flower: ~45%-55%
--------- General: ~30% [Dry] «| ~45-60% [Moist] |» ~70% [Wet]
- [20:40]: Checked the 3x3 veg tent.
--- Veg garden is looking healthy..
--- Two solo cups need watering..
- [20:48]: Here are the starting initial watering ranges:
------ Heady OG BX1 #1-2 » 255.4g → 335.4g
------ Gorilla Goat #1-2 » 294.4g → 325.4g
--------- General Weight Range: [Dry] ~275g «| [Dryback] ~300g |» ~325g-400g [Wet]
--- Both cups were last watered 3 days ago.
--- Took the starting weight of both clones before watering,
------ Heady OG BX1 #1-2 » 281.5g
------ Gorilla Goat #1-2 » 245.6g
--- While on a scale,
--- Evenly misted the top of both cups with RO water.
--- Did not spray the top growth.
--- Misted 10-20 sprays. Waited a moment, then misted again.
--- Repeated this process until both cups weighted at least 300g.
--- There was no runoff.
- [21:14]: Took the saturated weight of both cups after watering,
------ Heady OG BX1 #1-2 » 365.5g
------ Gorilla Goat #1-2 » 365.4g
--- Updated the wet weight and watering dates for both cups.
--- Placed both cups back into the tent.
--- Cuttings in the propagation tray are looking good..
- [21:27]: Checked the humidifiers.
--- Tanks are still full and no leaks found.
--- Onwards to next week..
[END OF WEEK 23]

Likes
22
Share


@Fatnastyz
Follow
10-18
She hasnt even acted like I bent her top!
Recovered nicely. Her buds have turned upwards to welcome the light! 😁
10-19
Water, noticed some slight burn, will flush her next day or so. She looks pretty good other.
Spaced some branches just just a tad. Cleanin up, while she fattens!
Has a minty smell.
I know Im rough, very grateful for these beans Weedseedsexpress!💚😻
Ill get my shit together! 💪🤘
.

Likes
26
Share


@BlackDragon22
Follow
Che dire ragazzi... Odori fortissimi nell'aria, come vedete gli insetti stanno a pranzo e cena sulle mie piccole.. Pazienza! Non dovrebbe mancare tanto, penso 2 settimane al raccolto, sono riuscito a farcele vedere di giorno finalmente è sono contento di poterle condividere con tutti voi 🙏🏽 aggiunte un po di noci in più, anche se si vede un po di fox talking, il resto perfetto.
Likes
15
Share


@chupacabra80
Follow
привет ребята,вот срезал мой куст, вроде не плохо вышло?! посмотрим сколько будет весить когда высохнут )))) амнезия мой любимый сорт,как только высохнут отпишусь какой будет результат )))
30,06,2021
вот и результат почти 90 грамм,на весах 40 грамм но это моя доля урожая ,я выращиваю в месте с другом так что моя половина 40 грамм сухих шишек и мы еще и покурили пока шишки подсохли, так что приблизительно у меня получилось 85-90 грамм сухих шишек,шишки выросли толстыми но они не плотные,потому и такой результат, посмотрите мой апельсин у него хорошие плотные шишки , он начал цвести в 60 дней , растение без проблем,кто не любит ждать этот сорт не для него )))
09,07,2021 мой урожай пересох, +35,3 с было очень жарко и я не мог контролировать температуру (( я ожидал результат лучше но не вышло, надеюсь дальше все нормализуется


Likes
6
Share


@BigGGrows
Follow
This week was a big week for the candy cush. I noticed upon watering her to run off, that in the same day the pot would go super dry and light weight. I also noticed stress in the leaves and roots poking out the bottom of the pot. It was time for a transplant. So far so good! Upon transplanting i performed more LST to help her fill in the pot. She went from a 1 gallon to a 5 gallon. She was also defoliated thia week.


Likes
25
Share


@Cannibalgardens
Follow
Well the genetics from this line still continue to impress me they are quick germinating seeds and have a fast growth rate once in the ground . I wanted to try these strains for a while and was hoping this would be a great to smoke . I'm not disappointed at all it's got great terps and Dense buds with sticky trichomes . The plant grew like an indica in fan leaf shape but had long colas almost like a sativa .. The grow was organic for the most part and gave me the chance to try a legendary strain . She had a great outdoors presence its a gorgeous flower to run outdoors had no issues with the bud rot and pm was almost never there .. That being said better training with a more steady feeding. Line up would have gotten me a better harvests but for now I'm happy with it .. next year I will do a few more strains I got left ( stinkin bishop )


Likes
9
Share


@garchol
Follow
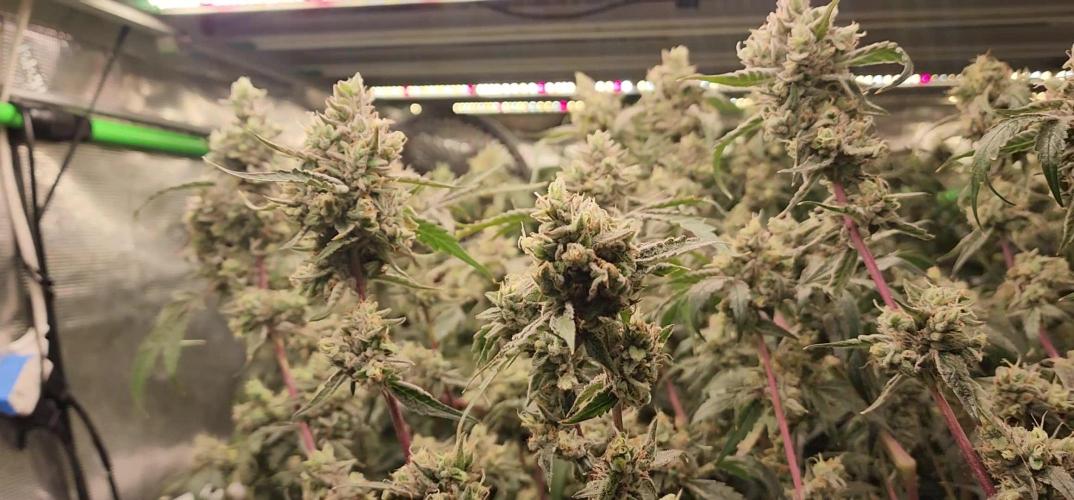
We successfully completed week 8 and things are starting to get interesting. The buds have grown significantly in size over the last days and the smell has gotten much stronger. I think I also need a new air filter… The leaves did some coloring in the past week which makes this beauty look even more handsome. I optimized the air intake of my tent this week by replacing my one 100mm tube with two 130mm 3d printed light traps so breathing is much easier now and the vent can run a bit less fast.
Likes
4
Share

@DogDoctorOfficial
Follow
🥒 Project Blue Tent – Week 5
Pickle Lemon Haze F1 – Pheno B (Folder 14B)
Hello everyone, and welcome back to another chapter of Project Blue Tent! 💙🌱
For anyone discovering this diary for the first time, Project Blue Tent follows four individual Pickle Lemon Haze F1 plants, each grown under exactly the same environmental conditions while being documented separately from seed to harvest.
Although every plant shares the same genetics, each one develops its own personality, growth habits and structure. By giving every phenotype its own diary, we get to appreciate those subtle differences while learning how each plant responds throughout the entire grow.
Today we're checking in on Pickle Lemon Haze F1 – Plant B.
──────────────────────────────
🌱 Week Five – Filling Every Corner
This week has been all about controlled expansion.
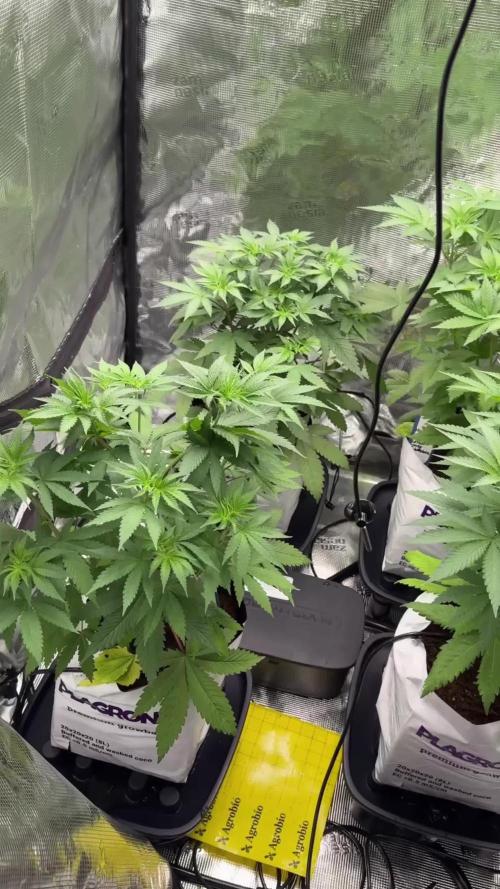
After recovering beautifully from last week's topping, Plant B has exploded with vigorous new growth. Rather than stretching excessively, she's focused her energy on producing an incredible number of side branches, creating one of the bushiest structures inside the tent.
With so many healthy shoots developing, it was the perfect moment to begin introducing the SCROG net.
For anyone unfamiliar with the technique, SCROG stands for Screen of Green. Instead of allowing the plant to grow vertically, each branch is gently guided underneath a horizontal net, encouraging it to spread across the available space.
The objective isn't simply to make the plant wider.
By opening the canopy, every future flowering site receives better light penetration and improved airflow, while creating a much more even surface for flowering later on. Rather than producing one dominant cola, the plant is encouraged to develop many equally productive tops.
This week we spent some time gently bending and positioning branches beneath the screen, allowing Plant B to begin claiming her share of the canopy.
She handled it like an absolute champion.
──────────────────────────────
🌡️ Environmental Conditions
Maintaining consistency continues to be one of the main goals inside Project Blue Tent.
Stable environmental conditions allow the plants to recover quickly from training while maintaining uninterrupted vegetative growth.
This week's average conditions were:
• 🌡️ Day temperature: 30°C
• 🌙 Night temperature: 25°C
• 💧 Relative humidity: 58%
• 🥥 Root zone temperature: 24°C
• 💦 Nutrient solution: 18°C
• ⚗️ pH: 5.8
• ⚡ EC: 1.92 mS/cm
• 💨 CO₂: approximately 450 ppm
• 💡 Light schedule: 18/6
Despite the slightly warmer daytime temperatures this week, the plants have continued growing vigorously, showing excellent transpiration and healthy development throughout the room.
──────────────────────────────
🥥 Feeding Strategy
As the plants continue increasing their growth rate, their nutritional demands naturally increase alongside them.
A couple of weeks ago all four phenotypes began displaying a slightly lighter shade of green. Since every plant responded the same way while maintaining vigorous growth, it was clear they simply wanted a little more food rather than showing signs of stress.
The feeding schedule was adjusted accordingly and continues producing exactly the response I was hoping for.
Current feeding consists of:
• Plagron Hydro A — 1.9 ml/L
• Plagron Hydro B — 1.9 ml/L
• Plagron Hydro Roots — 1 ml/L
The newest growth is gradually deepening back into a richer green while maintaining excellent growth speed and healthy leaf development.
Sometimes the smallest adjustments make the biggest difference.
──────────────────────────────
🌿 Pickle Lemon Haze F1 – Plant B
Every week this phenotype becomes more interesting.
While her sister shows slightly more vertical ambition, Plant B has decided to become an absolute bush.
The recovery after topping has been outstanding. Both new main leaders have established themselves perfectly while countless secondary branches continue racing upward, creating an incredibly dense canopy filled with future flowering sites.
After introducing the SCROG net this week, it quickly became obvious just how much lateral growth she's capable of producing. Every branch seemed eager to occupy its own space, making the training process surprisingly enjoyable.
One characteristic that really stands out is her natural symmetry. Even after being bent in multiple directions, she continues producing an impressively balanced framework with very even spacing between developing tops.
Her stems continue thickening nicely, internodal spacing remains compact, and leaf posture stays upright throughout the day, clear signs that she's handling every bit of training without complaint.
She's lush, healthy, vigorous, and showing exactly the kind of structure I love seeing before flowering.
Looking at her now, it's hard to believe she was topped only a short time ago.
──────────────────────────────
🌿 Looking Ahead
As both Pickle Lemon Haze sisters continue filling the tent, canopy management is becoming increasingly important.
These two ladies are definitely going to compete for space over the coming weeks, and that's exactly the kind of problem every grower enjoys having.
The next step will simply be continuing to weave branches through the SCROG net while allowing every future top to find its own place in the canopy.
A light selective defoliation may also become necessary soon. Not because the plant needs correcting, but simply to improve airflow and allow more light to reach the rapidly developing interior branches hidden beneath this beautiful sea of leaves.
For now, though, she's doing exactly what I hoped she would.
Growing wider.
Growing stronger.
And becoming one impressive little bush.
──────────────────────────────
💙 Thank You
A huge thank you goes to Zamnesia for the incredible Pickle Lemon Haze F1 genetics and for providing the complete ecosystem that makes Project Blue Tent possible.
Another heartfelt thank you goes to Plagron for supplying the Premium Growbags together with the Hydro nutrient line, helping these ladies build strong root systems and maintain vigorous growth week after week.
I'd also like to thank GrowDiaries for providing a platform where growers from around the world can document their journeys, exchange knowledge, and continue inspiring one another every single day.
And finally, thank you to everyone following Project Blue Tent.
Whether you've been here since germination, recently discovered these diaries, actively leave comments every week, or simply enjoy watching these beautiful plants evolve, your support truly means a lot.
Every phenotype tells its own story.
This one is quickly becoming one of my favourites.
I hope you're all having an amazing week.
Until next time...
Growers Love, happy growing, and take care everyone! 💚🌱
Likes
3
Share


@High_Grade_Dadli
Follow
2 of dem from the 2nd set don't seem to catch dem self yet🤷🏾♂️ but the rest are taking off....those from the 1st set still ain't transplanted and they are pushing hard ties ain't holding dem back. 2 that where transplanted previously jus tryin to get dem a good size n send dem on a breeding project for the beginning of the
Most of new cutting have visible root

Processing
Likes
12
Share


@DD1FORTY8
Follow
**** WEEK 10 ****
both hulks shaping up to be some real beasts. just can’t beat good ol sunlight

Likes
30
Share
@DogDoctorOfficial
Follow
✂️🍯 Tical x Zamnesia — Nectar Drip | Drying & Trimming Report 🍯✂️
And… we are back again 😄
Yes — we are dividing the reports once more.
At this point it is probably becoming part of the diary itself, but honestly, there is simply too much happening during these runs to compress everything into one giant update without losing important moments along the way.
So thank you for the patience.
And welcome back to the next chapter of our Nectar Drip journey:
the drying,
the trimming,
the resin collecting,
the temple balls,
and the beginning of the cure.
🌱 Quick Recap
For anyone arriving only now:
This run was grown from seed under 12/12 lighting from the beginning.
No long vegetative phase.
No giant training sessions.
No massive shaping.
Just letting the genetics express themselves naturally while observing:
- structure,
- morphology,
- resin production,
- flower behavior,
- and overall cultivar personality.
Last week reflected the harvest itself:
- trichome maturity,
- fading colors,
- hanging branches,
- macro photography,
- stem structure,
- and final harvest observations.
One of the smaller plants was frozen immediately after harvest for future washing and extraction work, which we will still cover in a dedicated future update once we complete the washing process properly.
But this week?
This week belongs to the dry flowers.
And honestly…
these girls became something beautiful.
Drying Process
The flowers dried for roughly 10 days under controlled conditions:
- approximately 18–20°C
- around 60% RH
- with the first couple of days closer to 45% RH to help release initial surface moisture safely
This part matters far more than many people realize.
Drying is not simply:
“waiting until the plant becomes dry.”
It is controlled moisture migration.
The outside of the flower always dries first.
The inside stays wetter longer.
And the goal is slowing that process down enough for:
- chlorophyll breakdown,
- smoother smoke,
- terpene preservation,
- proper moisture redistribution,
- and stable curing afterward.
Dry too fast?
The outside crisps while the inside traps moisture.
Dry too slowly?
Risk increases:
- mold,
- anaerobic conditions,
- terpene degradation,
- unstable cure.
These Nectar Drip girls dried beautifully.
Dense flowers.
Excellent structure.
No rushed drying.
No hay smell.
No collapse.
Just slow clean progression.
And when the branches finally gave that satisfying “click” instead of bending…
we knew it was time 😄
✂️ Trimming Time
So:
gloves on,
trim bin ready,
studio lights running,
music playing quietly in the background,
Mr. Baggy supervising operations as always 😄
…and branch by branch, the process began.
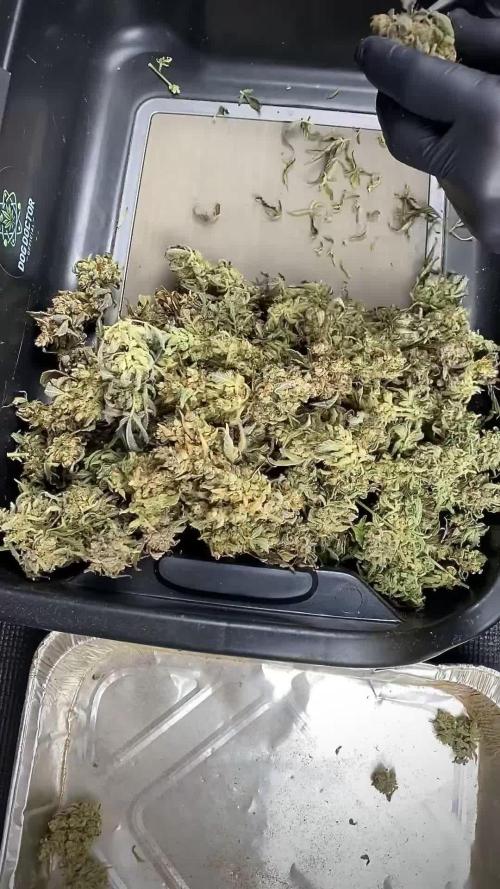
We trimmed entirely by hand using Zamnesia curved-point scissors.
And honestly, these scissors became one of our favorite trimming tools.
The pointed curved tip allows:
- deeper precision,
- cleaner access between calyxes,
- easier sugar leaf removal,
- less accidental flower damage,
- and better control overall on dense compact flowers.
Especially important on cultivars like this one.
Because Nectar Drip became DENSE.
Not airy.
Not fluffy.
Proper compact greasy flowers.
The kind that fight back while trimming 😄
Every branch had to be broken down carefully:
- separating buds individually,
- removing excess leaf material,
- preserving flower shape,
- protecting trichome coverage,
- and trying not to spend half the trimming session glued to the scissors.
And yes…
the resin production here was honestly ridiculous.
🖤 Resin Everywhere
This cultivar is oily.
Not just frosty visually.
Oily physically.
The gloves became coated quickly.
The scissors accumulated thick dark resin constantly.
The trim bin slowly filled with golden material underneath.
And every few minutes we found ourselves scraping resin from:
- gloves,
- scissors,
- fingers,
- and tools.
That sticky dark material eventually became beautiful little temple balls.
And honestly?
The way this resin behaved says a lot about the quality of the cultivar.
Some resin stays dry and crumbly.
This one softened almost instantly with minimal heat.
Just body temperature alone was enough to:
- soften,
- bind,
- darken,
- and become workable.
Extremely greasy resin.
Extremely rich trichome expression.
The little temple balls became:
dark,
soft,
sticky,
shiny,
and incredibly aromatic.
Beautiful medicine already before even curing properly.
🏆 Final Dry Numbers
And now the final flower numbers for the dried plants:
🌱 337.3 grams dry flower
Plus:
the frozen material resting in the freezer for future washing and extraction work.
And honestly?
Very happy with these numbers.
Especially considering:
- the quality,
- density,
- resin production,
- flower structure,
- and the overall level of expression these girls delivered.
This was not “big yield but average flower.”
This was genuinely high-quality medicine.
📦 Storage & Beginning The Cure
After trimming:
the flowers were placed into glass jars for curing.
The temple balls also rest curing slowly inside glass.
And now another important phase begins:
time.
Because curing changes everything.
Terpenes settle.
Moisture equalizes.
Harshness fades.
Aromas deepen.
Smoke smooths out.
The cultivar slowly reveals its final personality.
And honestly?
This Nectar Drip already smells incredible.
Sweet.
Creamy.
Fruity.
Almonds.Dark.
Warm.
Slightly candy-like.
With this deep resinous backend that keeps evolving every day.
The room smelled unbelievable during trimming.
At some moments it genuinely felt like opening:
fruit candy,
fuel,
cream,
and warm resin all at once.
Very unique profile.
Very memorable.
📸 Documentation & Studio Sessions
Of course, we documented almost everything:
- trimming time-lapses,
- resin collection,
- temple ball formation,
- close-up flower shots,
- drying branches,
- sticky gloves,
- macro details,
- cinematic studio moments,
- and behind-the-scenes chaos 😄
Because honestly…
these moments matter too.
A grow diary becomes more than just showing finished buds after enough weeks.
It becomes documentation:
- of process,
- mistakes,
- lessons,
- atmosphere,
- obsession,
- patience,
- and passion.
And this run definitely carried all of that.
⏳ What Comes Next?
Next update will probably become the final chapter:
- curing review,
- smoke report,
- terpene evolution,
- effect profile,
- overall strain impressions,
- and our honest final thoughts about this Tical x Zamnesia collaboration after living with the medicine properly.
And honestly…
we are extremely excited for that one.
Because this cultivar already feels very special.
🙏 Final Thanks
And as always…
thank you.
To Zamnesia.
To Tical.
To Plagron.
To F.O.G.
To Lumiflora.
To the gear.
To the platform.
To the supporters.
To the silent followers.
To the OGs still here since day one.
To the curious new visitors.
To the people learning quietly in the background.
To the skeptics.
To the lovers.
To the haters too 😄
And to everybody who stopped scrolling long enough to spend even a few moments here with us.
That alone deserves gratitude.
This collaboration genuinely feels special.
And honestly…
I still feel like Nectar Drip has one more beautiful chapter left before this journey fully ends.
📡 DELETED @ 1K Please stay tuned.we never quit https://www.youtube.com/@TheDogDoctorOfficial NEW 🙏 Thank you for your patience and continued support.
FOR DISCOUNT CODES AND MORE JUST FOLLOW THE LINK https://website.beacons.ai/dogdoctorofficial
📲 Don’t forget to Subscribe and follow me on Instagram and YouTube @DogDoctorOfficial for exclusive content, real-time updates, and behind-the-scenes magic. We’ve got so much more coming, including transplanting and all the amazing techniques that go along with it. You won’t want to miss it.
GrowDiaries Journal: https://growdiaries.com/grower/dogdoctorofficial
Instagram: https://www.instagram.com/dogdoctorofficial/
YouTube: https://www.youtube.com/@dogdoctorofficial Deleted by Youtube - https://www.youtube.com/@TheDogDoctorOfficial NEW
Vimeo : https://vimeo.com/dogdoctorofficial Under construction stay tuned ⸻
Explore the Gear that Powers My Grow
If you’re curious about the tech I’m using, check out these links:
🔆 Lighting & Environmental Control
• Future of Grow — Advanced LED lighting technology
https://www.futureofgrow.com/
DISCOUNT CODE: DOG20
• Lumiflora — Under-canopy LED lighting
https://lumiflorade.com/
• TrollMaster — Environmental controllers and automation gear (past collaboration)
⸻
Genetics
• Zamnesia Seeds — Genetics used in this project
https://www.zamnesia.com/
⸻
🌱 Soil, Substrates, Boosters & Root Support
• Plagron — Substrates, bio mixes, and supportive products
https://plagron.com/en/
⸻
🎒 Storage, Curing & Preservation
• Grove Bags — Curing and storage solutions
https://grovebags.com/
⸻
📸 Photography Equipment & Tools
(Not sponsors, but part of my creative toolkit)
• Sony A6700
• Sony full-frame macro lens + few more
• Stacking photography workflow - learning
• iPhone (for behind-the-scenes shots)
We’ve got much more coming as we move through the grow cycles. Trust me, you won’t want to miss the next steps, let’s push the boundaries of indoor horticulture together!
As always, this is shared for educational purposes, aiming to spread understanding and appreciation for this plant. Let’s celebrate it responsibly and continue to learn and grow together.
With true love comes happiness. Always believe in yourself, and always do things expecting nothing and with an open heart. Be a giver, and the universe will give back in ways you could never imagine.
💚 Growers love to all 💚
📸 P.S. – The Eye Behind the Lens
All photos in this diary (for now — except for the ones showing the camera, which I took with an iPhone) are taken with a Sony A6700 paired with a Sony full-frame macro lens and a few more.
Photography is part of the story — it’s how we share the fine textures, the glow, and the quiet details that words can’t always capture.
I’ve also started experimenting with photo stacking — a technique where multiple images, each taken at a slightly different focus point, are layered together to create one perfectly sharp image from front to back.
It’s not digital enhancement or AI; it’s pure photography — a way to reveal the plant’s beauty in microscopic depth, from trichome to petal.
You’ll even see a few shots of "ghost me" capturing the shots — camera, lens, setup — because every grow deserves not just to be cultivated, but documented like art.
FOR DISCOUNT CODES AND MORE JUST FOLLOW THE LINK https://website.beacons.ai/dogdoctorofficial
NEW DISCORD - Official Server Invite Link : https://discord.gg/ksjAkA5T74

Likes
9
Share


@victor_lion
Follow
This is going very well, the buds have grown in abundance and there are still new flowers sprouting, there are still a couple of weeks imag