
Processing
Likes
Comments
Share


@Cannibalgardens
Follow
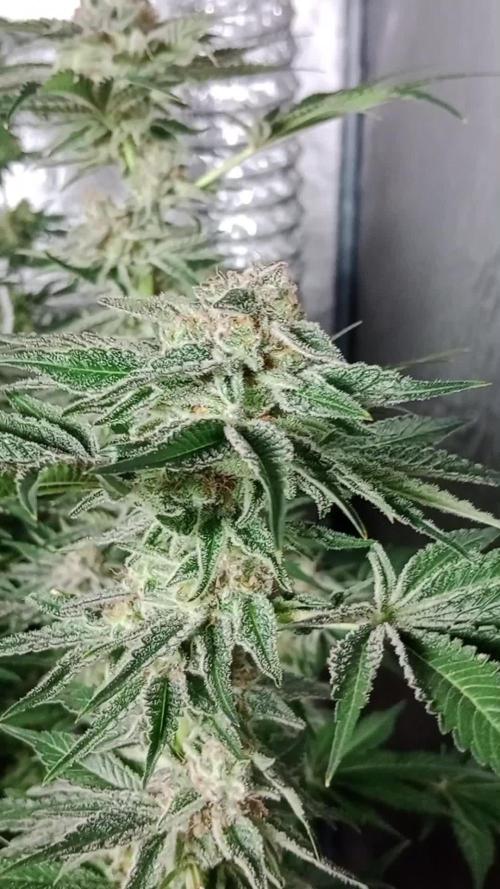
I'm loving this strain so far she is very short in stature and takes to training very well the structure I'm liking ...she was bent around some more this week and recovered very well. The girl will be continued with the trading for at least another 4 weeks before the flip over to flower . I'm getting excited to see how she will look in another week just such good genetics ...cheers fam

Processing
Likes
18
Share


@GrowingisFunkO
Follow
Week 14 - 06/14 - 06/20
Light - 400 W HPS & 265 W LED
Temperature - 76 +/-3
Humidity - 40 +/-5
D43 Flower - Watered the ladies, they are swelling up nicely. While I am happy to stare at these beauties daily, this is definitely the boring part of growing, not much to report besides beautiful bud growth. They have also started to produce a strong scent, to the point where I will smell the entire house up if the garage door is open. Loving the way this grow is turning out.
D46 Flower - Water with nutrients and added some blackstrap molasses to the mix. I took a risk today and tested out some late flower defoliation, I took the large fan leaves off two of the clones and front Hulkberry and Royal Gorilla Scrog. I want to see the difference in growth with late flower defoliation.
D47 Flower - Moved the LED light a little further away, I had noticed some light burn on one of the clones. Decided to build a drying box since I am pretty sure I will have to harvest these strains separately. Added some pics, its a quick build out of some stuff I had laying around the house. Only had to buy a $10 filter that I could cut up and $20 silica gel packs. I am running the exhaust air from the tent into the dry box that will filter through the $10 charcoal filter I cut up and doubled up on the filtration. I'm going to add refreshable silica gel packs in the box to help fight humidity. Hopefully, it works.


Likes
7
Share


@Skull
Follow
Really picked up in growth this week but even though there Auto still no sign of flower. The research I've done seems to suggest that a photo period of 20 4 is neassery to induce flower

Likes
16
Share


@Bigbankbossshit
Follow
Sorry guys I want to wait for a little bit, had to spend time with the family. My plants have bounce back from being overwatered I have one runt (caused by root damage from being overwatered) which is my cereal milk I’m sure she’ll bounce back but she will never make a fullest potential. Other than that all my plants are looking healthy ready to go three more weeks and veg. Then it’ll be time for the big flip. I had a awesome time growing these babies for my mental note my Mac1 and Gelato have the strongest smell my far from touch (stem rubbing lol).


Likes
10
Share


@I_Identify_As_A_Dan
Follow
Week 11 for White Widow by Greenhouseseedco
She filled out nicely after her defoliation, just strengthening the branches daily now for her to be able to hold more weight when it comes to flower time.
Because of the messed up light schedule + massive shifts of temps from 28+ to 6... outside the tent so really for 7 hours their growth is completely stunted, but I'm making due with what I have 😂

Likes
3
Share


@Barcelona_Farmers710
Follow
Esta variedad suele ser poco productivas pero una pasada para fumar o hacer cualquier tipo de extracción. La Blue Gelato 41 todo fue para ice y la verdad que un sabor increible! Una buena genética farmers!🍁

Likes
10
Share


@Rko41
Follow
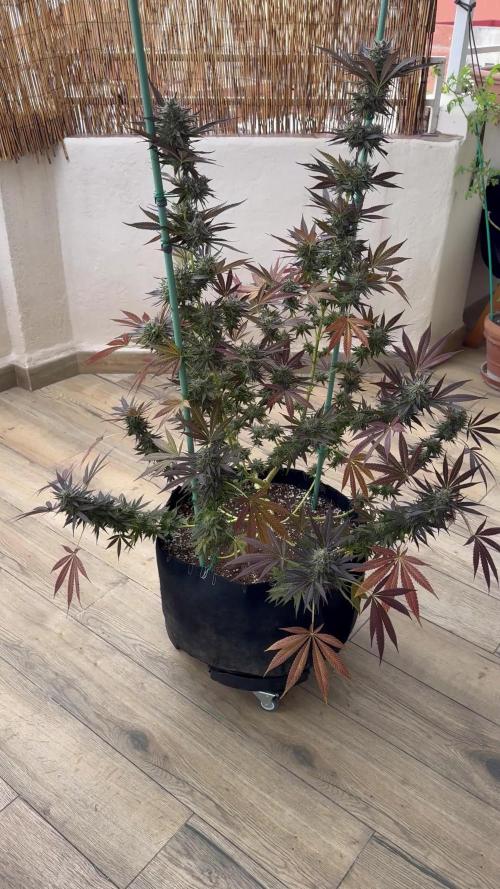
Facile à cultiver à toute suite pris sa couleur violet super odeur pressé d’y goûter

Likes
3
Share


@Snuffys_garden
Follow
Week 8 is going great, started flush
toward the end of week 7 on Zkittlez and OG Kush. Also started flushing Pink Kush CBD and Purple Punch at start of week 8. All are packing weight still and smelling very fragrant. Trichomes are starting to cloud out and I am planning on harvesting when trichomes are starting to amber.


Likes
5
Share


@diabolicalgrows
Follow
GG4 Clone day 151 10-30-24
- Gave 4 cups of regular water
GG4 Clone day 155 11-3-24
- Gave 4 cups of regular water
GG4 Clone day 156 11-4-24
- Gave 4 cups of regular water
GG4 Clone day 158 11-6-24
- Gave 4 cups of feed water
Likes
34
Share


@ElLocoDeLaHabitacion420
Follow
I have not been at home too much this week so theres not too many photos but im flushing right now just counting down the days to chop this plant down! I have a problem with foxtails due to my tent not being high enough to raise the lights but thats fine.... ill get a new tent pretty soon ( This is my first Indoor grow! thats why im still learning about lights and all that.. I used to grow outdoors so my indoor and autoflower techniques still in baby steps

Likes
Comments
Share


@BombBuds
Follow
Pflnazen wurden die Woche in 100% Coco umgetopft.
20l stofftöpfe
Eine Pflanze wurde aussortiert.
Mal schauen wie sie das umtopfen vertragen.
Likes
10
Share


@TiRobotProds
Follow
Les site d'usine grossissement de jour en jours, bientôt engraissement des colas au Méga pk.

Likes
2
Share


@Jelemond
Follow
This is my first grow and it’s all organic as well 👌🏽.I didn’t experience any deficiencies and besides the fact that they are pretty small I have to say I’m pleased. We will see what my total harvest will be I’m guessing around a quarter pound 4 ounces maybe little less 🤷♂️🏽


Likes
21
Share


@NG420
Follow
I wasn't sure how to properly flush with flawless finish my girls so I followed different ways. For the TOP I just watered with flawless finish until I had 20% run off. For the FIM I watered with flawless finish double amount than usual and after 12 hours ph'd water until having clear running offs.I think I'm going to cut them off in the middle of next week.Can't wait!
Likes
9
Share

@Psychopat_od_vedle
Follow
Zdravím bando,Den 63 chodím kolem jak mlsný kocour 🤤jen už čekám na správný čas.ješte to vidím na pár dnů.Jantar pořád nevidím 🧐

Likes
11
Share

@NidoR420
Follow
I harvested Dorel and will soon do #4 as well. I had to as I don’t have the space to dry all 3 at once. Tbh Dorel didn’t look so good today, although I couldn’t see much amber trichromes she looks a bit overdone. Will probably do #4 this weekend, and Ozz the 2 following weeks
Harvested both, now it’s just Ozz! Plenty of pictures and videos for this week :)) she’s nearly there, I will probably start the harvest next week. Had a few bud rots on #4 and Dorel, but overall they’re fine. Ozz looks beautiful on the other hand, she hadn’t any more bud rots for weeks


Likes
9
Share


@Nachtjasmin
Follow
Dies war eine Gratis Beigabe zu meiner Bestellung. Die Freude war besonders groß als ich die Beschreibung des Strains gelesen habe :)
Die Kleine hatte Probleme die Samenhülle und das -häutchen abzuzustreifen von den Keimblättern. Also habe ich ihr etwas geholfen.
Sie steht jetzt in 14l Hanferde von Sonnenerde.
Bin sehr gespannt, ob overhyped oder ob wirklich gute Ergebnisse hierbei herauskommen. Lasse mich gerne positiv überraschen ;)
Falls jemand Ratschläge, Tipps und Tricks hat, gerne raus damit :D Ist erst mein zweiter Grow und ich habe sehr wenig Erfahrung. Bin dankbar für jeden Punkt, in dem ich mich verbessern kann!