The Grow Awards 2026 🏆 


Likes
Comments
Share
@GroloCup
Follow
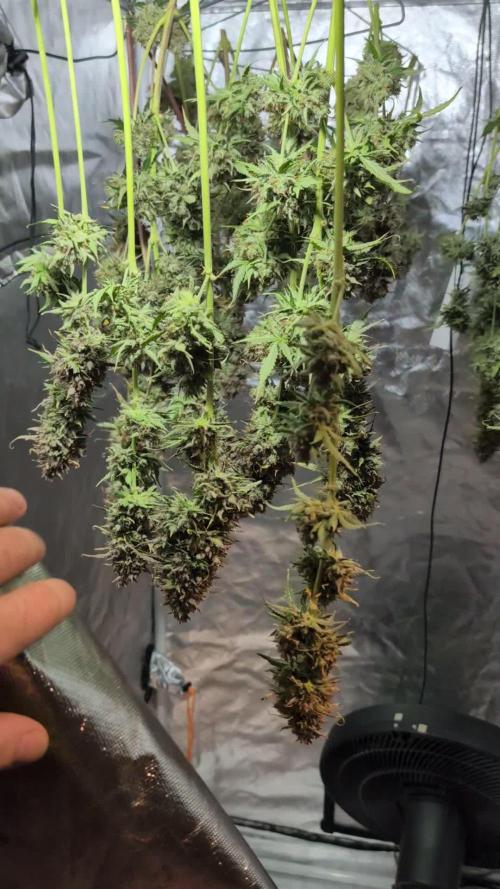
She's moving along into flower and I've started using a little bloom nutes now that the stretch is tapering off. Took off a few fan leaves that were blocking some bud sites and removed some lower growth that wouldn't make much more than underdeveloped larf. She's definitely crowded in the tent, but she's continuing to go through her paces and should stay on track. She's starting to effervesce and it's a sweet earthy note with a more skunky stem rub. Lets see where this week takes us!

Likes
45
Share
@AsNoriu
Follow
So day 125 and last Late FastDiesel is choped, she will be the Champ. Amazing plant and realy interesting strain.
Early Big FastDiesel 73.61
Slimmer Early FastDiesel 68.5
Late FastDiesel still to come ..
Day 131. Long journey, amazing result
Late FastDiesel 104
And total 246.11
Fantastic, in report will raise that strain to heaven ;)


Likes
226
Share
@Kitties_and_Colas
Follow
~_~_~_~_~_~_~_~_~_~_~_~_~_~_~_~_~_~_~_~_~_~_~_~_~_~_~_~_~_~_~_~_~_~_~_~_~_~_~_~_~_~_~_~_~_~_~_~_~_~_~_~_~_~_~_~_~_~_~_~_~_~_~_~_~_~_~_~_~_~_~_~_~_~_~_~_~_~_~_~_~_~_~_
08/07/21:
😸Week 4!! (a day early, Sunday plans etc..)..
We've been feeding lightly with every watering (we're in promix) but we may throw some EWC in their pots..the mainlined plant is sporting new growth and building symmetrically, she had almost no recovery downtime to speak of, i couldn't be happier 😻..the low stressed plants
are starting to fill out, we've been doing a lot of leaf tucking with those 2. thanks for reading if you made it this far lol, we'll update midweek..happy growing folks! 😽💡🌱❤️
~_~_~_~_~_~_~_~_~_~_~_~_~_~_~_~_~_~_~_~_~_~_~_~_~_~_~_~_~_~_~_~_~_~_~_~_~_~_~_~_~_~_~_~_~_~_~_~_~_~_~_~_~_~_~_~_~_~_~_~_~_~_~_~_~_~_~_~_~_~_~_~_~_~_~_~_~_~_~_~_~_~_~_
8/10/21: 🐱
The new growth seems to be coming light colored, they're definitely getting enough to eat for their size..idk..ill just keep doing the same routine and make changes if/when it gets worse..ty for stopping by ❤️💡🌱
~_~_~_~_~_~_~_~_~_~_~_~_~_~_~_~_~_~_~_~_~_~_~_~_~_~_~_~_~_~_~_~_~_~_~_~_~_~_~_~_~_~_~_~_~_~_~_~_~_~_~_~_~_~_~_~_~_~_~_~_~_~_~_~_~_~_~_~_~_~_~_~_~_~_~_~_~_~_~_~_~_~_~_


Likes
26
Share
@NearlyDeadGrows
Follow
Buds getting finaly bigger...
The Color is just amazing!
Two little videos.
Gave her a little tent cuz it’s getting way too cold now

Likes
17
Share
@leliantu
Follow
62 días desde el cambio a 12/12. Esta semana, el lunes 16, fue la ultima semana con abonos, y desde el miercoles he estado regando con Flawless Finish (llevo 3 riegos, miércoles 18, viernes 20, domingo 22) para limpiar las raíces. Las plantas han respondido bien, se empezaron a decolorar las hojas tomando algunos tintes bien bonitos. No estoy apurado y creo que les voy a dar otra semana más. Buen cultivo a todos.

Likes
145
Share
@Salokin
Follow
Hello Growmies,
The final chapter of this incredible journey has unfolded, and it's time to share the bountiful harvest and reflections on the entire cultivation process. Trimming the plant was a joy, and with gentle fingers, I removed all the large fan leaves. The precision in this process revealed the true beauty of the buds, setting the stage for a smooth harvest. With care and gratitude, the plant was chopped, and the buds were hung to dry. The anticipation for what lies ahead only adds to the sense of accomplishment. The wet weight, excluding fan leaves, stands at an impressive 782 grams. The buds are massive, a testament to the efficacy of the nutrients used, particularly the Power Buds. The name seems apt, as the result is a collection of sticky, dense buds with subtle lemon notes and sweet pungent undertones. In the final moments, the plant unveiled some delightful purple hues. While I wish I could have allowed them to intensify further, it's a reminder that each grow is a learning experience. In hindsight, a slightly longer fading period would have accentuated those beautiful colors. We live and learn, and that's the essence of this journey.
A heartfelt thank you to Plagron and Zamnesia for hosting this amazing contest. The quality of the products and the support throughout the journey have been invaluable.
As this chapter concludes, I'm left with a sense of fulfillment and gratitude for the collective experience we've shared. The plant's growth, from seed to harvest, has been a testament to the art and science of cultivation.
Feel free to check out my other adventures in my bigger environments, until then...happy growing!
Stay Lifted
Salokin
Likes
10
Share
@TegridyCal
Follow
Automatic Royal Amnesia is growing at a rate that we really like a lot and with a very stable and orderly regularity. We made the topping leaving 2 floors of branches underneath that one as our usual style. She looks really strong, healthy and very beautiful.

Likes
88
Share
@ILoVeThiSpLaNt
Follow
Giorno 55.Le due Kmintz da oggi prenderanno solo acqua ph 6.2. Hanno entrambe il 10% di tricomi ambrati e entro 7/14gg max verranno tolte. Ho proprio voglia di fumarle!!! Le due Watermelon sono più lente. Sicuro altri 20/25gg minimo. Alla prossima settimana e grazie del passaggio 😊

Likes
18
Share
@Wilmer
Follow
Being not expert with autos I can't complain about 190g in 3 months. I'm smoking and trying a bit , it's still a bit fresh so the taste is still developing and I will update this comment when weed it's cured.
The high for the moment is light but nice, it's take your mind and not your body, very relaxing and smooth 👽👽

Likes
15
Share
@STAYINGONMYMAINCBATORUNTWO
Follow
Doing amazingly! Actually started flush literally today! So stay tuned to see how chunky these flowers are going to get! They smell delicious! Candy shop in my tent with all these flavours!
Likes
12
Share
@Grow_for_Happiness
Follow
Well that's it folks, the time has come where we get to see the fruits of our labour and get ready to start another adventure.
The girls were great just cruising through their last 5 days since update. They were harvested on day 82 from planting seed in soil. Solid buds ranging from golf ball to baseball size, lots of hues of blue and purple. Absolutely packed with trichomes and dense as ever. Cleanup was easy, just hung upside down and stripped the fan leaves, then broke into large sections to hang in the old 4x4. Dr Greenthumb prescribed 58-60% RH and lots of air movement for the next two weeks and they'll be ready to sample before curing for a month.
Ended up with 472g dried trimmed bud and 120g of trim.
Well the dry is all done and the buds are looking, smelling, and tasting amazing! Can't imagine how much better they will be after a few weeks of curing. Golf ball size and larger buds, super dense and solid when squeezed very little to no compression. Very Crystal packed and tons of red hairs. During trimming buds maintained shape and had very little size loss. Taste is great, nice sweet and fruity with an undertone of earthy blueberries. Great buzz, nice and relaxed body with a clear but mellow mind. Easy way to waste a day away chillin while melting away the after work muscle pains and anxieties. I do love blueberry strains, and this one is no exception.


Likes
3
Share
@jardinprimitivo
Follow
El sabado 10/8 se pasa temporizador a 13 horas de luz.
El domingo se sacan ramas bajas para hacer esquejes.
Se agrega trampa para mosquitas.


Processing
Likes
10
Share
@TheOtherSide
Follow
09/29 - 10/15 D50-D56
10/02 D18 - Folded the top of the fabric pot down and opened the bottom for air. Redid all the LST. About 7-8 buds at top of canopy. 5-10 under buds. She is beautiful! I am sooo excited! If all continues well, I am going to be super happy with my first lady.
10/01 D52 - 1.75 Gal Ph 6.3 water, 3 mg Cal-Mag +
10/03 AM D54 - 1 Gal Ph 6.3, 3 cal-mag+, 2.5 micro, .5 gro, 3 bloom, 1/8 easy weed
10/05 AM D56 - 1 Gal Ph. 6.2 3 cal-mag+, 2 micro, .5 grow, 3 bloom
24x36x60 tent
Optic 1 54w cob (Seed, Early Veg)
Optic 1 XL 100w cob (Later Veg, Flower)
2x 28" tower fans
1x 6" clip on fan
3 Gal Fabric pots
Carbon filter & Exhaust Fan
Coco-Coir & Perlite - 70/30 soil

Likes
26
Share
@MrJones
Follow
Strawberry Pie Auto
~~~~04.20.23~~~~
“DAY 72 Above Ground”
📝Sunday 07.02.23 - These ladies are looking ready to harvest, going to cut after lights-on, and do a pre-harvest report.
📝Wednesday 06.28.23 - The buds continue to pack on weight and ripen, the smell in the tent is amazing, fed with a Mayan tea from Humbolt Nutrients, loved the way it looked, they have great products.
~~~~~~~~~~~~~~~~~~
📝Strawberry Pie Auto
📝Grown By: MrJones
📝@fastbuds_official
📝Soil - ProMix HP
📝Medic Grow Smart 8 LED - SETTINGS 60% F1
📝@medicgrow420
📝@gaiagreenorganics
~~~~~~~~~~~~~~~~~~
📝 A true delight with a delicious aroma and a stunning 26% THC. This eye candy of a cultivar boasts unique colors and reeks of red berries and cookie dough that will leave your mouth watering.
~~~~~~~~~~~~~~~~~~
Likes
8
Share
@Big_Worm
Follow
This girl is growing amazingly and she stinks you Thai Mint 😍 She’s definitely my one of favourite strains.
Most of her pistils have receded and once they have all done I’ll start checking her trichomes.
I think it’ll be around 2 weeks before harvest and a bud wash.
Happy growing 🤙🏿

Likes
69
Share
@Natrona
Follow
Week 7 7/25-31
AUTO AFGHAN BULLET
7/25 2gal
TPS1 30ml
Cal mag 5ml
Recharge 5ml
Kelp 2 tbsp
PH 6.3
PPM 1010
Temp 73
7/28 2gal
TPS1 45ml
Cal mag 5ml
Recharge 5ml
Kelp 80ml
PH 5.7
PPM 1210
Temp 72
Auto bullet bounced back nicely from last week's defoliation. Bullet’s opening her structure to open the lower inner branches made her really wide,.
Thank you @DivineSeeds for the opportunity to participate in not only the photo contest but also the auto grow contest.
Thanks for the visits, likes and comments; I appreciate all the plant love💚.
Have fun & love what you grow 💚
Sending you good vibes of love, light, and healing 💫
💫Natrona 💫