
Likes
Comments
Share


Likes
57
Share


@Grow4Releaf
Follow
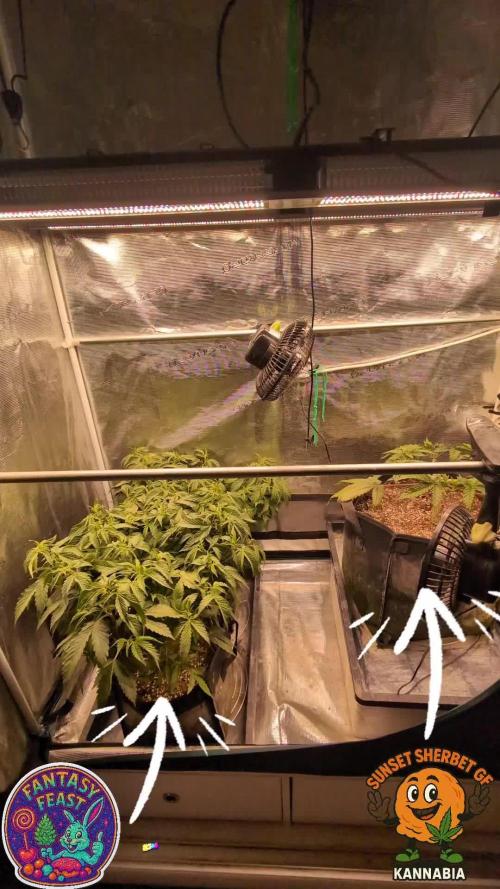
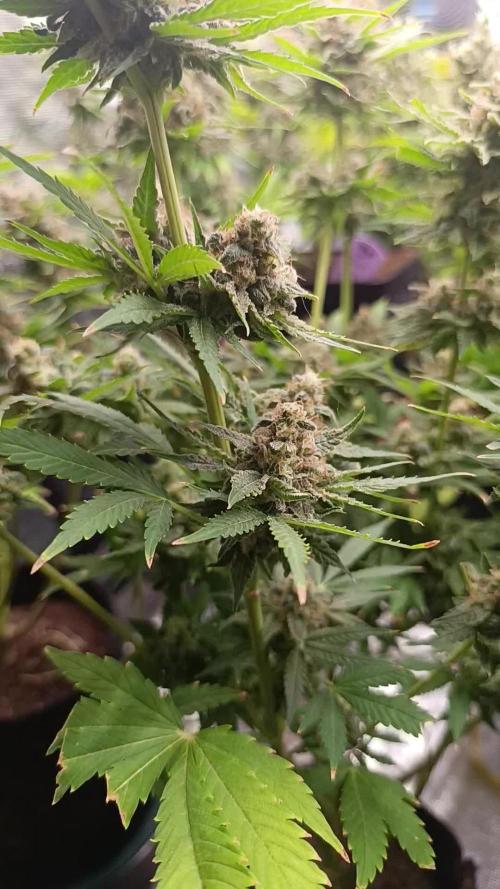
She's moving along well still , looking pretty normal on the other limbs besides the upper main cola lol that things a mess.
Still no computer todo my photos on or background but this app had been helping out. Stupid watermark can kick rocks lol.. but it's free.
She's gotten some of the Tea co super tea blend, but just one feed didn't add to main list of stuff. Besides that she's began to get Green Sensation aswell to see how she can fill out ..
Not really much done other then watching, she's shorter then her sisters so ppfd is on the lower end roughly 600/650 but that'd change once they move or I can lift her up if needed. She's kosher so far tho.
Thanks again for checking this thing out, appreciate everyone's time !!!

Processing
Likes
13
Share


@Green_Blood
Follow
On the final few days of a 10 day flush.
Will be chopping down this week to harvest and hang dry.
Really excited to try this one. The smells in the room are unreal.

Likes
199
Share

@yan402
Follow
This two were part of another diary and got moved out due to space reasons at VW8 and moved back indoors at VW20
https://growdiaries.com/diaries/218151-auto-god-s-glue-grow-journal-by-yan402
13.09.25 VW21 Both are looking good and are developing tighter nodes than when they were outside, I'm going to have to keep cutting them back every once and a while I also applied nematodes against thrips and fungus gnats.
20.09.25 VW22 some spots and some yellow leafs, I think it's a root problem, probably root bound, but both seem healthy and are getting thicker so maybe just top up with Coco coir and give a slight different nutrient schedule less Tri Part Bloom could do the trick MAYBE lol.
27.09.25 VW23 Topped up the pots with extra coco coir and trimmed the side roots a bit, both plants were root bound 📹
🌱💦🌱💦🌱💦🌱💦🌱💦🌱
Day to day tasks & actions 🌿
🌱💦🌱💦🌱💦🌱💦🌱💦🌱
27.09.25 VW22 – Fed 3l of #1 → 2l runoff
28.09.25 VW23 – Fed 3l of #1 → 2l runoff
29.09.25 VW23 – Fed 3l of #1 → 2l runoff
30.09.25 VW23 – Fed 3l of #1 → 2l runoff
01.10.25 VW23 – Fed 3l of #1 → 2l runoff
02.10.25 VW23 – Fed 3l of #1 → 2l runoff
03.10.25 VW23 – Fed 3l of #1 → 2l runoff
04.10.25 VW23 – Fed 3l of #1 → 2l runoff
(*RUNOFF reused for tomato plants)
🍶💧🍶💧🍶💧🍶💧🍶
💧 Nutrients in 30L #1
🍶💧🍶💧🍶💧🍶💧🍶
💧 TriPart Micro: 10 → 30 → 40 ml
= 0.33 → 1.00 → 1.33 ml/L
🍶 TriPart Grow: 0 ml
= 0.00 ml/L
💧 TriPart Bloom: 10 → 30 → 20 ml
= 0.33 → 1.00 → 0.67 ml/L
💧 Cal-Mag: 60 ml
= 2.00 ml/L
🍶 Home-made FFJ/FPJ (new fish batch): 30 ml
= 1.00 ml/L
💧 pH Down:
Citric acid (BuxXtrade) — adjust to ~pH 6.0
📦 TOTAL : = 160 ml per 30L = 5.33 ml/L
🍶💧🍶💧🍶💧🍶💧🍶
⚙️✂️⚙️✂️⚙️✂️⚙️✂️⚙️
✂️ Tools & equipment ✂️
⚙️✂️⚙️✂️⚙️✂️⚙️✂️⚙️
✂️ 2× MarsHydro SP3000
⚙️ MarsHydro 150mm ACF Ventilator
✂️ Trotec dehumidifier (big unit)
⚙️ Mini no-name dehumidifier
✂️ Kebab skewers (LST – stainless)
⚙️ Wire + roast skewers (LST assist)
✂️ Scissors (HST)
⚙️ Vacuum (for spills & cleanup)
✂️⚙️✂️⚙️✂️⚙️⚙️✂️⚙️✂️⚙️✂️⚙️
🍒🍭🍬🌈🍒🍭🍬🌈🍒🍭🍬🌈🍒
🦄Fantasy Feast ( Seeds)🦄
🌈🍒🍭🍬🌈🍒🍭🍬🌈🍒🍭🍬🌈🍒
Species: Hybrid (Regular)
Genetics: The mother is Unicorn Whip by Dirty Bird Genetics. The father is Charcuterie by Cannarado Genetics.
Effect: Unknown Mixed effect body and head high
Flavor: Some phenos are Skunky gassy fruity, some are fruity sour citrus with a chemical touch and a touch of skunk
Flowering: Estimated 8–10 weeks
Resistance: Strong — Testing phase done


Likes
10
Share


@420DeepGrow
Follow
Gracias al equipo de Zamnesia, Marshydro, XpertNutrients y Trolmaster sin ellos esto no sería posible.
💐🍁MAC 1:
La MAC 1 es una variedad muy solicitada, creada originalmente por Capulator y distribuida solamente a determinados criadores y cultivadores. ¡Pero ahora ya puedes cultivar este tesoro en casa y disfrutar de sus cogollos densos, jugosos y potentes!
Gracias a su densa copa y vigor, la MAC 1 es una opción ideal para LST, poda apical y otras técnicas de entrenamiento (incluido el lollipopping). Cuando entra en floración, las plantas de la MAC 1 se estiran bastante y una vez maduras pueden alcanzar una altura de 160cm en interior y más de 180cm en exterior. De media, las plantas feminizadas de la MAC 1 necesitan un total de 9-10 semanas para terminar la floración, momento en el que estarán repletas de cogollos índica pequeños y compactos.
🌻🚀 Consigue aqui tus semillas:
https://www.zamnesia.es/10906-zamnesia-seeds-mac-1.html
Código Descuento 20%: ZAMMIGD2023
💡TS-3000 + TS-1000: se usaran dos de las lámparas de la serie TS de Marshydro, para cubrir todas las necesidades de las plantas durante el ciclo de cultivo, uso las dos lámparas en floracion para llegar a toda la carpa de 1.50 x 1.50 x 1.80.
https://marshydro.eu/products/mars-hydro-ts-3000-led-grow-light/
🏠 : Marshydro 1.50 x 1.50 x 1.80, carpa 100% estanca con ventanas laterales para llegar a todos los lugares durante el grow
https://marshydro.eu/products/diy-150x150x200cm-grow-tent-kit
🌬️💨 Marshydro 6inch + filtro carbon para evitar olores indeseables.
https://marshydro.eu/products/ifresh-smart-6inch-filter-kits/
💻 Trolmaster Tent-X TCS-1 como controlador de luz, optimiza tu cultivo con la última tecnología del mercado, desde donde puedes controlar todos los parametros.
https://www.trolmaster.com/Products/Details/TCS-1
🍣🍦🌴 Xpert Nutrients es una empresa especializada en la producción y comercialización de fertilizantes líquidos y tierras, que garantizan excelentes cosechas y un crecimiento activo para sus plantas durante todas las fases de cultivo.
Consigue aqui tus Nutrientes:
https://xpertnutrients.com/es/shop/
📆 Semana 2:
Gran primera semana, ella ha dado un gran estiron estos días, si sigue así será una gran cosecha.
Esta semana se practica defoliacion, poda de ramas bajas y se le agrega Sticky Fingers .
La carpa está ocupada al 100%, sigue una floracion explosiva gracias a @Marshydro y @Xpertnutrients y @Trolmaster con esta gran genética 💪.
Potencia de la lámpara: 70%
Likes
2
Share


@PINUFLA
Follow
Día: 72
Riego: 1L x Pl.
- SoloTek Bloom 3mlxL
- HeavyBud 3mlxL
- Vitamax 1mlxL
- MonsterBloom 0,3gxL
Día: 75
Riego: 1L x Pl.
- ProSilicate 1mlxL


Likes
3
Share


@UnicornSparklehorn
Follow
We're at the end of week 4 and she doesn't seem to have triggered flowering yet. Fortunately this is giving me time to fill up her canopy. Seedstockers claim she's an XXL plant and I hope to test that.

Likes
19
Share


@Iamdisabl3dsgirl
Follow
So happy my gorilla glue have started showing their first signs of floweringlast night. One in the front is filmed ( non intentionally ) The back one was toped once. They are flourishing in their growtechgarden self wicking pots.

Likes
22
Share


@bypado_farm
Follow
Day 69:
Watered each plant with 1.5L with nuts
1379 ppm, 2951us/cm, 2.9 EC (1 purple punch, wedding Cheesecake)
1391 ppm, 2959 us/cm, 2.9 EC (gorilla cookies) 1L
319 ppm, 678 us/cm 0.6 EC (3 strawberry banana and 2 purple punch) (2L each)
3 different feedings for the 10 plants
Still flushing all the strawberry banana and 2 purple punch with flawless finisher, 2ml per L. (1st week flawless finisher, 2L each, 2nd week clear water, 150L each pH tap water)
Day 71:
I've been struggling with the humidity, always around 70%, I can't turn the lights off at the moment. I lost one of the main fans during 2 days, and I found mold on all the tops on one purple punch and on the smaller strawberry banana as well. First timing having this issue! High humidity plus not enough air circulation equals this. Mistakes happen for a reason. Need to start rethinking my whole air circulation, exaustor, fans, etc etc. I removed the infected buds, I used a magnified glass to help me do the job better. I did everything like the book. Already have 3 fans on the tent, let's see how it goes. Humidity between 65-75%
Day 73:
Watered each plant with 1.5L with nuts
1458 ppm, 3101us/cm, 3.1 EC (2 wedding Cheesecake and 1 gorilla cookies)
283 ppm, 602 us/cm 0.6 EC (3 strawberry banana, 3 purple punch and 1 wedding Cheesecake) (2L each)
2 different feedings for the 10 plants
Still flushing, 1st week flawless finisher, 2L each, 2nd week clear water, 150L each pH tap water)
Everything running smooth, they are starting to show the colors from the flush I've been doing.
Day 75:
Watered each plant with 1.5L with nuts
290 ppm, 617 us/cm 0.6 EC (3 strawberry banana, 3 purple punch and 3 wedding Cheesecake) (2L each)
Day 77:
Watered each plant with 1.5L with nuts
1811 ppm, 3810 us/cm, 3.8 EC (gorilla cookies)
253 ppm, 538 us/cm 0.5 EC (3 strawberry banana, 3 purple punch and 3 wedding Cheesecake) (2L each)
Still flushing... Going to cut some of them this week.
Likes
20
Share


@pifflestikkz
Follow
Day 98
Day 63 Flower
30/05/24 Thursday
Finally the time has come!!
The fox tails aren't a issue for me as it's Percy smoke, and to be fair, there decent fox tails 😍😂.
The plant is huge for a auto.
I have wet trimmed,
Removed all excess stem.
Wet bud weight is 587g
Wet trim is 35g
I will update dry weight and smoke report 👌
Thank you to everyone who liked, commented and followed 🙌
Love for the grow 💚
Till next time ✌️

Likes
35
Share


@MadeInGermany
Follow
Info:
Unfortunately, I had to find out that my account is used for fake pages in social media.
I am only active here on growdiaries.
I am not on facebook instagram twitter etc All accounts except this one are fake.
Hey everyone :-)
Another nice week goes by and it is slowly becoming a bush from training 😊.
This week it was poured 2 times with 1 l each time (For nutrients, see the nutrient table above).
She was trained once again with topping.
You still have some time until it blooms until space is free :-).
Otherwise everything was checked and cleaned like every day.
Have fun with the update and stay healthy 🙏🏻
You can buy this Nutrients at :
https://greenbuzzliquids.com/en/shop/
With the discount code: Made_in_Germany you get a discount of 15% on all products from an order value of 100 euros.
You can buy this Strain at :
https://greenhouseseeds.nl/
☝️🏼☝️🏼☝️🏼☝️🏼☝️🏼☝️🏼☝️🏼☝️🏼☝️🏼☝️🏼☝️🏼☝️🏼
Green House Seeds Company Cup Clone 🏆
Type:
Wonder Pie
☝️🏼
Genetics:
Wedding Cake x OG Kush
👍😍
Vega lamp: 2 x Todogrow Led
Quantum Board 100 W
💡
Flower Lamp : 2 x Todogrow Led
Cxb 3590 COB 3500 K 205 W
💡💡☝️🏼
Earth: Canna Coco Professional +
☝️🏼
Nutrients :
Green Buzz Liquids :
Organic Grow Liquid
Organic Bloom Liquid
Organic more PK
More Roots
Fast Buds
Humic Acid Plus
Growzyme Big Fruits
Clean Fruits
Cal / Mag
Organic Ph - Pulver
☝️🏼🌱
Water: Osmosis water mixed with normal water (24 hours stale that the chlorine evaporates) to 0.2 EC. Add Cal / Mag to 0.4 Ec Ph with Organic Ph - to 5.8


Likes
4
Share
@420DeepGrow
Follow
📆 Semana 10
Recta final bien definida, con cogollos completamente compactos, muy duros y cargados de resina. La planta empieza a mostrar ligeras tonalidades que acompañan la maduración, manteniendo una apariencia muy resinosa y brillante.
Los tricomas se sitúan en un equilibrio entre lechosos y ámbar, avanzando progresivamente hacia un punto óptimo de corte en las próximas dos semanas. El aroma se intensifica y gana profundidad, marcando un perfil cada vez más cerrado y reconocible.
La actividad de la planta es mínima, enfocada únicamente en el acabado final, mientras se acentúan los signos de consumo de reservas en hojas grandes.
Cultivo estable, afinado y entrando en la fase decisiva.
Seguimos creciendo fuerte 💪!
Likes
21
Share


@Onlypotent420
Follow
Hi all!
Grow room- no updates on the grow area status as usual.
Blue dream auto- the blue dream plant is definitely starting to settle in to the flower. And just going through the motions. I kinda like I left some branches y’all in the back. If it would have been even I don’t think they would be getting as good as lighting so that’s a plus. Ppm 850
Master kush. The master kush is didn’t really do as big of a stretch the first week of flower like I thought it would. Maybe this week... all those toppings I did definitely paid off she bushing like crazy definitely. Ppm 800
Until next time #StayKited


Likes
9
Share


@Belivitez
Follow
25. 7. Plants are still under the sun 😎 i cut 4 of 6 main branch. Buds looking supreme/ milky trichomes, but with some white pistils ( maybe fox tails).
29.7. I put dry buds into paper bag for week and than into the jar 💪 i cut down all plants ❤️

Likes
223
Share


@Tropicannibis_Todd
Follow
Well growmies this one is a keeper that's for sure 👈 couldn't of asked for better Genetics 😉
She lead the pack during the entire grow ....
Amazing Plant
👉 Big thanks to all my Growmies out there in GD land 👈 Much appreciated 🙏
Thanks To MarsHydro for the TS1000
👉I used NutriNPK for nutrients for my grows and welcome anyone to give them a try .👈
👉 www.nutrinpk.com 👈
NutriNPK Cal MAG 14-0-14
NutriNPK Grow 28-14-14
NutriNPK Bloom 8-20-30
NutriNPK Bloom Booster 0-52-34
Likes
31
Share


@Mrs_Larimar
Follow
This Spring I was asking @James from RQS, wich recommendations he can give for Good Outdoor Performer in my Country. ( Northern Europe)
Because most of the Year i have to Harvest earlier due bad Weatherconditions.
Because in 3rd .of September, weather changes, and big Rain begins
He recommended me Honey Cream and Speedy Chile
So I started Grows with this Strains
And its a Superstrain!! for my Conditions,
That means they get ready in Time, before everything gets worse
Great growing Strain, very big and stable Branches, .........When they started Flowering they go in Overdrive
The Result is a wonderful strong Plant, filled on and on with Buds
Today we harvested The Lady in the 75l Growpot
On Sunday the Lady into the ground, gets Harvested
We made some Photoshooting and Videos to show her Beauty, but its nearly impossible To catch her in Pictures
but we tried
Luckyly ii nvented in a wet trimming machine, and the Lady was cut down in short Time,
and gave us a good Number ( i have no cluehow much,,,Iam guessing for 300 g)
Sunday October 4th
Second Honey Cream was Harvested, She had agood shot Of Purple due Cold nights.
She was so fresh , when I took of the Bif Leaves, they made asmacking Sound
Plant Number 2 was sitting in The Ground, I started fertilising her late( 2 weeks before Harvest), but not tooo Late
She nearly catched up , in Budbuiding her Sister.
So Thank you for those Gentics... its for me a "must to grow again Plant"
Iam going to write more on Sunday, about buds smell and resinousness

Likes
43
Share


@TheCannaProphet
Follow
~ FastBuds PAPAYA SHERBET Photoperiod~
Well here we go on another journey together through 'Canna-land' and this one's kinda special... forget that, it's VERY special because this is FastBuds newest surprise for the community, a FEMINIZED PHOTOPERIOD STRAIN!🤯
I was fortunate enough to score these seeds, of which only 1000 were available and can't wait to see what this strain can do! This Papaya Sherbet, according to FastBuds, is a hybrid with a 9-10 weeks flowering period. For a more detailed and accurate description of this strain the following from FastBuds says it best:
"Combining the massive stature of Papaya (Oni Selection) with the strength and resilience of one of our best keeper cuts (Sunset Sherbet), this strain develops into a big, expansive bush adorned with numerous bud sites that later transform into a generous harvest of medium-sized buds. Papaya Sherbet flowers deliver a signature flavor of premium cannabis with subtle citrus undertones that emerge upon inhaling. During growth, her aroma makes for a sweet yet pleasantly bitter fragrance, giving you an idea of what the smoke will taste like. Notably stress-resistant, Papaya Sherbet is a great choice for growers working in challenging environments. She is very forgiving and rebounds quickly from any adversity, allowing growers the freedom to experiment with confidence that she will take everything like a champion she is. This strain embodies resilience, flavor, and abundant yields in every grow cycle."
Sounds like an epic strain and I personally cannot wait for this lady to strut her stuff!😍
________________________________________________________________________________________________________________________________________________________________________________________________________________________________________________________________________________________________________________________
The Setup:
This is going to be an outdoor grow, but I have started the Papaya Sherbet photoperiod indoors as our weather is still a bit too chilly to put a newly sprouted seedling outside (nighttime temp's dipping regularly into the 40's℉).
The plan is simple... let her grow inside under a 19/5 light schedule until the nighttime temperatures are in the mid 50's℉, which shouldn't be long. After which, she'll be moved outside and transplanted into the soil which I have already setup and inoculated with beneficial microbes from BioTabs and slow release dry amendments from Gaia Green. Once she's established herself outside she'll be given periodic top dressings of Gaia Green 4-4-4 and 2-8-4 along with worm castings and Compost Tea's. Her grow area is approx. 5'x5' and I have posts and a trellis net set up already for when she gets bigger to aid in training her. Let the fun begin!🤪💚
________________________________________________________________________________________________________________________________________________________________________________________________________________________________________________________________________________________________________________________
Weekly Updates:
6/24- The FastBuds Papaya Sherbet photoperiod is now going into Week Seven from seed and is going strong! She has definitely increased her height and continues to sprout new growth! Her color and vigor also remain excellent having gotten past her early episode of getting her leaves chewed on.
Today I top dressed the Papaya Sherbet photoperiod with 2 cups of Gaia Green 4-4-4 along with 1 cup of Down To Earth Bio-Fish 7-7-2 and 1/2g of Wiggle Worm castings. After top dressing and working the amendments in by hand I replaced the straw coating over the soil and watered them in with 3g of straight well water via garden hose as usual.
6/26- Our summer is here and we're under an early heat wave this week with daytime temp's hitting the mid to upper 90's ℉ with heat indexes in the low 100's ℉... in short, IT'S FNG HOT!🔥🔥🔥
I'm watering the FastBuds Papaya Sherbet photo daily now with 5g of straight well water from the garden hose. I'm watering at sundown so that the water will have some time to soak down into the soil before the heat evaporates it. The coating of straw that I previously spread over the soil around her base has helped a lot as well.
6/28- Our weather is HOT now with heat indexes over 100℉ so I'm watering the Papaya Sherbet photoperiod every day with 5g of straight well water from the garden hose in the late afternoon once the plant is in the shade.
Other than the ever present leaf hoppers, which love the leaves but leave the flowers alone, and an occasional Japanese Beetle, there aren't any serious pest issues currently. The FastBuds Papaya Sherbet photoperiod continues to have excellent color and vigor, continuing to add new growth and increase her height, it seems daily!
6/30- The weather continues to relentlessly bake everything outside... And so, the daily watering continues!🌱🚿
Another healthy week for the FastBuds Papaya Sherbet photoperiod and I hope to see many more ahead!
Thank you for checking out my diary, your positive comments and support make it all worthwhile! 💚Growers Love!💚😎🙏
Likes
9
Share


@BelgianBudtender
Follow
Hey farmers,
Week 12 was pretty chill compared to the previous one. My plant is starting to look and smell like the real deal with all that stickiness and aroma. The buds are getting bigger too, but I can't help but worry about the foliage. I think I might have let it grow too much, but it's too late to do anything about it now.
On top of that, I'm pretty sure the leaf damage is from the LED light burn again. Unfortunately, I can't do much to fix it since I've already maxed out my vertical space. But hey, at least I know what the problem is, right? To try and counteract it, I decided to reduce the feed this week since I noticed some nutrient pooling. Hopefully, that will help prevent any more damage from happening. All in all, the plant seems to be doing well and I'm excited to see how she turns out in the end.