By continuing to use the website or clicking Accept you consent to our cookies and personal data policy and confirm that you are at least 18 year old. For details please see Privacy Policy and Terms
Accept
Likes
Comments
Share


@BudGardener420
Follow
Hallo liebe Grow-Community!
Ich freue mich, euch heute an meinem neuen Grow-Projekt teilhaben zu lassen!
Nach einiger Vorbereitung und mit viel Vorfreude habe ich mich entschieden, meine Reise mit GreenHouse Seeds NL5xHAZExKALIMIST zu dokumentieren. Dabei möchte ich nicht nur meine Fortschritte festhalten, sondern auch von eurer Erfahrung und euren Tipps profitieren.
Es ist meine 1. Erfahrung, welche ich im hydropoischen Anbau sammeln darf.
In diesem Report werde ich regelmäßig über die Entwicklung meiner Pflanzen berichten, angefangen bei der Keimung über die vegetative Phase bis hin zur Blüte. Ich bin gespannt, wie sich alles entwickeln wird, und hoffe, dass wir gemeinsam viel lernen und uns austauschen können.
Über Feedback, Ratschläge und konstruktive Anregungen freue ich mich immer – schließlich macht das gemeinsame Growen noch mehr Spaß! Also, lasst uns starten und gemeinsam in diese spannende Reise eintauchen.
Vielen Dank schon mal für eure Unterstützung und viel Spaß beim Lesen 🌱
In deiner ersten Woche der Cannabis-Keimlingsphase habe ich die Samen in Steinwolle gekeimt, die mit pH-reguliertem Wasser vorbereitet wurde.
1. Vorbereitung der Steinwolle:
Die Steinwolle wurde vor dem Einpflanzen der Samen mit Wasser getränkt, dessen pH-Wert auf etwa 5,5 bis 6,0 eingestellt wurde. Dies ist der optimale pH-Bereich für die Nährstoffaufnahme in der frühen Wachstumsphase.
2. Keimung:
Die Cannabis-Samen wurden in die vorbereitete Steinwolle gelegt und leicht bedeckt. Die Steinwolle hält die Feuchtigkeit gut, was für die Keimung entscheidend ist. Die Samen benötigen eine warme und feuchte Umgebung, um zu keimen, idealerweise bei Temperaturen zwischen 22°C und 25°C.
3. Erste Anzeichen des Wachstums:
Innerhalb von 24 bis 72 Stunden sollten die Samen zu keimen beginnen. Die ersten Anzeichen sind die Öffnung der Samenschale und das Erscheinen der Keimwurzel (Radikel).
4. Entwicklung der Keimblätter:
Nachdem die Keimwurzel sich in der Steinwolle verankert hat, beginnen sich die Keimblätter (Cotyledonen) zu entwickeln. Diese sind die ersten Blätter, die aus dem Samen sprießen und sind für die Photosynthese in dieser frühen Phase verantwortlich.
5. Licht und Feuchtigkeit:
Während dieser Phase ist es wichtig, dass die Keimlinge ausreichend Licht erhalten, jedoch nicht zu intensiv, um Verbrennungen zu vermeiden. Eine dimmbare LED_Lampe - um eine geringere Intensität einzustellen - ist ideal. Die Steinwolle sollte feucht, aber nicht nass gehalten werden, um Schimmelbildung zu vermeiden.
6. Überwachung:
In dieser Woche solltest du die Keimlinge täglich überwachen, um sicherzustellen, dass sie nicht austrocknen und dass keine Anzeichen von Schimmel oder Krankheiten auftreten.
Am Ende der ersten Woche sollten deine Cannabis-Keimlinge gut verwurzelt sein und die ersten echten Blätter beginnen sich zu entwickeln, was den Übergang in die nächste Wachstumsphase markiert.
Hello dear grow community!
I am happy to share my new grow project with you today!
After some preparation and with a lot of anticipation, I have decided to document my journey with GreenHouse Seeds NL5xHAZExKALIMIST. I not only want to record my progress, but also benefit from your experience and your tips.
It is my first experience in hydroponic cultivation.
In this report, I will regularly report on the development of my plants, starting with germination, through the vegetative phase, and finally flowering. I am excited to see how everything will develop and hope that we can learn a lot together and exchange ideas.
I am always happy to receive feedback, advice and constructive suggestions - after all, growing together is even more fun! So, let's get started and immerse ourselves in this exciting journey together.
Thank you for your support and happy reading 🌱
In your first week of the cannabis seedling phase, I germinated the seeds in rockwool that was prepared with pH-regulated water.
1. Preparation of the rockwool:
The rockwool was soaked with water before planting the seeds, the pH of which was adjusted to around 5.5 to 6.0. This is the optimal pH range for nutrient absorption in the early growth phase.
2. Germination:
The cannabis seeds were placed in the prepared rockwool and lightly covered. The rockwool holds moisture well, which is crucial for germination. The seeds need a warm and humid environment to germinate, ideally at temperatures between 22°C and 25°C.
3. First signs of growth:
Within 24 to 72 hours, the seeds should start to germinate. The first signs are the opening of the seed coat and the appearance of the radicle.
4. Development of the cotyledons:
After the radicle has anchored itself in the rockwool, the cotyledons begin to develop. These are the first leaves to sprout from the seed and are responsible for photosynthesis in this early phase.
5. Light and humidity:
During this phase it is important that the seedlings receive sufficient light, but not too intense to avoid burns. A dimmable LED lamp - to set a lower intensity - is ideal. The rockwool should be kept moist but not wet to avoid mold growth.
6. Monitoring:
During this week you should monitor the seedlings daily to make sure they do not dry out and that no signs of mold or disease appear.
By the end of the first week, your cannabis seedlings should be well rooted and the first true leaves should begin to develop, marking the transition to the next growth phase.
Thx

Likes
5
Share


@SgtDoofy
Follow
Feb 27
Swapped over to an 18/6 light schedule a couple days back. Getting some really good perking-up during sleep.
Not quite ready for LST yet.

Likes
17
Share


@Stupenico
Follow
So harvest time finally.
Only 2 plants at the end but still I am happy with the result.
After cutting them I placed them for 4 days inside the dark tent.
I struggle a bit with the humidity as the air was really dry.
So now its time for curring.
I have placed the bud inside jars.
Lets wait for a few weeks to have a first try !
See you for the smoke review.

Likes
41
Share


@Cannaguy
Follow
Gelato x GMO is taking off in the 15 gallon pot, showing rapid growth every day. The Blue MOBs seem to have stopped growing vertically in the 5 gallon buckets and are now filling out existing branches while they all reach for the sun. The 15 gallon Blue MOB seems to still be growing in height as well as filling out existing branches. Heavy rain has been persistent with few days of direct sunlight yet plants are still growing. Massachusetts ended up receiving the tail end of a big storm so I have not had to water them the entire week, the soil has stayed damp and kept the plants hydrated
Likes
7
Share


@SUMAN
Follow
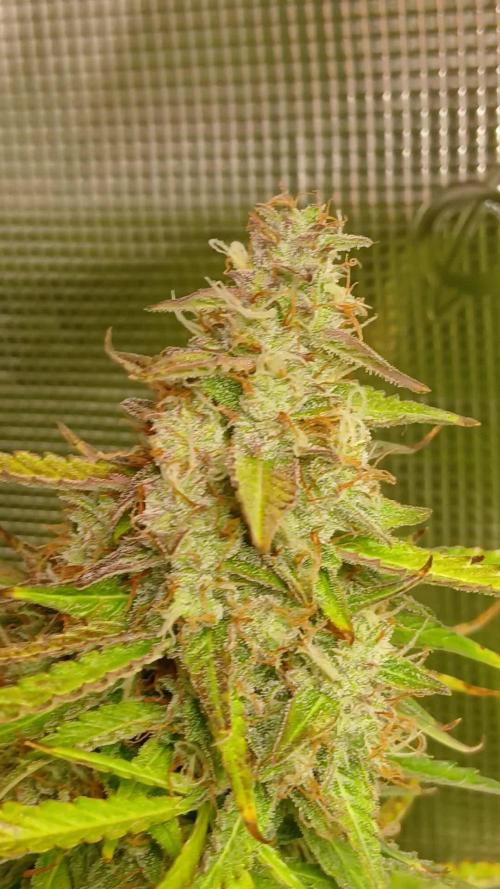
Buds starting to stack nice up and has a pineapply fruity smell with some gassy funk on the back end

Likes
90
Share


@AsNoriu
Follow
Day 43. Girls still on water, but they are getting bigger, need more water, so installed trays, gave them a lift from ground and hopefully this weekend heavy LST and defoliation session with light BioBizz FishMix feed .
All girls are nice, two a bit smaller, but they should catch up. Made small shuffle , sometimes it looks to me, that one light is overperforming others in veg.
Day 45. Heavy training, loads of lst and defoliation, pure phed water.
Think to give them 2 more weeks before flip, will clear up in a week all small shoots and bottoms.
Happy Growing !


Likes
3
Share


@GrowingNBlowin
Follow
Flipped to flower on 01/25. Pretty easy week and she stretched as I hoped she would. Almost as tall as my other plant in the tent that's 2 1/2 weeks older! She's healthy and strong. Excited to see what she does in the flowering stage :)

Likes
8
Share

@Trinidad
Follow
02.07.25. Day 77
2 phenos have dense buds the other 2 I think just needs time to catch up. The smell is amazing, sweet with slight citrus. Buds are sticky. Fresh reservoir change out today. Trichomes are looking cloudy. I think now will be good time to harvest, however I want to push them some more. I will begin flushing after this week, or if trichomes say other wise.
5.08.25. Day 80
Today I added a sound of bees buzzing (10hr youtube video) in the tent. I saw documentary (https://m.youtube.com/watch?v=E8SJlyrEDX0&t=8s) of plants where plants produced sweeter nectar when exposed to this low frequency noise compared to those that was not. It is said the plant does this in an effort to attract pollinator. I am not sure how much truth there is to it however it seems logical.
In another section of the documentary the plant roots was also able to hear water. Anywhere the speaker was placed with same low frequency of water the roots grew in that direction. Amazing.

Likes
15
Share


@Lontra
Follow
Tag 29:
🌱: Beginn Woche 5. Da ich denke, dass wir mittlerweile in der Vorblüte sind, trage ich diese als erste Blütewoche ein. Es gab ganz leichte Anpassungen am LST, ich werde die Lady jedoch vermutlich von nun an in die Höhe wachsen lassen. Desweiteren wurden einige der untersten Fächerblätter, die bereits vollständig verschattet waren, entfernt. Auch 1-2 kleinere Blätter, die nach innen wuchsen und den Blüten die Sonne nahmen, wurden entfernt. Leider ist mir auch eines der größeren Fächerblätter abgebrochen, das ich noch behalten wollte, aber ich denke sie wird es verkraften.
💧: Die Erde ist immernoch feucht.
💡: Die Beleuchtung ist unverändert (DLI ~40, Abstand zur Pflanze ca. 35cm)
Tag 31:
🌱: Bisher lasse ich sie einfach erst mal wachsen, ich denke jedoch darüber nach die nach innen wachsenden Fächerblätter morgen doch noch mal zu entfernen.
💧: Die Erde ist immernoch feucht.
💡: Die Beleuchtung ist unverändert (DLI ~40, Abstand zur Pflanze ca. 35cm)
Tag 32:
🌱: Heute wurde erneut die Schere angesetzt und ein paar der nach innen wachsenden Blätter sowie ein paar kleinere Triebe im Inneren entfernt. Das LST wurde nur minimal angepasst, um eine einheitlichere Höhe zu erreichen.
💧: Die Lady wird so langsam etwas durstiger und so gab es heute wieder ca. 3 Liter Nährstofflösung. Diese wurde jetzt etwas erweitert und entspricht nun ca. 50% Bio Bizz Düngerschema. Zusätzlich dazu gab es dieses mal auch CalMag+Bittersalz.
💡: Die Lampe wurde ein paar klicks nach oben gehangen um die Werte in etwa konstant zu halten (DLI ~40, Abstand zur Pflanze ca. 35cm)
Tag 34:
🌱: Heute wurden nur die Blätte etwas sortiert, um den Blüten mehr Licht zu geben. Mittlerweile haben die höchsten Triebe etwa 20cm (vom Boden aus) erreicht.
💧: Die Erde ist noch feucht.
💡: Die Lampe wurde noch ein Stück weiter nach oben gehangen, um die Beleuchtung in etwa konstant zu halten (DLI ~40, Abstand zur Pflanze ca. 35cm)
Tag 35:
🌱: Ein paar der untersten, im Schatten liegenden, Blätter wurde entfernt, sowie 2-3 kleine Nachzügler Triebe aus dem Inneren. Das LST wurde ein wenig angepasst. Ich denke darüber nach noch ein paar mehr kleine Nebentriebe (vor allem aus der Mitte) zu entfernen, damit der vorhandene Platz besser für die größeren Triebe genutzt werden kann. Über Gedanken/Meinungen/Ideen dazu würde ich mich freuen 😉
💧: Zu Tagesbeginn ließ sie ihre Blätter ganz schön hängen und die Erde war ziemlich trocken, also gab es auch heute wieder etwa 3 Liter Nährstofflösung.
💡: Die Beleuchtung ist unverändert.


Likes
36
Share


@Roberts
Follow
The big Potter of Gorilla Glue is doing well under the Spider Farmer G3000 light. She is starting to flower, and looking pretty healthy. Everything is looking good at thr moment. Thank you Spider Farmer, and Amsterdam Marijuana Seeds. 🤜🏻🤛🏻🌱🌱🌱
Www.amsterdammarijuanaseeds.com
Thank you grow diaries community for the 👇likes👇, follows, comments, and subscriptions on my YouTube channel👇. ❄️🌱🍻
Happy Growing 🌱🌱🌱
https://youtube.com/channel/UCAhN7yRzWLpcaRHhMIQ7X4g
Spider Farmer G300w: https://amzn.to/3S2zvsd
Spider Farmer 10X20 Heat Mat Kit - https://amz.fun/lsa0J
Spider Farmer Amazon Store: https://www.amazon.com/spiderfarmer
Spider Farmer Official Site: https://spider-farmer.com
Discount code: saveurcash

Likes
15
Share


@Viccrazyweed
Follow
Guys, i don’t know where is going to take me but this trip is being awesome, as i wanted, the critikal plant has grown in spiral and she is developing a lot of little new leaves, growing gorgeous but im a newbie, i don’t not if its fem or not until flowering I guess (?)
Cookies was growing superslow and i don’t know why i topped it but she is recovering now, might not grow because of then injury
I know this “advanced” training methods are gonna make the growing stage last another month at least for sure
I have improved moist levels by spraying them quite a few times daily, tap water with 1ml of propolis 5% every 0.5L and have turned the ph correct with some natural orange juice, a few drops use to be enough
I turn the heather on sometimes and it comes with fan so perf but im worried the most of the time they are with low airflow levels due to the fact i have not a proper space and they are in a corner of my room
Likes
27
Share


@Stigghiola
Follow
Questa settimana ho montato la lampada hps e l'ho spostata nella zona in cui le piante mi sembrano più pronte, i fiori stanno ingrossando sempre di più e dai filamenti arancioni sembrerebbe che stiano maturando, guardando con il microscopio i terpeni sono ancora trasparenti.
Aggiornamento 27 novembre, ho controllato i terpeni della black cream al microscopio e sembrano quasi pronti prossima settimana tolgo qualche cima delle 2 black cream che sono quasi pronte e lasciando i rami più bassi per che risultano ancora meno pronti rispetto ad alcuni.
Aggiornamento 28 Novembre : Le piante continuano a crescere costantemente le black cream sembrano sempre più pronte per il raccolto.
Aggiornamento 30 Novembre : Oggi ho deciso di raccogliere alcune cime di 2 black cream che erano belle pronte.


Likes
15
Share

@Roberts
Follow
Blur dream is doing good. She is going deeper into flowering. Everything is looking good and just letting her do her thing. Thank you Spliff Seeds, Medic Grow, and Athena. 🤜🏻🤛🏻🌱🌱🌱
Thank you grow diaries community for the 👇likes👇, follows, comments, and subscriptions on my YouTube channel👇.
❄️🌱🍻 Happy Growing 🌱🌱🌱
https://youtube.com/channel/UCAhN7yRzWLpcaRHhMIQ7X4g.
Likes
13
Share


@NewJackWeed
Follow
12/26-12/28/20: So I have no idea what to expect. I just hope moving the light farther away was a good idea! I've had to turn the fan on a couple of times to bring the 82F temp down and now it's creeping back down.
12/29/20: Still no growth and I can't maintain the humidity above 45%. I placed a piece of saran wrap over the pot to help it retain some water. I also moved the 1000w lamp a little farther away and I have the fan running. I also need to figure out the exhaust set up. Too daunting.
12/30/20: The cherry finally popped and I can see ole girl starting to break the surface. Adding the saran wrap helped with the moisture and this morning was the result. The temp still seems a be high (81F) and the humidity still isn't maintaining (~51%). I watered the seedling a bit and spray twice a day. It's currently back under the wrap.
1/2/21: Ole girl Salisi is growing slowly, but strong. I added a humidifier from Target to maintain the humidity between 40-60%. Temperature still lingers around 82F, but I think that's ok:🤷:.
1/4/21: Salasi is growing with purpose now! Two more days until she graduated to the big pot. I moved her inside of a nursery with vents open and gave her a full watering. RT: 82F, RH 62%.
1/9: Salasi's looking ok but I'm concerned about stem length. I just sprayed inside the nursery and a couple spritzes to the top soil. I'm concerned about thinning?

Likes
3
Share


@JeyGanesha
Follow
7/2/25 prima settimana a 12/12 .. inizierò a vedere i primi allungamenti a giorni. Sta iniziando la prefioritura
Likes
6
Share


@jaydee702
Follow
planted two branches from my last grow of Bubba CheeseCake.The ladies are Now in Full Veg ill be Topping them By Next weeks update.i dod a tinypot Grow on the Mother of these Clones so its going to be Super Sticky Growing it in Full sized environment the Strain Was Awsome even being Stressed with cramped conditions.This Grow Will be alot Better all around.

Likes
4
Share


@eldruida_lamota
Follow
Vamos familia, actualizamos la novena semana de floración de estas Thunder Banana de Seedstockers, salieron las 3 de 3, 100% ratio éxito.
Aplicamos varios productos de Agrobeta, que son increíbles para aportar una buena alimentación a las plantas.
Temperatura y humedad dentro de los rangos correctos dentro de la etapa de floración.
La tierra utilizada es al mix top crop, por cambiar.
De 3 ejemplares seleccioné los 2 mejores para completar el indoor, cambié el fotoperiodo a 12/12 y también apliqué una poda de bajos, se ven bien sanas las plantas, tienen un buen color progresan a muy buen ritmo por el momento, las flores han tricomado que da miedo, no sé si aguantaré una semana más o me las quito ya, veremos el finde semana.
Agrobeta:
https://www.agrobeta.com/agrobetatiendaonline/36-abonos-canamo
Hasta aquí todo, Buenos humos 💨💨💨.

Likes
32
Share


@EBPbyEVD
Follow
Hey folks! ✌️
I was sick for a whole week and skipped last week's update, but I've got some exciting things to share with you now.
At the time of this post, we're on day 53 of flowering.
While I was down with a fever, the plants suffered a bit due to drying out. The big one was hit the hardest. As soon as I started feeling better, I watered them, but the big plant experienced some gnarly salt buildup. Both plants were emergency flushed, and now the situation is more than good.
During this time, the male plants were actively producing pollen, which I collected. I've decided that I have enough pollen for future experiments, so today I culled the males to ease the workload.
In my small tent, the LSD auto by Barney's Farm is flowering. I might pollinate one branch to see what happens.
The big plant is struggling with the weight of its branches, knocking its neighbors' heads (it even broke off some male branches!). I've tied the heavy branches to wire supports attached to the main stem.
Now I can clearly see the seeds forming and maturing.
I'll keep the plants until the seeds start dropping onto the floor.
The plants have fully recovered and are feeling great.
For nutrients, I'm using AB at 40ml per 5l with an PPM of 1695 and pH of 6.1.
I'm giving around 10 liters to the big one and 3-4 liters to the small one.
And now, I invite you to admire this beauty.
Take care, my friends!
Sending you all my love ❤️❤️❤️
