
Likes
Comments
Share


@Ieiogrow94
Follow
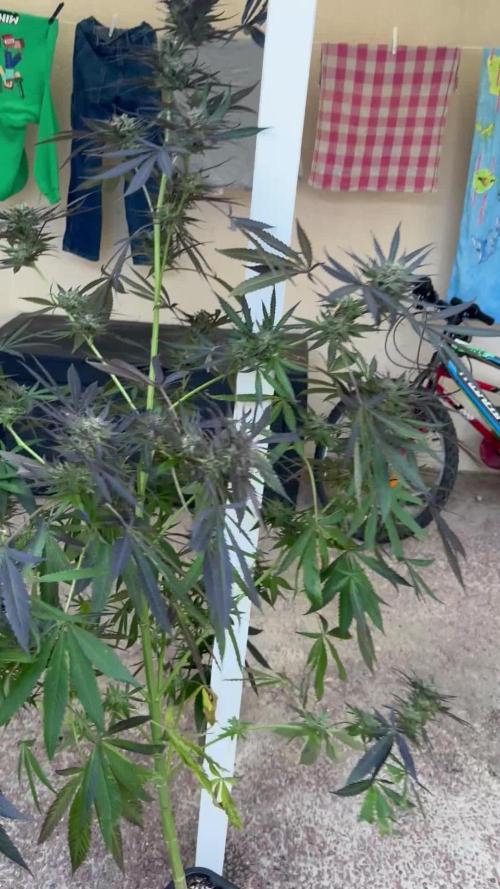
Eccoci di nuovo qui!!!
Super eccitato per questa nuova collab con Kannabia Seed Company, team davvero al top, che mi ha dato l’opportunità di testare questa nuova genetica e di condividere i progressi con tutti voi!!!
Come sempre partiamo nei bicchieri per poi travasare.. Questa volta verrà svolto tutto sotto la Lumatek Zeus 465 ProC, mi aspetto molto da questo ciclo!!
Ma che colori ha?!
Davvero senza parole complimenti TEAM!!
Grazie a tutti per il supporto ❤️🍀🔥


Likes
7
Share


@Danger90946
Follow
Day 8 11/01/2021- Welcome to another week of veg. Today I started LST.
Day 12 11/05/2021- Even though you can’t see she has already began to pre flower can see the white pistil coming out. I think I will switch my light to 12/12 on Monday to have my photo lemon start flowering as well.
Day 14 11/07/2021- last day of the week and also last day of Veg.

Likes
23
Share


@Gromorethailand
Follow
So, into day 9 of 12/12 and the girls have responded quickly. Bud sites appearing everywhere. Top dressed with some more nutrients, have had daily manicuring, i prefer little and often rather than 1 massive blast. I have turned the lights up to 85%, and will work it to 100 over the next week or so.


Likes
6
Share


Likes
9
Share


@TeamQuality420
Follow
This week I am going through and pulling the large fan leaves off , she is a slow flowering plant so I'm just doing my best to be patient with her !!! A true gem with an unique structure !!!
I think this girl is gonna be a 10 week flower , she is just starting to get smaller flower spots . Still a beast !!
Added a CO2 bag directly above the canopy , added a 150 watt "blurple" light above GG#4 S1( number 2)
More picture notrs and videos to follow !!

Likes
5
Share

@BigLebowski
Follow
Blütetag 36
Die Gießmenge wurde leicht erhöht auf 2 Liter/Tag/Pflanze. Ich gieße aktuell alle drei Tage sechs Liter.
Vor zwei Tagen habe ich einen Stamm gespalten. Die Pflanze verkraftet es gut und der Durst bleibt. An dieser Pflanze sind die Stigmata noch nicht ganz so weit entwickelt, wie bei den anderen Beiden. Vielleicht ernte ich Diese zuletzt. Trichome entwickeln sich gut und man erkennt bereits etwas Bernstein.
Blütetag 40
An einigen Stellen sind die Trichome bereits bei 10-15% bernsteinfarbend. Letztes Gießen war nur mit Cal/Mag. An Blütetag 42 ein letztesmal düngen und danach gibts nurnoch Wasser mit Flawless flush.

Likes
31
Share


@TheHighentist
Follow
I changed the light cycle 11/6, directly to 12/12 by prolonging the sleep period.
They got their first bloom nutrients 13/6
Humidity im slowly dropping, as they have not bloomed yet.
12/6
-Temps 24-28day/21-23 night
-Humidity 69% (+-4)
13/6 Water day*
-Upped the water intake, from 750ml last watering, to 850ml and change in nutrients.
Changed nutrients from Biobizz Grow(2ml/L) + Biobizz Fish-mix(2ml/L)
to Biobizz Topmax, Bio heaven, and Bloom (1ml/L) (((biobizz grow every other feed)))
-Temps 24-28/22-23
-Humidity 65% (+-3)
14/6 They look healthy and happy. 47 Cm in height.
-Temps 24-28/22-23
-Humidity 65% (+-3)
15/6 Look just fine, not any huge growth but no signs of mistreatment
-Temps 24-28/22-23
-Humidity 64% (+-3)
16/6
13/6 Water day* and grow tent cleaning.
-850ml
Biobizz Topmax, Bio heaven, and Bloom (1ml/L) (((biobizz grow 1ml/L every other feed)))
-Temps 24-28/22-23
-Humidity 63% (+-3)
17/6 Looking good
-Temps 24-28day/21-23 night
-Humidity 63% (+-3)
18/6 was away all day
-Temps 24-28day/21-23 night
-Humidity 63% (+-3)
Processing
Likes
15
Share


@vibealive
Follow
This week is going along great... I left Friday the 14th for my brother's cottage... So I matter sure to give her a whole cup of water... Came home to lots of growth!
Likes
23
Share


@NSCanna
Follow
The Black Devil's OG is trucking along without issue, while the Northern light is a tad on the droopy side at night and is likely expecting earlier night hours. I will likely adjust my light schedule to reduce the stress.
The videos posted came out pretty well, considering they came out of a cell phone camera. 400x ends up being really blurry as the phone can't focus properly to compensate, but you can still see all the bacteria dancing around. Some nematodes and ciliates there too.


Likes
107
Share


@Tropicannibis_Todd
Follow
ALRIGHTY THEN GROWMIES 😎
REMINDER I DO 2 UPDATES PER WEEK 👉WEEKLYROUNDUP👈👉MIDWEEKLY UPDATE👈
We just hit week 8 and all is well , have to admit she's just killing it super happy with how shes coming along 😃 .......
👉currently having a Cal/Mag , pH issue but hoped I worked it on the last feeding 👈
I'm still training her with LST and it's looking good 👌 And she's filling out the pot perfectly👌 Lots of tops 👈
, rain water to be used entire growth
Lights being readjusted and chart updated .........👍
I GOT MULTIPLE DIARIES ON THE GO 😱 please check them out 😎
THANKS FOR TAKING THE TIME TO GO OVER MY DIARIES 👍
👉IF ANYONE IS LOOKING FOR A PLACE TO HANGOUT VIA GROWDIARIES AND TALK GROWING AND JUST CHILL AND WHATEVER .....👈
👉I CREATED GROWDIARIES DISCORD SERVER !!!!!!!!!!!👈
LINK IS 👉
https://discord.gg/zQmTHkbejs
AND SEE HOW IT PLAYS OUT !!!!!!!

Likes
18
Share


@Bread_n_Buds
Follow
Now we've reached day 25.
We are in the transition phase, pre-flowering if you want, when the seedlings reveal their sex by showing the white fluff or the boyish balls. Here and in all F1 Hybrids you can be SURE, SURE as death that you will never see any balls.
If you have underestimated this aspect of the F1 Hybrid, go back and think about how many times you found the balls on the paint, full of pollen that fertilized your ladies.
Do you like having young ladies impregnate you? Absolutely not for me and this is a very valid reason why you can choose the F1 Hybrid. Really guys the seeds suck and the genetics of the various breeders if they don't do a job like this it means that they are super hybrid poles with genetic traces scattered here and there. Inglourious bastards.
Here we don't want to be Aryan but to cultivate healthy plants with safe results.
Our Watermalon Candy F1 per mea culpa mea culèa mea grandissima culpa shows some signs of overfeeding, the famous yellow tips of the leaves. Let's be clear, this is minor and is due to the fact that these genetics are so good that they need very little or no fertilizer in the vegetative phase. Then if you already have fertilized soil, forget about growing guys, another pro!
I gave the recommended doses even a little less to tell the truth of both Aptus and Plagron and the plants more or less all have these small signs of over. LITTLE guys, wait until the end to save if you feel like it, or at least I recommend it.
To fix this little thing we go to flush with pH 6.2 and only give Aptus Regulator which should rebalance the plant and soil before delicately moving on to fertilizers for flowering.
Site Description
ZAMNESIA SEEDS - WATERMELON CANDY F1 HYBRID AUTOMATIC: BUDS BURSTING WITH FLAVOR
If you've been looking for a flavorful strain with superb genetics that's effortless to cultivate, the hunt is over. Thanks to reliable F1 hybrid genetics, Watermelon Candy F1 Automatic showcases the highest degree of productivity and efficiency. This strain takes everything you know and love about the original, and packages it in a plant with even greater potential.
GROWING WATERMELON CANDY F1 HYBRID AUTOMATIC
Derived from Watermelon, Candy Kush, and ruderalis, Watermelon Candy F1 Automatic is a finely tuned medley of genetics. This cultivar is fast to flourish and reliable to grow, no matter where you choose to grow. Taking just 9–10 weeks from germination to harvest, she provides a uniform growing experience culminating in a huge haul of buds for her size.
Reaching heights of 65–80cm, Watermelon Candy F1 Automatic stays pretty grounded, making her perfect for smaller growing areas where space is a commodity. It also means you can fit more plants in if you have the room! Once ready to yield, growers will see a return of 400–450g/m² indoors and up to 100g/plant outdoors. Moreover, Watermelon Candy F1 Automatic is highly resistant to pests and disease, making it an ideal strain for newcomers and fans of low-maintenance cultivation.
AROMAS, FLAVORS, AND EFFECTS OF WATERMELON CANDY F1 HYBRID AUTOMATIC
If we haven't already sold you on the power of F1 hybrid genetics, the proof is in the pudding. Watermelon Candy F1 Automatic is teaming with terpenes and cannabinoids, making for a lively high coupled with huge flavors. Just one hit is all it takes to sample rich fruitiness mixed with sweet candies and a slight earthiness to back it up. And with an average THC content of 23%, the effects are euphoric at the start but settle into deep relaxation soon after. Whether you're chilling alone or with friends, Watermelon Candy F1 Automatic will see you right.
As for fertilizers, I'm doing a small comparison experiment to finish off the fertilizers I had at home, it's not 100% indicative, it's only on two specimens but given the stable genetics I decided to try to compare the results of Plagron Vs Aptus , both excellent brands which they will certainly produce beautiful plants which are already of excellent stable genetics. In the next few weeks the comparison will be more evident now the seedlings are still very small and just potted.
So seeds of all brands, in addition to these great F1 Hybrids and the entire Zamnesia line, fertilizers and everything related to the world of cannabis, you should buy them from the best online store in the sector
www.zamnesia.io
Likes
37
Share


@GODSGIFT_2005_JM
Follow
For LIQUIDS & NUTES ******GREEN BUZZ NUTRIENTS***** organic.
Also i’m using their LIVING SOIL CULTURE in powder form!
MARSHYDRO ⛺️ has large openings on the sides which is useful for mid section groom room work. 🤩
☀️ MARSHYDRO FC 3000 LED 300W
💨MARSHYDRO 6” in-line EXTRACTOR with speed-variation knob, comes complete with ducting and carbon filter.


Likes
1
Share


@Krautbauern
Follow
harvest time soon. Maybe making hash or some cookies out of her. Smell is very intensive right now. Unfortunately I repotted her way too late she didn‘t got dense buds. take a look at my other diaries for good plants haha :)


Likes
21
Share


@STAYINGONMYMAINCBATORUNTWO
Follow
What to say what to say...... lol last week of nutes and I flush! Smells so heavenly like someone dropped me into a candy filled ball pond lol the buds are so dense and hard so swelling during flush has got me excited already because they’re only going to put on weight at the end! So happy with this one! Mouth waters every time I open the tent! As the wedding gelato is in the same one so heaven meets heaven! I had noticed a little burn maybe wind burn when my fans were closer but hasn’t affected the plant itself at all! Harvest real soon! This is the best I’ve done ever I did say I will show all I have learned in these next diaries after honey cream and look?? Love it!