The Grow Awards 2026 🏆 


Likes
Comments
Share
@Krisis
Follow
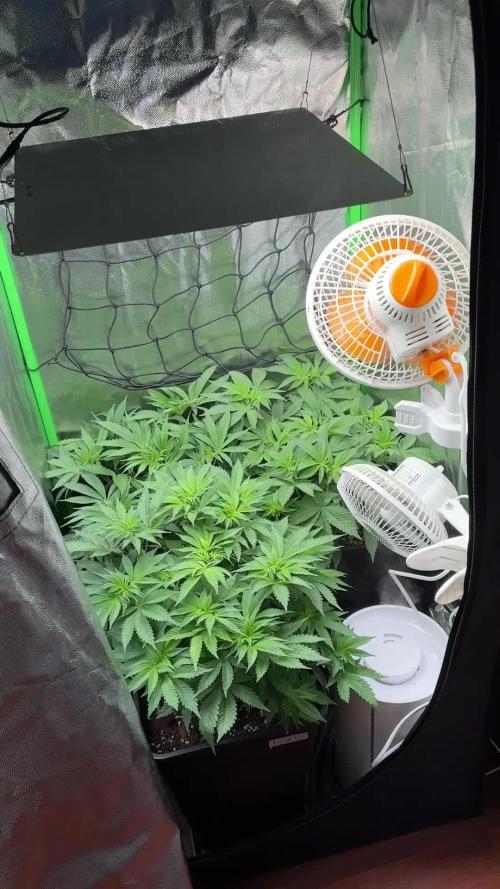
03/03/25. It’s flip time! Day 1 flower let’s go
This runtz definitely gotta have this name because of the candy. Nothin small about this girl. She’s a wild beast.
I did use some lst clips on her to move her branches out a bit because her leaves are just huge.. and sticking all over everywhere.
I didn’t keep following up with more lst clips as I’ve done with some others this grow. I kinda like her being all wild and doing what she wants.
If she could talk she’d say -can’t be tamed!
Okay, okay..so she’s skipping watering day today. Her soil is a bit damp still today, so I will wait until tomorrow. If we’re going based off last watering, she will be drinking a bit over a gallon, with run off. I was going to skip watering because I normally feed every other watering, but with as crazy as she’s going, and the fact that she’ll be putting in some extra work now, I’ll be feeding her again.
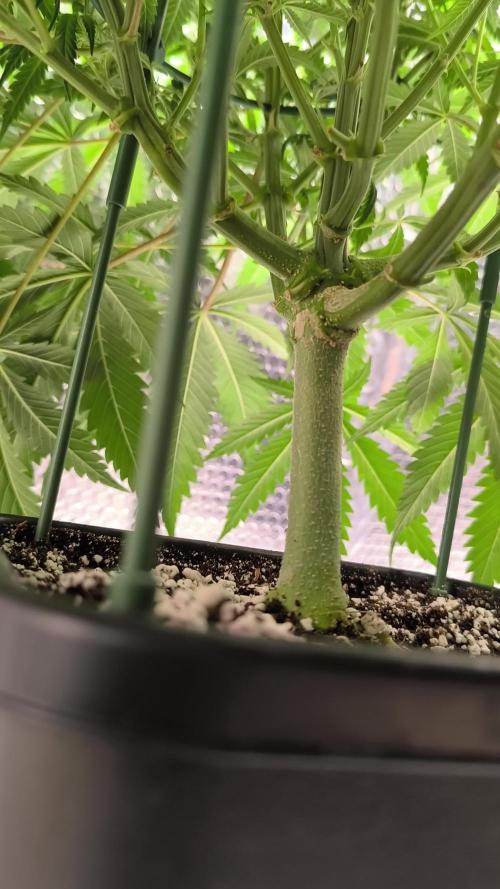
I’ve kind of been showcasing plant #2 most recently just because I feel she is probably more standard in appearance.
Plant #1 (Mellow Yellow) was born a pale color and through her life she’s always had yellow new growth, and as she pushed out more growth, the leaves would green, and the next new growth would come out yellow.
It’s a crazy sight to see now that the whole top looks yellow. I initially thought something was wrong with her, or her nutrition, but she’s just always been this way, and has grown perfectly fine.
I guess we will see if she seems to have any problems in flower. Should be interesting.
Oh, and, her feedings/waterings are the same as her sisters.
Let’s get ready to see some beautiful buds!

Likes
Comments
Share
@Dankmark420
Follow
Finally I took some pictures of them and goddamn I am loving the look of theese girls so far💚😍


Likes
17
Share
@HowtoBubatz
Follow
We’re in the second week of flowering, and the plants are really starting to stretch! 🌿
They’ve gained good height, especially the one without LST, which has grown tall very quickly.
It’s been exciting to watch them reach upward as they prepare for the bud development phase.
Everything is looking good overall, and I’m happy with the progress so far. I’m really looking forward to seeing how the buds will start forming in the next few weeks! 😁✨

Likes
15
Share
@Venabr96
Follow
Estamos aqui começando mais uma semana, algumas folhas apareceram manchadinhas e com uns buraquinhos.
Pode ter sido por causa da queda da lampada ensima delas...
Folhas muitos grandes e desenvolvimento muito bom
A piquena esta crescendo bem,muito forte e linda com belas folhas. Ira crescer para cima reta sem nenhuma tecnica.

Processing
Likes
54
Share
@schmorgastheborg
Follow
Here is a quick vid and a few pics from last night. I am away from the ladies- but they look and smell great. The Jack and Blueberry greened back up with a little additions nitrogen. Jack is smelly as hell! Can't wait.


Likes
2
Share
@Hidden
Follow
: 1st flow week :) really happy with the girls no problems or deficits yet (my fault in some cases). I wanted them to grow taller but I installed the lights too close and it prevented to grow tall and also in some cases defoliation was too aggressive and the girls had to overcome that.
- Day 1 week 1 flow: no action just changed lights to 12/12 and flow mode.
- Day 2 week 1 flow: watered them with nuts and ph 6,3 or so, no big deal.
- Day 3 week 1 flow: just watching them grow and overcome small tent, decided to take out the net cuz no point of it girls just can gro vertically.
- Day 4 week 1 flow: shower of 1L with nuts described, following biobizz schedule.
- Day 5 week 1 flow: not much to do waiting for them to growww
- Day 6 week 1 flow: shower of 1L with nuts described, following biobizz schedule.
- Day 7 week 1 flow: a little defo and ready for week 2 :)

Likes
Comments
Share
@absolutgrow
Follow
dear grow community,
I report back with the fifth week of my royal gorilla auto grow. This week my plants have started to flower. They have grown extremely well and I have a lot of fun taking care of them. I have now stopped using LST as I want the plants to grow upwards. I have also changed my fertilizer. I also changed my sodium vapor lamp from veg to flower. I'm looking forward to see my babies flower and hopefully produce big buds. I am mostly satisfied with the strain, but one plant has began to flower realy early as you can see in the picture.
best wishes
absolutgrow

Likes
10
Share
@Hempire
Follow
Hello growers !
This week I start flush ! To clean the roots and to not smoke nutrients left. I fight against bugs and spiders that want to investigate my plants ... I check the trichomes and they are all white

Likes
3
Share
@CalGonJim
Follow
7/14 12am MONDAY. THEY ARE STILL SLEEPING BUT I HAVE BEEN HAVING THE BEST RESULTS. will continue with aminos, mblue , enzyme. 3am ADDED TRIBBLES TO THE DOCTOR PROP, BIG BIG DAY, AND MAGNETIC FACES..... SHOULD INCREASE MY AMINOFUNUPTAKE. LOOK AT THIS!!!!!!!
🚨WHY DOES TMG POWDER WORK SO GOOD ON ME?
from search """"AI Overview
You're experiencing positive effects from TMG powder, which is likely due to its diverse roles in supporting crucial bodily functions.
Here's a breakdown of the key reasons why TMG (trimethylglycine or betaine) might be working well for you:
Methylation Support: TMG is a methyl donor, meaning it provides methyl groups (a carbon atom with three hydrogen atoms) that are vital for a process called methylation. Methylation is involved in numerous bodily functions, including DNA repair, gene expression regulation, detoxification, and the production of neurotransmitters (chemicals that influence mood and cognition). If your body's methylation process was inefficient before supplementing with TMG, the addition of these methyl groups could be enhancing many aspects of your health and well-being.
Homocysteine Reduction: TMG helps convert homocysteine, an amino acid that can be damaging at high levels, into methionine. Elevated homocysteine is associated with an increased risk of heart disease, stroke, and other health issues. By supporting healthy homocysteine levels, TMG helps maintain cardiovascular health and blood vessel integrity.
Liver Health: TMG plays a role in liver function and detoxification by aiding in fat processing and supporting the body's natural detoxification pathways. Research suggests that TMG may help protect the liver from alcohol damage and be beneficial for nonalcoholic fatty liver disease.
Cognitive Function and Mood: TMG supports the production of neurotransmitters like serotonin and dopamine, which are crucial for mood regulation and mental clarity. Some research suggests TMG may enhance the effectiveness of antidepressants and help alleviate symptoms of depression and anxiety, potentially by lowering homocysteine levels.
Cellular Health: TMG is an osmolyte, meaning it helps regulate cell volume and maintain fluid and chemical balance within cells. It also acts as an antioxidant, protecting cells from damage caused by oxidative stress.
Athletic Performance: Some studies suggest that TMG may improve muscle strength, power, and endurance, potentially by influencing creatine synthesis and reducing fatigue.
Important considerations
While TMG offers potential benefits, research is still ongoing, and some studies have shown mixed results regarding certain benefits, particularly related to athletic performance.
It's always recommended to consult with a healthcare professional before starting any new supplement, including TMG, especially if you have existing medical conditions or are taking other medications.
High doses of TMG may cause digestive issues in some individuals.
In summary, TMG's positive effects are likely due to its ability to support essential methylation processes, help regulate homocysteine levels, promote liver health, and potentially contribute to cognitive function, mood, cellular health, and athletic performance. If you're experiencing positive results, it's a good indication that your body is benefiting from TMG's multifaceted actions. """"""""
7/ 14 1145PM STILL MONDAY. WATERING TODAY WITH THE SYSTEM AND TAMI INSTEAD OF ADVANCED NUTES/ FOR SUPPLEMTNS. TAMI SMELLS LIKE CLEAN FRESH CLAY SO NICE, SO ALL THE PLANTS SMELL LIKE THAT. ONE MORE TIME WITH TAMMY.
🚨 NO ENERGY SHOTS TODAY!!!! JUST COFFEE. ITS THE QUICK SORB AMINOS, NITRIC BOOST, METHELYENE BLUE, TMG POWDER, METHYL FOLATE PLUS, WOW!!! WHAT WORKS ON ME WORKS ON THE PLANTS, JUST ABSOLUTELY AMAZING!!!!!!!!!!!
7/15 Tuesday 424am. All plants are doing great water today with the System and TAMI today, 1pm Tammy is a little bit strong even at a half a milliliter per liter with the exception of the Tyson 2.0 goats. These are just incredible. I can’t begin to describe how strong and how different these are from any other plant I’ve ever grown.🚨🚨🚨👍👍👍👍💥💥🌿
7/16 430am smoking GC Auto I trimmed yesterday, very nice. II love Autos for this. nice smoke right off the plant, no 2 weeks to dry and 4 weeks to cure, nice right away!!! Not perfect some chlorophyll, but bong filters that enough and a nine not too strong feeling.
7/17 330am they are all doing good. I felt it was time to try a higher wattage on the lights. I hope it’s not a mistake, but I have the cooling system worked up so it should help exit the hot air directly off of the driver on the light, they seem very strong and able to handle the extra light we’ll see.🚨🚨👍
Likes
14
Share
@pHilosophy420
Follow
Day 56 - she is drinking water like dragon and will be a monster. 5cm stretch this week and everything is well so for, looking forward to see future weeks.

Likes
6
Share
@RFarm21
Follow
Week 2 november - 8 november
5 november - transplant to 5 galon pot
the humidity in the last few days has been very high
Likes
14
Share
@TheBudWhisperer
Follow
Week 2 of veg is in the books. Despite making some changes and dropping back to a 300w fixture, also upping the nute ratios - growth has been pretty decent for a single first week of veg. Got some yellowing on the leaves which is somewhat concerning. Again, hopefully rectified now that we’ve regulated to more acceptable temps and humidity. All are fairly uniform to start and the new bucket system has been issue free which is a bonus. Figure another week to the fim and then another week of veg before the flip. All on pace to get em to flower as quick as possible👌. We’ll cull as soon as able - if we pick up 3/4 spaces after losing the males that would greatly assist to free up some more space elsewhere and move in some new fems that have been backlogged recently. Finally back to focusing on quality buds and it’s and great feeling👍.
Strain details
She’s a mix of a particularly strong Northern Lights, crossed with a Spicy Bitch sativa hybrid. The hope is that we’ll be able to combine the overtly narcotic effects in the NL and mellow it out somewhat with the quality daytime sativa effects found in the SB.
Both strains feature numerous grower qualities. Both parents possessed vigour and resiliency, the SB particularly colourful in late flower. These beans were the product of a shotgun breeding run that presented an unexpected opportunity so there’s quite a bit of testing that should flow from the various F1’s we’ve produced.
Likes
14
Share
@PersonalSmok3s
Follow
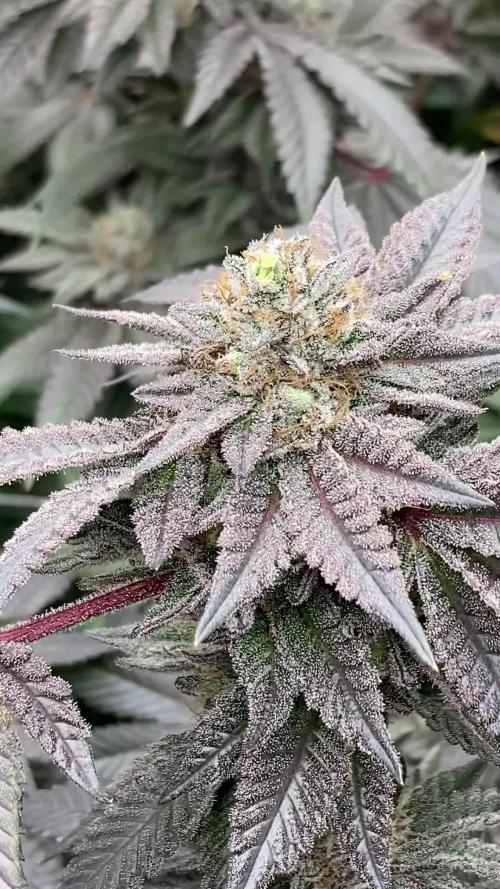
All done with the growing, now time for the long arduous harvest 😸🤦♂️🤷♂️✨.
Started the harvest on day 63 of flower, I’ve not just checked their trichomes with a loop or anything, but I’m happy with how they look.
The smell is very intense. Slightly worrying in all honesty 👀 filter is really struggling, contemplating getting out my spare extractor fan&filter just while it all drys. Maybe two filters will scrub the smell completely.
It’s a lovely smell, Sour Tangy Sherb, but now an extremely heavy gassy wall of smell has permeated everything.
Pretty much all the buds have turned purple, just a few of the lowers are a pale green, but that’s to be expected.
I’m in the process of cutting them all up into individual branches, giving them a quick wet trim, then hanging them on hangers.
I’m aiming for around 10 days drying, then a final trim and into jars for curing.
This was the final run of the MotorOG, it’s been a fun strain to run 😸 another decent one from LIT Farms.
I’d like to thank everyone who’s taken the time to have a look, comment or like this diary, I hope it’s been helpful in some way.
PersonalSmok3s 😸🌱💚
Likes
26
Share
@GERGrowDesigns
Follow
Dear Growers ,
Welcome to Week 8 or Flower week 5 // Day 56-63 from Sweet Seeds Permanent Jealousy Xl Auto.
Incase of Moving to a New Home . I Decided to skip some Weeks from every Diarie of the 12x12 Automatic Project . Everything should be Normal in the next Weeks .
Whether you're a beginner or an expert, you are warmly invited to join, ask questions, and share your own experiences along the way!
Project Setup & Conditions:
• Brand/Manufacturer: Sweet
• Tent: 222cmx150cmx150cm
• Light: 2x 720 Watt Full Spectrum
• Humidity: 50%
• Soil: Narcos Organix Mix
• Nutrients: Narcos Products
• pH Value: 6
If you want Germinitation results like mine , check out Kannabia Seeds with my link [https://www.kannabia.com/de?ref=61966] and grab the germination device or the strains I used . Trust me – it’s worth it for sure !
Get another 20% Discount at all products using the code [GGD] at the Checkout .
Stay curious and keep up Growing —we look forward to welcoming you back for the next chapter soon!
Likes
19
Share
@willertex
Follow
📅 D36 - 06/11
📜 Applied Defolation, LST and SCROG techniques
✍️ 1,5 EC
♒ 6 pH
🌊 10 L
📏 25 cm
📅 D38 - 08/11
📜 Raised EC
✍️ 1,5 EC
♒ 6 pH
🌊 10 L
📏 25 cm
Likes
46
Share
@Drgreen13
Follow
Hi guys, so I think she's starting to flower. I can see tiny pistol hairs now. I shall be bringing her indoors in a few weeks when I have space because we will most certainly be having lots of rain here in the UK. Please check out my other diaries, and feel free to leave a like, maybe even a follow.
Drgreen13#6724 (discord)
Stay high, stay fly, #420everyday.
Processing
Likes
1
Share
@ladyjane
Follow
8/22 - There has been some explosive growth among my 4 purple Microdots. They are growing by leaps and bounds each day,
8/23 - So far everything is going smoothly. Just watering each day w/ RO water and organic black strap molasses.
8/24 - Brewing up some compost tea. This will be there first! As they start to get a little bigger I've made a prediction for sex. I think A238 & A239 are male and A240 & A241 are female. We'll see!
8/25- Fed the ladies with the compost tea and used it as a foliar spray as well. They responded very well and continue to have crazy, rapid, growth.
8/27 - They have gotten so big and bushy. I'm going to start a little LST on them today!
8/30 - They are starting to show sex! Still can't tell whether it's male or female...but it should be any day now!
Likes
8
Share
@RdSkM
Follow
Día 54. A pesar de todos los problemas e inestabilidad con esta planta, parece haberse quedado pequeña, no obstante sus flores fueron engordando y compactándose y se ven una delicia de colores y cristales blancos encima como pequeña montañas.
Ya falta poco...

Likes
48
Share
@Regenwurm
Follow
Klima durchweg sehr gut. Aufgrund von dem Umtopfen nur 2 mal reines Regenwasser und 1 mal Zusätze von Green Buzz. Den Ladies geht es auch ohne Dünger in dieser Phase hervorragend. Den Haupstamm HST um die Seitenteilen zu puschen. Lichtstärke auf 35 % erhöht bei gleichem Abstand von rd. 40 cm. Heute Licht auf 40 % erhöht.
Ventilator im Zelt umgebaut um mehr Fläche zu generieren. In den nächsten Tagen wird das erste mal etwas grober entlaubt.

Likes
6
Share
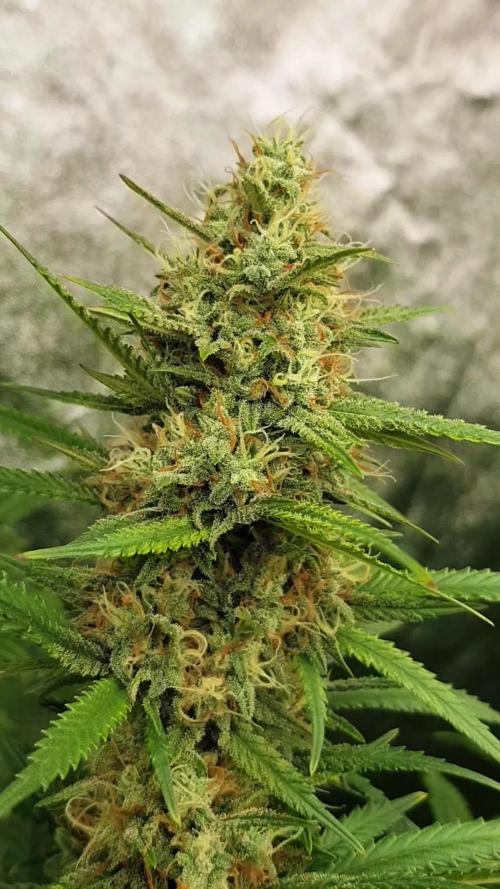
@SAC87
Follow
Hey Growers.
It’s going great around here. These girls are happy, healthy and growing like mad. They’ve chunked up so much that they’re starting to lay down. It’s just a couple at the moment so I’ll keep an eye on them and see if intervention is needed. The trichomes are so gritty it feels like table salt between your fingers and the Cali has a orange/lemon citrus and woody scent. The Jack is sour skunk and the cookies Kush is a sweet sugary scent.
I’m not 100% sure if they’re fox tailing from light stress or just natural Kush characteristics. I’ll be keeping an eye out for hermie’s and stress. I’ve added some Green Planet Rezin, as I think it’s awesome and helps with aroma and makes oily terps. I’m thinking this will be my last top dress and I’ll probably just do half dose and top up with monster bloom for the next couple waters then drop everything except cal and Rezin.
Happy Growing 🌱
