
Likes
Comments
Share


@Growbody
Follow
Tag 73: Viele Trichome der Watermelon Candy F1 Automatic von Zamnesia Seeds sind schon Trübe, auch die meisten Blütenfäden sind orangefarben. Die Blüten sind sehr fest. Die Ernte der Watermelon Candy wird diesmal strikt nach dem idealen Mondstand erfolgen.
Habt einen schönen Tag. 😀

Likes
6
Share


@La_VecinaCannabica
Follow
Ha sido miy buena la experiencia de cultivar esta cepa ,me ha encantado el olor,los terrenos que tiene y su sabor.
Es una planta muy fácil de cultivar y ha dado muy buena producción final

Likes
100
Share


@ILoVeThiSpLaNt
Follow
Giorno 65
Ad oggi ho tagliato le due Rainbow Belts (qualche giorno prima per esaltarne il gusto Zkittlez) e le due Zombie Kush una al giorno 58 l'altra giorno 63.
Rimane questa bestia di Milk Monkey. Sento biscotti sento vaniglia ma sento anche dell'acido. Mai avuto cime così piene di resina. Mamma mia che spettacolo di banca semi questa Exotic Genetics (meglio spendere qualche euro in più e avere erba che vale 20/25euro al grammo che spendere poco per avere erba commerciale)
Saluti e a settimane prossima 🖐️ ❤️


Likes
6
Share

@AestheticGenetix
Follow
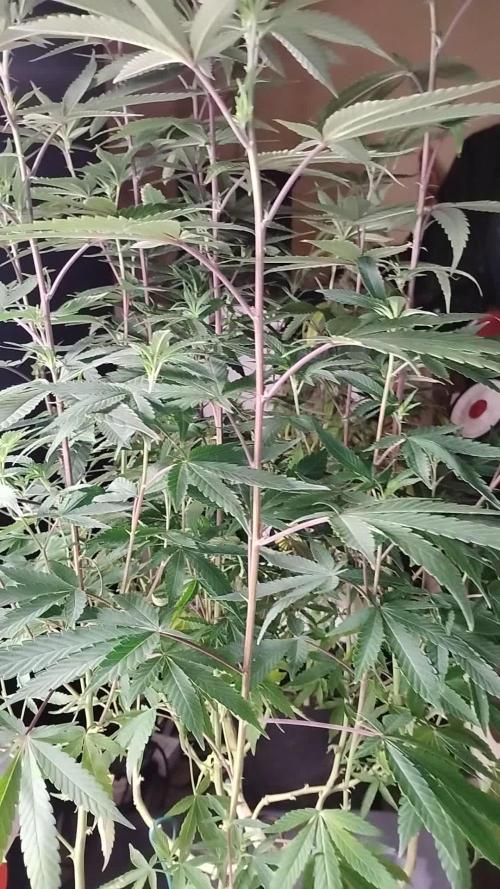
Been working on getting rid of the purple stems. She seemed super happy today.
Not a ton of noticable stretching going on with her. She looks really nice so far.
I haven't noticed many pistils yet. Been about 8 days since 12/12


Likes
17
Share


@4chuk
Follow
Nov. 13 - Week 6 begins.
Nov. 17 - It continues to do better than I had thought it would, but this morning it was wilting 😬 I can't keep letting that happen.

Likes
80
Share


@Qlimax
Follow
👉Day49- fixed some LST so plants had the max light possible and did defoliation,i noticated 2/5plants have toooons of tricones but rest 3 olmost nothing 😣....some new yelow leafs start to show on 1plant. Wil make video later today.
👉Day51 Got seeds today from 42fastbuds skittlers and blackbarry for next grow :D and got 4x gratis lemon skunk seedss(some new local breeder)😘😘💚❤️I think i will grow them same as this time same pots with 3xblackberry and 1xskittler 1xlemon skunk 🤝
👉Day53 plants looks good... on some still little calsium deficiency on 2 plants mostly,they are now cca.70cm main one 85cm. +Did the last defoliation and reorganizate them,noticated alot stigmas on buds turning orangeish..🧡
Changed the light from 21h>20h ligh ,owerall flowers flowring rly good all flowers got alot of tricones now,👍cant wait till harvest!!💚✂️💚🔬🧡🛏️🧡😂
👉👉Til next weeek mates!!!stay safe and have fun last days of booring 2020 :D

Likes
52
Share


@Jef79
Follow
ANESIA SEEDS
FUTURE #1
Gorilla Glue #4 x Starfighter F2
Genetics: 50% Indica, 50% Sativa
Yield: 500g/m² • up to 700g per plant
Flowering time: 9-10 weeks
Harvest outdoors: begin of october
suitable for indoors and outdoors
Height: 110-130cm
THC: 37%
Aromas / flavors: pineapple, mango
Wow.. What a fantastic strain.. Both my partner and myself are very happy with "Future #1".. It definitely seems to deliver on the hype it had buzzing around!.. It took a bit longer to dry than usual (im presuming from the extra weight tbh).. After my second roll i felt her strength creeping over me and was convinced this is a very unique strain.. She doesn't get covered in trichomes on her fan leaves like sum well known varieties and THE only negative i have is she obviously wouldn't produce alot of trim for extraction.. But - I really don't mind though because what you get in return is just a huge bounty of eye redin, nose twitching very dense, trichome laden buds.. I wasn't 100% sure about her flavour on first few joints but soon forgot i was meant to be takin notes🤣🙈.. Took 12/13 days hanging dry and she was jarred up and opened every day for 15mins(4-5days).. She's super smooth to smoke and very moreish.. I love this strain, it gets my nose tingling!.. im pretty active on it also with less aches so that is very positive.. I would 100% recommend "Future #1" to everyone.. If your a non-heavy smoker then just take her slowly at first, she will creep up on you.. 😁👍

Likes
36
Share


@MadeInGermany
Follow
Info:
Unfortunately, I had to find out that my account is used for fake pages in social media.
I am only active here on growdiaries.
I am not on facebook instagram twitter etc All accounts except this one are fake.
Flowering day 72
since time change
to 12/12 h.
Hey everyone :-)
Today it was harvested.
Despite that there was a bit of mold on the top 2 buds, it turned out to be a very nice amount :-).
After the lady was in the dark for 48 hours she was trimmed by hand :-).
Then the buds were put into the drying tent at 62% humidity, where they now remain for 8-12 days before they are put into the jar to ferment with 62% boveda packs.
Of course, the last update will come after the fermentation and I wish you all the best until then.
Stay healthy 🙏🏻
You can buy this Strain at :
https://originalsensible.com/original-sensible-seeds-zkittlez~20503
Type:
Zkittlez
☝️🏼
Genetics:
Afghan Kush Indica x Grandaddy Purple x Grapefruit hybrid
👍
Vega lamp:
2 x Todogrow Led
Quantum Board 100 W
💡
Bloom Lamp :
2 x Todogrow Led
Cxb 3590 COB 3500 K 205W
💡💡☝️🏼
Soil :
Canna Coco Professional +
☝️🏼
Fertilizer:
Green House Powder Feeding
☝️🏼🌱
Water:
Osmosis water mixed with normal water (24 hours stale that the chlorine evaporates) to 0.2 EC. Add Cal / Mag to 0.4 Ec Ph with Organic Ph - to 5.5 - 5.8 .

Likes
2
Share


Processing
Likes
11
Share


Likes
5
Share


@Burneracct
Follow
Was out of town all week and came back to find the CBD Star in my space bucket not looking good. It looks like a phosphorus deficiency but not entirely sure. Yellow leaves with brown/black spots and dark red/purple stems. I flushed it with 2 gallons 6.5 pH water, re-fertilized, put it out in the sun and defoliated. I defoliated pretty heavily since many of the fan leaves were yellowed and blocking light from the lower bud sites. The center was also getting pretty dense so I carefully removed some of the leaves to help with airflow.
Despite the stress, It seems to have bounced back reasonably well. There’s probably irreparable damage given the level of yellowing but the buds continue to grow and thicken.
Cheese has absolutely exploded and looks great. It probably doubled in height last week with many bud sites on the 5 main stalks. Excited to see how it turns out.


Likes
26
Share


@KingSalomonsWeed
Follow
Notfallprotokolle treten in Kraft.
Grund?
Gelato 41fast
UNKONTROLLIERTE GEWALT.
Obwohl ich sie einige male sehr zärtlich dazu überredet habe (ok, es knackte einige male) in andere wuchs richtung zu wachsen, nimmt sie ¾ des grow room an platz ein. Und, das ist keine Beschwerde. Sieht von oben fast aus wie ein sea of green (zufall).
Und überall, diese watte Bällchen.
Ich bin entzückt!
Update. Es wird wasser mit Wasser gegossen, welches ich aus einiger Entfernung per Hand aus einem wasserlauf hole.. 😛
Die Phylaxien der Gelato 41 fast sind anders.
Heftig. Sind superdick lang und schnell wieder braun.
Bud Körper bilden sich und sind hart.
Und das überall. Ok tiefer gleich kleiner.
Am 001.009.021 wird sie 71 tage alt.
35 in Blüte.
And, what the phylaxien!
I mean they re unnormal.
Never seen phylaxien growing so massive (i mean pls look at one phylaxie., i think theyre big,) and then as FAST they go brown.
Boah difficult to explain.
I checked the soil. Wet enough.
Looking my Gelato 41 FAST. She is everywhere healthy.
I read this is a monster genetic
But to see, how it grows!
This strain is (so far) different from all the others i made with before.
First its a photo. (accidently because I'm a idiot)
Than 2 weeks untrained growing.
Than not vey lovefull i showed her her new grow direction.
And the smell. Of Gelato 41 fast is..
The smell of Gelato, 41 fast.
Heavy smell on your fingers from everywhere. Steam, sheet,,, buds are becoming sticky.
I mean i smell vanilla schololade.
My Next noise means she smells like an gelateria.
And YES! SHE IS! FAST!
GREAT! WORK(till now).👍🏻 👊
I tried to make some defoliation... You wont see on the photos. Just 3 leaves and 8 little buds somewhere i found.
O8. Oo9. I cut off 2 side branches.
I knewed it before that they will take only energy from the GELATO 41 FAST.
But holy mother earth, she got enough of this.POWER!
And its me a little ankward, because im the only one till now, who got an growdiary of this FABULOS HEAVY SWEET SMELLING STRAIN!
And., the BREEDER SEEDSTOCKER, himself is watching this GROWDIARIE!!!
And holy mother earth... Im so a noob.
First I thought it was business, advertising.
The contact, i mean.
Than, after i joined the original website of SEEDSTOCKERS, and i read what i really bought!
THE PENNY FALLS..
Its the FLAGSHIP.! (
.
So im the advertising?
Oh je oh je. I do my best, but remember, please,
(and because of some little mistakes i did)
.
.
.
OK OK ok ok, big mistakes!
It is not the yield another grower can go for it, what i expect i will harvest.
But HiGHEST Quality!
This is what i expect.
And dont get me wrong,
I build an joint of some fast dried micro buds.
Brought to a friend.
After the third time Jonny goes out(because after one or two breathes he forgotten jolly Rogers). He Realized it. "Hey i hold the joint now all the time (15 min). Why don't you say a word?"
"I knewed it. But i just smiled. Looking about how long it takes till you notice it!"
He thought a few seconds "Longer"…
Both began to laugh.
So the quality i try will be heaven!
DID YOU REMEMBER THE SEED
WHEN I FELL IN LOVE?
SMARAGDGREEN.
10.09
Everday you can see the buds go with more flesh.
And sticky as nothing i had before.
Smelly? Yes. It is!
It seems that i had an Sativa dominant phenotype
Like the leaves form. (and from some fresh harvested i smoked, with 75 % milky trychomes, and the rest clear... 😛 Heavy uplifting, motivated you start to do something! As you start to moving you discover that you re really stoned).
And my 0.36 m² tent is from the GELATO 41 FASTer as i never seen any Cannabis so quick blooming, sticky everywhere.
ABNORMAL! in a great way.
And i think, soo small arent they. Or?


Likes
59
Share


@Neo09
Follow
🌌🛸 hey hou,
just putting in all pics from begging till now, cos im really low with the time,.. behind this project is biggest story of my life, not only grow story, its much more behind.. i wish nobody to get such a grow in way as i do,. actually is nothing possitive there and this project i started, cos i lost everthing what in life importnt is. with this project, once, i wanted to give back just a litle bit of that what i got,.. and it still not eneough,. some things you cant buy, you cant pay,.. and you can get back... peace and stay hard, thing about what you decide, think about twice..
Likes
Comments
Share


@GreatScottBuds
Follow
Its very frosty and I would say overall very good if you are looking for hash. I personally do not get much flavors out of it. I harvested 3 plants, flushed them properly, and dried them properly. All of that said, the flavor just wasnt there for me. I get a coffee aroma from its buds but definitely lacks flavor. I do not get any sweet notes from it like I should. This strain is strawbanana cream x do-si-do so I was hoping for a bit more flavor. I do not weigh wet, so final dry weight after a tight trim was a little over 6 ounces.


Likes
20
Share


@eldruida_lamota
Follow
Venga familia que ya viene la cosecha de esta Panty Punch de Seedstockers, que ganas que tenia ya de darles machetazo.
No veas que pinta que tienen estas plantas.
Las flores aparte se ven bien resinosas, y son bien prietas, aparte son súper aromáticas huelen mucho.
(COLOQUEN UN BUEN FILTRO PARA EL OLOR).
a sido una genética con la que disfruté mucho cultivarla, la genética es perfecta para SOG y es bien vigorosa, es muy fácil cultivarla y muy resistente merece la pena si eres cultivador principiante.
Hasta aquí es todo, espero que lo disfrutéis, buenos humos 💨💨.
Likes
16
Share


@Septooth
Follow
It is looking like 2 - 3 more weeks till harvest. Buds are thick and heavy. Not alot of trichrome production yet, but getting more every day.

