
Likes
Comments
Share


@GERGrowDesigns
Follow
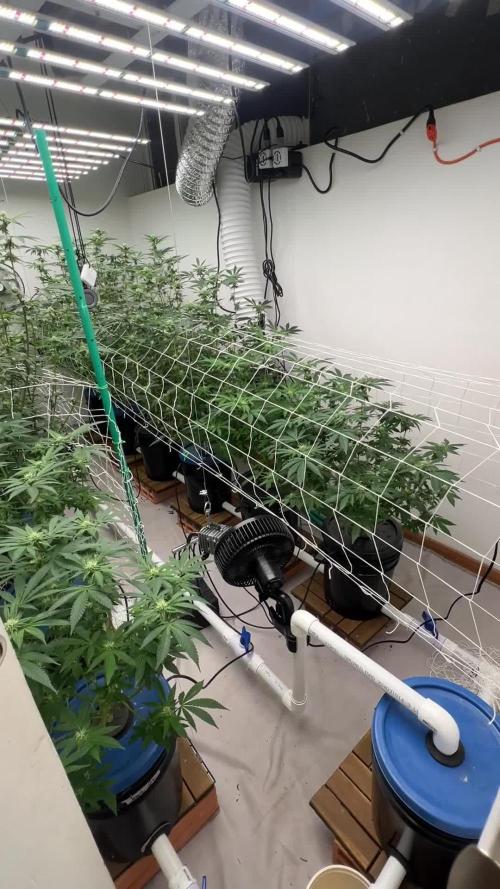
The Greenomatic doing Good
Getting bigger and the buds are devoloping.
Nothing Special Happend . Just doing my Narcos Organic Nutriets every water theye gaining .
Water : 2-4 Liter every 1-2 days
19hour light
200 watt light
20liter pot
28 day Temperature
55%Humidity

Likes
45
Share


@chapadux420r
Follow
5 week have already passed since the start of the flowering stage. The stunned auto is healed and growing happily and strong with 40cm
Both green poison are already really sticky and with lots of the good sugar. The smell is getting really strong too and the buds are going big and fat. Plant height: 40cm
The critical + 2.0 are the ones with the strongest smell, but the shortest too with 35cm. The good thing about them is the 14/16 tops they have
Finally the skunk 47 wich was an offer and at the beginning, the slowest growing but became the tallest with 45cm. Strong, fruity smell and long and dense buds.
Just did the last defoliation on every girls, nothing too heavy and introduced the Plagron Green Sensations.
Tell me what you think guys! See you next week 😎


Likes
6
Share


@DaddyPrime2
Follow
i was surprised that she was done on 2/15/25
spidermites had completely taken over one bud so i decided to check trichomes and she seemed ready.
Processing
Likes
14
Share


@Mr_Og_GreenThumb
Follow
Today 7/30/19, day 57 and the start of week 9. I'm still continuing to alternate between days with my pesticide treatment (especially after finding that bug living on one of hulkberries fan leaf) and thrive alive green daily foliage spray as a prophylactic solution against any possible pests or mold going into these last few dog days of veg. I will flush them with distilled ph'd water for two days this weekend in preparation for flower. Then I'll start them on some "flower fuel" bloom booster on top of my secret for success flower recipe at 1/4 of the recommended strength.
Outside of that still no adverse issue to report for the end of the 8th week. After my last trim, they both have responded very nicely, I was kind of worried about fat banana stalled growth. But one thing I noticed when I topped her at the 6th node, yes the main stem stopped growing but it developed many bud sites up and down every stem. Whereas hulkberry was topped at the 8th node, she has mainly focused on developing long stems and only 2 or 3 bud sites along her stems. Even though hulkberry in structure, is much bigger than fat banana and has a way bigger root system. Fat banana is bushier and has developed way more bud sites than hulkberry. I can't tell which strain will yield the most at this point only time will tell!
Also, a big shout out to "J"@RQS, thank you for the excellent customer service. Another reason why Royal Queen Seeds is top 3 in breeding!!

Likes
8
Share


@GigglePickle
Follow
Leaves are filling out more after the defoliation. Some plants are showing difficulties from the cold root zones. No nug growth shown yet.
Likes
14
Share


@Terpyboyz
Follow
So this grow came to a finshed but I had a. Few issues that’s held me up from finishing up the diary, but in due time I will reupload it all in order soon. But over all I will also update with a final weigh in of each strain produced so stay tuned 🤙🏻🔥


Likes
9
Share

@HUMO_Cultiva
Follow
Update of Goofiez 2 !! It’s incredible this strain is so strong and fast grow !! Stay tu ed

Processing
Likes
10
Share


@DonPablo_
Follow
buds are very visible and getting some mass (still really small though) and really satisfied with the number of bud sites. REALLY REALLY can't wait to harvest these ladies.
P.S. the plant at the end of the last video is an autoflower we planted a few weeks ago.


Likes
14
Share


@Loco11
Follow
Bin sehr glücklich über das Resultat. Die Sorte ist mir richtig gut gelungen, nicht nur vom ertrag auch die Kompaktheit der Buds. Ich glaube mein nächstes Projekt wird Runtz Muffin sein. :))
Likes
12
Share


@Naujas
Follow
The girl's upper leaves look terrible :( I didn't manage to give her more potassium in time :( Well, the flowers bloomed really well, they are not small, and there is definitely a lot of sugar on them :) the smell is also amazing :) apart from the upper leaves, everything looks pretty good :) when I cut her, her image will change :) I think she has max 2 weeks left ;)


Processing
Likes
8
Share


@eldruida_lamota
Follow
Que hay fumetillas, terminamos el primer mes de floración, pensé que serían algo más rápidas pero bueno, tengo tiempo, aun así hay que ver hasta el final que es lo que sucede.
Controlamos ph humedad por debajo de 45% temperatura media de 24.5 grados, aumentó una vez por semana la cantidad de ml por producto, último cultivo con advancednutrients, los próximos proyectos los trabajaré con AgroBeta.
Buenos humos fumetillas 💨💨💨

Likes
33
Share


@FlavoursUk
Follow
Day 78 - pheno 1 was cut down, id normally hang dry the whole plant but decided to do it in branches instead. Second pheno has been left in darkness as i haven't had the time to cut.
Pheno one is hung up and drying.. Room Humidity 60/60. As soon as she's dry enough I'll finish trimming her up. Then put them into jars. Might use boveda 60% packs but I'll see. Smells strong! Will post a harvest when both plants have been dried fully an in jars. Hope you enjoy the videos and pictures.
Stay tuned.

Likes
4
Share


@brosef_b_baggin
Follow
Start of week 7(May 3rd 2022). I’ve been using Lotus Grow every watering and so I decided to flush the pots with 7x their water holding capacity in the bathtub. I will be alternating between Lotus bloom/boost and a plant based “tea” from Dragonfly Earth Medicine called Fat Flowers. Lights were too close and caused marks on the leaves which look like deficiencies, I’ll keep a close eye until I can be sure. The petioles are purpling on the indoor plants as well(might be genetics though from the Strawberry Nuggets).
Processing
Likes
19
Share

@eldruida_lamota
Follow
Vamos familia, empieza lo bueno, y es que estás gorillas si han estirado, la primera semana de floración, aportamos algo de big bud para ir amoldándolas.
Es una cepa que se comporta bastante bien en indoor, tallo grueso y bastante distancia entre internudos, deseando ver que flores nos da.
ph controlado en 6,5 ahora va todo fenómeno, temperaturas ideales, humedad correcta 50 % , y pronto la bajaremos a 40 %.
Hasta ahora lo que hay, próximamente nos vemos familia.
Likes
21
Share


@Lontra
Follow
Week 5 finally brought some stretch. At the beginning of Week 6, I adjusted the LST and removed some smaller leafs deep down in that forest that started to turn yellow. Furthermore i started to add BioBizz - Top Max to the list of nutritions.
On day 42, I removed some leafs near the bottom (about 25) that already were or have started to turn yellow. Additionally I tried to water 1 day earlier than the times before. Furthermore i adjusted the LST a little bit, in hope for some smaller buds to catch up with the rest.
At the end of the 6th week, the lady still looks great and seems to be focusing on the buds. As it is getting warmer and warmer outside and therefore also in the box, I have also hung up a CO2 bag in the box. I hope it helps her to cope with the high temperatures. Even if I don't know if this really helps, I don't think it should do any harm.
Likes
9
Share


@BelgianBudtender
Follow
Heya Growmies,
explosion of growth this week, along with it the first signs of flower.
as a result I have made the choice to not clone this girl for reversal, and instead just enjoy her in her entirety.
she's fully recovered and bounced back now.
I would love to see a stretch!
Have a good one!
https://marshydro.eu/?ref=belgianbudtender
Coupon code belgianbudtender

Likes
3
Share
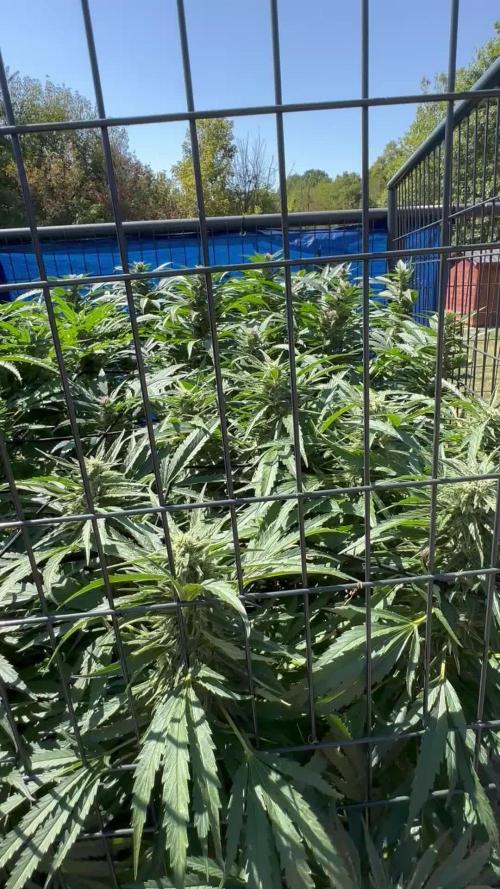

@BushDoctor740
Follow
Ok so it’s been along time since my last update as life has been busy for me.I have moved these 3 ladies outside sometime the end of June or early July and they have thrived.Ive topped them a few times after the initial topping and have added 3 scrog nets to keep the colas spread open over time and keep em below my fence top :).Some really nice colas and smells amazing I just know my neighbor is jealous 😆 kidding we smoke and bs together often.Ive been feeding them twice a week 4ml per gallon of advance nutrient line and they love it.Ive noticed they are starting to really thicken up this past week as its sept 19th today.I have some rain coming next week but it’s been a drought in Ohio so no worries about bud rot or mold until now.Im debating on adding a roof structure this weekend before the rain hits.What are opinions on polycarbonate roof top ??

Likes
51
Share


@Corwinism
Follow
WEEK 16 - (06/13/2021 - 06/19/2021)
Week 8, Day 50 - FLOWER: 06/13/2021
After inspecting the trichome development for the last 7-10 days or so, I’ve decided that today would be the ideal time to begin flushing. The American Pie #1 does not look like it’s ready to begin flushing quite yet, as she appears to be about a week behind in maturity. Despite that, I’ll still begin flushing her today too.
Recycled water: 70ppm, 69℉
+ pH Up: 7ml
Mixture: 95ppm, 6.4 pH, 69℉
ppm/ppm = runoff/soil
JB#1 - 895/800, 6.1 pH
AP#1 - 529/434, 6.5 pH
AP#2 - 365/270, 6.7 pH
GC#1 - 624/529, 6.3 pH
--------------------------------------------------------------------------------------------------------------------------------------------
Week 8, Day 51 - FLOWER: 06/14/2021
Did a trichome check on the plants today. Spent more time with the Jelly Banana to better determine her maturity level. She actually looks like she is ready to harvest today. I’d say trichomes are 75-80% milky, with an amber trichome here and there.
I’m going to try and push her through at least one more low-ppm watering and test the runoff. If I start seeing more amber trichome development, I will cut her down.
--------------------------------------------------------------------------------------------------------------------------------------------
Week 8, Day 54 - FLOWER: 06/17/2021
Recycled water (8 gallons): 69ppm, 5.8 pH, 70℉
+ HydroGuard: 8ml
+ pH Up: 3ml
Mixture: 82ppm, 6.0 pH, 70℉
ppm/ppm = runoff/soil
JB#1 - 688/606, 6.5 pH
GC#1 - 602/520, 6.5 pH
AP#2 - 633/551, 6.9 pH
AP#1 - 685/603, 6.5 pH
--------------------------------------------------------------------------------------------------------------------------------------------
[SUMMARY]
I expect this to be my last full week of flower. All the girls are looking ripe for the chopping.
The aroma that bursts out of the tent when I unzip it every time is heavenly. American Pie #1
is still about a week behind in maturity, but she will get cut down with the other plants
regardless. Jelly Bananen started to turn a lime green color so she'll probably get chopped
and hung up in the next few days when my second tent arrives (4x2 AC Infinity).
That wraps up this week! See you ladies and gentleman in the next entry. 🙏


Likes
Comments
Share


@Mr_nugs_lover_David
Follow
Beautiful pheno of Black cherry punch with that purple color, amazing sweet aroma just like her sisters. Fat dense nuggets, can't wait to smoke this super sweet flowers. You guys can't imagine how sweet black cherry punch is, can't believe the 5 phenos have the exact same aroma however only 2 are purple. Let's see what happens guys peace ✌️💚❤️ #probioticgardening #organic