Recommended
Likes
Comments
Share
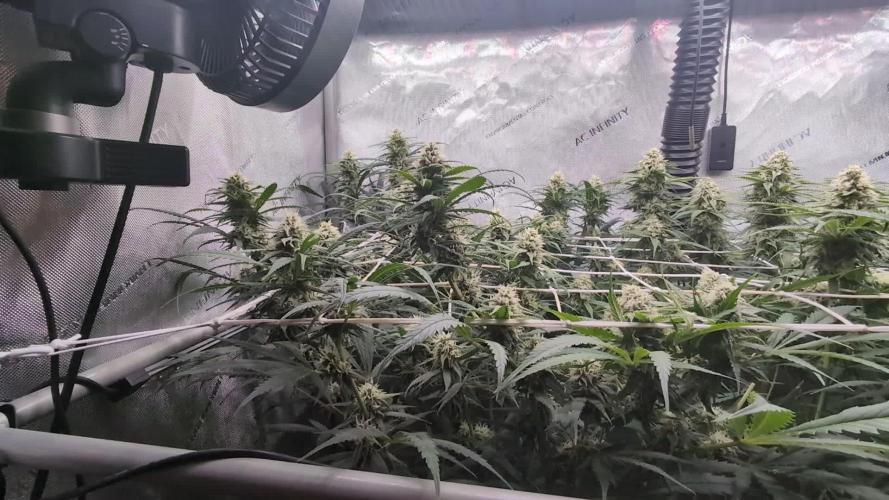
Que pasa familia, vamos con la novena semana de floración de estas Papaya Sherbet feminizadas de fastbuds. Vamos al lío, de las 3 plantas, me quede con 2 por espacio, siempre pongo alguna semilla de más por si no abriese alguna por no perder ese hueco del indoor. También se trasplantaron a su maceta definitiva, en este caso de 7 litros que además provocó un shock que también solucione. El ph se controla en 6.2 , la temperatura la tenemos entre 20/24 grados y la humedad ronda el 50%. Las flores están bien prietas y sacan unos aromas afrutados bien llamativos, está acabando de madurar pero no veas como se han puesto. Hasta aquí todo, Buenos humos 💨💨💨.
Likes
5
Share
@RookGrow
Follow
They’re getting juicy, just feed some compost tea made from Dr Earth Tomatoes Veg and herb fertilizer and some Molasses. Just seen a Nat so I don’t think I’ll be doing the tea again, I want to prevent bugs as much as I can. I’ll be putting up a sticky trap to catch it I only seen 1 but 1 is enough for me
Processing
Likes
5
Share
@Bombtofu
Follow
Everything on the readings seem well. Plant two seems to be having some kinda nutrition issue. I'm not sure what it is on the first set it leaves. Plant one is seeming to be super strong, healthy, and green. Gonna just keep watching the water levels and ph and keep on trucking.
Likes
422
Share
Hi everyone 😁 Welcome back in another week update! Thank you all for this amazing support on this bananas journey💚💚💚 Uploading and updating each week content on daily bassis so please revisit this diary if week not over yet. So far all going great. Girls looking very healthy and happy. Due to my short trip had to leave my 🍌💜👊 girls unsupervised for 3 days. Was stunned when opened my cabinet on the Dec 5th. Athena stretched like crazy. Good 3 inches. She better slow down as not much roof space left for her. May tie some taller branches to netting if necessary. Introducing blooming nutes for the first time this week on December 6th at smaller dosage and on the second watering as listed. Week 8 Dec 4 - Dec 10 Dec 5 Leaves tucking Dec 6 Heavier selective defoliation on both girls. Athena fully lolipopped and Xena at 75%. Watered with 8 ltr beetwen both with perfect runoofs PH 6.4. Girls were very thirsty 🤤 Dec 7-8 Just enjoying how my girls developing. Frost has landed and they are start showing colours. All is looking great. Dec 9 Second watering for this week 7 ltr beetwen both. Runoffs PH 6.4 Even with so much difrence in size of my 🍌💜👊 girls it seems that they are drinking my juice almost equally. Dec 10 Applied selective defoliation and tied 3 tallest branches of Athena to netting to avoid any potential burns on these beautiful baby colas. It's the end of the week! Thank you all again for such a great support, all the likes, dm's, comments and follows 💚💜💚💜 Stay tuned for coming week update 😁✌️💚
Likes
37
Share
After germinating the seeds are transplanted into small pots with soil (see tutorial in VIDEO above). The soil is prepared with water mixed with a little bit of BIO NOVA Roots (0,5 ml/l), which aids the development of the seedling. Transplanting is very easy now, because they have grown a STRAIGHT tap-root while hanging during the SERIOUS' WAY of germination. This straight root allows for easy potting of the seeds. Simply make a little hole in the center of the soil with your pinky finger and carefully place the germinated seed with the white root pointing DOWNWARDS into the hole. Best is to lay it onto one side-wall of the hole with the seed shell right at the surface. Then I push the other side inwards and enclose the whole root with soil. At the end only the top of the seed-shell peeks out of the soil. IT IS VERY IMPORTANT to plant the seeds NOT TO DEEP into the soil. The seedling only needs extra strength to work itself upwards thru the soil and you run the risk of the soil drying out and the seed dying off. When you PLANT THE SEED VERY SHALLOW into the soil (=with the top of the seed-shell still peeking out) your seedling can grow out right away and you have a small plant already 24 hours after putting the seed into the soil. The small seedling sometimes still has the seed-shell on its 'head', it normally falls off by itself, but sometimes you have to carefully help and take it off with your finger nails. Be careful to NOT clip of the seedling accidentally when you do this! The seed-shall has an inner lining, which feeds the small seedling when it germinates. This inner lining sometimes gets tangled around the stem of the small seedling after the shell has fallen off. This little skin MUST be taken off the stem right away! Once it dries up, it gets hard and can strangulate the seedling around the stem. In order to avoid this, the skin must be taken off as soon as possible! I show it in the pics above and also made a video about taking off the inner lining of the seed.
Likes
4
Share
@Dmars
Follow
11/14 Day 23 from flip. The stretch has been explosive, so much so that I’m beginning to have height concerns. I can probably add another trellis net and lower it down a little bit, but not by much. I just have to hope they level off soon. I’ve needed to turn the lights down every day or two, and even then I’m at almost 800 PAR / 34.6 DLI at the topmost part of the canopy. The majority is closer to about 725 PAR / 31.3 DLI so I’ll leave it there for now. 11/19 Day 28 from flip. Well, the stretch sadly hasn’t stopped. I was able to raise my lights a few extra inches but it’s now maxed out at the top of the tent. The topmost branch is about 12” away from the lights so this really is about as much as I can realistically handle. I realize Ethos was up front about sending this strain into flower earlier than normal due to the way it grows but this is really nuts. We’ve now easily tripled, if not almost quadrupled, in height and lord knows how much there is still to go. Stretch aside, everything else with the grow is bang on. Everything looks healthy, no signs of any disease or pests, every branch has solid airflow around it with nothing being too crowded. I just need the stretch to stop and everything will be great.
Likes
26
Share
Day 71 09/09/24 Monday Feed today using de-chlorinated tap water pH 6 with calmag. Day 72 10/09/24 Tuesday Nothing, just monitoring mould. Day 73 11/09/24 Wednesday (END OF QUARANTINE) De-chlorinated tap water pH 6 only today. Now I have put them to finish underground a 600w hps under 12/12 schedule with the Divine Black opium. Luckily no more mould has spread, and all plants look happy healthy and still developing. Overall very happy I saved the crop ✌️💚 Day 74 12/09/24 Thursday De-chlorinated tap water pH 6 today with Plagron products. Finally a video and pictures update ✌️💚 Day 76 14/09/24 Saturday De-chlorinated tap water pH 6 only today.
Likes
14
Share
The Sensi Seeds Research breeding project has created eleven cannabis seed varieties. How? By combining new cannabis cultivars with a selection of strains from their long-established cannabis gene bank. For the first time in thirty-six years, they are opening the doors of the Sensi Seeds Research and Development Department. Week #7 Plants are growing, needed to give them all the space available and had to switch on all the lights ! It’s full Veg mode now. I will ScrOG them next week, this might be a 9 weeks Veg, will see how they grow into the screen during the next week. Still thinking about the room with 4 x Mars-Hydro SP250, I could be able to save energy and to gain more light ! No nootz this week, just plain pH’d water, the Product-X is doing his job and the BIO Soil is alive. (I’m looking for a job in the Cannabis industry as Master Grower, Mineralogist, Quality Control)
Likes
17
Share
@mcjordan
Follow
Week 9 started, nothing much has changed from week 8, just looking at buds and trying to notice the changes in size and just checking in. Plants look well, mostly buds, some lower leaves arent that healthy but probably due to light. Still adding flower nutriens, because I think harvest could be one or two weeks away, could flush later. Not sure if I should add even more water? Cant really tell from plants. Hoping this week buds will get bigger in size, currently they seem pretty small still. Week 9 ended, plant 1 has nice big bugs, some brown-ish flowers, sad that it outgrew space, some top buds were burnt by light, plant no 2 which was under secondary light also have nice big buds (this light has more red color i think), also this plant outgrew its space and had burnt top buds from light, but it looks almost ready, lots of brown flowers, also it has leaves with marks and issues, so already started to flush it, plant no 3 has nice frosty buds, but they are smaller in size, either lightning setup didnt reach it or maybe it was because of all the stress it recieved in vegetation weeks. Defoliated plants, which I think now is kind of mistake, should remove only the big fan leaves, no the small ones, perhaps thats why plant no 3 has smaller buds, because it recieved lots of defolation lately. Changed up lightning setup and moved plants around for better light conditions. Plant no 1 or no 2 could actually be ready for harvest or in few days, im not really sure, Im waiting on all plants for harvest, because will use grow space for drying and curing. Also I've shoulde started flushing somewhere this week, now Im going to start flushing only at end of week which could be too late.
Likes
6
Share
@Jubaea
Follow
I think 2 a 3 weeks more before harvest
Likes
4
Share
@Crwfz1
Follow
She’s done. That’s it for This Bruce banner original sensible always is on point this plant is gorgeous and so stinky has flowery diesel notes and tons of tricomes can’t wait to get this dried looking about 3 oz dry I would assume from my experience on to the next ones now !
Likes
220
Share
These had a pretty good life. I actually only fed NPK the one time . Germinated them in a Zambeza propagator, i really recommend getting one of those propagators, they're reusable and really take the heat off those first days when you're sweating. Pooped them into their plugs they sprouted out strong, germinated 5 kept 3. transplanted them no problem. Veged these for 4 weeks, then they shot up. during veg they stretched out a bit early on i should have been giving some specialised micro i had on had but for some reason on the other i didnt. They needed extra support for their first three weeks, so i decided to LST them around week 2. Two camping hooks one anchor for the main stem and one to keep the plant down. Once i dialed in my lamp to plant distance they benefitted by slowing down on the stretch a bit. they all took to LST extremely well, bushing out and creating an nice even canopy. They pushedout these thick indica leaves, one of my plants was a lighter colored leaf pheno, the vertafort one. The Six Shooter genetic really stretches, if just off the top of my head it seems that the plants quadrupled in size over an 8 week period, completely eclipsing their neighbours and creating a thick dense canopy throwing shade down below. Each turned into a bush with three or more mains sticking out the top by week 6. IThe results start to look real pro around week 8. Before that though I hadn't been defoliating. This and simple lack of light means that I had loads of undevellopped colas. If I'm honest I should have tried to harvest in stages but by colas. Anyway these kind of grew like a gorilla glue but with much different and much better flower structure. The plants started pushing out flowers and pistils and preflowers etc early, but then took a while to gear up towards towards getting fat. The flower branch out in a spiral pattern up and down the main and secondary colas evenly, creating this misssile shaped colas, but they branch out once sometimes twice, which means less branch to nug ratio than a gorrilla glue by a full multiple. They started smelling like lemons around the time they were fattening up. Then they started getting buff, really little by little, what did rippen rippened evenly. Some colas was basically waste especially the colas stuck on the sides of the tent and some of the colas where for some reason or another there was no light there due to the dense canopy. Truly a BEAST OF A PLANT, HIGH POTENTIAL, great BRANCHING, if you look carefully each plant has more than a dozen colas, Timed it so the harvest was on a day the plants were chock full for plain water after ten day's worth of additive aided flushing. hung to dry slowly in the tent, got it around 55RH inside the buds over 12 days then trimmed and jarred in miron glass with boveda 62. The trim was a great experience, took a while but not that long because the flowers were so nice in the way they are. you do have to trim every sugar leaf one by one though if you're doing it by hand, broke these sizzors that @Mrs_Larimar sent me because of the resin lol. so I pull these plants out my tent and I just kinda look at them and they're basically dark green because of all the sugar leafs, i'm thinking to myself "shit i messed up this isnt even that frosty". well, what i found out is every time i clipped one of those trademark long sugar leafs off it revealed absolutely resious white frost. That's what can keep someone motivated. ! Once jared, if there's boveda in your jar, you dont really need to burp it daily, or even weekly i just let it sit there, obviously i've been smoking it and following the cure, let me tell you this one needs longer to cure than you're used to maybe, at least two more weeks of cure after a slow dry. Four weeks after the chop , it's a strong weed ! Didn't smell all that loud, but I have a 1300M3/H exhaust so... i'm not surprised. I will say though that my neihbour said she could smell weed even when I wasnt home and she could smell weed in the corridor, from the times I was trimming and basically every time I open my jar. Gonna need a new carbon filter for the next grow. I retired my lightbulb too. Hard to put my finger on the taste because the smoke is so smooth, and when i saw GD had a tag for Woody, i knew right away this was that taste i felt. I will say this though, cure this correctly, dont rush, dry it real slow, then cure it, citrussy tastes, usually those will evaporate, leaving this distinguished terpene heavy hitter much better tasting. So what can i tell you, this weed is white weed, so frosty. Bag appeal is great too, this strain pushes out pistills like no other, maybe even more than the gorilla glue. that means this is a chill weed right? One of the phenos I grew had more pistils than the other two. Mr. B's did, but i dont know if you can really tell from the close ups, i'll try to put some more pictures up. I got two maybe three phenotypes in terms of taste. Mr. B’s is much pine-ier than the others, and when the joint goes out and you light it again, it’s even more piney … I’m actually really happy about that reminds me of white rhino from the east coast back in the day but way piney-ier than that even. When you smoke the other phenos the smell is incense and the taste is really really smooth & woody. Sometimes I find different after tastes on the exhale like coffee, pepper, and maybe sweet/fruity sometimes too depends on the pheno I'm toking on. It is LOUD THOUGH, always have a spare filter on hand IT’S NOT WORTH IT get it ! Well at the end of my first grow, i'd like to quickly review all of Bulbi's own : Bulbi"s Own Early VegMicro: Fine green powder with calcium and all the rare metals in it. I didnt use it ! Damn, next time I'll amend my soil with it like i did this time on the FBT1 Bulbi's Own Cal Mag : Organic fine white powder with calcium and magnesium, i used it in the feed and sometimes as a spray. I didnt know how much to put in because these things dont come with instructions so i ended up putting 1/4 doses most of time. The correct amount should have been 2.5G/L. Bulbi's Own Flower Micro : Organic fine beige powder that I used mixed in with the sulfur. I think this one's a keeper, really helped my plants make it through the stress of bottom feeding and all that heat. Bulbi's Own Mag Sulfur : Organic fine red powder that I used mixed in with the Flower Micro I used this one in my spray too , to great effect, in my opinion Bulbi's Own Beneficials Trio : This was the base beneficials mix I had, you need to put 7.5 to 15g/l , watch out for clumps, use at the night fall, or when still dark. Bulbi's Own Anti Afid : I threw it in there i think just in time to protect my plants when I intentionally overwatered when I went on my trip. There were some white flies that emerged, because... well that's what they do isnt it. but there were just a few of them and they ended up flying around wierdly, and within four days, no more white flies, didnt even use yellow sticky tape ! You mix this one with the trio for even more effect. I used these in a spray I think , also. Bulbi's own Anti-Worm : This one is more directed against larvae, and can be combined with the base trio. I was weary of using it, but I'm glad i did to give my soil matrix that full spectrum of biological protection. Bulbi's own Humic Acid : This one i loved, looking back I'm regretful not having used it more. the dry humic acid is a great experience, the quality of it was impressive, clumps would seperated into more clumps ad infitum the feed slowly turning completely ink black. definituely using this once a week from now on Bulbi's own Amino Acids : this one is just amino acids, maybe next time I'll use it at the same time as the humic acid, but I'm not 100% on that. What i did do was spray the top layer of the soil with amino acids when I accidently ran into some issues from spraying kelp all over the place. So in that sense it's an absolute life saver and a must to have on hand. Bulbi's Own Kelp Extract Concentrate. Loved this one too haha, so thick, and green, check out the video of when i pour it lol. Worked great, raises the pH some so be careful, i used this one as a sprat aswell to get those plant growth hormones pumping during the seeding and veg stage. Bulbi's Own CO2 : well part of what I set out to do was to test the CO2 theory. Like roots do absorb CO2 but at a lower efficiency than leaves say 15% vs. 85% the theory being enriching your water or feed with CO2 would ultimately benefit the plant. So i enriched water with these ceramic based co2 tablets, because CO2 is a soluble gas, it stays in water. Then i fed the plants in this manner in the feed and also as a spray. The idea behind that was that co2 enriched water would come in direct contact with the plant allowing for absorption of some quantity of CO2 through the leafs. Someone explained to me that these are actually old school techniques. Well I know i started late and didnt follow a regular schedule like i wished for but the plants didn t die, or show any immediate negative upon innoculation, so what can I say? I'm doing this again, perhaps. Only problem is that these things are really a pain to pH correctly General Hydroponics Dry pH Down : GREAT PRODUCT, hard to find but amazing – not registed on GD for some reason I still have to make my bubble hash so any advice welcome ! 🚀
Likes
13
Share
@Rob691
Follow
D-15 : Repotting girls from a 1L hard pot to a 11.8L smartpot, turned light to 100%. D-16 : Feeding with Biobizz, stop humidifier. Everything is ok right now. Leaves are growing fast. They have a beautyful green color, I love this color ! D-20 : Everything seems to be ok.
Processing
Likes
11
Share
Looking good. 2-3 weeks to go. PH is great. Starting to really make resin glands. Smells great
Likes
23
Share
@Fatnastyz
Follow
12-8 Week 7 Lets go!! They are moving along nicely. Water when they wake today. Plain ol Yummy water! Stinkin now! Only to get More intense. #excited Hahaha removed scrog net. they Dont have much to grow, wasn't worth. just made watering and defol harder! Live and learn. I'm gettin there!!💪 12-9 Thristy girls!!😭 Drink my tears of joy. 💪💪👌 12-12 watered yesterday. look happy I think. :p Getting plenty of light, maybe a bit much, but no signs of stress. Keeping the course, till other wise! lol the older 2 are supposed to be done in 15ish days. Looks like gonna be a little longer. 😁 GD I love this smell. They getting their sparkle on now too! Kinda thick lookin trichomes. Well compared to my last grow. They are such small plants! These may turn out to be my first Fatnastyz Buds!! 💪💪👌🙏
Likes
9
Share
@JE2100
Follow
Sorry been terrible at keeping up with this these are videos and photos i have taken over the weeks I've not been updating. I will update next Tuesday with photos and a video of how it looks now.