
Likes
Comments
Share


@Naujas
Follow
New beginning-in a suitcase :) this is my 4th growth in a suitcase :) Sweet Seeds - Cream Caramel auto:) I think it will be an interesting growth, I don't know yet if I will try to train it, or if I will have to freeze the top of the plant at the base:) I will decide everything as I go ;) , 1 day after germination it was transplanted into its final pot, because I wanted to plant it a little deeper, so that there would be more space in the future:) good luck to everyone.

Likes
4
Share


@HowtoBubatz
Follow
This plant is thriving in its 3rd week of vegetation—it’s growing very healthy and strong!🌱
I’ve applied some Light Stress Training (LST) to ensure all parts of the plant are receiving equal light exposure, and it’s responding beautifully.
Midway through the week, I noticed the first signs of flowering!
This plant is transitioning into bloom faster than expected, which is really exciting. It seems eager to show what it’s capable of.
Now, I’m looking forward to seeing how it handles the stretch phase—I can’t wait to watch it shoot up and develop further.😊

Likes
10
Share


@TiRobotProds
Follow
Good👍🏼 je recommande. Les pistils sont sortis la floraison commence 1,5L d'eau réparties sur toute la semaine. Le niveau du ph es de 6,4 et L'EC a 1,4.

Likes
39
Share


@AestheticGenetics
Follow
5/8/25
Chopped at day 65 of flowering. Will update more soon.
Not sure if the plagron product did much of anything.
Thank you to Zamnesia and Plagron for sponsoring this Grow.
5/9/25 first day/night of drying and temps are at 67.8 and humidity is at 61%
5/12/25 i had left for vacation for the weekend but when i came back the whole house smelled like a dispensary lol and the humidity was down to 55% sadly
but i have it back up to 60% and 67°F. tonight will be day 4 of drying and i suspect theyll be done in the next couple days around day 6 or 7
Eternity Grow Cup 2025 🤙💣🤘

Likes
88
Share


@Roberts
Follow
Gorilla Jealousy F1 is doing good. She had a solution change done about 5 to 6 days ago. She is about half way through flowering. Her colas are bulking currently. They do have a nice layer of frost on them already. Everything is looking like good at the moment. Thank you Spider Farmer, and Seedsman. 🤜🏻🤛🏻🌱🌱🌱
Thank you grow diaries community for the 👇likes👇, follows, comments, and subscriptions on my YouTube channel👇.
❄️🌱🍻 https://www.seedsman.com/?a_aid=Mrsour420.
This is my affiliate link to seedsman.
Thank you Happy Growing 🌱🌱🌱
https://youtube.com/channel/UCAhN7yRzWLpcaRHhMIQ7X4g

Likes
8
Share


Likes
10
Share


@MrJones
Follow
Original Sensible Seeds White Chrystal Meth Auto
🔸🔸🔸04.20.23🔸🔸🔸
Day 38 - Above Ground
📝Sunday 05.28.23 - This girl is so stunted, but from where she was and where is now is pretty good, so I will keep her and let her be what she is, flipped the Smart LED over to the flower setting, it increased the wats a bit but the far red is going to be amazing!
📝Wednesday 05.24.23 - Besides being very small this girl looks pretty healthy, I would love more of these seeds to have another go at this strain, not sure if it ever recovered from the poor germination and remains stunted. The Medic Grow Smart 8 LED is doing very well, at 60% the plants are getting plenty of light and not showing any signs of over-stretching!
🔸🔸🔸🔸🔸🔸🔸🔸🔸🔸
▪️Grown By: MrJones
▪️Medic Grow Smart 8 LED / Settings 60% & V1
▪️@medicgrow420
▪️@originalsensibleseeds
▪️@gaiagreenorganics
▪️Soil - ProMix HP
🔸🔸🔸🔸🔸🔸🔸🔸🔸🔸
📝The taste and aroma of White Crystal Meth Auto are equally appealing as her shining stunning looks and hard-hitting effect. The taste and aroma are a throwback to the Old School, Skunky with herbal and citric tones, and overall a great strain for making hash or rosin. These tantalizing flavors and aromas are conjured up from an exquisite formation of terpenes the earthy myrcene and the floral essence of terpinolene being the dominant, a mix of caryophyllene and pinene combine their tones to produce the musky citric scent.

Likes
14
Share

@CheeRz
Follow
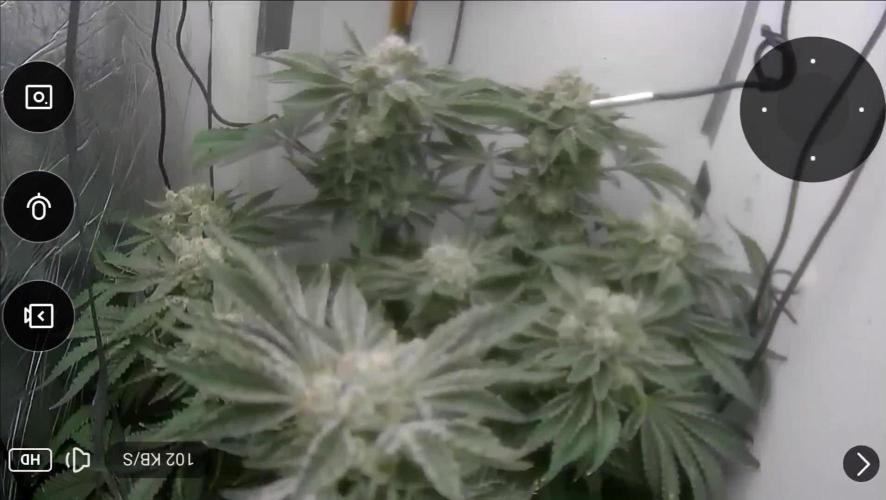
WEEK 14 - HARVEST: The Grand Finale
🌼 FLOWERING PROGRESS
The journey of the Monster Maker has come to its successful end. After 9 full weeks of flowering, she reached her absolute peak. The final days showed a stunning purple fade, and the bud density became rock-solid. As seen in the final photos, the structure was perfect, and every site was loaded with high-quality flower. It was time to chop!
👃 TERPENES & AROMA
Even during the harvest process, the scent was overwhelming. The sweet, citrusy tangerine notes have merged with a heavy, spicy, and earthy funk. It smells like a premium dessert with a gassy twist. I expect the terpene profile to become even more refined during the slow dry.
🌡️ ENVIRONMENT & VPD
Final conditions in the tent were kept at 24.8°C and 46% RH (VPD ~1.65 kPa) right until the end. Now, for the drying phase, I have adjusted the environment to aim for a slow, 10-14 day dry to preserve those precious tangerine terpenes.
💧 NUTRIENT FEEDING & WATERING
The 7-day flush with pure, pH-regulated water was completed perfectly. The plant looked beautifully "starved" and clean, which should result in a very smooth smoke and pure white ash. No more nutrients, just the natural essence of the plant.
💭 GROWER'S NOTE
HARVEST DAY! Seeing this lady without her leaves (the "naked" structure) really shows the success of the LST and training. Every branch held a massive, frosty treasure. Now the real patience begins with the drying and curing process. I am beyond happy with the resin production on this Sweet Seeds masterpiece. Stay tuned for the final weight and smoke report!


Likes
5
Share


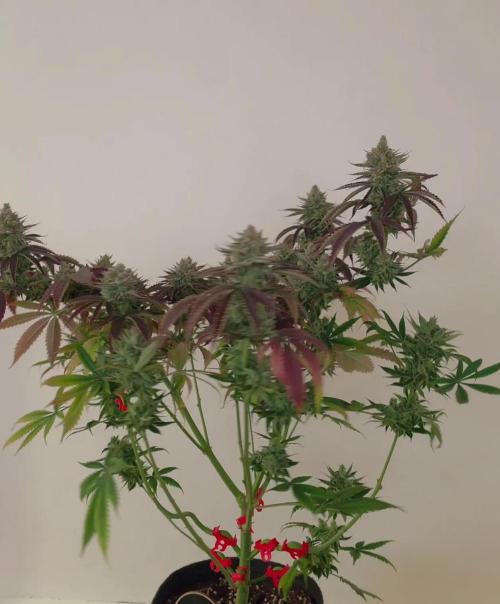
@GreenForMiles
Follow
She’s looking very frosty! I put the lights as close as possible rocking almost 500 ppfd.
Likes
4
Share


@Creme_De_La_Creme
Follow
Autopot system was turned on day 15 !!
Now everything is on automatic 🦍🍓🦍🍓
Im not touching this girl until day 50 or some like that, no LST, no topping, just a stress free VEG, lets go !
NO DEFOLIATION AT ALL


Likes
15
Share


@eppeep42
Follow
Gorilla Cookies & Papaya Cookies: 25L Pot with Biobizz All Mix, they get 1ml/L
Lemon Cherry Cookies: 19L Pot with Biobizz Light Mix, so she gets 4ml/L
- to clear up any possible confusion, there is no specific reason as to why i have the Lemon Cherry in the smaller pot with another soil mix, it just turned out that way-
04.09.2024:
So the initial firs try at LST turned out to be okay, but i lost a pair of leafs and realized its pretty annoying to do it with the garden wire, since the fabric pots are moving alot if i try to move them a little, resulting in too much pulling at the connected parts, so need to be careful about that.
Also i used the LST clips the first time. i think i will continue the kind of spiral shape its taking on, sounds good, at least as a novice, in my head.
The Lemon Cherry Cookies is still too small in terms of height for me to try some LST, also i cannot fill up the pot with more soil cuz shes too small. on my next grow will also definetly keep that in mind to fill the pots up all the way.
Kinda creeped out that after 3 days the soil still is not fully dry, its slightly moist still, just a little. but i will keep following the advice rather to little than too much. i think latest tomorrow morning i will water them finally. must also be the high humidity in the last 2 days. edit: i did end up watering her the same day at night, was the right choice at least by the way they looked after watering.
06.09.2024:
Damn when i looked into the tent today and took a closer look i got a little paranoid because its the first time seeing the pistillons! So at Week 4 Day 3 showing the earliest signs of Flower, just like the Lemon Cherry Cookies, which is still very small in terms of height, which makes me a little sad- but then again, they had a rough start.
I just would have liked for them to have one more week of pure growing, as i fear they will end up not that big. But for my first grow i will be very happy with minimum 40g per Plant.
07.09.2024:
went a little crazy with the LST clips, but very satisfied overall especially at the top its nicely spread now.
08.09.2024:
sadly one of the branches snapped on one of the LST clips, as i saw in the morning. it was barely hanging on the last flop of skin. i carefully reattached it and put a bandage around it, not long after i also added garden wire tightly wrapped around it. i hope it will recover in the next few days.
09.09.2024:
happy with the growth and look of the new Papaya Cookies. Still worried about the Lemon Cherry though. she has to get taller!! also one of the leafs on top is covering a lot of new branches, so im thinking removing it will help to boost her. the most LST i can do on her so far is bend her a little to the side with wire at the top to open it up at least a little bit. The temps are finally dropping more so its around 26 Grad Celsius during the day, 22-23 at night
10.09.2024:
the Gorilla is growing nicely by now for sure. just worried she will get way too tall compared to the rest so it will be hard to give each plant the light it needs. also finally removed the one pair of leafs and all the little new growth can feed on the light now! Temps cooling even more, summer is slowly over here in my part in Germany. Tent temps around 22-23 Grad Celsius.
Maybe i will make a second grow diary for the Papaya Cookies, since the older two are already pre flowering and i cant keep the correct week-settings for the Papaya.
Processing
Likes
36
Share


@Stevodidge
Follow
Seen some good progress over the last week. Have been tinkering with water cycles. Got it up to 3 x 15min cycles in a 24 hour period, but i think I'm going to go back to two 15min cycles in 24hrs because she seems to wilt a bit in the morning. I'm wondering if the cycle an hour before lights out is too much. I've reset the cycles to 15min an hour after lights on and again 8 hours later for 15 min. I'll see if that improves things. I'm also going to change the reservoir for a fresh batch of water, nutrients and ph balance today or tomorrow. I've also got a sister plant on the go, but she's about a week behind in growth as she germinated later. She's also doing well, but obviously smaller than her big sister.

Likes
39
Share


@GrowWiththeBro
Follow
Mild flushes last week.
Day 54/ Day 1 of Flowering. Fed and light defoliation.


Likes
36
Share


@nonick123
Follow
Día 94 (02/09) Aplico Insect Frass como Top Dress para ver si revierto un poco el amarilleamiento que muestran algunas hojas, ya que empieza a ascender por la planta
Riego con 500 ml H2O pH 6,5
Día 95 (03/09) Dia nublado y de temperaturas entorno a 24 ºC. NO es necesario regar!
Día 96 (04/09) Llueve que te llueve! 🌧️. Temperatura 21 ºC. Dias de humedad alta por aquí!
Riego con 500 / 1000 ml H2O pH 6,5
Día 97 (05/09) Floración en progreso. No veo ni una sola oruga con el bacillus thuringiensis y espero que siga así! 🤞
Dia muy nublado. No hace falta riego
Día 98 (06/09) Riego con 500 / 1000 ml H2O pH 6,5 + 4 ml/L de BioGrow de Biobizz para tratar de parar el amarilleamiento que asciende por la planta
Día 99 (07/09) Riego con 500 / 1000 ml H2O pH 6,5 + 4 ml/L de BioGrow de Biobizz para tratar de parar el amarilleamiento que asciende por la planta
Día 100 (08/09) Riego con 1 Litro de Té Floración de Lurpe Solutions. Preparación: 24 horas con bomba de aire (oxigenación) con ingredientes:
Healthy Harvest 8 ml/L + Insect Frass 16 ml/L + Hummus Lombriz 8 ml/L + Melaza 1 ml/L + Kelp Hidrolizado 0,25 g/L
Aplico de nuevo Insect Frass como Top Dress
💦Nutrients by Lurpe Solutions - www.lurpenaturalsolutions.com
🌱Substrate PRO-MIX HP BACILLUS + MYCORRHIZAE - www.pthorticulture.com/en/products/pro-mix-hp-biostimulant-plus-mycorrhizae

Likes
18
Share


@thenotillwizard
Follow
Harvested at day 76, after 72h of darkness.
Very good yield!
3.3 pounds of dry buds + 1 pound of trim
The 2 keepers yielded 366 and 342g of premium quality smoke.
Very uplifting and energizing high :) Love it!

Likes
28
Share


@Felloffthegrid420
Follow
Jumped up a few feet idk yet but look like I got a winner here guys might be going in to flower idk

Likes
57
Share


@ThrashedTV_BakedByGlaze
Follow
Week 4 - 01/22 to 01/28 2021
Pictures from Days 25 + 26
TRANSPLANTED! Might have waited too long but hopefully the transplant and LST stress might slow the plant down since i think it's already flipping to flower like the Red Poison & Purple Lemonade in my other diaries 😱
Ended up more 50/50 ratio of Destiny Organic's Dark Matter Living Soil + ProMixHP since I had to make the Destiny last. Apparently they went out of business just after I decided it was my favourite/new soil :( Would rather stay away from Ocean Floor since I haven't had the best experiences with it (bugs/rust fungus etc) Feel free to drop some recommendations other than Fox Farms below 👍
The Dark Devil Auto is otherwise healthy and starting show hints of colour in the stems 😈
I raised the @ViparSpectraLED P1500 another eight inches after transplant and started basic LST. I really wanted to get these four under a ScrOG but if 3/4 are already flipping and the LSD is still runty I might have to wait it out again.
It already has a solid skunky/hash plant smell on the fingers after adjusting them and it looks like it might actually be a tripod mute with three flower sites per node. Hopefully I can stretch it out and take advantage of the extra bud potential 🙏
I have the @MarsHydroLED TSL2000 set up and ready to go once the girls settle into their new pots. Have the new surge protector/heavy duty power cords/power tool grade timers as mentioned in Week 3. Some of it shown in the pictures.
Threw some videos in this week as well with some Queen's Radio GaGa, Beastie Boys' Brass Monkey, and a little hint of Arkells ....COME TO LIGHT on the short @ViparSpectraLED ..GET IT.. 😓
--
Thanks for checking in! Throw down a like and/or follow so I can return the favour 🙌
Check out my Diary of the Year 2020 Entry for my Original Auto Sour Diesel: https://growdiaries.com/diaries/54258-fastbuds-original-auto-sour-diesel-grow-journal-by-glazedgrow
IG: @GlazedGrow
CannaBuzz: @GlazedGrow


