
Likes
Comments
Share


@LoccoMotive
Follow
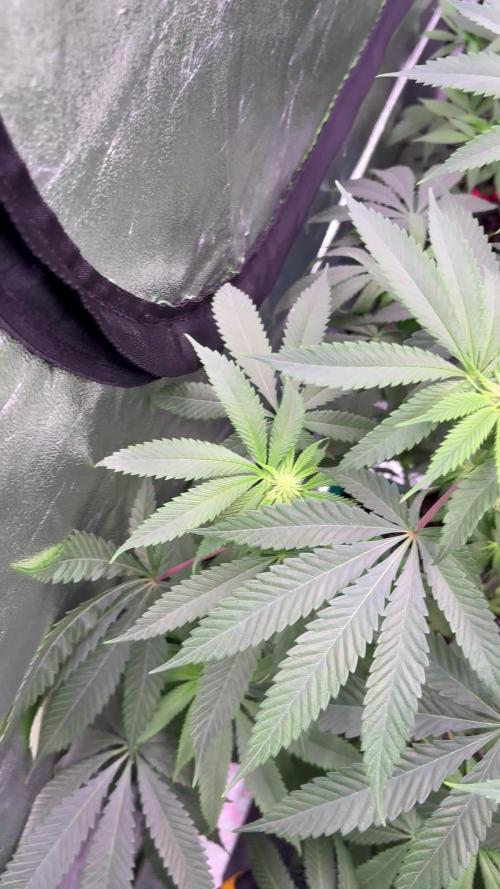
Währ auch zu schön gewesen um wahr zu sein, dass alles glatt läuft 😌
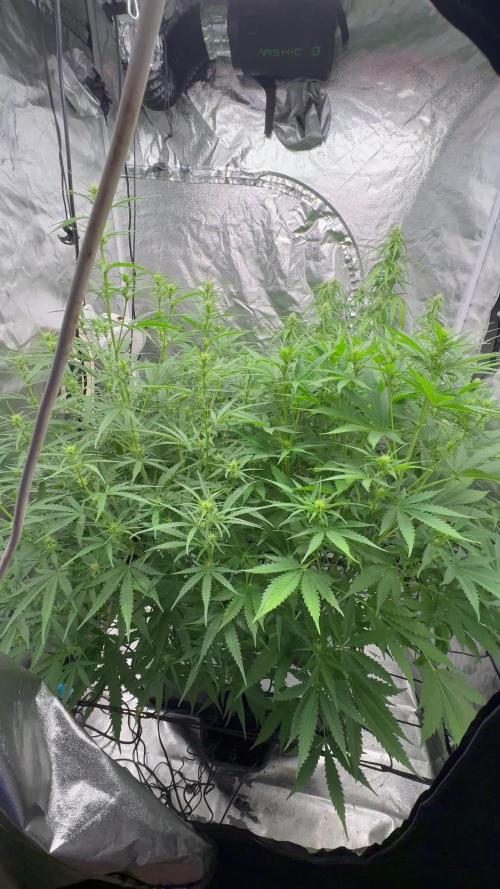
Das Setup wird weiter und weiter an die Bedürfnisse der Pflanzen angfepasst und verfeinert.
Der Luftbefeuchter ist jetzt nach draußen gewandert damit ich mehr Platz im Zelt Gewinne.
Er läuft jetzt einfach dauerhaft auf Stufe 1-3, Statt nach Luftfeuchtigkeitsmessung.
Ich habe die Gießmengen jetzt auf 500ml erhöht. Anfang der Woche noch mit 2ml Calmag pro Liter.
Mit der MH App habe ich mir eine Art Tag-Nacht-Simulation gebastelt. PPFD liegt bei etwa 350-410.
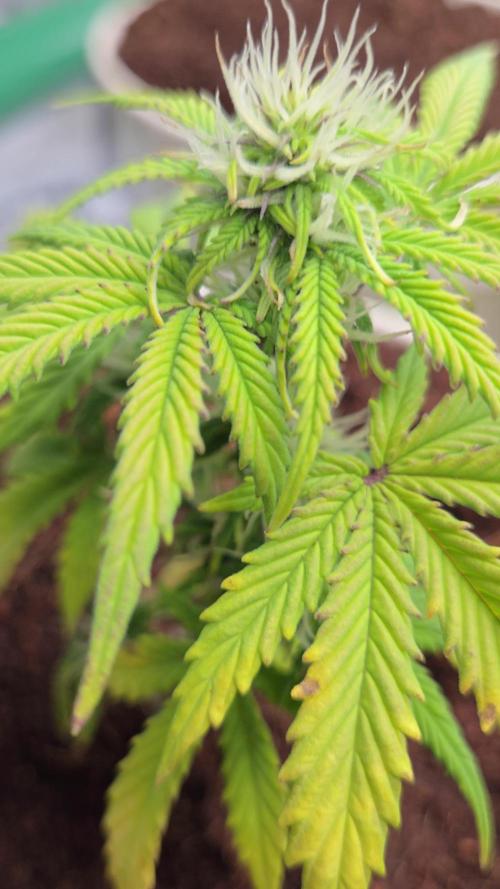
Am 18.03.2025, etwa mitte Woche 3, habe ich über der 4. Nodie die beide Fastbuds einem F.I.M.ing unterzogen. 😱
Ich bin mir nicht zu 100% sicher ob ich alles richtig gemacht habe. In meinem Kopf müsste es aber passen. 👉👈
Die 2 Tage nach dem Fiming verhalten sie sich trotzdem sehr gesund und machen einen fItten Eindruck. 💪
Gewachsen sind sie auch ein Stück. Ich bin mir nur nicht sicher was daraus jetzt erwächst 😵
Etwa zur gleichen Zeit verwandelte sich meine Bruce Banner in eine Zombie-Pflanze. 👽
Sie sieht aus als würde sie jeden Moment umkippen. Werder Tot noch lebendig. 💀
Dabei sah sich ein Paar Stunden zuvor noch recht Fitt aus. Keine Ahnung woran das liegt... 😟
In den 2 Tagem danach, wuchs sie nur minimal... besser als gar nichts...
Ich werde sie weiterhin bis in die Blüte mitschleifen und gucken was passiert. 😒
Tja... Momentan ist dieser Grow eine einzige Wundertüte... 💩
Das stresst mich manchmal mehr als es sollte 😑 😅
Wünscht mir Glück 😇


Likes
27
Share


@Fullmeltalchemist
Follow
D93ish - 11.6 - I found her in a dumpster with a split stem and no grow equipment and our journey began. From the clandestine tent and trying different lights to spider mites and super cropping. Me and this baby been there. She was a great teacher and I loved her dearly. I'm incredibly grateful for her resilience and patience with me as learned my way around this new skill. I killed her last night, cut her into pieces and put her in a box to dry. I havent smoked any of the newly harvested Dumpster Queen and won't test it until it goes into cure jars, but the sample I took off over a week ago was divine and opened my eyes to everything I've been missing in organic grown nugs. Thank you all for you support. I'm so stoked moving forward with this newfound hobby and passion.
Will update in a week or so on the dry weight, cuz I'm really interested too. Expecting about a QP, just enough to give as gifts to some awesome friends and keep me going until my next harvest!
11.9 - stems were snapping i trimmed her up further into jars and weight came out to 80g. The nugs are not very dense or large, but are very very sticky and full trichomes. Smells of sweet dank floral and pine and the dank and floral notes really come out in a joint. I just got bubble bags from BubbleBagDue and will practice extraction on some the the trim and super larfy stuff : Thanks again for the support and following along everyone. My other diaries are where Im implementing all the lessons I learned with DQ and where I'll continue documenting my ongoing pursuit of growing grade A organic meds!
11.19 - D106ish - Our cure with the boveda 62% bags has been on for 10 days and the bud is about perfect. Been smoking hard on it and is still thoroughly enjoying it. Notable changes in flavor is the shift of that floral scent to more berry. It smells soo good I bury my face in the jar haha. The effect is still very uplifting and creative, which is great since I'm writing my phd dissertation. Anyhow, be well. Tons of love!
Likes
2
Share

@Satax
Follow
The week went well, the plants are growing nicely. Everyone has started to develop properly, just a slight calcium deficiency on the Green Poison on the top right, otherwise I intervene as little as possible since everything seems to be going smoothly.
Bit of pintch on the top off some on.

Likes
44
Share


@Chedderbob112
Follow
El living la Vida chedda mother Fukin Bob 112 here wee fuking go usual rite troops need tae go see a man aboot a dug


Likes
4
Share


@Growin_Ish
Follow
Somehow I miscalculated the days and started week 6 prematurely. I will just continue here thru to week 7
Day 32 From Seed
NYD#2
Started LST. Pot was light, watered at 6.3 including Fish Sh!t.
NYD#3
The pony tail backfired. The main is mangled. Despite small nodes, I started LST and watered at 6.3 including Fish Sh!t.
Day 33 From Seed
Did some research and found out the ponytail should only be used during the light cycle and removed for the dark period. I left it on, which caused the ugly. Lesson learned!
Day34
Adjusted and added LST. Watered #2 at 6.5. #3 was still heavy, no water needed.
Day 37
Watered, adjusted LST
Day 39 From Seed
Watered, adjusted LST. Found a bug that isn't a fungus gnats (NYD#3). Inspected both plants for more. Did a neem oil top drench and added Vicks Vapor Rub to the pot rims (bug deterrent). So raised light roughly 4 inches.
Day 41
Light watering, adjusted LST ties, top drenched with Neem Oil. Added a few ounces of peroxide to the humidifier. They'll both need a top dress soon.
Likes
69
Share


@TOTEM
Follow
When you show love to a plant, she will do the same to you. That’s what’s happening! This gorgeous Euphoria is a gift from nature (and RQS 😄). Not much to say about the ferts, which are doing their job. Flowers are getting bigger, so yeah, cool!
Likes
28
Share


@PrairieFrostGrow
Follow
This little girl started her journey on April 4th with germination into a water glass and finished up on June 27/20 – Day 78 from germination. She was a fun grow and was very resilient through the whole run. She spent most of her grow time in a 20/4 light schedule. She formed nice frost levels and stayed to a very nice and manageable height of roughly 20” tall without topping or bending her main stem. She was not as fussy about nutrient levels and took them well. She does like her medium on the dryer side though. Small little auto bush of OG Kush crossed with Indica genes😃 She would make a nice a plant to run while you are vegging out some photos for 6 or 8 weeks as she is not very big in size but will swell up and yield decent weight👍
She was grown in a 3 gallon fabric pot with coco coir and maybe 15% perlite. She was fed salt based nutrients……..so sorry but they are flushed out and that is what I am more comfortable with. Focus on the early growth with microbes, fungi and kelp!! She was fed the normal pattern with pH being held around the 5.4 to 5.8 range in feeding. Then as flower approached, I gave the pots a more consistent look at the runoff numbers and she was running 7.8pH coming out of her!!!!! WTF. She stayed in her pot that she was planted in and fought this issue all through the rest of her grow.
The pH issues started surfacing around week 3….as we headed into flower of course. Scratching my head for weeks, I ultimately didn’t change anything other than really low pH feeding going in…….below 4 idea. For weeks she had 3.9 water going in and still getting 7.8 running off. I initially felt it was related to cheap fabric bags so I cut slits in the very bottom of the bags that stayed and tried transplanting other girls into plastic pots, which it can be fabric pot issues but I am not as convinced anymore for this run that there was an issue there, wasn’t sure about giving her Magnesium on top of Magnesium and therefore did I mess her up good on the inside early on in week 2 idea, out of options I changed back to RO water and that seems to have solved my issues……I was using tap water that was not filtered this run🤬 The pH was high so that was adjusted but with the ppm being at 185 to 200 range I chose not to buy a filter and just dechlorinated the water only. I was tired of lugging 5 gallon water bottles in and out of the basement😃 That is a difference from all other grows…..silly for not catching this by week 4! So…….back to lugging bottles in and out of the basement😂😂😂
She really started to take shape around weeks 7 and 8 and formed a beautiful little cannabis plant and grew to 20” tall and roughly 18” wide. Main focus with her was to just perform LST on side branches and let the top go…….I wanted to just let her go and see what would happen to her main cola for size and height……plus I don’t do that…….I always bend over the tops on my grows so this was a little different for myself.
She grew very nice leaves and a lot of them. This pheno had a lot of leaves to her and that is fine……its not really my first choice in characteristics of a plant though..…..so much more work at trim time……Green Poison XL Auto, SWS71, was a dream to trim👍 as a comparison!! She didn’t fox tail very much she firmed up her buds towards the end. The resin production was a little slower coming out in her but by week 7/8 she was getting pretty impressive😋😋😋 White and sticky!! She smelt of woods with citrus notes…..works for me👌
There were no issues at all retaliated to pests or bugs……I threw in a couple sticky traps but there weren’t any to catch. She handled the high humidity in this run great and there were no signs of any powdery mildew👍👍👍 She is a very stable strain from Sweet Seeds!
Day 63 was last feeding, flushed for almost two weeks. Rezin and Liquid Weight still given for one of the weeks but the last week was plane water. In hind-site I think I should have hit her with some Flawless Finish to help get that last bit out of her. She did feed on most of her nutrients but some of the lower leaves were still more green that I would have liked. She was cut down on day 77…..11 weeks is about what I suspect looking at her in week 7…….this was roughly 8 weeks flower time……makes sense😃
She grew for 75 days and then I decided what the heck…….she needs a hole in her stem to stress her out😃 I didn’t try breaking a branch but rather drilled a hold into the base of her stem……something new to try out. I think I will try more holes next time….max 3 I think……then I want to run a couple with cracking their stems and see if there is a difference👍 I feel more in control of a drill and its accuracy vs bending branches and they snap where they want to…….anyway it was worth a try!!!! Worst case, it made it easy to hang her as a whole plant to dry😃
This girl battled pH issues all her life and as a result the buds were not where I would have liked them. There were not fluffy…..but here were not as hard as I would like for rolling joints, so the whole girl went to concentrates She dried for 7 day as a whole plant, 2 days more in smaller branches, then 1 day curing in jars before dry ice sift. She yielded 74g of dry cured buds, 2.65 ounces. Not bad…..I don’t think her buds would have gotten a lot bigger but they certainly would have had more weight if they firmed up…..grower issue, not genetics.
So…..lets make some rosin from this girl🤩 The yields on this and making her hash a perfect colour are not what this process is about…..let’s get that out of the way right away……this is about another way to enjoy and consume my cannabis for my own relaxation and medicinal needs. Taking pictures of rosin is always a challenge…..it is always dark in the pictures unless you are using a nice DSLR to let more light in.
Rather than making bubble hash with water, I just used the bags to make a dry ice kief from the buds. Unfortunately I couldn’t get a block of dry ice and had to use these cubes…….don’t like these as much because there are too many surfaces beating your green plant material and your kief goes green before long when shaking. Could have done it with out ice all together…..nicer hash but lots left on the plant afterwards that way so yield is low. Used two bags in this extraction, the 220 as the bag for edibles and the 120 as the bag for pressing rosin to smoke…..dry ice hash rosin!! The yield on this from the 74g of bud was 22.4g kief. 220 bag was 12.6g and the 120 bag was 9.8g. Not great I guess but I didn’t want to keep going for 4 and 5 minutes with the bags…..these were roughly 2 minutes with the 220 being 3 minutes on the high side. You can certainly see that the 120 product is more golden in colour than the 220 but since I didn’t crazy, the 220 is still a very nice colour.
Last step on this journey was then to take the kief and make our rosin. I pressed product using 37um bags with the temp set at 160 degrees. All were done the same for the most part……roughly 4 gram presses, the same temperature, and the time. The first presses were 90 to 120 seconds. If a second press was done on the pouch, then it was at the same temp but for only 40 to 50 seconds. The yield on this was just shy of 7 grams…….6.77g…..roughly 30% yield from Kief???,…..roughly 9.2% from flower???…….would have likely done better right from flower😂 😂 😂 it was fun, regardless of the yield😃 Tasty rosin!!!! Can’t beat rosin for getting the true tastes of the plants. These numbers are absolutely due to my abilities with extraction.......sure don’t judge the genetics based on my returns......she is a frosty plant and will give great returns!!!👍👍 Several pictures show that, I hope!!
So that will wrap up this diary for Sweet Seeds Killer Kush Auto, SWS56. Certainly give this girl some consideration if you like OG Kush and also have space concerns in your grow. She is beautiful frosty little girl with a punch. Certainly get the usual woody and citrus notes from her rosin and she has a lasting high. She helps to get get you going and willing to finally start cleaning that corner of the room you have been avoiding…….watch out though…..distractions😃……next thing you know 40 minutes go by and you are staring at a box of DVD’s wondering what happened to CD’s…….cassette tapes (the art of the “mix tape”), 8 tracks, vinyl……ALBUM COVER ART Baby!!!!!! Then its either back for another rip, or get your crap done because the next rip leads into even less work getting done😃😃
Great job as usual @Sweet_Seeds !!! Looking forward to the next one……Cream 47 photoperiod……actually, already done germination and a new diary coming👍👍…..compare a 3 gal pot to a 5 gal pot, or a fabric vs air pot, and see what my yield differences are??
Thanks for the read and greatly appreciate the comments Growmies!!!!! Love spending time on a forum for growers to help fellow growers. Much grower love and thanks again for your time, opinions, and suggestions🙏🙏🙏
Cheers!!


Likes
20
Share


@DaddyPrime2
Follow
6/11 day 55 day 56. Officially 2 months of growth. Somehow I've kept an auto flower in the vegetative stage for quite a bit of time. They are flowering and have stretched a ton. I will get actual measurements for each plant this
Pheno #1 looks more indica (they all are) than the others. The pistils are shorter but more of them and the node spacing is a tighter than the others and she's stayed the shortest(least amount of stretch) and has thicker leaves(maple leaf style) her pistils started white and now have a pink tone to them and on closer inspection, some of the sugar leaves are purpling. This one could be expressing it more so because of environment. This week we've had lows and rains and cloudy weather. The other night it was in the low 40s, so in hindsight it might be environmentally expressed.
Pheno #2 is the one that's been the most well rounded the whole time. Popped quick and has always been steady and not too tall and not too short. Her pistils are bright white like roots or an initial taproot. But the calyx are a deep deep purple. I believe this purple expression to be a genetic phenotypical expression rather than environment. The purple clashes with the white so beautifully. They just makes it all pop with the green. It honestly looks like a purple clover flower 😄
Likes
2
Share


@CannaIGrow
Follow
Topped this girl this week, she’s growing pretty good. Very nice looking plant to my eye.
Likes
9
Share


@Bluemels
Follow
In 2 Tagen werde ich ernten! 😎
Insgesamt bin ich sehr zufrieden mit die grow, es war mein erster Versuch eine Automatic toppen, scroggen und zu biegen.
Die Northern Lights ist eine robuste Pflanze die bei optimalen Bedingungen sich gut von solchen Eingriffen erholt.
Sie ist den letzten Tagen sehr gelb geworden, braucht nur noch alle 3 Tage Wasser.
Der Geruch ist mild süß aromatisch.
Likes
14
Share


@ApothecAries
Follow
I used half the recommended dose of Indo products for each plant through this grow. The monkey juice is half recommended making it every week rather than full dose every two. The sticky bandit was fed with it every week at half dose till later on.
Likes
22
Share


@Mazgoth
Follow
First week of flushing.Here is my schedule for flushing with flawless finish.
First flushing is with just a LOT lot water.
Second flush:watering normal with flawless finish and flush after 20/24 Hours,let it sit overnight but be careful because trichomes will go crazy,if you don’t have enough milky trichomes this method will increase the trichome production immediately the next day.
Repeat this method until you are satisfied with the results but don’t go more than 12/15 days,im using flawless finish 3 times in total so use it at least twice.
24 hours flawless finish isn’t doing any damage extra than the 8 hour schedule that advanced Nutrients prefer,but after 24 hours will start to damage the plant so you need to give a good flush after using it
IM USING 1.5L WATER SO 2/2.5ml flawless finish
Likes
2
Share

@youdan
Follow
una pianta eccezionale, coniglierei a tutti di coltivarla, ho avuto un raccolto strabiliante quindi non mi posso lamentare di nulla, anzi! come sempre daz mi impressiona!

Likes
7
Share


@Onlygrow99
Follow
Este próximo día 14/06/23 entraremos en la 3º semana de crecimiento. A día 12/06/23 llevamos 28 días desde que se empezó a germinar.
ya están todas trasplantadas a la macetas definitiva de 7 litros. Las he regado con roots + crecimiento + calmag + enzym. Todo de BOOM nutrients.
He realizado el trasplante en 1 hora y 50 minutos en la mañana del lunes 12/06/23 en directo, en twitch.tv/xmackobox
Likes
2
Share

@MrWeeedWorld
Follow
Nach einer spannenden Woche und einem großartigen Wochenende auf der Mary Jane in Berlin gibt es endlich wieder ein Update meiner drei Lemon Cherry Cookies.
Die Pflanzen entwickeln sich weiterhin hervorragend und haben in den letzten Tagen einen ordentlichen Wachstumsschub hingelegt. Das Low Stress Training zeigt mittlerweile seine Wirkung und die Seitentriebe beginnen kräftig aufzuholen. Aus den einst kleinen Sämlingen entwickeln sich langsam schöne, breite Outdoor-Büsche.
Besonders erfreulich ist die gute Vitalität aller drei Pflanzen. Die Blattfarbe bleibt gesund und satt, das neue Wachstum ist kräftig und die Pflanzen zeigen keinerlei Anzeichen von ernsthaftem Stress. Selbst die Dame, die zu Beginn etwas ungewöhnlich gewachsen ist, entwickelt mittlerweile ihren ganz eigenen Charakter und holt hervorragend auf.
Durch das LST wird das Licht optimal verteilt und immer mehr zukünftige Blütenstände erhalten direkten Zugang zur Sonne. Genau jetzt beginnt die Phase, in der die Struktur für die kommenden Wochen aufgebaut wird.
Die Lemon Cherry Cookies zeigen bisher genau die Eigenschaften, die ich mir von einer starken Outdoor Autoflower wünsche: robust, vital und voller Wachstumskraft.
Jetzt freue ich mich auf die nächsten Wochen, denn schon bald dürfte die Vorblüte beginnen und die eigentliche Show kann starten.
Vielen Dank fürs Vorbeischauen und bis zum nächsten Update! 💚🍋🍒
--------------------------------------------------------------------------------------------------------------------------------------------------------------------
After an exciting week and an amazing weekend at the Mary Jane Expo in Berlin, it's finally time for another update on my three Lemon Cherry Cookies.
The plants continue to perform beautifully and have put on some impressive growth over the last few days. The Low Stress Training is clearly paying off, with side branches starting to catch up and creating a much wider structure. What started as small seedlings is slowly turning into a beautiful outdoor canopy.
One thing that stands out is the overall vigor of all three plants. Leaf color remains healthy, new growth is strong, and there are no signs of significant stress. Even the plant that started off growing a little differently is now showing plenty of character and catching up nicely.
The LST is helping distribute light evenly across the entire plant, allowing more future bud sites to receive direct sunlight. This is exactly the stage where the foundation for a productive flowering period is built.
So far, the Lemon Cherry Cookies are showing everything I want from an outdoor autoflower: strength, resilience, and vigorous growth.
I'm really looking forward to the next few weeks because pre-flowering should be just around the corner and the real show is about to begin.
Thank you for following along and happy growing! 💚🍋🍒🌱
Likes
25
Share


@Grower_Of_Persia
Follow
my dry and cure style is this:
4 days of hanging upside down to get water activity lower to around 0.6 in 50% humidity and 26 C temp (i know its a little high but we are in a hot summer right now and i cant get it lower even with air conditioner) and then after 4 days of drying i remove leaves and stalks, trim buds and move them to jar for the rest of their life :D . and in the first 4 days of curing i open the jar door and let hem get some fresh air in the jar for about 5 minutes and close the jar door again, after 4 days of curing like that buds are smokable but they will get better as they getting cured about 1 month.
buds are one of the hardest as fucking rocks type of buds! very dense , compact , sticky , smelly , amazing at every aspect
growing stage was 60 days and flowering stage was 70 days total (harvested tops at day 63th)
the total weight of dry buds was : top buds 174 G + lower buds 55 G = 229 G
my overview of strain with details:
the seeds:
unfortunately i only got 1 seed cracked out of 5 so i will not know how much this genetic can get different but at least i got the chance to grow once of this wonderful strain
the plant :
in every stage you can ensure that you are dealing with a high level plant ,
she will get big so you have to control her height LST and SCROG highly recommended , will grow very well with tick stalks and big fan leaves , has good resistance for stress and will respond very well to stress trainings , she really has gorilla power in herself ,
fresh buds on plant :
buds are very compact and dense even from start , fresh blossoms smells like pineapple and mango , 2 different shades of sweet smells like you hold 2 junks of pineapple and mango in your hand and you smell them together, she is a trichome and resin factory , very very sticky , very oily , strong smell
dried buds:
very compact and dense , hard as rocks , has dark colors with purple hues inside it , it smells sweet
smoke :
very smooth and sweet like lollipop , pineapple , mango like , after 2 minutes it'll kick in and you'll get higher and higher with every breath , has a strange and especial high mind high mostly

Likes
2
Share

@Ninjabuds
Follow
The plants are looking really healthy. I’m still getting used to my new lights. I think I didn’t push enough light in week 2 of flower I’m ramping up the light intensity now. I had to whip out my par meter I was keeping the light to far off the plants. This light has to be closer to the plants than my mini sun. I’m lurking this light a lot I just need to get used to it
Likes
52
Share


@McBubatz
Follow
14. Woche, P1 fällt morgen, die ist soweit gut denke ich (ca. 20% aufwärts Bernstein Trichome).
P2 braucht leider noch ca. 1 woche länger.
93. Tag ist für P1 das Ende, sie wurde heute vorgetrimmt und zum trocknen aufgehängt.
Ergebnisse gibt es wenn die P2 auch geerntet wird, denke nächste Woche um die Zeit.
Aber eins kann ich euch versichern, is mit Abstand die schwerste die ich ist jetzt hatte😊🍀🍀.
Gebt euch auch mal wie viele Trichome die gute produziert hat, Duft is noch sehr pflanzlich, Blüten sind ziemlich fest gewesen hoffe das es nach dem trocknen noch so ist. Alles in allem super Run.
Hoffentlich is die gute bei den Top 10 das wäre ein träumchen, wobei ich es wirklich jedem gönne zu gewinnen und bei soviel starker Konkurrenz geht ich wahrscheinlich unter.
ABER was ein geiler Contest trotzdem, hier ein dickes fettes Dankeschön an Zamnesia und Plagron für die Möglichkeit hier überhaupt mitmachen zu dürfen 🙏💙💜
98. Tag , werd die gute am Samstag/Sonntag je nachdem wie ich Zeit finde, umlegen und zum trocknen aufhängen.


