
Processing
Likes
Comments
Share


Likes
299
Share


@Metatronix
Follow
Hallo to You all my familly and usual visitors. Thank you for stopping by and all the likes and comments....You rule!
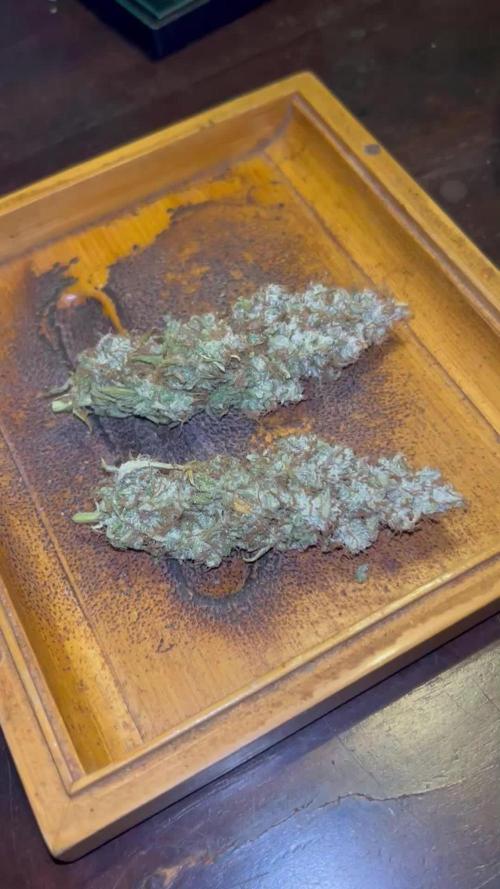
That's it the Amnesia CBD is down, came down on 21 december and during the Christmas and New Year celebrations was drying up as for now she is for over a week curing in jars.
The smell is not very remarkable i get some notes of pine and herbs. But apart from smell she's crashing it :) She grew like a monster under the Mars Hydro TS 1000 150 Watt lamp, I Am really pleased,
especially considering how little maintenance i performed on this girl. Dinafem did create a real tough plant.
A big thanks to Mars Hydro for supplying the necessary equipment for this grow.
That's it for this week folks, have a wonderful week and please come beck visit in about a week for the smoke review and final dry weight results update to this diary ;)

Likes
7
Share

@OnlyBuds
Follow
Harvest Update – The Finale 🌱🏁
Alright Muchachos, this is the harvest update.
Everything is done now: chopped, trimmed, dried and jarred.
Yield-wise, it wasn’t exactly what I originally expected – but honestly, the quality makes up for everything.
The smell is already absolutely insane.
Heavy lemon, sweet candy, bonbon vibes, fresh and fruity. Really loud. And that’s before a proper cure. After another 2–4 weeks in the jars, I already know where this is heading.
Smoke report so far:
• Joint: burns great, smooth, tasty
• Vape: super clean, very smooth, flavor pops hard
• Aroma: lemony, fresh, fruity, slightly sweet – just perfect
One thing still hurts a bit: the front-right plant.
That phenotype was something special – really special. A shame I didn’t take backups, because that one was absolute fire. Lesson learned.
All in all:
A bit wild, not everything went according to plan, but a hell of a fun run and an amazing result in terms of quality.
And don’t worry – this is not the end.
In the background, the next ladies are already lined up, waiting for their turn in flower. More on that very soon.
Muchachos, thanks for following along.
Stay tuned. Hasta la vista. 🌱🔥
Likes
28
Share


@Luv2Grow
Follow
Update 20 Jan 2021 - Well starting the cure a bit earlier than I’d like cause I’m having issues getting the humidity up so she dried up quick. Working on rehydrating her a bit and have her in mason jars now. Ended of with 88 grams of rock solid buds. Still want it to rehydrate and cure a bit before trying her out.
What can I say, a very simple and easy grow. Had absolutely no issues during the grow and ended up with 380 grams of SOLID wet bud. Even some of the lower buds that didn’t get much light are pretty rock solid. Going by the smell and solidness of the buds, I got a feeling this is gonna be a too 2 strain, if not number 1. Looking forward to growing this one again and as soon as I harvest another plant, I’ll probably start another one of these.

Likes
3
Share


@Growella
Follow
Over all Blue Toof was a great strain to grow. Very easy to manicure and LST. Great strain funky dank and berry tasting. Defiantly a winner in my book. I advise anyone in the future who does grow this strain, have rubber gloves on deck!


Likes
2
Share

@Chrisandweed
Follow
Pues de van viendo mas gordas las pelotas de golf que tiene esta planta por cogollos y no tan mal oye jajajajaja. El olor es muuuuuy muuy muy dulzón y la resina se siente muy abundante a estas alturas. Con esta variedad juraría que le queda un riego mas con encimas, y ya despues paso a arrancar un lavado de raices de 2 semanas y corte... No lo tengo aún claro porque lo dicho, se están resistiendo jajajajaja pero es inevitable que les vaya quedando menos.
Os juro que es absolutamente asqueroso subir un video a la plataforma, seguramente no suba mas videos, son como 15 minutos de tener el telefono con la pantalla encendida en esta pagina mientras se sube, con todo absolutamente bugeado y funcionando fatal, así por cada video que pueda subir, cuando antes no era así ni de lejos y se que no es mi conexión porque hasta conectándome por cable con un hub tira bien, y el teléfono que uso un mi11 ultra, no será de los mas modernos a dia de hoy, pero no deja de ser un pepino de telefono.
Likes
90
Share


@1Right_Angle
Follow
23rd of July
- Attempting to let the soil get “dry”. See what Mother N has to say about that. Day 3 w/no rain ! The Soil is still very moist
- Last fed on the 20th
- Foliar Spray in the a.m. just to tease
- boy does the audio sound bad on the phones Video !!
Kinda historic, sorryboutthat
24th,
- added some Epsom Salts to todays feed, magnesium and sulfate for the Soil. GOOD READING AVAILABLE...
- went ahead and fed on day 5, iffy weather all around. GO
- only 2 gallons used
25th,
- killer day finally after more rain lst nite
- re-positioned two questionable side-branches, down low and in front. Whole plant is open. Not a leaf to remove. Anybody thats done this style of grow, let me know if theres a hole in the program.
*** smoked some of the Beaver Seeds; Maui Wowie Autoflower that I recently grew, you know, while tending the plant today… well laugh at the fact that the 15% thc of the famous dope truly kicks Butt; seriously good weed
- “next” Meal posted above, beginning the transition to bloom nutrients !
- activity at the Bud-sites is picking-up
26th,
- amended the plant base w/ 2 cups of liquid phish-poop lol
- next proper meal posted above ~eta 30th or 31st
- anxious to get the Bloom nutes in & running
29th
- big, long, burp, after sliding 3 gallons of “transition-food” into Jack
- Meal is posted above with no Molasses today; TDS 1400ppm
- started a MONTHLY inclusion of dissolved Epsom Salts. I will be including it in Foliar applications as well, w/ Fulvic Acid.

Likes
54
Share


@MarsHydroLED
Follow
Day 77 of flower
Week 11
Just waiting for the Afghan hindu kush to finish and will be cutting down the rest.
1 blue dream
1 Afghan hindu kush
Grow light: mars hyrdo tsw2000 at 100% power 14inches above 🌞☀️
Medium: coco coir mix with compost at a 50/50 ratio with 30% perlite added⛰️
Nutrients: fox farm dirty dozen 🦊🚜
Grow space: 4x4x7
Water: tap water (my tap water is allows 110ppm) left out for at least 24hours
Likes
48
Share


@AsNoriu
Follow
Day 43. Girls are filing up nicely and the only issue i had with supercroping instead of heavy tieing - was one split, but both branches are fine and should hold large colas.
Blue Dream closest to heater got thirsty first, so leaves a bit droopy.
Girls got phed water today, next feed - molasses tea, then water and later full blast of nutes. No Root Juice, took out Cal-Mag too for now.
In 3 days girls go to 24+ hours darkness and FLOWER !!!!
Day 46. After 36 hours of darkness its always small rush to see your girls - they are just DIAMONDS ;))
Vegetation stage went like couple weeks, if not my stupid overboost of exhaust and low humidity i would save 4-7 days i think.
So its FLOWER time, girls will get theirs feed tomorrow.
Very impressed with Zamnesia seeds, let's hope next stage will be even better !!!
Happy Growing !!!

Likes
35
Share


@nonick123
Follow
Día 44 (15/07) Wow! No hay shock de trasplante! 😍💥😁
Todas las ramas se han estirado hacia arriba tras el ajuste de LST y se están formando nuevos nodos rápidamente
Esta combinación de nutrientes de Lurpe + substrato de PRO-MIX HP es una maravilla 😍
Día 45 (16/07) Ayer tuvimos ola de calor (37 ºC) y han aguantado muy bien!
A última hora de la tarde (cuando ya no había sol directo) les apliqué H2O en spray foliarmente para refrescar los estomas
Hoy parece que vuelven las temperaturas estándar para esta época del año: 29 - 30 ºC en las horas centrales del día
Riego con 1 litro de H20 pH 6,5
Día 46 (17/07) Pequeños ajustes de LST
Hay algunas ramas inferiores que no se han formado / estirado mucho
Lo más probable es que haga una buena limpieza este domingo, 7 días después del trasplante, para dejar solo los brotes por encima del 4º nudo
Día 47 (18/07) Riego con 0,5 litro de H20 pH 6,5
Este domingo (día 50) haré limpieza de partes bajas y tal vez también de nuevo topping en las 4-6 ramas principales 😁
Día 48 (19/07) Día de muchísimo calor con 37 ºC. A ver como lo llevan!
Riego con 0,5 litro de H20 pH 6,5
Día 49 (20/07) Para ayudarles a llevar mejor el calor de las horas centrales del día, coloca una malla de sombreo (70%) sobre el invernadero
Lo cierto es que se nota que baja mucho la temperatura debajo de la malla! Van a estar más fresquitas! 😍
Riego con 0,5 litro de H20 pH 6,5
Día 50 (21/07) Training session!
Hago limpieza del tercio inferior de la planta, de todas las ramas y nudos que no superan la línea del dosel marcada por el 4º nudo (1er topping)
También hago topping (2º) a todas las ramas principales
La idea es tener 12 ó 14 colas principales para que no se hagan muy altas
De paso saco unos cuantos clones de las ramas inferiores eliminadas 😁💥
Para superar el estrés, hago las siguientes aplicaciones y riego:
- Riego con 1 Litro de Té Vegetativo de Lurpe Solutions. Preparación: 24 horas con bomba de aire (oxigenación) con ingredientes:
Green Sunrise 8 ml/L + Insect Frass 16 ml/L + Hummus Lombriz 8 ml/L + Melaza 1 ml/L + Kelp Hidrolizado 0,25 g/L
- Aplicación foliar Kelp hidrolizado de Lurpe Solutions a 0,25 ml/l
💦Nutrients by Lurpe Solutions - www.lurpenaturalsolutions.com
🌱Substrate PRO-MIX HP BACILLUS + MYCORRHIZAE - www.pthorticulture.com/en/products/pro-mix-hp-biostimulant-plus-mycorrhizae

Likes
6
Share


@Lordviper28
Follow
These lady's have been weird but have been growing great I got two them with Topps showing orange furs and are frosty as hell and smelling lovely this thebstart of the 5th week of flower

Likes
63
Share


@Ganjagrandaddy
Follow
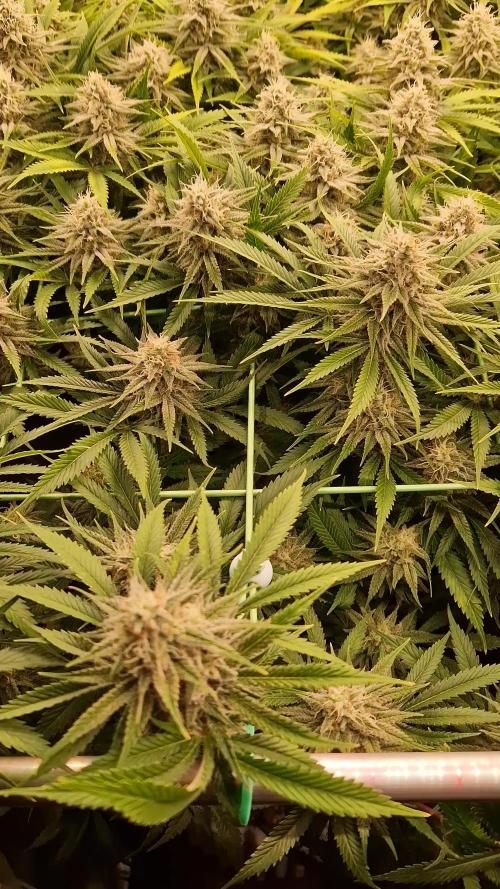
DAY 49 FLOWERING: sorry about the video this week. Very long week and it is hot in the grow room now. My camera is not as good on my phone now so the quality suffers I think. Bare with me on this one. Lol
Now the important bit , the plants.....
All of the purple monkey look amazing now with their pinks and reds shimmering in the lights. They smell amazing now and all look so ready besides a flush of new pistils all over most of them. #3 is not at that stage and may be harvested any day now I think bitbthebother 2 need another week i feel to hit their best before ripening off. Tine will tell this week. They have been rock solid throughout this heatwave and even with very dry pots issues , have not skipped a beat. Certainly one to grow again.
Banana mash are all looking slightly different in how they have dealt with the heat now. A lot of yellowing starting to happen on a couple and the other two have great trich build ups , very different from each other but all the same age ect.. They will need about 2 more weeks i think and expect a 10 week flowering period for them now. They are very sweet smelling now and their shaggy appearance and long spikes are very appealing.
The younger crosses are now starting to swell up more too with the exotic? Looking like it will be a good finisher too. It is easy to see the mimosa Lemin genetics in both of them now but no clue in which exotic the ? Is yet....
With all that said , they are feeding g better now the temp has dropped a little and the end is close now growmies. Be safe and healthy

Processing
Likes
15
Share


@Lazuli
Follow
Tangie 1 is flowering
Tangie 2 starts flowering
Blue dream is still in pre flower


Likes
34
Share


@Bread_n_Buds
Follow
Our Rainbow Sherbet has started to flower, the main lining here worked really well. Unlike the other plants I cut at the second internode to create the mainfold.
This is a smart choice because autoflowering plants flower more or less at the 5th / 6th internode, if you have to do topping it is better to start as soon as possible to delay flowering as much as possible.
Another reason for topping / mainfold at the second internode is that the plant is lower and you can work the mini brunches much better. In fact here we managed to create a T-minlining. In the sense that the mini brunches form a perfect 90 degree T with the main stem which is not easy at all.
To do this you have to use the arches with the wire it is much more complicated and the cut at the second internode helps a lot.
So topping at the second internode, mainfold and then continue for another three internodes and topping again. You can decide to cut something along the way I left perhaps too much stuff here. However, for better or worse, everything that can see a fair amount of light enough to flower well is left.
The plant is a specimen with a medium internodal distance and I managed to work it reasonably well.
We are still using soil, feeding and all the recommended additives from Plagron 100% organic. We have moved on to the flowering start card that maintains the same Power Roots additives - Sugar Royal, Pure Zym and adds the flowering stimulant dear in my house for obvious reasons of Biscotti. Of course the basic fertilizer now is Alga Bloom.
The Green Sensation when the flowers are already a little swollen, do not start immediately. The Power Buds must immediately stimulate the initiation and development of the buds.
---- Decide on the right soil and calculate your fertilizer schedule based on the soil on the official website.
-- www.plagron.com
Try a seed of this variety that drives us crazy..
---- https://www.zamnesia.io/en/11230-zamnesia-seeds-rainbow-sherbet-automatic.html
Zamnesia Description //A cross between Pink Guava, Sunset Sherbet and a hint of ruderalis, Rainbow Sherbet Auto offers a wide range of flavors, effects and more. This 70% indica-dominant strain reaches considerable THC levels (24%) and is suitable for both experienced growers and those taking their first steps in the world of cannabis cultivation.
All the best that mother nature has to offer is on ---- www.zamnesia.com
Processing
Likes
29
Share


@Grey_Wolf
Follow
Ginger Nut Cookies 16th Jan 2020
Well she's still alive despite me nearly cooking her by leaving her out in the full sun for too long 😄 Should have remembered to slap on some suncream 😂
Anyway Shit happens and I only lost the first set of true treaves and i'll refrain from putting her out in the sun for now. The reason I'm keeping it on the 16hr light schedule
is because I think it will be photo dependant & I'd like to see if it can get a bit of vegetation growth before it tries to flower. Otherwise I'll only end up with a miniature plant
and that would only be wasting my time . If it does sprout pistils during this lighting schedule then it must be an autoflowering strain but I dont think it will.
**** Great Aussie Music Videos **** Last week was Gotye with "Somebody that I used to Know" It went number 1 for awhile here and did quite well in the US I believe.
It's time to step it up a notch so for this weeks Video i give to you the one and only............Accadacca aka AC/DC with Thunderstruck 💪💪💪
I was lucky to see them live in 2010 for the "Black Ice " tour . Best Concert ever despite my ears ringing for days later 😆
Sadly Malcom Young passed away in 2017 and the lead singer Bryan Johnson had to retire from the band because of hearing loss ( No Wonder)
So Check this video out and Rock your socks off to some Good aussie Music ..... I'll be back next week with more tunes and another grow update
Grey_Wolf
****** https://youtu.be/v2AC41dglnM **********
Likes
25
Share

@TrickzGrowz
Follow
Ich bin sehr verliebt in diesen Pheno. Wenn sie jetzt auch noch lecker schmeckt und gut wirkt, würde ich sie sogar nochmal anbauen.

Likes
7
Share


@Ieiogrow94
Follow
Eccoci qui!!!
Tutto procede per il meglio, i pistilli sono usciti e ora si va dritti dritti alla maturazione, NE VEDREMO DELLE BELLE!!!
Dopo la carenza che ha manifestato sta migliorando ed a breve vedremo i risultati del lavoro!!!
Grazie a tutti per il supporto ❤️🔥🌲

Likes
10
Share


@Dabking
Follow
Chopped on day 82, and dried for 8 days.
Produced 27.9 grams (1 Oz) of flower.
The yield isn't great, but it's my fault due to stressing and transplanting the plant. I had to fix her and by time she was back on track, the yield was severely impacted. However, the quality seems great. Now time for curing.
