The Grow Awards 2026 🏆 


Likes
Comments
Share
@weedelicious
Follow
Hey ihr Lieben! Nach 10 Tagen Trocknung habe ich das Curing begonnen. Die Äste haben geknackt und mir signalisiert, dass sie bereit sind. Nach 5h Handarbeit war ich dann fertig. Mega anstrengend :P! Aber hat sich sehr gelohnt :). Trotz das ich dieses Mal anstatt mit mineralischem Dünger mit einem ein Komponenten-Dünger gedüngt habe (Hesi Bio-Bloom), habe ich sogar mehr herausbekommen... Bin sehr zufrieden :). Nach dem Curing habe ich das Material in die Terplocbags gepackt und lasse sie nun dort schön fermentieren - das hat letztes Mal sehr gut geklappt und kann ich nur empfehlen. Danke an alle die mich bei meinem 2ten Run begleitet haben, ihr seid die Besten! Mir hat es auch mega Spaß gemacht und ich freue mich schon darauf, meinen 3ten Run mit euch zu teilen - mehr Infos dazu kommen bald.


Likes
Comments
Share
@deadhead1996
Follow
To think I thought she was stunted! Doing really well this week, temps are skyrocketing where I’m at and will remain high this week. We had a lot of rain earlier this week, which seems to have helped her, but also brought some fungus gnats around. I’ve been using yellow traps + am going to let this heat finish drying out the top layer of soil.

Likes
9
Share
@floodinghideout
Follow
(3.8.22) Day 21 of flower. Watered each plant 2.5L of nutrient mix.
POST NUTE FEED RUNOFF LEVELS:
Plant 1: 1605ppm, 6.2ph
Plant 2: 1367, 6.6ph
Apprehensive/not sure how to go about further defoliation. I’ve removed everything from below the net, and taken away every fan leaf that looks like it’s not directly connected to a bud site. Everything that remains appears to be connected to a bud site.
Do I need to remove more? On one hand, I’m afraid that I’ll end up stressing out the plant this far into flower. On the other, I’m afraid of possibly running into PM at some point. RH is increasing with the warmer weather (between 45-55, 65 on a rainy day). Lots of little leaves laying on each other. Thinking about getting a small dehumidifier to put into the tent.
Also, just going forward with future grows, should I have removed every branch that grew out of one of my mains? If you look at the photo below the net, I’ve got my main branches and all those little stems that branched out seem to be what’s really causing the crowding. I thought the point of LST was to have it do exactly that, but looking at everyone else’s grow it looks like they just limit themselves to the big main branches and clean up everything else.
(VIDEO) I've got two 6" fans. One at the bottom right under the net blowing up, one at the back left above the plant (but slowly being taken over) blowing down. Everything in between seems to be dancing around with air. It being my first grow, I'm not sure if I'm not doing enough or overdoing it lol
(post script): For plant 1, the scrog net is only 8 inches above the soil. With plant 2, it's only 5 inches above the soil. I was so concerned about the plant "possibly doubling or tripling in flower" that I really LST'd my plant early on and did my best to level her out. As a result, I was able to fill out the perimeter of my tent easily, but there was not much vertical growth to speak of. This meant that when I put my scrog up, it was barely above the rim of each pot. Next time/grow, I may experiment with letting the plant get a little more height before leveling her out? Idk/not sure. Also, my light placement was close enough that my node spacing was VERY tight. I've read that this is a good "problem" to have, but I can't help but thinking if my plants had a bit more verticality to them they'd be easier to work with.
(3.10.22) Watered both plants with 2.5L of ph'd water.
Was a bit lower than I would have liked at approx 6.2ph, ppm was 83
Post water runoff:
Plant 1 - 6.2ph/1248ppm
Plant 2 - 6.3ph/776ppm

Likes
11
Share


Likes
51
Share
@urbi09
Follow
FEEDING
Nutrient soultion was the same as previous week and was given twice per day.
DIARY
Day 108
Did some major pruning today, unfortunately I had a lot of pictures, but accidentaly removed them while cleaning storage on my phone.... Anyway, I removed all the bottom leaves and cleaned the inside of the plant so there would be more air flow. I also removed lower branches that would never reach the top of canopy. In total, I removed 10 L bucket worth of leaves and branches
OVERALL PLANT STATE
I measured the plant height on day 109 and again on day 112. In three day plant grew from 65 cm to 75 cm, she is streching a lot.
The width of the plant is 120 cm, the lenght of the plant is 130 cm.
WEATHER REPORT
Day 106-109, 112
It was sunny these days, day temperatures were 33 °C, night temperatures were 22 °C
Day 110-111
Weather was cloudy, it looked liked it would rain but it never did. Day temperatures were 22 °C, night temperatures were 18 °C.


Likes
Comments
Share
@spastagia
Follow
Hey all!
Welcome to the first week of veg. She is doing great! I fed her on Monday (Jan 6th) with 1/16th tsp of seaweed extract by Green Rush Nutrients mixed in with dechlorinated 250ml tap water. The solution was set at 6.1pH. I fed her again with the same quantity and pH on Wednesday (Jan 8th). I have my humidifier on throughout at the lowest settings. I need to buy a hygrometer lol.
Anyway, I fed her with 1/16th tsp of seaweed extract and 1/2 tsp of Green Rush Grow mixed in with 500ml of dechlorinated tap water. Her mommy (my wife) fed her this time on Saturday night (Jan 11th).
The light intensity is now set to 100% and its still hanging 18 inches from the plant.
This week, I will make sure to take daily pictures.
Happy growing!
Likes
7
Share
@Loucifer
Follow
Good week think one is mutated maybe fed it to much water should have given it less then the others
Likes
93
Share
@Ferenc
Follow
Alright. 5th week just started. FIMming is done on the Purple Punch with Today, it looks so good and big. I think it is growing wider than taller, even her "hands" with the fan leaves are bigger than mine, and now it will be wider because of FIMming. The Gelato Cookie D'ohpe is also fine I started LST yesterday. I will continue the same way of fertilizing this week on Friday 2x, Saturday in the morning, Monday 2x, and Wednesday 2x. I raised up the water quantity so from today I will give 75ml per plant 2 times (Morning, Evening) so 150 ml per plant, altogether 300 ml. It also applies when I fertilize the plants, but the only difference is that the water is with bat guano and acacia honey mix. This Friday ( Day 32) I did not water them to not to be overwatered. I just sprinkle now for the night. This Sunday was fertilization day also, Saturday I did not water them. Gelato Cookie D'ohpe started flowering this week, pre flowers can be seen. When it is harvested, I will set the light schedule 12/12 for the Purple Punch to start flowering. The Gelato Cookie D'ohpe is autoflowering, the Purple Punch is feminized.
What a mix yeah, but it is my first time growing. Tuesday update: Gelato Cookie D'ohpe is stretching rapidly, flowering time started. Purple Punch is growing also very well new shoots are coming. End of the week Gelato Cookie D'ohpe is 40cm, it started stretching so quick due to flowering. Purple Punch is 26cm.

Likes
5
Share
@pzwags420
Follow
I installed a PH controller but it didn't work right and only the ph up peristaltic pump is working. I will use this over my vacation as my PH drifts down naturally so this should work until i get a replacement. I watered in my gsc and other seedlings until runoff with 850 ppm heavy in nitrogen to green them up as the organic top dressing is taking too long.will see how they respond.on week 4 day 4 They are responding well to nitrogen Gsc is taking off!!!will continue nitrogen until end of this week as needed.


Likes
3
Share
@mftexans420too
Follow
Mz Blizz doing her. Dayyyum thang defo nutes #vgrowlea #automatic pilot #soilless

Likes
5
Share
@BigGGrows
Follow
She is now in preflower showing budsite/tops. So far i counted 10. Still doing LST and did a light defoliation removing maybe 5 leaves. She is growing nicely with a decently even canopy. I have started 1/4 strength nutrients. Calmag, fox farms big bloom, and fox farms tiger bloom.


Likes
8
Share
@420DeepGrow
Follow
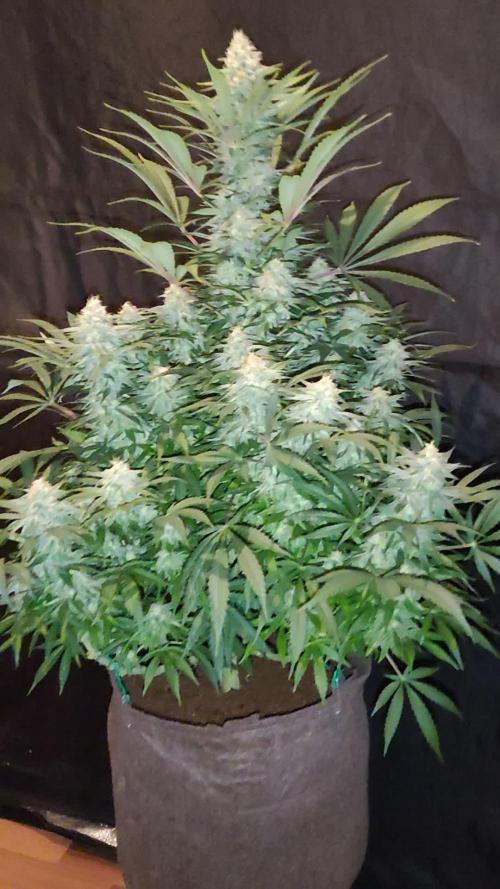
📆 Semana 5:
Formación de Cálices
Las Auto Pablo Escobar avanzan decididas en floración. 🌸
Los pistilos se multiplican y empiezan a formar cálices visibles, dándole volumen a los primeros racimos florales. La planta aún estira un poco, pero con gracia y sin desmadre.
El color se mantiene vibrante, con hojas sanas y erguidas. Se percibe una mayor demanda de agua, reflejo de su metabolismo en plena marcha.
💧 Riegos frecuentes, sin exceso. Se ajusta el ritmo para mantener el sustrato activo pero aireado.
☀️ Clima estable, sin sobresaltos. Las condiciones de luz y ventilación se mantienen óptimas, y el entorno favorece una floración tranquila y continua.

Likes
Comments
Share
@Samsemilla
Follow
Anscheinend werden die Blüten sehr kompakt wachsen, das könnte noch zu Problemen führen...

Likes
12
Share
@GREENPHOENIX6262
Follow
*Week 3 Flowering 09/17*
Fastbuds - Mimosa Cake (Auto) (2)
Thus far the flower transition has run smoothly and both plants are running accordingly
Nute feeds have increased
*Week 3 End of week Flowering 09/23*
Flowering for both Mimosa's is proceeding accordingly.
Light defoliation was applied
Light LST to heavy COLA's was applied, anchored to the trellis net.
*FRONT TENT (MIMOSA-2) QUICK VIDEO ADDED*
Likes
3
Share
@dvr147
Follow
12/2/2024 - Starting this post a little early since it doesn't start until tomorrow. That said, two of the three plants are in flower while the Mystery Seed remains in Veg. I would expect it to transition and stretch over the next day or two. The other two plants (Granite Runtz & Frosted Cherry O's) are growing/stretching rapidly easily putting on 1-3 inches of growth per day. I have decided to top dress throughout flower with Gaia Green Power Bloom. I'm just a little leary of the Grow Dots fizzling out towards the end so I'm going to use a slow release organic to top dress with high in Phosphorous. These plants couldn't look any better and now my focus will turn to caring for all the bud sites and making sure each nug gets plump and dense and as big as it can get. I'm banking on a 1lb crop total from these three plants.
12/3/2024 - Ok we're into week 6 now and two of the plants are well into flower and the Mystery Seed is showing pre-flower now and is stretching out. I expect it to catch up with the other two in the next few days. Everything is going extremely well and I couldn't be happier. This morning I fed all three plants with Recharge and Silica along with 2 liters of water PH'd to 6.5. I think watering is going to increase a bit still from here but I'm paying very close attention to moisture in the soil. I've got PPFD readings up near 850-900 across the canopy and with the addition of side lights I'm hoping that I can get some deeper penetration to some of the lower branches. I continue to build out my toolkit for future grows.
12/4/2024 - Probably my last post for this week unless something spectacular happens. Everything is going very well though I found a few rust spots on one leaf which I removed from the Frosted Cherry O's...nothing I'm too concerned about at this point. Overall things are going extremely well and the plants are growing beyond my expectations. Looking forward to the coming weeks as the buds start to develop.

Likes
21
Share
@darb35
Follow
Last week was a short one, decided to chop them on day 80.
Both plants weigh at 800g wet, hoping to get a bit over 100g dry.
They could probably go for another week to get fatter, but I was feeling ready looking at the trichomes.
Hope the dry slow, I can't get RH above 50% so hoping that won't be so bad.
Processing
Likes
7
Share

Coming along nicely in a week or so I will Super crop and scrog shortly thereafter flip to 12-12
Supercropped November 9th 2018
Sugar Black Rose clones humidity dome
Lollipoped and Topped and Scrogged
Nov. 11, 2018
