
Likes
Comments
Share


Likes
13
Share


@wheedtobeus420
Follow
She’s finally finished I’m so happy to have her. She smells like red starburst and zkittlez. She taste like she smells. I’m very happy how she turned out. Beautifully. Super sweet and right up my alley. Fastbuds hits it out of the park once again!

Likes
422
Share


@Crashoverite
Follow
Hi all 😁
Welcome to my 🍌💜👊 week update.
Hope everyone keeping well and having a great week.
Thank you so much for your all support on this bananas journey 💜💚💜💚
What a amazing week. Very little to work around those beauties. The smell is so delicious already. They smells like sweet berries. Buds are loaded with trichomes, very sticky and hard as rocks especially on Athena. Trichomes are mainly clear and some parts milky. Absolutely love power of LST and how it worked on this strain. If you won't look under net it's almost impossible to see which cola belongs to main stem.
Week 11
Dec 25 - Dec 31
Dec 25-26
Joyful observation
Dec 27
Selective defoliation and
First watering for this week. Nutes adjusted, almost 8ltr between both. Runoffs PH on both at 6.2. I am finding this PH level for this strain as perfect. Girls are looking super healthy and drinking they mixture like crazy.
Dec 28-30
All is going smoothly. I can see more and more weight each day.
Dec 31
Secomd watering foe this week. 8 ltr beetwen both.
It's the last day of this week and also end of 2023!!
See you in the new year 🍾🥂🍀
Peace and love brothers and sisters ✌️💚
Links
https://2fast4buds.com/seeds/banana-purple-punch-auto
https://plagron.com
https://www.biobizz.com/
https://fishheadfarms.com/
Likes
2
Share


@johnjoe9525
Follow
had big bud over the weekend, The soil was very dry when I came in on Monday so give it 2 litres hopefully last the next day or 2. Still very tempted to defoliate but unsure if it is the right time or what to remove.
Decided to try and defoliate it a bit. see if it has any impact. still a bit worried about things like this what wiht it being my first plant

Likes
3
Share


@LittleBigTrees
Follow
Defoliated and in its flowering pot, switched to 12/12 on day 35 she's stretching out nice.
Will start feeding from week 7.

Likes
5
Share


@Jays_Not_Here_Man
Follow
#1 Has stretched up and out! If she continues to fatten as tight as the other two, she will probably be the one with the most weight. Her branches are the tallest and reaching up at least 4-6 inches past both her sisters. Her main cola has some light bleaching, nothing I can do about that, we’ll see how she wraps up.
#2 is going to be a producer! She has so many tips and they are all fattening and developing at about the same rate, she is going to be a beast! Her main cola is rock hard. Did a defoliation on her, she is appreciating the extra light penetration 😎💨
#3 is fattening up! She never did stretch, but then again I had her tied and trained pretty far out. She has been thirsty, I have been feeding a dose close to 700 ppm every other feed which has been every 3rd day for her. During the lower feeds, ppm has been around 275. Her tricomes are mostly clear, with some cloudy starting to show. She has the longest to go, but us already dense, and will only get better.

Likes
27
Share


@Lordshiva83
Follow
Olá amigos, estamos na segunda semana de floração com 48 dias de vida estão todas de boa saúde a crescer como uns monstros 🤩, esta semana adicionei bactobloom (bactérias para estimular a floração), e elas já começaram a mostrar as pré-flores, estou muito feliz com estas princesas 💪🍀🌱

Likes
120
Share


@StarLorr
Follow
Welcome to my Strawberry Pie 🍓🥧diary.
In this Diary:
Seeds: [420 Fast Buds]from my growmie Tropicannibis_Todd 👊🏻😎
Media: Pro~Mix HP Open Top Grow Bag, Connect.
Nutrients: Green Planet Nutrients,
2 Part Dual Fuel starter kit.
RealGrowers: Recharge.
Diablo nutrients: Supplements.
Feeding :
Wed 06Mar: 3 1/3L Nuts/Recharge pH'd 6.5
Sat 09Mar: 2L Monster Flower,Blaster pH'd 6.5
Mon 11Mar: 3 1/3L Nuts/Recharge pH'd 6.5
___________________________
D-Fol: 10Mar keeping up with the fan leaves😄
__________________________
She's getting smelly and sticky😋
Buds are getting bigger😁
Some pistils are changing colors.
___________________________
Thanks for stopping by, likes and comments are appreciated.👊🏻😎
Keep on growin!
Keep on tokin!!!
😙💨💨💨💨💨
Likes
8
Share

@GoodTimesOrganics
Follow
Hi liebe Community and Welcome Back! 🌿💚
Die kleinen Äffchen rocken! 🌄🐒
Hier im gesponserten Bio Tabs NL Grow, erreichen wir aktuell eine höhe von 63 CM.
Nach der Geschlechtsbestimmung, war es nun Zeit, die mädels in ihr neuen Topf zu verpflanzen.
Hier sehen wir an den Blattspitzen Licht gelbliche Verfärbungen und dass ist mir bereits in einem meiner vergangenen Grows aufgefallen.
Ich kann allerdings noch nicht definieren an welcher Komponente es liegt
Die Pflanzen entwickeln sich super gut und sind sehr robust.
Die Seitentriebe bilden sich immer weiter aus. Die Blattform ist schön Breit und Buschig.
Die Umgebungsgegebenheiten sind aktuell gut:
—————
🌞 Temp: 24
🌚 Temp: 18°C bis 19°C
💨 RH: 58%
VPD: 0,91 kPa
💡ppfd: 330 mpm
—————
Viele Grüße 👋
Likes
30
Share


@PEAKYPLANTERS
Follow
ladies and gentlemen
Welcome to peaky house gardens
We will give a little more plain water for another week and then we will cut and reap the fruits of this marvel that tastes like wild berries 😋


Likes
43
Share


@FreezingIslandBoi
Follow
Most of the pistils are brown and fewer is coming out. This is the last week that I will feed them and will flush with pH water tomorrow. They have gained quite some size during this week and couldn’t imagine chopping them down last week. Tangerine Dream got bleached a little bit, height issue. There is also a tiny bit of purple on the bleached area. Overall trichomes on the bud gland are starting to become cloudy with some amber.


Likes
10
Share


@Kinghaze
Follow
In week 3 of flowering, the ladies suffered from nutrient deficiency.
Due to vacations, they had SPA water only for a week.
I immediately added nutrients to the water tank, with an EC of 1.8
I will also add green sensation starting this week.
I also defoliated them, all the affected leaves are almost all gone.


Likes
32
Share
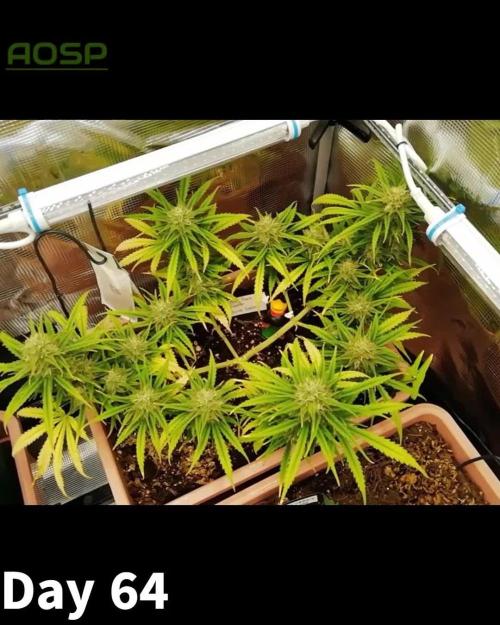

@All_our_small_plants
Follow
Bewässerung: 1000 ml jeden 2 Tag in der elften Woche
pH-Wert: 6,4
EC-Wert: 2 mS/cm
Temperatur: 30ºC
Luftfeuchtigkeit: 65%
Schädlingsbekämpfung: im Moment haben wir keine Anzeichen das es was zu bekämpfen gibt, sobald die ersten Anzeichen da sind werden wir handeln :), aber zur Sicherheit haben wir wieder ein paar Raubmilben an die Pflanzen gehenkt.
PPFD: 600 µmol/m²/s
DLI: 38 mol/m²/Tag
Düngemittel: Sie bekommt CalMag von BioBizz zu Prävention. Ab Tag 44 haben wir angefangen sie mit einem Mineralischen NPK Dünger (NPK 3,5-6-6) zu Gießen, Plagron wurde auch hinzugefügt. Ab tag 64 nur noch PK 13/14 und Plagron
Besonderheiten: wir versuchen bei diesem Grow Effektive Mikroorganismen aus.
-Tag 64 Pablito hat heute wieder etwas Dünger bekommen, wir schätzen dass sie nächste Woche fertig ist 😉
-Tag 66 Wir haben sie heute wieder etwas Dünger gegeben, nächstes mal schauen wir die Trichome 👻
-Tag 68 wir mussten feststellen dass sie eine Nährstoffblockade hat, zum glück ist gegen ende des Grows und wir müssen nichts mehr machen außer ernten, die nächsten tage bekommt sie nur noch Wasser 😞

Likes
2
Share


@Tagadatek
Follow
Bonne flo pour certaines og , les autre son un poile plus lente et la bannana fait sa vie était ralentie par son accident


Likes
19
Share

@Growbody
Follow
Willkommen zu meinem Growbericht der Gorilla Cookies Auto von 2Fast4Buds. Der Strain wurde 2022 zur besten Indica beim Autoflower World Cup gewählt. Laut FastBuds deren meistverkaufter Strain. Grund genug, den Strain zu testen. Ganz Aktuell wurde die Gorilla Cookies Auto von 2Fast4Buds hier bei den Grow Awards 2026 in der Kategorie Best Strain auf Platz 3 und in der Kategorie Best Autoflowering Strain auf Platz 1 gewählt. Das macht mich noch neugieriger...
Für den Grow verwende ich 15 Liter ROOTiES Stofftöpfe.
Ich war sehr zufrieden mit der Sonnenerde, deshalb habe ich nachbestellt. Sonnenerde hat seine Mischung für die Bio Hanferde letzten Oktober/November geändert. Jetzt sind da kleine Tonkügelchen drin und kleine Gipsstückchen. Laut Sonnenerde soll das die Erde luftiger machen. Auf den Fotos kann man die unterschiedlichen Mischungen gut erkennen. In den AirPots ist die alte Sonnenerde, in den Stofftöpfen die neue. So kann man das Wachstum in den verschiedenen Erden schön vergleichen.
Die Smart Start Plugs von zamnesia hab ich wieder verwendet.
Tag 64: 1,5 Liter Wasser.
Tag 66: Die Gorilla Cookies Auto von 2Fast4Buds bekommt 1,5 Liter Wasser. Sie ist klebrig wie Leim und riecht tatsächlich nach frisch verlegtem Linoleum.
Tag 68: 1,5 Liter Wasser.
Tag 70: 1,5 Liter Wasser.
Schön, das du dir meinen Bericht ansiehst. Schau gerne wieder rein 👋😎
Likes
1
Share

@BossberryFarms
Follow
Finally!!!! It’s week 10!!! These should all be finishing up within the next week or so! So excited to get these harvested soon 😍 I started the flushing process on Plant C and will start flushing the other two this week.
Let me know what you think! How many days do you think until harvest time??!
